If you love cheesy, buttery bites, you’ll adore this Cheesy Pull Apart Garlic Bread recipe. It’s simple, quick, and perfect for sharing. Just imagine crusty bread stuffed with gooey cheese and infused with garlic goodness. In this post, I’ll guide you through every step, from selecting the right ingredients to mixing flavors for that ultimate taste. Let’s dive into this mouthwatering treat that will soon become your go-to snack!
Ingredients
Main Ingredients Needed
– 1 loaf of crusty sourdough or Italian bread
– 1/2 cup unsalted butter, melted
– 4 cloves garlic, minced
Additional Flavorings and Seasonings
– 1 teaspoon dried oregano
– 1 teaspoon dried parsley
– 1/2 teaspoon red pepper flakes (optional)
– Salt and pepper to taste
Cheese Selection
– 2 cups shredded mozzarella cheese
– 1/2 cup grated Parmesan cheese
– Fresh parsley for garnish (optional)
To make cheesy pull-apart garlic bread, start with a loaf of crusty bread. Sourdough or Italian bread works great. The crust gives it a nice texture. Next, you will need butter. Melt it well to soak into the bread. Garlic is key for flavor. Mince your garlic finely for the best taste.
For extra flavor, add herbs. Dried oregano and parsley pair well with garlic. If you like heat, add red pepper flakes. Don’t forget salt and pepper. They help balance the flavors.
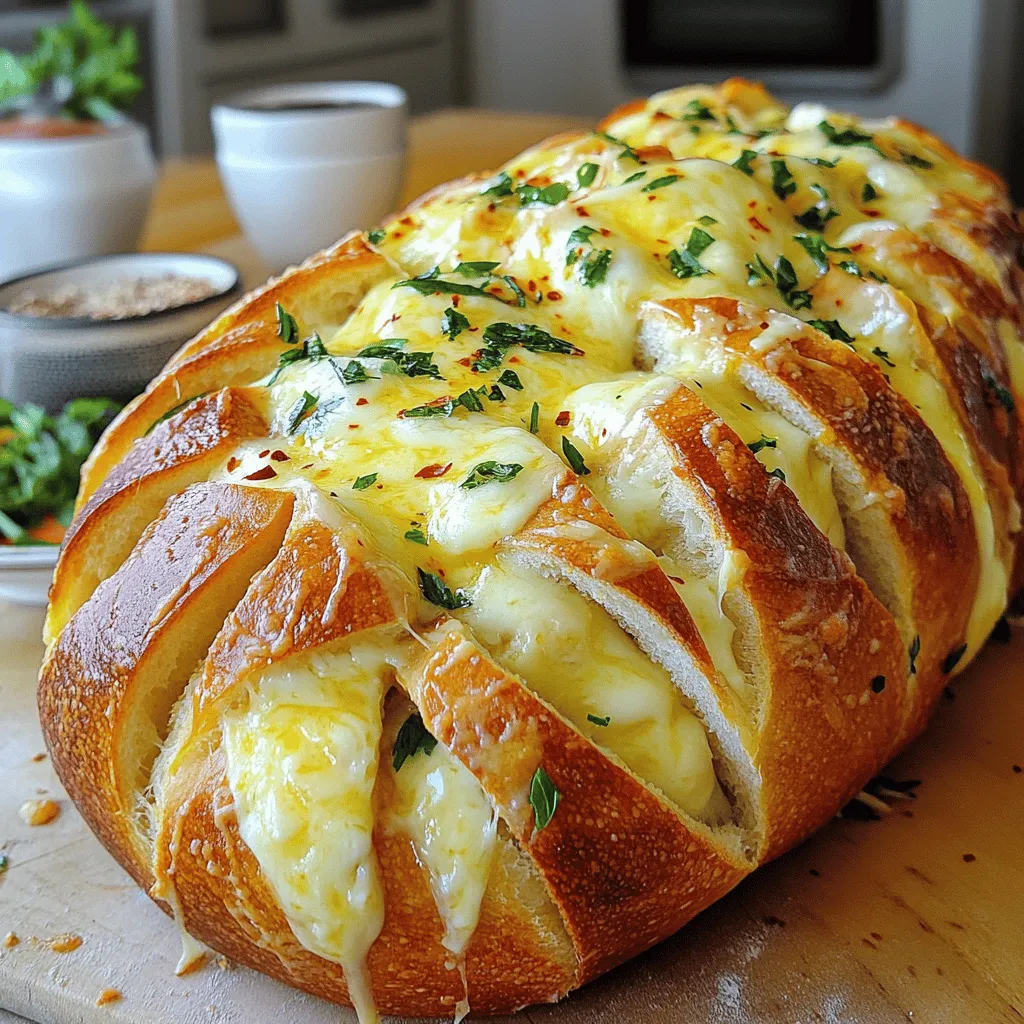
Now for the cheese! Mozzarella is a must for its meltiness. Parmesan adds a nice sharp taste. You can mix these cheeses together. This will make each bite cheesy and delicious. If you want, add fresh parsley on top for a pop of color.
Step-by-Step Instructions
Preparation of Ingredients
– Preheat the oven to 375°F (190°C).
– Carefully slice the loaf of bread: make deep cuts about 1 inch apart.
Start by heating your oven. This step ensures your bread bakes evenly. Next, take your loaf and make deep cuts. Cut both horizontally and vertically, but don’t cut all the way through. This keeps the loaf intact for pulling apart later.
Combining Flavors
– Mix melted butter with minced garlic, oregano, parsley, red pepper flakes, salt, and pepper.
In a bowl, combine melted butter with minced garlic. Add dried oregano and parsley for flavor. If you like spice, toss in red pepper flakes. Finish with salt and pepper to taste. This mixture will coat your bread with rich, savory goodness.
Filling the Bread
– Drizzle the garlic butter mixture into the cuts and stuff with cheese mixture.
– Wrap in aluminum foil and bake.
Now it’s time to fill your bread. Use a brush or spoon to drizzle the garlic butter into all the cuts. Make sure each cut gets butter. Next, mix mozzarella and Parmesan cheeses together. Stuff this cheesy mix into each cut. Once filled, wrap the loaf tightly in aluminum foil. This helps the bread steam and keeps it moist while baking.
Baking Process
– Bake for 15 minutes covered, then uncover and bake until golden brown.
Place the foil-wrapped bread in the preheated oven. Bake for 15 minutes to let the flavors meld. After that, carefully unwrap the foil. Put the bread back in the oven for another 10-15 minutes. You want to see the cheese bubbling and the crust turning golden brown. This is when the magic happens!
Now, your cheesy pull-apart garlic bread is almost ready to serve. Enjoy pulling apart those gooey, cheese-filled pieces.
Tips & Tricks
Ensuring Optimal Flavor
– Use fresh garlic for the best results. Fresh garlic gives a strong, rich taste.
– Experiment with additional herbs for complexity. Try basil, thyme, or rosemary for new flavors.
Achieving Perfect Cheese Melt
– Use a combination of cheeses for layered flavor. Mixing mozzarella and cheddar creates a tasty blend.
– Ensure cheese is evenly distributed in the bread cuts. This helps every bite be cheesy and delicious.
Presentation Tips
– Garnish with fresh parsley for a pop of color. It makes the dish look even more inviting.
– Serve with a dipping sauce for extra flavor. Marinara or garlic butter pairs well with the bread.

Variations
Cheese Combinations
You can change the cheese in this recipe to suit your taste. Substitute mozzarella with cheddar for a sharp flavor. Gouda also melts well and adds a nice creaminess. If you want a richer texture, try adding cream cheese. It makes the bread super gooey and delicious.
Flavor Enhancements
Want to spice things up? Incorporate sun-dried tomatoes or olives for a burst of flavor. These ingredients add a nice tang that pairs well with the cheese. If you like heat, add jalapeños to the garlic butter mix. Smoked paprika gives it a warm, smoky flavor that is hard to resist.
Bread Options
While sourdough or Italian bread is great, you can try different types. Ciabatta has a light and airy texture that works perfectly. Focaccia adds a nice fluffiness, too. If you need gluten-free options, look for gluten-free bread. It can be just as tasty and pull-apart friendly.
Storage Info
Storing Leftovers
Keep your cheesy pull-apart garlic bread in an airtight container at room temperature for up to 2 days. If you want to keep it longer, refrigerate the bread. This will help maintain its flavor and texture.
Reheating Instructions
To enjoy your garlic bread again, warm it in the oven. This will help restore its crispy texture. If you’re in a hurry, you can use the microwave for quick reheating. Just be careful not to overheat it.
Freezing Guidelines
If you want to save some for later, wrap the bread tightly in foil or plastic wrap. You can freeze it for up to 1 month. When you’re ready to eat it, thaw and reheat it directly in the oven. This way, it stays delicious and cheesy!
FAQs
How can I make my cheesy pull-apart garlic bread even more flavorful?
You can add more herbs and spices to the garlic butter. Try mixing in fresh basil or thyme. You can also include a pinch of smoked paprika for a smoky kick. Each addition will bring a new taste to the bread.
Can I use a different type of bread for this recipe?
Yes, you can use other crusty loaves. Ciabatta and focaccia are great choices. They hold the cheese and butter well. You can even use a baguette for a different texture.
What can I serve with cheesy pull-apart garlic bread?
Cheesy pull-apart garlic bread pairs well with many dishes. Serve it with marinara sauce for dipping. It also goes great with a fresh salad or a comforting soup. The flavors balance nicely together.
Can I prepare cheesy pull-apart garlic bread in advance?
Yes, you can make it ahead of time. Assemble the bread and keep it in the fridge. Just remember to bake it when you’re ready for a warm treat. This saves time when hosting or enjoying a cozy night in.
Cheesy pull-apart garlic bread is a fun and tasty dish. You learned the key ingredients, preparation steps, and tips for great flavor. Remember to choose the right cheese and enhance the garlic butter for more taste. Try different breads and flavor combinations to make it your own. This recipe is easy to customize and perfect for sharing. Whether as an appetizer or a side, it will impress everyone at your table. Enjoy making this delightful treat!


