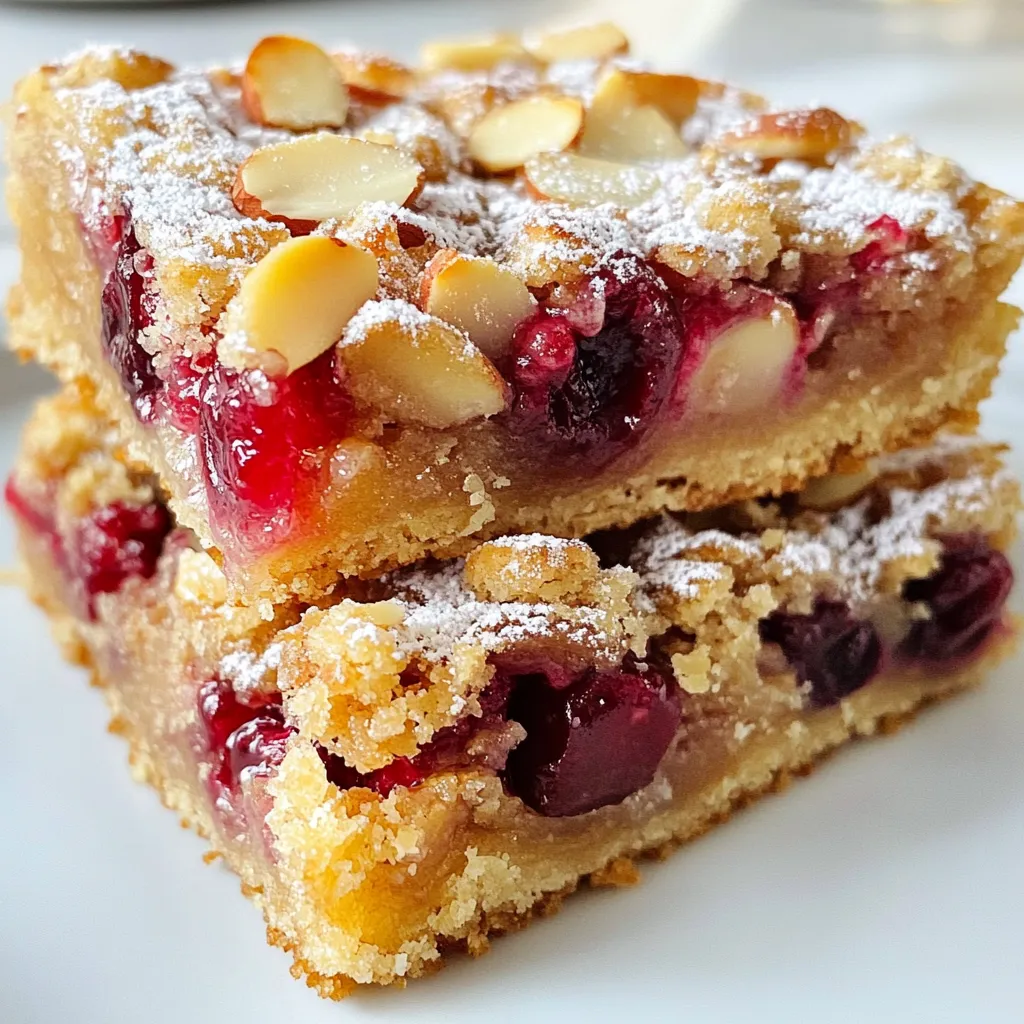
Looking for a delicious treat that’s easy to make? Cherry Almond Crumble Bars are a perfect choice! These bars are sweet, nutty, and simple to whip up. You only need a few ingredients to create this mouth-watering dessert. Whether you’re baking for a special occasion or just for fun, this recipe will impress your friends and family. Get ready to learn how to make these tasty bars that everyone will love!
Why I Love This Recipe
- Delicious Flavor Combination: The sweet and tart cherries combined with the nutty almond flavor create a delightful taste that’s hard to resist.
- Easy to Make: This recipe requires minimal effort and simple ingredients, making it perfect for both novice bakers and seasoned chefs.
- Perfect for Any Occasion: Whether it’s a casual family dessert or a special gathering, these crumble bars are versatile and always a hit.
- Healthy Ingredients: With almond flour and oats, these bars offer a healthier dessert option without sacrificing taste or texture.
Ingredients
Detailed Ingredient List
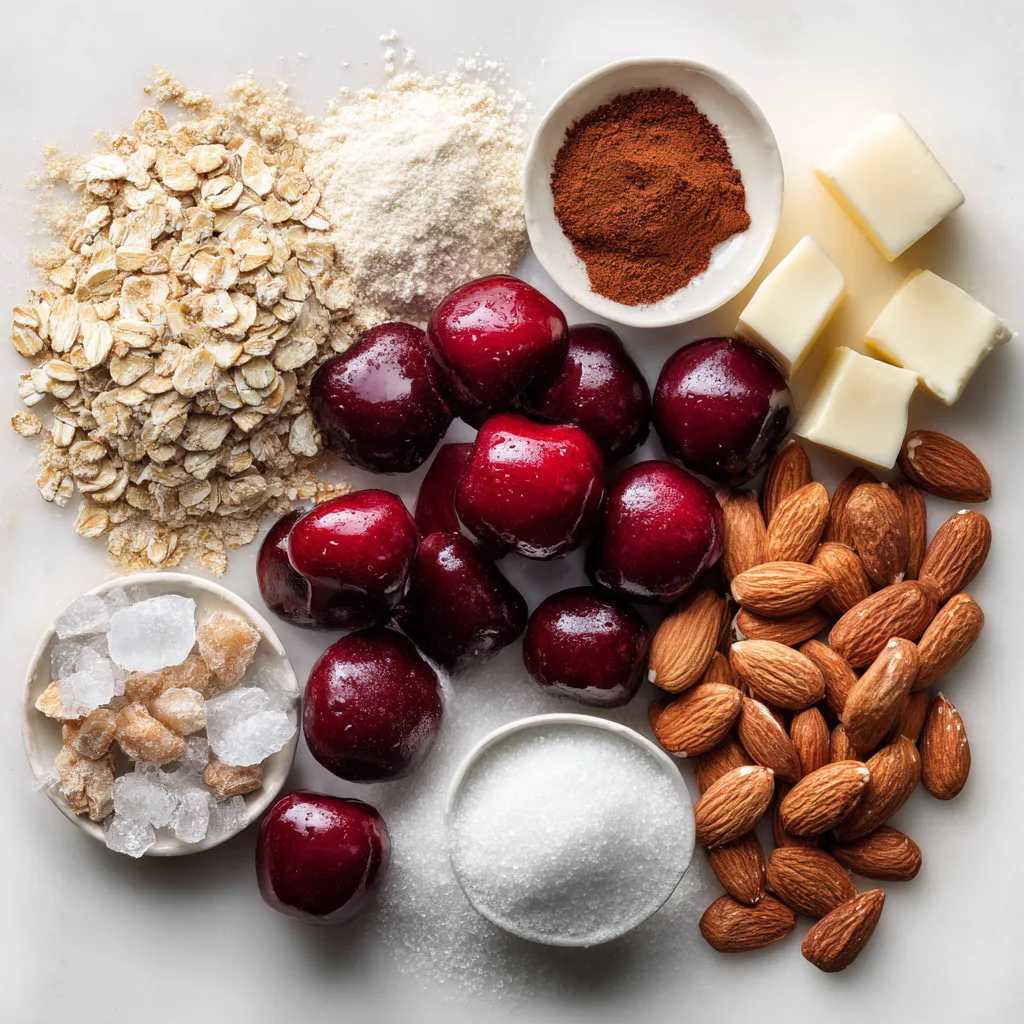
To make Cherry Almond Crumble Bars, you will need:
– 2 cups fresh or frozen cherries, pitted and halved
– 1 cup almond flour
– 1 cup rolled oats
– 1/2 cup brown sugar
– 1/4 cup granulated sugar
– 1/2 cup cold unsalted butter, cubed
– 1/2 teaspoon vanilla extract
– 1/4 teaspoon almond extract
– 1/2 teaspoon cinnamon
– 1/4 teaspoon salt
– 1/4 cup sliced almonds (for topping)
These ingredients create a tasty balance of sweet cherries and nutty almonds. The oats add texture, while the sugars bring sweetness.
Optional Ingredients for Customization
You can play with flavors by adding ingredients like:
– Zest of one lemon for brightness
– A handful of chopped walnuts for crunch
– A dash of nutmeg for warmth
These options let you make the bars your own. Feel free to adjust based on your taste.
Substitutes for Common Ingredients
If you don’t have some ingredients, try these substitutes:
– Use coconut flour instead of almond flour for a different flavor.
– Swap brown sugar with honey or maple syrup for a natural sweetener.
– Use margarine or coconut oil if you want a dairy-free option.
These swaps work well while keeping the bars delicious. Always adjust the amounts to match the consistency of the original recipe.
Step-by-Step Instructions
Preparation Steps
Begin by preheating your oven to 350°F (175°C). Grab a 9×9-inch baking dish and line it with parchment paper. Make sure to leave some paper hanging over the edges. This helps with easy removal later. In a large bowl, mix together 1 cup of almond flour, 1 cup of rolled oats, 1/2 cup of brown sugar, 1/4 cup of granulated sugar, 1/2 teaspoon of cinnamon, and 1/4 teaspoon of salt. Stir it all well until combined. Next, add 1/2 cup of cold, cubed unsalted butter to the bowl. Use your fingers or a pastry cutter to blend everything together. You want a crumbly texture.
Now, take half of this mixture and press it evenly into the bottom of your prepared baking dish. This will be the base layer for your bars.
Baking Instructions
In a different bowl, take 2 cups of pitted and halved cherries. Toss them with 1/2 teaspoon of vanilla extract and 1/4 teaspoon of almond extract. Spread these cherries evenly over the base layer you just made. Next, crumble the remaining oat mixture over the cherries. Make sure to cover them well so every bite has that tasty crumble. Finally, sprinkle 1/4 cup of sliced almonds on top for extra crunch.
Place the dish in your preheated oven and bake for 30 to 35 minutes. Look for a golden-brown top and bubbling cherries. This shows they are ready!
Cooling and Cutting Instructions
Once baked, remove the dish from the oven. Let it cool completely in the pan. This step is key to ensuring the bars hold their shape. When cooled, use the parchment paper overhang to lift out the bars. Place them on a cutting board. Use a sharp knife to cut them into squares or rectangles. Enjoy your cherry almond crumble bars!
Tips & Tricks
How to Choose the Best Cherries
When picking cherries, look for bright colors. They should be firm and plump. Avoid any with wrinkles or brown spots. Fresh cherries taste sweet and juicy in your bars. If using frozen cherries, choose high-quality brands. They should only have cherries, with no added sugars.
Achieving the Perfect Crumble Texture
For the best crumble, mix the butter with dry ingredients well. Use your fingers to rub the butter into the flour mixture. Stop when it looks like coarse crumbs. If your mixture is too wet, add more oats or almond flour. You want a crumbly texture that holds together but isn’t too wet.
Common Mistakes to Avoid
Avoid overmixing the crumble. This can make it tough instead of crumbly. Don’t skip the cooling step after baking. Letting the bars cool helps them hold their shape when cut. Lastly, ensure your oven is preheated before baking. This gives your bars a nice golden color and a great flavor.
Pro Tips
- Use Fresh Cherries: If possible, opt for fresh cherries to enhance the flavor and texture of your bars. They provide a juicier filling compared to frozen cherries.
- Chill the Butter: Ensure your butter is cold before mixing it with the dry ingredients. This helps create a flakier and crumblier texture in the base and topping.
- Customize the Sweetness: Adjust the amount of sugar based on the sweetness of your cherries. If using very sweet cherries, consider reducing the sugar slightly for balance.
- Cool Before Cutting: Allow the crumble bars to cool completely in the pan before cutting. This helps them set properly and makes slicing easier without falling apart.
Variations
Different Fruit Options
You can change the fruit in these bars. Try using blueberries, raspberries, or apples. Each fruit brings its own flavor. For example, blueberries add sweetness. Raspberries give a bit of tartness. Apples add a nice crunch. Mixing fruits can also create a unique taste.
Gluten-Free Modification Ideas
To make these bars gluten-free, swap the rolled oats with certified gluten-free oats. This simple change keeps the taste but makes it safe for gluten-free diets. You can also check the almond flour label to ensure it is gluten-free. This way, everyone can enjoy the treat without worry.
Additional Flavor Enhancements
Add a pinch of nutmeg or cardamom for extra flavor. These spices give a warm and cozy feel. You can also mix in some chocolate chips for a sweet twist. A drizzle of honey or maple syrup can enhance the sweetness. Feel free to experiment and find your favorite combination!
Storage Info
Best Ways to Store Cherry Almond Crumble Bars
To keep your Cherry Almond Crumble Bars fresh, store them in an airtight container. This helps prevent them from drying out. You can keep the bars at room temperature for up to three days. If you want to keep them longer, the fridge is a better option. In the fridge, they can last up to a week. Just make sure to let them cool completely before you store them.
Freezing Instructions and Tips
Freezing these bars is easy and a great way to save them for later. First, let the bars cool fully. Next, cut them into individual bars. Wrap each bar in plastic wrap or aluminum foil tightly. Place the wrapped bars in a freezer-safe bag or container. They can last in the freezer for up to three months. When you want to enjoy them, just take out one or two.
How to Reheat for Best Results
To reheat your thawed Cherry Almond Crumble Bars, preheat your oven to 350°F (175°C). Place the bars on a baking sheet. Heat them for about 10 minutes. This helps to restore their fresh texture. You can also use the microwave for a quick heat-up. Just warm them for about 15-20 seconds. This makes them soft and gooey again. Enjoy your delicious treat!
FAQs
Can I use frozen cherries for this recipe?
Yes, you can use frozen cherries. Just thaw them first and drain any excess juice. This keeps the bars from getting too soggy. Frozen cherries work well and still taste great!
How long do the bars last?
These bars last about five days stored at room temperature. Keep them in an airtight container. If you want them to last longer, store them in the fridge for up to a week.
Can I substitute almond flour with another type of flour?
Yes, you can swap almond flour for all-purpose flour or oat flour. However, this may change the final taste and texture. Almond flour gives a nutty flavor that pairs nicely with cherries.
What can I serve with Cherry Almond Crumble Bars?
These bars are tasty on their own. You can serve them with whipped cream or vanilla ice cream. Fresh cherries make a nice garnish too. Pair them with a cup of coffee or tea for a delightful treat.
Is it possible to make this recipe vegan?
Yes, you can make this recipe vegan. Replace the butter with coconut oil or vegan butter. Use maple syrup instead of granulated sugar for sweetness. The bars will still be delicious!
This blog post shared a complete guide to making Cherry Almond Crumble Bars. We covered the ingredients, detailed steps, helpful tips, and storage methods. You can now customize your bars with various fruits and flavors. With the right choices, you will avoid common mistakes. Enjoy your delicious creation, whether fresh or frozen. Keep these tips in mind for the best results. Happy bakin


