Chicken Alfredo Stuffed Shells Creamy Comfort Meal

Welcome to the cozy world of Chicken Alfredo Stuffed Shells! If you crave creamy comfort food that warms your heart, you’re in the right place. This dish brings together tender pasta shells, savory chicken, and rich Alfredo sauce for a meal everyone will love. In this post, I’ll guide you through each step, share helpful tips, and even suggest fun variations. Let’s start cooking this delicious dish together!
Ingredients
List of Ingredients
To make Chicken Alfredo Stuffed Shells, gather these ingredients:
– 12 large pasta shells
– 2 cups cooked chicken, shredded
– 1 cup ricotta cheese
– 1 cup grated mozzarella cheese
– ½ cup grated Parmesan cheese
– 2 cups alfredo sauce (store-bought or homemade)
– 1 teaspoon garlic powder
– 1 teaspoon Italian seasoning
– Salt and pepper to taste
– Fresh parsley, chopped (for garnish)
Alternative Ingredients
You can switch some ingredients for a twist:
– Swap ricotta cheese for cottage cheese for a lighter taste.
– Use shredded rotisserie chicken for quick prep.
– Try different cheeses like fontina or gouda for a rich flavor.
– Substitute homemade alfredo sauce with a creamy white sauce for a unique touch.
Tips for Selecting Quality Ingredients
Choosing the best ingredients makes a big difference:
– Pasta shells: Look for large, sturdy shells to hold the filling well.
– Chicken: Use freshly cooked chicken for the best taste. Avoid canned chicken.
– Cheese: Opt for block cheese and grate it yourself. This enhances flavor and texture.
– Alfredo sauce: If buying, pick a brand with simple ingredients. Homemade is always best if you have time.
– Herbs and spices: Fresh herbs like parsley add brightness. Check for vibrant color and aroma.
Using quality ingredients elevates the whole dish, making every bite a delight.
Step-by-Step Instructions
Cooking the Pasta Shells
To start, boil a large pot of salted water. Add the pasta shells and cook them until they are al dente. This usually takes about 8 to 10 minutes. Drain the shells and let them cool a bit. Set them aside for now.
Preparing the Filling
In a big mixing bowl, combine the shredded chicken and ricotta cheese. Add half of the mozzarella and half of the Parmesan. Then, mix in the garlic powder, Italian seasoning, salt, and pepper. Stir it all well until the filling is smooth and creamy.
Assembling the Dish
Now it’s time to fill the shells. Use a spoon or a piping bag for ease. Fill each shell with the chicken mixture. Pack it in well, but don’t overstuff them. This will help them hold their shape.
Baking the Stuffed Shells
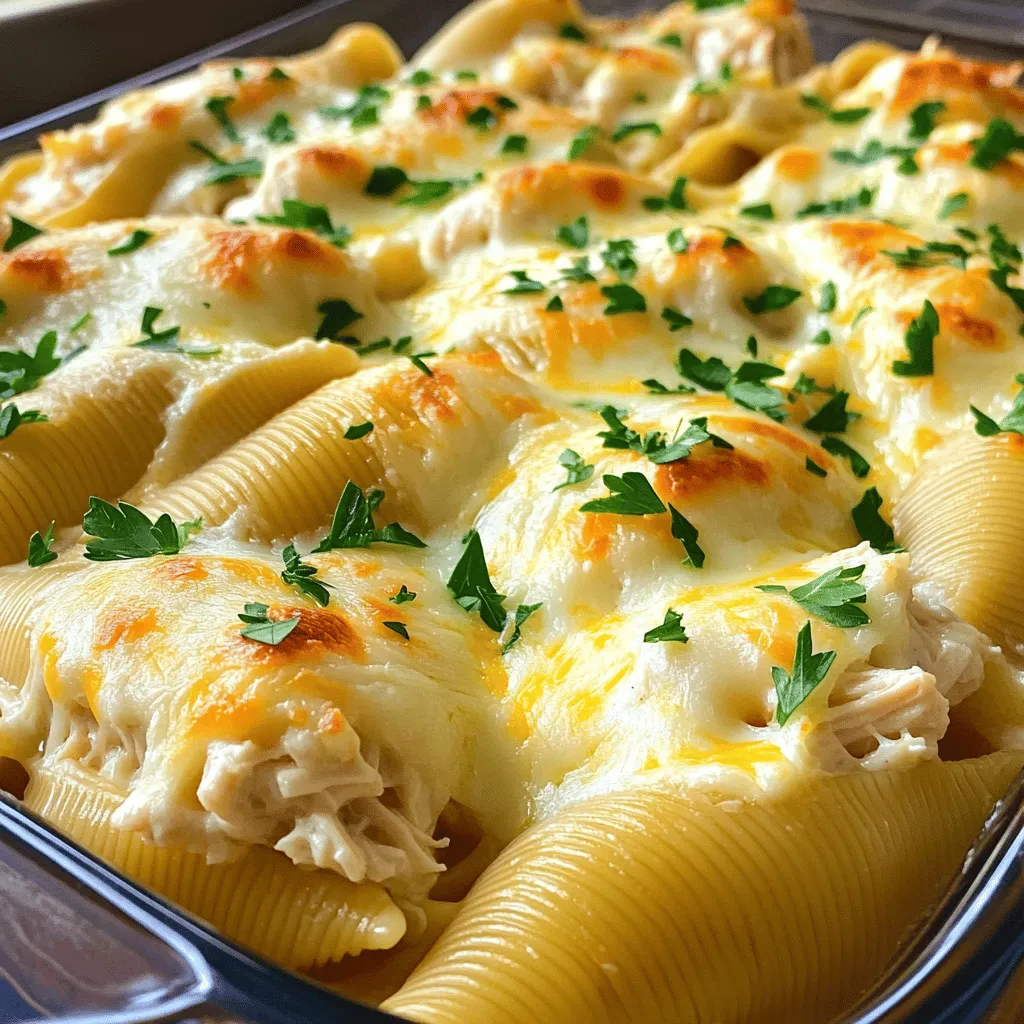
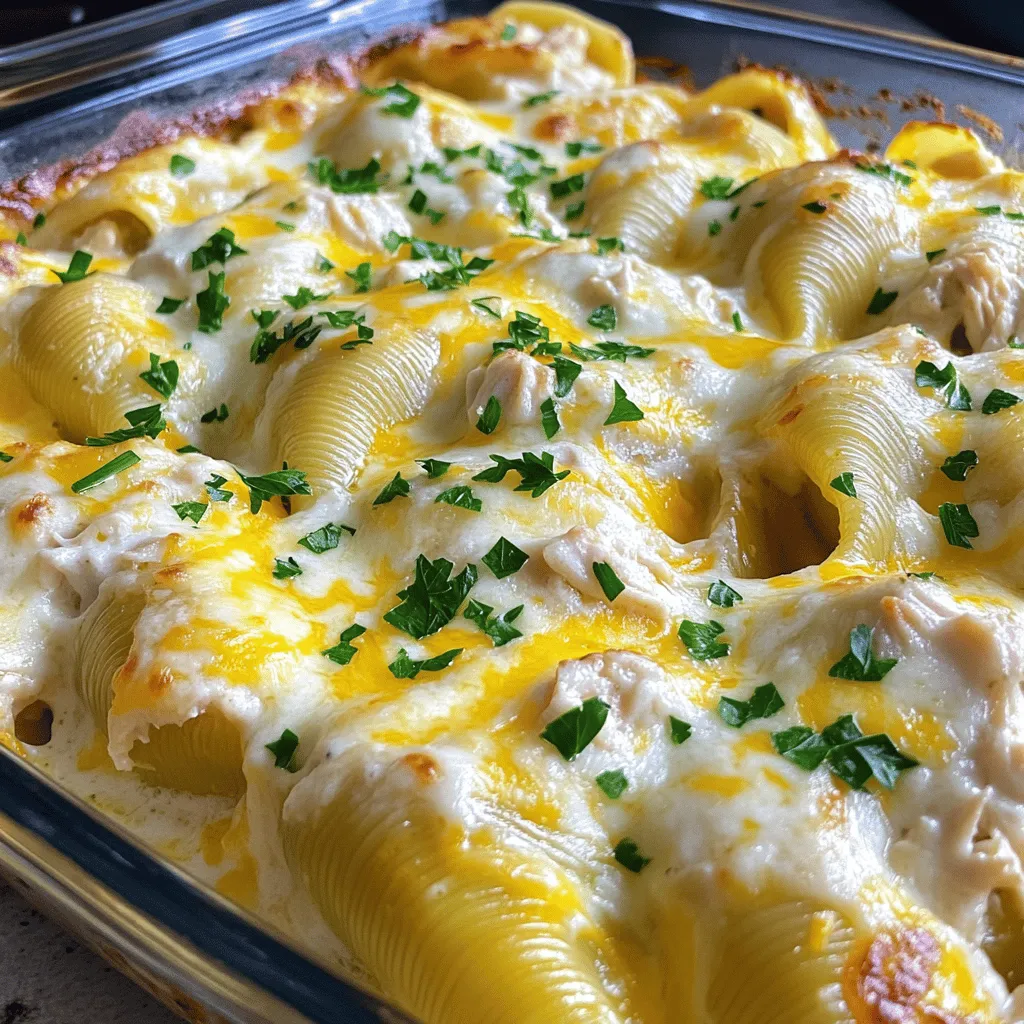
Preheat your oven to 375°F (190°C). Spread 1 cup of alfredo sauce on the bottom of a 9×13-inch baking dish. Place the filled shells in a single layer on top of the sauce. Pour the rest of the alfredo sauce over the shells. Make sure they are covered evenly. Top with the remaining mozzarella and Parmesan. Cover the dish with aluminum foil and bake for 25 minutes. After that, remove the foil and bake for another 15 minutes. The cheese should be bubbly and golden when done.
Let the dish cool for a few minutes before serving. Enjoy your creamy comfort meal!
Tips & Tricks
Best Practices for Cooking Pasta
To cook pasta shells well, follow a few simple steps. Use a large pot with plenty of water. Add salt to the water; this helps flavor the pasta. Bring the water to a rolling boil before adding the shells. Cook them until they are al dente, which means they are firm but not hard. This usually takes about 9-12 minutes. After cooking, drain the shells, but do not rinse them. Rinsing can wash away the starch that helps the sauce cling.
How to Make Homemade Alfredo Sauce
Making homemade Alfredo sauce is fun and easy. You need just a few key ingredients: butter, heavy cream, and cheese. Start by melting butter in a pan over low heat. Then, add heavy cream and stir well. Let it simmer for about 5 minutes, then add grated Parmesan cheese. Mix until the cheese melts and the sauce thickens. You can also add garlic powder or Italian seasoning for extra flavor. Homemade sauce tastes richer and fresher than store-bought.
Ensuring Creamy Texture in Filling
To keep the filling creamy, use a good mix of cheeses. Ricotta cheese adds a nice texture, while mozzarella and Parmesan enhance the flavor. Make sure the chicken is shredded finely so it blends well. Adding a bit of alfredo sauce to the filling can also help. This keeps it moist and adds more flavor. Mix everything gently until it is smooth. If you find it too thick, a splash of milk can help.

Variations
Adding Vegetables to the Filling
You can boost nutrition by adding vegetables to your filling. Spinach, mushrooms, or bell peppers work well. Just sauté them first to soften and enhance their flavors. Mix the vegetables with the chicken and cheese for a tasty twist.
Different Protein Options
If you want to switch up the protein, consider using turkey or even shrimp. Shredded rotisserie chicken is a great choice for quick meals. For a vegetarian option, try using beans or lentils. Each protein brings its own flavor, making your stuffed shells unique.
Gluten-Free and Dairy-Free Alternatives
For a gluten-free meal, use gluten-free pasta shells. Many brands offer great options that taste just as good. If you need a dairy-free version, try cashew cheese or dairy-free cream cheese in place of ricotta. Use coconut milk-based Alfredo sauce for a creamy texture without dairy. These options let everyone enjoy this dish!
Storage Info
Storing Leftovers
To store leftover Chicken Alfredo Stuffed Shells, let them cool down first. Place them in an airtight container. They will keep well in the fridge for up to three days. Make sure to cover them with plastic wrap or a lid to keep them fresh.
Freezing Instructions
If you want to freeze the stuffed shells, place them in a single layer on a baking sheet first. Freeze them until solid. Then, transfer the shells to a freezer-safe container or bag. They can last in the freezer for up to three months. When ready to eat, thaw them overnight in the fridge before reheating.
Reheating Tips
Reheat the stuffed shells in the oven for best results. Preheat your oven to 350°F (175°C). Place the shells in a baking dish and cover with foil. Heat for about 20-25 minutes. You can also reheat them in the microwave. Just cover them with a damp paper towel and heat in short bursts until warm. Enjoy your creamy meal again!
FAQs
Can I use store-bought Alfredo sauce?
Yes, you can use store-bought Alfredo sauce. It saves time and still tastes great. Just choose a brand you like. I often go for a classic, creamy sauce. This option makes the recipe easy and quick.
What other cheeses can I use for this recipe?
You can mix and match cheeses for fun flavors. Cream cheese adds a nice touch. Gouda or fontina also works well. Just keep the ratios similar to maintain creaminess. Experiment with your favorites!
How long does it take to bake chicken stuffed shells?
Baking chicken stuffed shells takes about 40 minutes. Cover with foil for the first 25 minutes. This keeps them moist. Uncover and bake for 15 more minutes until the cheese is bubbly and golden. You’ll love the smell as they bake!
Can I make Chicken Alfredo Stuffed Shells ahead of time?
Yes, you can prep Chicken Alfredo Stuffed Shells ahead of time. Assemble them and store in the fridge for up to 24 hours. Just cover tightly with foil. When ready to bake, add a few extra minutes to the cooking time. Enjoy this easy meal any day!
In this post, we explored cooking Chicken Alfredo Stuffed Shells. We covered key ingredients, simple steps, and helpful tips. You learned how to select quality ingredients and ensure a creamy filling. Plus, we discussed tasty variations and storage methods.
As you try this dish, feel free to experiment. Share it with friends or family for a delicious meal together. Enjoy your cooking adventure and make it your own!


![- 1 lb boneless, skinless chicken breasts - 2 tablespoons olive oil - Seasonings: chili powder, cumin, smoked paprika, garlic powder - Salt and pepper - Vegetables: red bell pepper, green bell pepper, yellow onion - Tortillas: flour or corn - Garnishes: fresh cilantro, lime wedges When you make easy chicken fajitas, you need fresh and tasty ingredients. Start with 1 pound of boneless, skinless chicken breasts. Cut them into thin strips for quick cooking. Next, add 2 tablespoons of olive oil. This oil helps the flavors stick. For the seasonings, use: - 1 teaspoon chili powder - 1 teaspoon cumin - 1 teaspoon smoked paprika - 1 teaspoon garlic powder These spices give the chicken a bold taste. Don't forget salt and pepper to enhance the flavor. Now, gather your vegetables. You will need: - 1 red bell pepper, sliced - 1 green bell pepper, sliced - 1 yellow onion, sliced These veggies add color and crunch. You will also need tortillas. Choose either 8 small flour or corn tortillas. Finally, fresh cilantro and lime wedges make great garnishes. The cilantro adds freshness, and the lime gives a zesty kick. With these ingredients, you can create a flavorful family dinner that everyone will enjoy. Check the Full Recipe for more tips! Start by mixing the marinade. In a large bowl, combine the olive oil with chili powder, cumin, smoked paprika, garlic powder, salt, and pepper. Stir it well until all the spices blend into the oil. Next, add the sliced chicken to the bowl. Toss the chicken strips in the marinade. Make sure each piece gets coated. Let it sit for 15 to 20 minutes. If you have more time, marinate it in the fridge for up to 2 hours. This gives the chicken great flavor. Heat a large skillet over medium-high heat. Once hot, add the marinated chicken to the skillet. It should sizzle when it hits the pan. Cook for about 5 minutes. Stir occasionally to make sure it cooks evenly. You want the chicken to be cooked through and browned. Check that it is no longer pink in the center. Now it’s time for the veggies! Add the sliced bell peppers and onions to the skillet with the chicken. Stir everything together. Cook for another 5 to 7 minutes. You want the vegetables to be tender but still crisp. This adds a nice texture to the dish. The colors from the peppers and onion will make your fajitas look amazing. For the complete recipe, check the [Full Recipe]. To make the best chicken fajitas, marinating is key. I suggest marinating the chicken for at least 15-20 minutes. If you have more time, try marinating for up to 2 hours in the fridge. This extra time allows the flavors to soak in deeply. For cooking, use medium-high heat. This ensures the chicken gets a nice sear without drying out. When it's time to serve, think about how to make your fajitas pop. I like to serve them on a large platter. You can layer the filling beautifully. Add a sprinkle of fresh cilantro on top for a bright touch. Lime wedges are a must-have for squeezing. They add a nice zing! For sides, consider guacamole, salsa, or a fresh salad. These pair well and add more flavors to your meal. One common mistake is overcooking the chicken. This can make it dry and tough. Keep an eye on it while it cooks. You want juicy, tender pieces. Another mistake is not choosing the right tortillas. Flour tortillas are soft and chewy, while corn tortillas are more traditional. Make sure to warm them up before serving. This step makes them easier to fold and enjoy. For the full recipe, check out the Easy Chicken Fajitas section above. {{image_2}} You can easily swap chicken for other proteins. Beef works great if you slice it thin. Use flank steak or sirloin for the best flavor. Shrimp is another tasty option. Just make sure to cook shrimp until it turns pink. Both options keep the dish fun and delicious. If you want a meatless meal, try using plant-based proteins. Tofu or tempeh can be great choices. You can also load up on veggies. Try mushrooms, zucchini, or even eggplant for a hearty bite. The mix of colors makes your fajitas look as good as they taste. To amp up the flavor, add jalapeños. They give a nice heat to the dish. You can also play with different spices. Try adding oregano or coriander for a unique twist. A squeeze of lime juice brightens the flavors, making your fajitas even more amazing. For the full recipe, check out the Easy Chicken Fajitas. To keep your leftover fajitas fresh, store them in airtight containers. Make sure the fajitas cool down to room temperature first. This helps prevent condensation, which can make them soggy. If you have extra tortillas, store them separately to keep them soft. Reheating chicken fajitas is easy. You can do this in a skillet over medium heat. Add a splash of water to steam them slightly and keep them moist. Stir occasionally for about 5 minutes. If you prefer the microwave, place them in a microwave-safe dish and cover with a damp paper towel. Heat for 1 to 2 minutes, checking every 30 seconds. Freezing chicken fajitas is a great way to save time. First, let the cooked fajitas cool completely. Then, portion them into freezer bags or containers. Remove as much air as possible to prevent freezer burn. You can freeze both the chicken and vegetables together. When you’re ready to eat them, thaw overnight in the fridge. Reheat as mentioned above for a quick meal. To add heat, you can use jalapeños. Slice them thin and toss in with the chicken. You could also add a pinch of cayenne pepper to the marinade. If you want more flavor, try a chipotle in adobo sauce. Just a small amount packs a punch. Adjust the spice to your taste. Yes, you can add many vegetables. Here are some great options: - Zucchini - Mushrooms - Corn - Asparagus - Cherry tomatoes These veggies will add color and flavor to your fajitas. Fajitas are great with various sides. Here are some tasty ideas: - Mexican rice - Refried beans - Guacamole - Salsa - Sour cream - Fresh corn salad These sides will complement your chicken fajitas well. You can find the full recipe for Easy Chicken Fajitas in the earlier section. You’ve learned how to make easy chicken fajitas that burst with flavor. We covered the key ingredients, easy steps, and helpful tips. You can customize your fajitas with different proteins and veggies, too. Remember, the right cooking method and storage will keep them fresh. Enjoy crafting your own delicious meals at home! Now, go ahead and impress your family or friends with your fajita skills!](https://dailydishly.com/wp-content/uploads/2025/06/bddc0842-410c-41cd-a0e7-7c4486f739b3-768x768.webp)


![To make roasted garlic and tomato pasta, you need these simple items: - 1 pound spaghetti or your favorite pasta - 8 cloves garlic, unpeeled - 4 cups cherry tomatoes, halved - 1/4 cup extra-virgin olive oil - 1 teaspoon dried oregano - 1 teaspoon red pepper flakes (adjust for spice preference) - Salt and pepper to taste - 1/4 cup fresh basil, chopped - 1/2 cup freshly grated Parmesan cheese (optional) Fresh ingredients make a big difference in taste. When cooking, I always use ripe cherry tomatoes. They burst with flavor. Fresh garlic gives a sweet, nutty taste after roasting. Fresh basil adds a bright note to the dish. Using these ingredients helps create a dish that feels special. You can adjust this pasta to fit your needs. If you're gluten-free, choose gluten-free pasta. For a vegan option, skip the Parmesan cheese or use a plant-based alternative. You can even swap cherry tomatoes for canned diced tomatoes if fresh ones aren't available. This way, anyone can enjoy this tasty dish. For a heartier meal, add cooked chicken or shrimp. Feel free to mix in veggies like spinach or zucchini for added nutrition. For the full recipe, check out the details above. Start by gathering your ingredients. For this dish, you need: - 1 pound spaghetti or your favorite pasta - 8 cloves garlic, unpeeled - 4 cups cherry tomatoes, halved - 1/4 cup extra-virgin olive oil - 1 teaspoon dried oregano - 1 teaspoon red pepper flakes (adjust for spice preference) - Salt and pepper to taste - 1/4 cup fresh basil, chopped - 1/2 cup freshly grated Parmesan cheese (optional) Preheat your oven to 400°F (200°C). This helps the garlic and tomatoes roast perfectly. On a baking sheet, place the unpeeled garlic cloves and halved cherry tomatoes. Drizzle with half of the olive oil. Sprinkle with oregano, red pepper flakes, salt, and pepper. Toss gently to coat. Roast in the oven for 20-25 minutes. Look for blistered tomatoes and soft garlic. The smell will guide you! Meanwhile, cook your pasta. Use a large pot of salted boiling water and follow the package instructions. Cook until it’s al dente. Don’t forget to save 1 cup of pasta water before draining. Once the tomatoes and garlic are done, let them cool a bit. Squeeze the roasted garlic out of its skin into a bowl. Mash it with a fork to create a creamy base. Mix the mashed garlic with the roasted tomatoes. Add the remaining olive oil and a splash of the reserved pasta water. Stir well to make a sauce. Now, add the drained pasta to the sauce. Toss it all together until the pasta is well coated. If the sauce is too thick, add more reserved pasta water until you like the consistency. Finally, stir in fresh basil. Taste and adjust seasoning with salt and pepper if needed. Serve your roasted garlic and tomato pasta immediately. If you want, sprinkle some grated Parmesan cheese on top. Enjoy this meal! For the full recipe, check the earlier section. Roasting garlic is simple. Start by placing unpeeled garlic cloves on a baking sheet. Cook them at 400°F (200°C) for about 20 to 25 minutes. You want them soft and golden. When done, let them cool a bit. Squeeze the garlic out of the skin with your fingers. It should be creamy and sweet. This garlic adds a rich, deep flavor to your pasta. Cooking pasta seems easy, but timing is key. Follow the package directions for cooking time. Use a large pot with plenty of salted boiling water. This boosts flavor and helps keep pasta from sticking. For the best texture, aim for "al dente," which means it should be firm to the bite. Remember to reserve some pasta water before draining. This starchy water helps thicken your sauce. Want to make your roasted garlic and tomato pasta pop? Here are some ideas: - Herbs: Add fresh basil or parsley for a bright touch. - Cheese: Toss in some feta or goat cheese for creaminess. - Nuts: Pine nuts or walnuts give a nice crunch. - Spices: For heat, add more red pepper flakes or a dash of smoked paprika. - Zest: A sprinkle of lemon zest can brighten the flavors. These enhancements will take your dish to the next level. Check out the Full Recipe for a complete guide to making this tasty meal! {{image_2}} Roasted garlic and tomato pasta is great for everyone. For a vegetarian twist, skip the cheese. You can add nutritional yeast for a cheesy taste. If you want a vegan option, use a plant-based cheese. This makes it creamy without dairy. You can also toss in fresh spinach or kale. These greens add color and nutrients to your dish. You can switch up the pasta for fun! Try whole wheat pasta for more fiber. Gluten-free pasta works well if you need it. You can even use zucchini noodles for a low-carb choice. Each type will change the dish's texture, so experiment to find your favorite. Want to make it heartier? Add protein like grilled chicken or shrimp. Cook these separately and toss them in at the end. For a veggie boost, add bell peppers or mushrooms. They roast well and taste amazing with garlic and tomatoes. Broccoli or asparagus are also great choices. These keep the dish fresh and colorful. For more details, check out the full recipe. To keep your roasted garlic and tomato pasta fresh, store it in an airtight container. Make sure it cools down before sealing. This will help keep the flavors intact. The pasta can last in the fridge for about 3 to 5 days. If you notice any off smells or changes in color, it's best to toss it. When you’re ready to enjoy your leftovers, reheating properly is key. Use a pan over low heat for the best results. Add a splash of water or olive oil to help the pasta regain its moisture. Stir often to prevent sticking. You can also microwave it, but cover the dish to retain moisture. Heat in 30-second intervals, stirring in between. If you want to save some pasta for later, freezing is a great option. Portion the pasta into individual servings and place them in freezer-safe bags. Remove as much air as possible before sealing. It keeps well for about 2 to 3 months in the freezer. When you're ready to eat, thaw it in the fridge overnight, then reheat as mentioned above. For the best taste, enjoy it within a month. Yes, you can use many types of tomatoes. Roma tomatoes add a rich flavor. Beefsteak tomatoes are juicy and sweet. You can also use canned tomatoes if fresh ones are not available. Just be sure to drain them well. This will keep your pasta from getting too watery. Experiment and find what you like best! To make this recipe gluten-free, choose gluten-free pasta. Many brands offer great options that taste good. You can find pasta made from rice, corn, or lentils. These pastas cook a bit differently, so check the package for instructions. Follow the same steps in the recipe, and enjoy your meal worry-free! Roasted garlic and tomato pasta pairs well with many sides. A fresh green salad adds crunch and color. Garlic bread is a classic choice that everyone loves. You can also serve it with grilled vegetables for a healthy twist. A nice glass of red wine makes the meal even better. Enjoy exploring different pairings! For the complete recipe, check out the [Full Recipe]. This blog post covered key ingredients for roasted garlic and tomato pasta. We explored fresh ingredients and alternatives for dietary needs. I shared step-by-step cooking instructions and helpful tips, like roasting garlic perfectly. We also discussed pasta variations and storage tips to keep leftovers fresh. In summary, this dish is simple, versatile, and delicious. You can make it fit your tastes and needs. Enjoy experimenting with flavors and ingredients! Your next meal can be a hit.](https://dailydishly.com/wp-content/uploads/2025/06/d553d96f-6423-4985-8dca-dedfc8f9e127-768x768.webp)