Looking for a quick and tasty dinner idea? Chicken and spinach stuffed peppers are the perfect choice! Packed with flavor and nutrients, these colorful veggies make a satisfying meal for everyone. In just a few easy steps, you can create a dish that is both healthy and delicious. Join me as we dive into the simple ingredients and straightforward instructions to whip up this easy dinner that will impress your family!
Ingredients
List of Main Ingredients
– 4 large bell peppers (any color)
– 1 lb (450g) ground chicken
– 2 cups fresh spinach, chopped
– 1 cup cooked quinoa (or rice)
Additional Ingredients
– Cheese Variety Options: Use mozzarella, cheddar, or feta for different tastes.
– Seasoning Suggestions: Try Italian seasoning, garlic powder, or cumin for a twist.
– Olive Oil and Aromatics: Use olive oil for cooking. Add onions and garlic for great flavor.
These ingredients create a tasty and healthy meal. The mix of ground chicken and spinach makes for a balanced dish.
Step-by-Step Instructions
Preparation Steps
Preheating the Oven
Start by preheating your oven to 375°F (190°C). This step is key. A hot oven helps cook the peppers evenly.
Preparing the Peppers
Take four large bell peppers in any color. Slice the tops off and remove the seeds and membranes. Brush the outside of the peppers with olive oil. This adds flavor and helps with browning. Place them upright in a baking dish.
Cooking the Filling
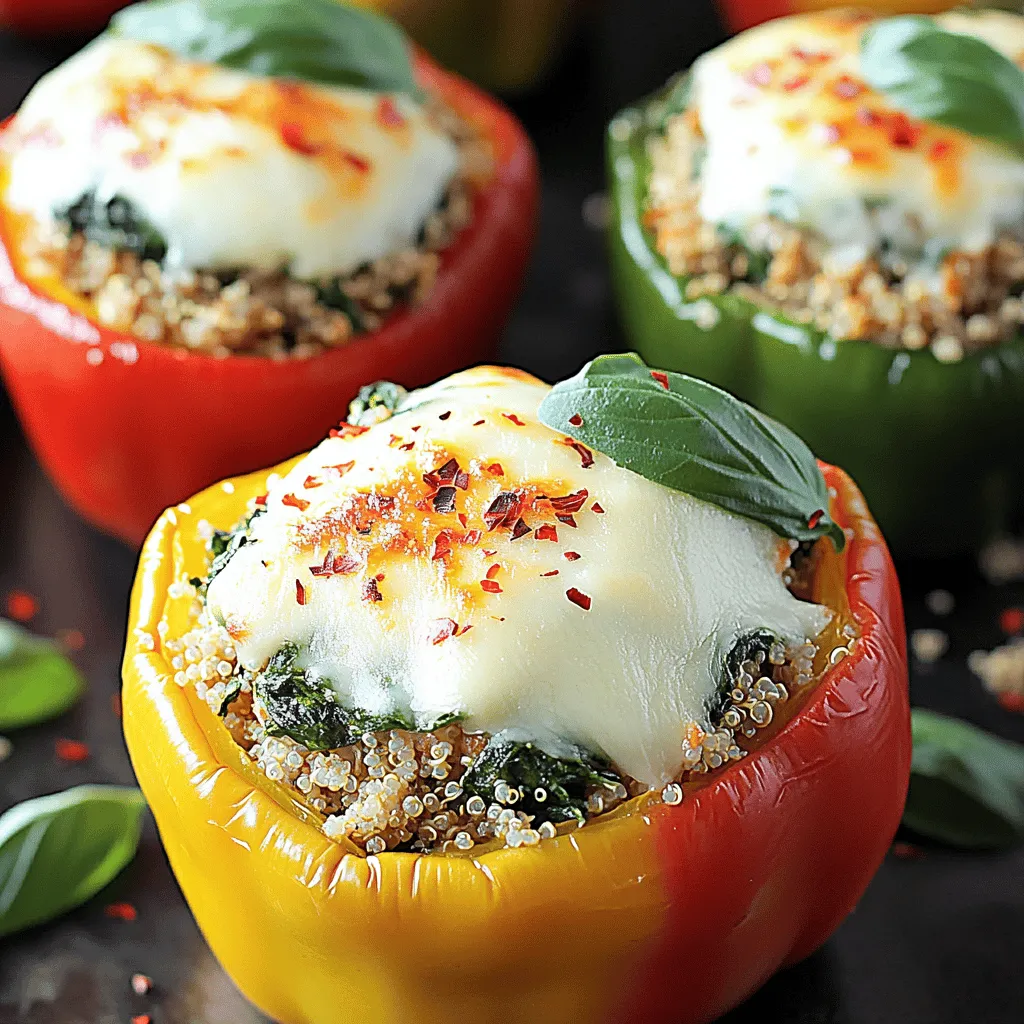
In a large skillet, heat one tablespoon of olive oil over medium heat. Add one finely chopped onion and sauté for about 3-4 minutes until it’s soft. Next, stir in two minced garlic cloves and cook for one more minute. Now, add one pound of ground chicken. Break it up with a spoon and cook it until it’s fully browned, about 6-8 minutes. Then, stir in two cups of chopped fresh spinach, one cup of cooked quinoa, one teaspoon of Italian seasoning, and half a teaspoon of red pepper flakes. Season with salt and pepper to taste. Cook for another 2-3 minutes until the spinach wilts. Remove from heat and mix in half of the shredded mozzarella cheese until it melts.
Assembly Instructions
Stuffing the Peppers
Carefully spoon the chicken and spinach mixture into each prepared bell pepper. Pack it tightly so it holds together well.
Topping the Stuffed Peppers
Once the peppers are stuffed, top each one with the remaining mozzarella cheese. This will create a nice cheesy layer when baked.
Baking Process
Covering and Baking
Cover the baking dish with aluminum foil. This helps the peppers cook through without burning. Bake in your preheated oven for 25 minutes.
Additional Baking Time for Browning
After 25 minutes, remove the foil. Bake for an additional 10-15 minutes. This allows the cheese to bubble and turn golden. Once done, take them out and let them cool slightly. You can garnish with fresh basil if you like.
Tips & Tricks
Perfecting the Recipe
Ensuring Chicken is Cooked Thoroughly
Cook the ground chicken until it is no longer pink. This helps keep everyone safe. Use a meat thermometer to check that it reaches 165°F (74°C). I always break it apart with a spoon as it cooks. This method ensures even cooking and flavor.
Tips for Peppers Retaining Shape
Choose firm peppers without cracks. Cut the tops off and remove seeds gently. Brush the outsides with olive oil. This adds flavor and helps them stay upright while baking. Place them in a baking dish, ensuring they stand tall. This way, they hold all the delicious filling.
Enhancements
Using Different Cheeses for Flavor
Mozzarella is great, but try mixing in other cheeses too. Cheddar adds sharpness, while feta gives a tangy kick. You could even use pepper jack for extra spice. Mix and match to find your favorite cheese combo!
Adjusting Spice Levels
Red pepper flakes add heat, but you can change the amount. Start with less if you prefer mild flavors. You can add more after tasting the filling. This way, it fits your taste perfectly.
Presentation Tips
Garnishing Ideas
Fresh basil leaves add color and flavor. Chop them finely and sprinkle on top before serving. You can also use a drizzle of balsamic glaze for a sweet touch. This makes your dish look fancy and taste even better.
Serving Suggestions
Serve the stuffed peppers on a bright plate. You can pair them with a light salad or some crusty bread. This adds balance to the meal. Enjoy the tasty colors and flavors on your dinner table!

Variations
Customization Options
You can easily change up the chicken and spinach stuffed peppers to fit your taste. If you want a vegetarian meal, use black beans or lentils instead of chicken. This adds protein and fiber. You can also mix in some chopped mushrooms or zucchini for extra texture and flavor.
For added color, try using different bell pepper colors. Yellow, orange, or even purple peppers can look stunning on your plate. You can also experiment with other veggies, such as corn, carrots, or diced tomatoes. These will give your dish a fresh twist while still being delicious.
Flavor Profiles
If you want a Mediterranean vibe, add feta cheese and olives. You could also use a mix of herbs like oregano and dill. This brings a bright and tangy flavor to your meal. For a Southwest style, swap the Italian seasoning for chili powder and cumin. Add some corn and black beans to the mix for a hearty touch. Top with avocado or salsa for an extra kick.
Cooking Methods
You can cook these stuffed peppers in different ways. For a quick meal, try an air fryer. Preheat it to 375°F (190°C) and cook the stuffed peppers for about 15-20 minutes. They come out crispy and delicious.
If you prefer slow cooking, place your stuffed peppers in a slow cooker. Cook on low for 4-6 hours. This method makes the peppers very tender and lets the flavors blend nicely.
Storage Info
Storing Leftovers
To keep your chicken and spinach stuffed peppers fresh, follow these steps:
– Best Practices for Refrigeration: Let the stuffed peppers cool to room temperature. Place them in an airtight container. They will stay good in the fridge for up to 4 days.
– Freezing Instructions: If you want to store them longer, freeze the stuffed peppers. Wrap each one in plastic wrap, then place them in a freezer-safe bag. They can last about 3 months in the freezer.
Reheating Tips
When it’s time to enjoy your leftovers, reheating is simple:
– Microwave vs. Oven: You can reheat stuffed peppers in the microwave for quick meals. Heat them for about 2-3 minutes. For a crispy texture, use the oven. Preheat to 350°F (175°C) and bake for 15-20 minutes.
– Maintaining Texture and Flavor: To keep the peppers moist, add a splash of water in the microwave. When using the oven, cover them with foil to prevent drying out.
Shelf Life
Knowing how long your stuffed peppers last is key:
– How Long They Last in the Fridge: These stuffed peppers are safe to eat for about 4 days in the fridge.
– Signs of Spoilage: If you see mold or a change in color, it’s time to toss them. If they smell off, do not eat them.
FAQs
Common Questions
Can I use other types of meat?
Yes, you can. Ground turkey or beef works well too. Each meat adds a different taste.
What can I substitute for quinoa?
You can use rice, couscous, or even farro. These grains will keep your dish hearty.
How do I know when the peppers are done?
The peppers should be tender and the cheese should be bubbly and golden. You can poke a fork into them to check.
Cooking and Preparation Inquiries
Can I prepare this recipe in advance?
Absolutely! You can stuff the peppers a day ahead. Just cover and chill them in the fridge.
Is there a way to reduce cooking time?
You can parboil the peppers for 5 minutes before stuffing them. This cuts down baking time.
Nutritional Information
Caloric Breakdown of Ingredients
Each stuffed pepper has about 350 calories. The chicken and cheese provide protein, while the peppers add fiber.
Dietary Adaptations for Allergies
For gluten-free folks, use quinoa or rice. If dairy is an issue, try a dairy-free cheese alternative. You can also skip the cheese entirely if needed.
This article covered how to make delicious stuffed peppers. You learned about the main and additional ingredients, step-by-step instructions, and helpful tips. We explored variations and storage methods for leftovers too.
Stuffed peppers are versatile and fun to make. Feel free to personalize the recipe to fit your taste. Enjoy cooking and sharing this tasty dish with others!


