Chicken Fajita Quesadillas Flavorful and Quick Meal

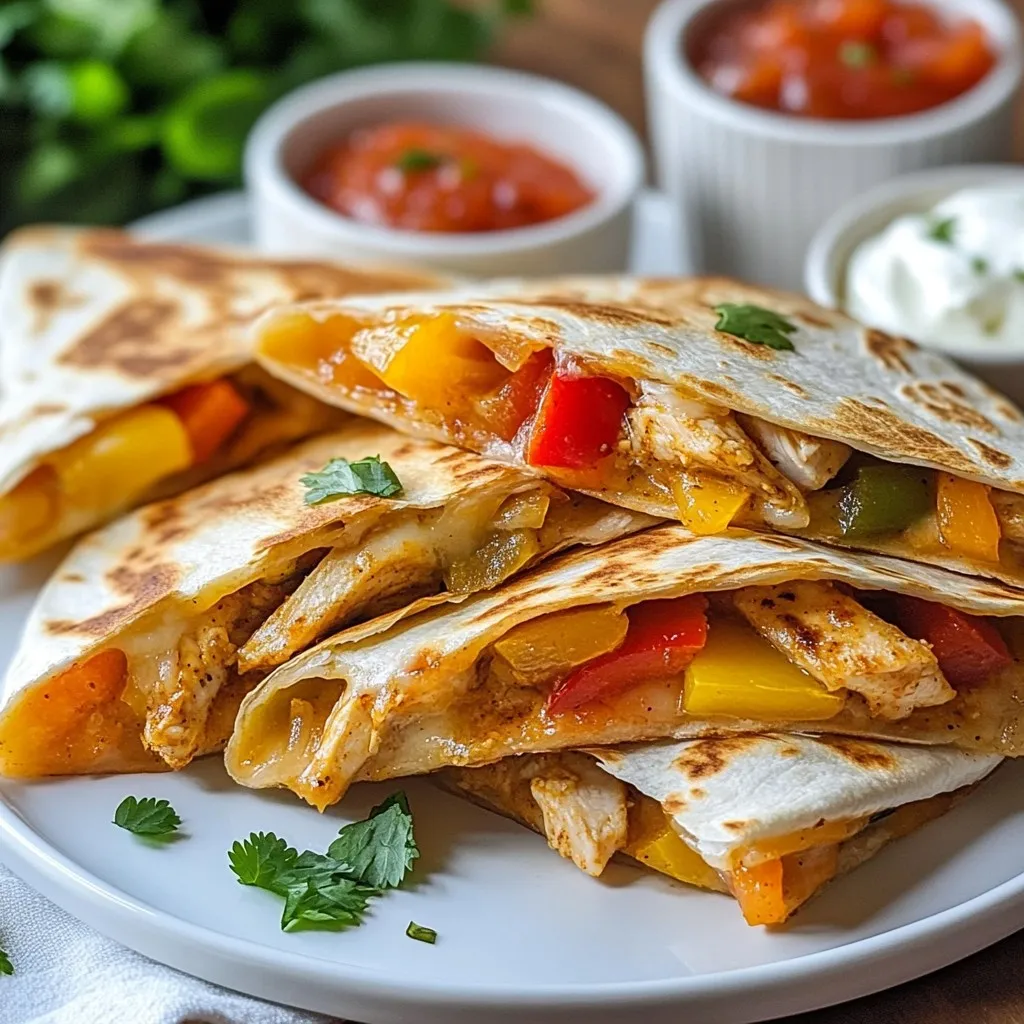
Craving a tasty meal that comes together in no time? Look no further! Chicken fajita quesadillas are packed with flavor and perfect for any night. With juicy chicken, fresh veggies, and the right spices, these quesadillas will delight your taste buds. And the best part? They’re quick and easy! Join me as I guide you through the simple steps to make this delicious dish. Let’s get cooking!
Why I Love This Recipe
- Flavor Explosion: These quesadillas combine savory chicken, fresh vegetables, and a delightful blend of spices for a taste that dances on your palate.
- Quick and Easy: This recipe comes together in just 30 minutes, making it perfect for busy weeknights or last-minute gatherings.
- Customizable: You can easily swap in your favorite veggies or proteins, allowing for endless variations to suit your taste.
- Fun to Share: Quesadillas are great for sharing! Serve them up with sour cream and salsa for a festive, interactive meal.
Ingredients
Chicken and Vegetables
For the chicken fajita quesadillas, you will need:
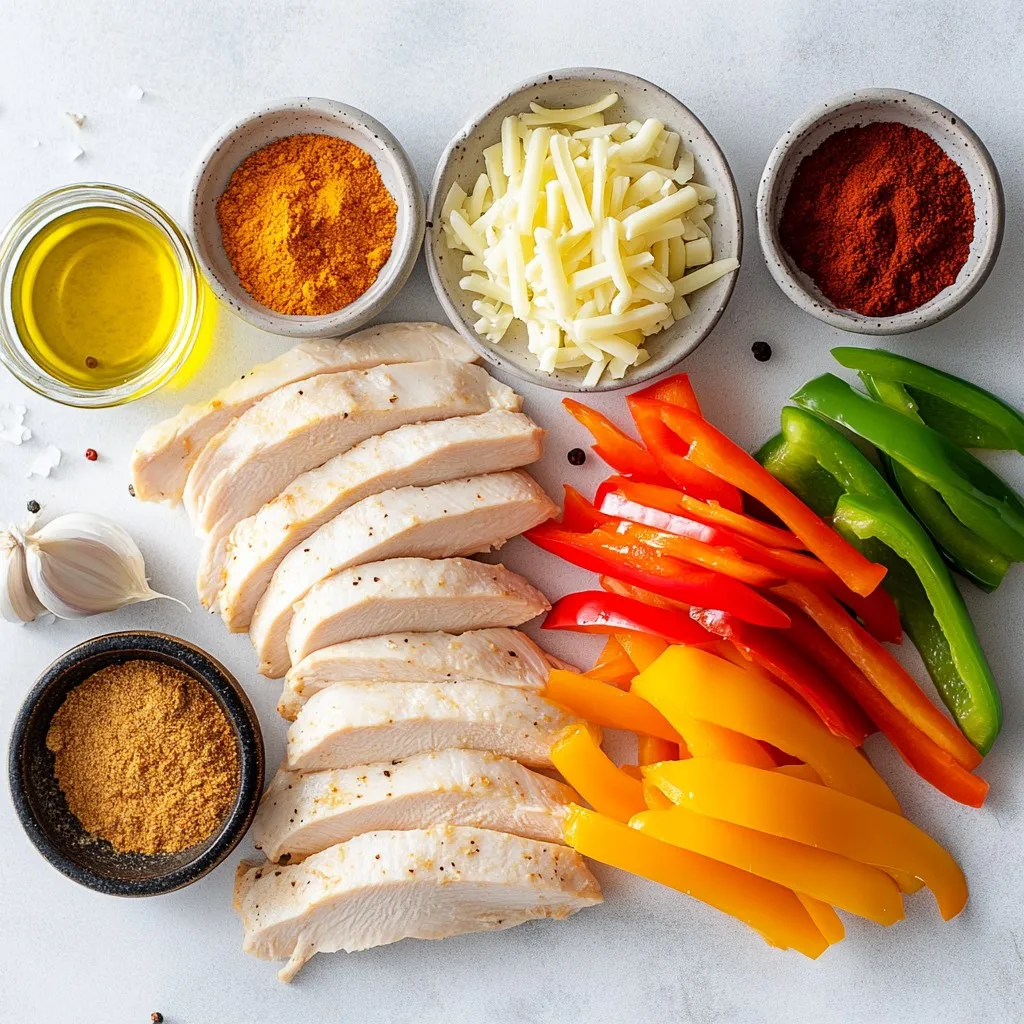
– 2 boneless, skinless chicken breasts, sliced
– 1 bell pepper (red or green), julienned
– 1 medium onion, sliced
– 2 cloves garlic, minced
Start with fresh chicken. Slice it thin so it cooks fast. Use a colorful bell pepper for taste and looks. Onions add sweetness, and garlic gives a nice kick.
Spices and Seasonings
To season the filling, gather:
– 1 tablespoon olive oil
– 2 teaspoons chili powder
– 1 teaspoon cumin
– 1 teaspoon paprika
– Salt and pepper to taste
Olive oil keeps the chicken moist. Chili powder adds heat, while cumin and paprika boost the flavor. Don’t forget salt and pepper; they bring all the tastes together.
Tortillas and Cheese
You’ll need:
– 4 large flour tortillas
– 2 cups shredded cheese (cheddar and Monterey Jack blend)
Large tortillas hold more filling. The cheese melts beautifully, bringing everything together. A mix of cheddar and Monterey Jack gives a nice balance of flavor and creaminess.

Step-by-Step Instructions
Preparing the Chicken Filling
First, heat one tablespoon of olive oil in a large skillet over medium heat. Add two sliced boneless, skinless chicken breasts. Season the chicken with salt, pepper, two teaspoons of chili powder, one teaspoon of cumin, and one teaspoon of paprika. Cook the chicken for about 5 to 7 minutes. Stir often until the chicken is fully cooked and no longer pink. Next, add one sliced bell pepper, one sliced onion, and two minced garlic cloves to the skillet. Sauté everything for about 5 minutes. You want the veggies to be tender and slightly charred. Remove the skillet from heat and set the filling aside.
Assembling the Quesadillas
Grab a clean skillet or griddle and heat it on medium-low. Place one large flour tortilla on the skillet. Sprinkle half of two cups of shredded cheese evenly over the tortilla. Then, spoon half of your chicken and veggie mixture on top of the cheese. Add the remaining cheese on top of the filling. Place another tortilla over the filling to form a quesadilla.
Cooking the Quesadillas
Cook the quesadilla for about 3 to 4 minutes on one side. Look for a golden brown and crispy bottom. Carefully flip the quesadilla using a large spatula. Cook for another 3 to 4 minutes until the other side is golden and the cheese melts. Remove the quesadilla from the skillet and let it cool for a minute. Cut it into wedges. Repeat the process with the remaining tortillas and filling.
Tips & Tricks
How to Achieve Perfectly Crispy Quesadillas
To get your quesadillas crispy, use medium-low heat. This heat lets the tortillas crisp up without burning. Choose large flour tortillas for more filling. Add enough cheese to hold everything together. Flip the quesadilla carefully with a spatula to avoid spilling the filling. Let them cool for a minute before cutting to keep the cheese from oozing out.
Flavor Enhancements and Common Mistakes
For more flavor, add a pinch of lime juice or fresh cilantro. You can also try different spices like oregano or chipotle powder for a kick. Avoid overloading your quesadilla with too much filling; this can make them soggy. Ensure your chicken is cooked thoroughly before adding it to the tortilla. This way, you will enjoy the best taste and texture.
Pairing Suggestions for Serving
Serve your chicken fajita quesadillas with sour cream and salsa for a classic touch. Guacamole adds creaminess and flavor, making each bite richer. You can also pair them with a fresh salad for a light side. For a drink, try a cold limeade or iced tea to balance the spice. These pairings will elevate your meal and impress your guests.
Pro Tips
- Use Fresh Ingredients: Always opt for fresh vegetables and high-quality chicken for the best flavor in your quesadillas.
- Don’t Overfill: Be cautious not to overload your tortillas with filling, as this can make flipping difficult and lead to spills.
- Keep It Crispy: Ensure your skillet is adequately heated before adding the quesadilla, this helps achieve a perfectly crispy texture.
- Experiment with Cheese: Try different cheese blends for unique flavor profiles; pepper jack adds a nice kick!

Variations
Vegetarian Options for Fajita Quesadillas
You can easily make these quesadillas vegetarian. Start with a variety of veggies. Use bell peppers, onions, and mushrooms for a hearty mix. You can add zucchini or corn for extra flavor. Replace the chicken with black beans or lentils. This gives protein and texture. You still get that great fajita taste without meat.
Different Cheese Blends to Use
Cheese is key for a tasty quesadilla. Cheddar and Monterey Jack work well together. But you can mix it up! Try pepper jack for a spicy kick. A blend of mozzarella and fontina gives a creamy texture. For a bold flavor, use aged cheddar or gouda. Each cheese brings its own charm to your dish.
Adding Extra Ingredients like Avocado or Beans
Want to make your quesadilla even better? Add avocado slices for creaminess. They pair perfectly with the spices. You could also toss in some cooked pinto beans or black beans. This adds fiber and makes your meal filling. Don’t forget to sprinkle fresh cilantro on top. It gives a fresh touch and bright flavor.
Storage Info
How to Store Leftover Quesadillas
To store leftover quesadillas, first, let them cool down. This step keeps them from getting soggy. Wrap each quesadilla in plastic wrap or foil. You can also place them in an airtight container. Make sure to store them in the fridge. They stay fresh for about three days.
Reheating Tips for Best Quality
When you’re ready to eat the leftovers, you want them hot and crispy. The best way to reheat quesadillas is on the stove. Heat a skillet over medium heat. Place the quesadilla in the skillet for about 3-4 minutes on each side. This method helps keep the cheese gooey and the tortilla crispy. You can also use an oven. Preheat it to 350°F (175°C). Bake for 10-15 minutes until warm.
Freezing Instructions and Thawing
To freeze quesadillas, wrap them tightly in plastic wrap or foil. Place them in a freezer-safe bag. They can stay frozen for up to three months. When you want to eat them, take them out and thaw them in the fridge overnight. Reheat them in a skillet or oven as mentioned before. Enjoy your delicious, quick meal anytime!
FAQs
What is the best cheese for quesadillas?
The best cheese for quesadillas is a blend of cheddar and Monterey Jack. This mix melts well and adds a creamy texture. Cheddar gives a sharp taste, while Monterey Jack is mild and smooth. You can also try pepper jack for a kick!
Can I use whole wheat tortillas?
Yes, you can use whole wheat tortillas. They add a nutty flavor and are a healthier choice. Just make sure to warm them slightly before filling. This helps them become more flexible and less likely to tear.
How can I make chicken fajita quesadillas spicier?
To spice up your quesadillas, add sliced jalapeños or diced serrano peppers. You can also mix in extra chili powder or a dash of hot sauce. For a smoky flavor, try adding chipotle powder. Adjust the heat to your liking!
Can I make these quesadillas ahead of time?
Yes, you can prepare the filling ahead. Cook the chicken and veggies, then store them in the fridge. When you’re ready, just assemble and cook the quesadillas. This saves time and still gives you that fresh taste!
In this article, we covered how to make delicious chicken fajita quesadillas. I shared tips on ingredients, cooking steps, and ways to store leftovers. You can try different cheeses and add extras for fun twists. The right spices make a big difference in flavor. Remember, practice makes perfect for crispy quesadillas. Enjoy your cooking and don’t hesitate to try new things. With these tips, you’ll impress everyone with your tasty quesadilla

Sizzling Chicken Fajita Quesadillas
Ingredients
- 2 pieces boneless, skinless chicken breasts, sliced
- 1 piece bell pepper (red or green), julienned
- 1 medium onion, sliced
- 2 cloves garlic, minced
- 1 tablespoon olive oil
- 2 teaspoons chili powder
- 1 teaspoon cumin
- 1 teaspoon paprika
- to taste salt and pepper
- 4 large flour tortillas
- 2 cups shredded cheese (cheddar and Monterey Jack blend)
- as needed sour cream and salsa for serving
Instructions
- In a large skillet, heat the olive oil over medium heat. Add the sliced chicken breasts and season with salt, pepper, chili powder, cumin, and paprika. Cook for about 5-7 minutes, stirring occasionally, until the chicken is cooked through and no longer pink.
- Add the sliced bell pepper, onion, and minced garlic to the skillet. Sauté for an additional 5 minutes, until the vegetables are tender and slightly charred. Remove from the heat and set aside.
- In a clean skillet or griddle, place one flour tortilla over medium-low heat. Sprinkle half of the shredded cheese evenly over the tortilla.
- Spoon half of the chicken and veggie mixture over the cheese, then sprinkle the remaining cheese on top. Place another tortilla over the filling.
- Cook for about 3-4 minutes on one side or until the bottom tortilla is golden brown and crispy. Carefully flip the quesadilla using a large spatula and cook for another 3-4 minutes until the other side is golden and the cheese is melted.
- Remove from the skillet and let it cool for a minute before cutting into wedges. Repeat with the remaining tortillas and filling.


. High-quality images are key for any recipe. They help you see the colors and textures of the dish. When serving, a bright bowl can make your salad pop. Try to layer the ingredients for a beautiful look. You can also add a sprig of cilantro on top for that finishing touch. How long does the salad last in the fridge? This salad lasts about 2 to 3 days in the fridge. Store it in a sealed container. The avocados may brown, but the taste stays good. Can I use canned beans instead of dried? Yes, canned beans are great for this salad. They save time and are easy to use. Just rinse and drain them before adding. Can I make this salad ahead of time? You can make this salad a few hours ahead. Just wait to add the avocados until right before serving. This keeps them fresh and green. What are the best toppings to add? Toppings like crumbled feta, fresh cilantro, or diced jalapeños really enhance the salad. You can also add a sprinkle of nuts for crunch. Is this salad gluten-free? Yes, this salad is naturally gluten-free. It contains no wheat or gluten products. What are the health benefits of black beans and avocados? Black beans are high in fiber and protein. They help with digestion and keep you full. Avocados are rich in healthy fats and vitamins. They support heart health and skin. This salad is a nutrient-packed choice. For the full recipe, check out the detailed instructions and enjoy creating this tasty dish! This avocado and black bean salad is fresh, nutritious, and easy to make. You learned about essential ingredients, how to prepare them, and tips for the best results. The recipe allows for tasty twists and options for everyone. Enjoy creating your own version while keeping it healthy and satisfying. This salad is a great dish for lunch, dinner, or gatherings. With vibrant flavors and colors, it’s sure to impress. Dive in and savor every bite!](https://dailydishly.com/wp-content/uploads/2025/06/59c4ae36-0ebd-4eac-932b-d71541cf887d-768x768.webp)


![- 6 large eggs - 1 cup fresh spinach, chopped - 1/2 cup cherry tomatoes, halved - 1/2 cup bell pepper, diced (any color) - 1/4 cup onion, finely chopped - 1/4 cup feta cheese, crumbled (optional) - 1 tablespoon olive oil - Salt and pepper to taste - 1/2 teaspoon garlic powder - 1/2 teaspoon dried oregano Each ingredient in these muffins brings a lot of good stuff. Eggs are full of protein and help build strong muscles. Spinach is packed with vitamins A and C, plus iron, which is great for energy. Cherry tomatoes add antioxidants, protecting your cells. Bell peppers provide vitamin C, which helps your body heal. Onions add flavor and may boost heart health. Feta cheese gives a nice taste and some calcium. Olive oil adds healthy fats and helps you absorb nutrients. Garlic powder and oregano bring extra flavor and may support your immune system. You can swap ingredients to fit your taste. Use egg whites instead of whole eggs for fewer calories. For a dairy-free option, try nutritional yeast or a plant-based cheese. If you don’t have fresh spinach, frozen spinach works too. Just make sure to thaw and drain it first. Other veggies like zucchini or mushrooms can replace bell peppers. You can even add spices like cumin or paprika for a twist. The full recipe lets you explore these fun options! Start by preheating your oven to 350°F (175°C). This temperature helps your muffins bake evenly. Next, grease a muffin tin with cooking spray or olive oil. This step prevents the muffins from sticking. In a large bowl, crack the six eggs. Whisk them well until they blend. Add salt, pepper, garlic powder, and dried oregano. Mix these ingredients until combined. Now, heat a tablespoon of olive oil in a skillet over medium heat. Add the chopped onion and diced bell pepper. Sauté them for about 3-4 minutes. You want them soft but not brown. Next, stir in one cup of chopped spinach. Let the spinach wilt for about 1-2 minutes. Remove the skillet from the heat. Add the sautéed veggies and half a cup of halved cherry tomatoes to the egg mixture. If you like, fold in a quarter cup of crumbled feta cheese. This adds a nice flavor. Evenly pour the egg and veggie mix into the muffin tin. Fill each cup about 3/4 full to allow room for rising. Bake the muffins in your preheated oven for 18-20 minutes. Keep an eye on them as they bake. The eggs should set and turn a light golden color. To check for doneness, insert a toothpick into the center of a muffin. If it comes out clean, your muffins are ready. If not, give them a few more minutes. Once cooked, remove the muffin tin from the oven. Let it cool for a few minutes. This step makes it easier to remove the muffins. Gently lift them out and place on a plate. Now, you have delicious and healthy spinach egg muffins! Enjoy them warm, or store them for later. For the full recipe, refer to the [Full Recipe]. You can make your muffins unique with different veggies. Try adding mushrooms or zucchini for more flavor. You can also switch the cheese. Swap feta for cheddar or goat cheese. If you're a spice lover, add a pinch of red pepper flakes for heat. You can even use herbs like basil or thyme to change the taste. These tweaks let you enjoy different flavors each time you make them. Sautéing your veggies before adding them to the eggs brings out their taste. This step softens the onions and bell peppers, making them sweet. You can also roast your tomatoes for a smoky flavor. Adding garlic while you sauté gives a nice aroma and taste. If you want a richer flavor, try using butter instead of olive oil. These small changes make a big difference in how your muffins taste. These muffins taste great with many sides. Serve them with a fresh salad for a light meal. You can also pair them with avocado slices for creaminess. A dollop of salsa on top adds a nice kick. For breakfast, a side of fruit complements the savory muffins well. Try them with a cup of yogurt or a smoothie for a balanced start to your day. You can find the full recipe [here](#). {{image_2}} You can easily make these muffins vegetarian or add meat. For a meat option, try diced ham or cooked bacon. You can mix in turkey sausage for extra protein. If you stick to veggies, load up on more colorful peppers. Zucchini or mushrooms add a nice touch too. Both options taste great and keep your muffins full of flavor. To make these muffins gluten-free, focus on the ingredients. The recipe already uses no flour. Make sure to check that all your add-ins, like cheese or meat, are gluten-free. You can even swap feta for a dairy-free cheese if needed. These simple changes let everyone enjoy your tasty muffins. Get creative with flavors! Fresh herbs like basil, parsley, or thyme can brighten your muffins. If you want cheese, try cheddar or goat cheese for a twist. Spice lovers can add red pepper flakes or smoked paprika. Each combination offers a new taste adventure. Explore different flavors to find your favorite mix. For the full recipe, check the details provided earlier. To keep your healthy spinach egg muffins fresh, let them cool first. Once cool, place them in an airtight container. You can store them in the fridge for up to five days. If you want them to last longer, freezing is a great option. To reheat your muffins, use the microwave or oven. If using a microwave, place one muffin on a plate. Heat it for about 30 seconds. If you prefer the oven, preheat to 350°F (175°C). Place the muffins on a baking sheet and heat for about 10 minutes. This helps keep them moist and tasty. Freezing is simple. Wrap each muffin in plastic wrap. Then, place them in a freezer-safe bag. Label the bag with the date. They will stay good for up to three months. When ready to eat, thaw them in the fridge overnight before reheating. You can enjoy these muffins anytime! For the full recipe, check out the Healthy Spinach Egg Muffins. To make your Healthy Spinach Egg Muffins fluffier, whisk the eggs well. You can also add a splash of milk or cream. This helps to create air bubbles in the eggs. Baking powder is another option. Just a teaspoon can lift the muffins up. Make sure not to overmix your batter. This keeps the muffins light. Yes, you can use frozen spinach. Just thaw it and squeeze out excess water. This prevents your muffins from becoming soggy. Frozen spinach is a great time-saver. It’s also nutrient-rich, just like fresh spinach. However, fresh spinach gives a brighter color and texture. Both options work well, so choose what you prefer. Spinach is full of vitamins and minerals. It contains vitamin K, which helps with bone health. Spinach is also rich in antioxidants. These help fight free radicals in your body. Eggs are a great source of protein. They help build and repair tissues. They also contain choline, which supports brain health. Together, spinach and eggs make a nutritious meal. Enjoy them in your Healthy Spinach Egg Muffins! For the full recipe, check out the section above. These healthy spinach egg muffins are easy to make and full of flavor. We covered the ingredients, their benefits, and tasty substitutions. You learned step-by-step tips for perfect baking and how to check for doneness. We discussed ways to customize your muffins and shared storage tips for freshness. Remember, variations allow you to cater to different diets and preferences. These muffins are not just delicious; they are also nutritious. Enjoy making and sharing them with friends and family!](https://dailydishly.com/wp-content/uploads/2025/07/77bd2bbd-3206-4841-bb2c-177ed70e9b7b-768x768.webp)
