
Do you crave a meal that’s full of flavor yet easy to make? Look no further! My Chipotle Lime Shrimp Bowls combine juicy shrimp, zesty lime, and hearty grains for a dish that’s both satisfying and simple. With fresh ingredients and a hint of spice, you can create a vibrant bowl that pleases the whole family. Let’s dive into this tasty recipe and elevate your weeknight meals!
Why I Love This Recipe
- Bold Flavors: This recipe combines chipotle and lime for a zesty, smoky flavor that elevates the shrimp to new heights.
- Quick and Easy: With a total time of just 40 minutes, this dish is perfect for a weeknight meal or a quick lunch prep.
- Nutritional Powerhouse: The inclusion of quinoa, black beans, and corn makes this bowl not only delicious but also packed with nutrients.
- Customizable: You can easily adapt this recipe by adding your favorite vegetables or adjusting the spice level to suit your taste.
Ingredients
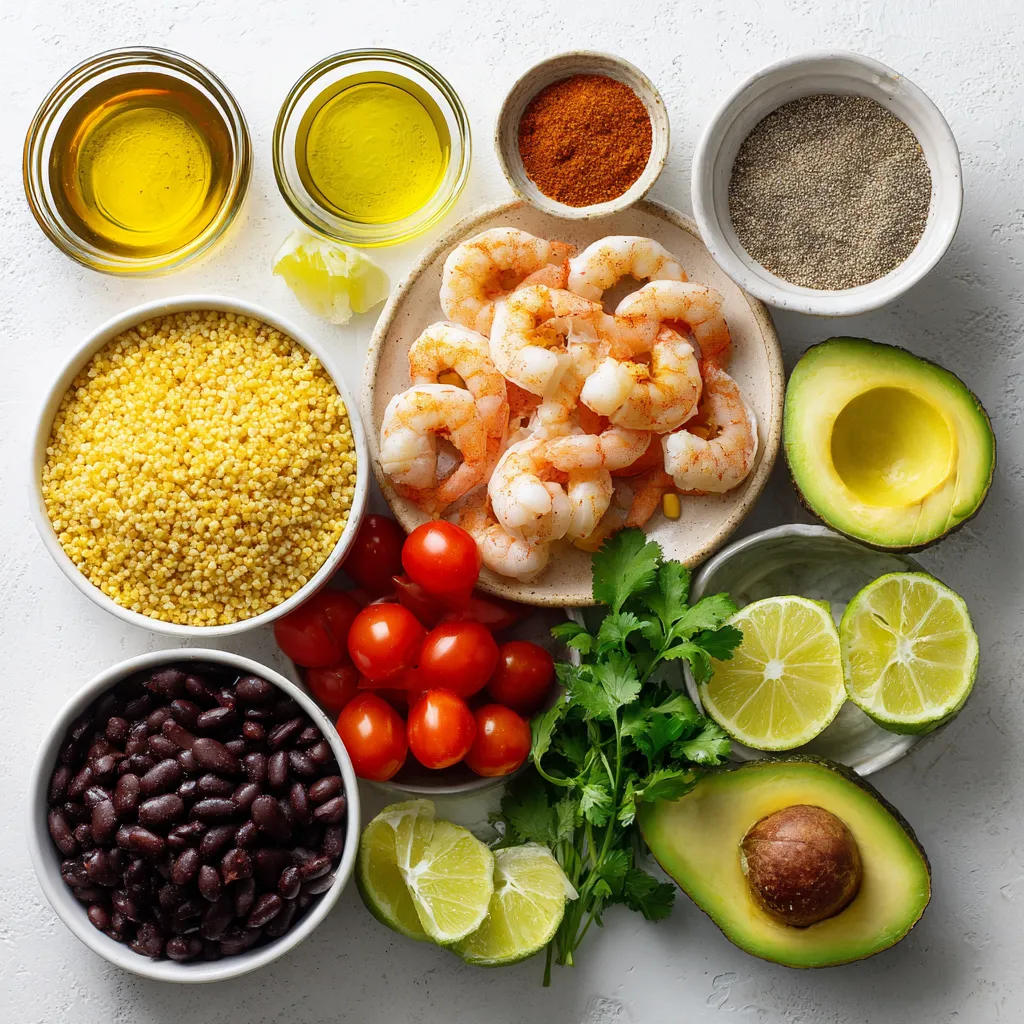
Main Ingredients
– 1 lb shrimp, peeled and deveined
– 2 tablespoons olive oil
– 2 tablespoons chipotle sauce (or 1-2 chipotle peppers in adobo, minced)
– Juice of 2 limes
– 2 cups quinoa (or rice)
– 1 cup corn (fresh, canned, or frozen)
– 1 cup black beans, rinsed and drained
– 1 ripe avocado, diced
– 1 cup cherry tomatoes, halved
– Fresh cilantro, chopped, for garnish
The main ingredients in this dish bring a mix of flavors and textures. Shrimp adds a tender protein, while quinoa or rice gives a nice base. Corn and black beans add sweetness and heartiness. The avocado adds creaminess, and cherry tomatoes bring freshness.
Spices and Seasonings
– 1 teaspoon garlic powder
– 1 teaspoon cumin
– Salt and pepper to taste
– Fresh lime juice
The spices and seasonings elevate the dish. Garlic powder and cumin add warmth. Lime juice adds brightness and a zesty kick. Balancing these flavors is key for an enjoyable meal.
Optional Garnishes
– Lime wedges for serving
– Additional cilantro for garnish
Garnishes make your bowl look appealing. Lime wedges add a burst of flavor. Extra cilantro enhances freshness and color. These simple touches can make a big difference in presentation and taste.
Step-by-Step Instructions
Preparing the Shrimp
First, you need to marinate the shrimp. In a mixing bowl, combine 1 pound of peeled shrimp with 2 tablespoons of olive oil, 2 tablespoons of chipotle sauce, the juice of 2 limes, 1 teaspoon of garlic powder, 1 teaspoon of cumin, salt, and pepper. Toss everything until the shrimp are well coated. Let them marinate for 15 to 20 minutes. This step adds great flavor to the shrimp.
Cooking the Quinoa or Rice
While the shrimp is marinating, you can cook the quinoa or rice. Start by boiling 4 cups of water in a medium saucepan. Once boiling, add 2 cups of quinoa or rice with a pinch of salt. Cover the pan and reduce the heat to low. Cook according to the package instructions—about 15 minutes for quinoa and 20 minutes for rice. This will provide a nice base for your bowl.
Cooking the Shrimp
Next, heat a skillet over medium-high heat. Add the marinated shrimp to the hot skillet. Cook them for about 2 to 3 minutes on each side until they turn pink and opaque. Be careful not to overcook them. Overcooked shrimp can become rubbery and tough. Remove them from heat as soon as they look perfect.
Warming Bowl Components
While the shrimp cooks, it’s time to warm the corn and black beans. In a small saucepan, add 1 cup of corn and 1 cup of rinsed black beans. Heat them over low heat, stirring occasionally until warmed through. This should take about 5 minutes. Warming these ingredients makes them more enjoyable in the bowl.
Assembling the Bowls
Now, let’s layer the ingredients in the bowl. Start with the cooked quinoa or rice at the bottom. Next, add a generous portion of black beans and corn. Top this with the chipotle lime shrimp, diced avocado, and halved cherry tomatoes. This colorful layering makes your bowl look great and appetizing.
Garnishing and Serving
For the final touch, sprinkle fresh cilantro over the top of the bowl. Add lime wedges on the side for an extra zesty kick. This not only adds flavor but also enhances the presentation. Serve your Chipotle Lime Shrimp Bowls warm and enjoy the burst of flavors!
Tips & Tricks
Perfecting the Shrimp
To make the shrimp shine, marinate them for 15 to 20 minutes. This time lets the flavors soak in well. If you marinate longer, the shrimp might get tough. When cooking, aim for 2 to 3 minutes on each side. The shrimp should turn pink and opaque. Be careful not to overcook them, or they will become rubbery.
Choosing the Right Grain
You can use either quinoa or rice in this dish. Quinoa has a nutty taste and a slightly chewy texture. Rice is soft and fluffy, which some may prefer. Quinoa packs more protein and fiber, making it a healthier choice. It also cooks faster than rice. Choose what fits your taste and health goals.
Customizing the Flavor
Want more heat? Add sliced jalapeños or a dash of hot sauce. You can also mix in fresh herbs like cilantro or parsley. For a twist, try using lemon or orange juice instead of lime. These changes can make the dish more exciting and unique. Experiment to find your favorite flavor combo!
Pro Tips
- Marination Matters: Ensure the shrimp are marinated for at least 15-20 minutes to absorb the flavors fully.
- Don’t Overcook Shrimp: Cook the shrimp just until they turn pink and opaque to maintain their juicy texture.
- Customize Your Grains: Feel free to use brown rice or cauliflower rice as a healthier alternative to quinoa or white rice.
- Fresh Ingredients Make a Difference: Use fresh herbs and ripe avocados for the best flavor and texture in your bowls.
Variations
Protein Alternatives
For a tasty twist, try using chicken instead of shrimp. Dice the chicken and marinate it just like you would with shrimp. Cook it in the skillet until it reaches a safe internal temperature of 165°F. You can also use firm tofu for a plant-based option. Press the tofu to remove excess water, then cube and marinate. Sauté it in the skillet until golden. If you prefer seafood, consider scallops or fish like tilapia. Adjust cooking times based on the protein you choose.
Vegetarian/Vegan Options
To make a vegetarian or vegan version, skip the shrimp. Replace it with hearty ingredients like chickpeas or jackfruit. For a similar texture, use marinated and grilled eggplant. You can also use tempeh for added protein. These substitutes pick up flavors well and keep the dish filling. Just remember to season them well.
Adding More Vegetables
Boost the nutrition and flavor by adding extra veggies. Bell peppers, zucchini, or even spinach work great. Just chop them up and sauté them with the shrimp or cook them separately. Seasonal vegetables like asparagus in spring or butternut squash in fall can also enhance your bowl. They add color and crunch, making your meal more vibrant. Try to mix in whatever veggies you have on hand for a unique taste!
Storage Info
Refrigeration Guidelines
To store leftovers, place them in an airtight container. Make sure to cool the food to room temperature first. Store in the fridge for up to three days. After that, the shrimp may lose flavor and texture.
Freezing Instructions
You can freeze the shrimp bowls either assembled or disassembled. If you freeze them assembled, leave out the avocado and cilantro. For disassembled bowls, pack the shrimp, grains, and veggies separately. Wrap tightly in freezer-safe bags or containers. Use within three months for the best taste.
When you’re ready to eat, thaw your bowl in the fridge overnight. If you need it faster, you can run cold water over the sealed bag.
Reheating Recommendations
For reheating, the best method is to use a skillet over medium heat. This keeps the shrimp juicy and the grains warm. Stir gently to avoid overcooking. If using a microwave, cover the bowl with a damp paper towel. Heat in short bursts, stirring in between, until warm. This helps keep the shrimp from getting rubbery.
FAQs
How long can I marinate the shrimp?
You can marinate shrimp for 15 to 20 minutes. This time lets the flavors mix well. Do not marinate shrimp for longer than 30 minutes. The acid from the lime juice can change the shrimp’s texture.
Can I use frozen shrimp for this recipe?
Yes, you can use frozen shrimp. First, thaw them in the fridge overnight. If you need them fast, run them under cold water. Make sure to pat them dry before marinating. This helps the shrimp soak up flavors better.
What can I substitute for chipotle sauce?
You can use sriracha or harissa as a chipotle sauce substitute. Both add heat but have different flavors. Sriracha is a bit sweeter, while harissa offers a smoky taste. Adjust the amount based on your spice level.
Is this recipe gluten-free?
Yes, this recipe is gluten-free. Quinoa and rice do not contain gluten. Just check any canned beans or sauces for gluten. Most black beans are safe, but it’s good to read labels.
How can I make this recipe spicier?
To add more heat, you can use extra chipotle sauce. Adding diced jalapeños is another great choice. For an extra kick, sprinkle some cayenne pepper over the shrimp before cooking. Enjoy your spicy bowl!
This article covers everything you need to know about making shrimp bowls. We explored main ingredients like shrimp, quinoa, and spices that bring flavor. I shared easy steps from preparing shrimp to assembling your bowl, plus handy tips to perfect your dish. You can adapt the recipe with different proteins or veggies, and I discussed storage for leftovers.
Now, it’s your turn to create your own delicious version. Enjoy this healthy meal with family and friend


