Chocolate Chip Cookie Dough Dip Irresistibly Delicious
. 1. In a mixing bowl, combine softened butter, brown sugar, and granulated sugar. 2. Beat this mixture until it is creamy and smooth. 3. Next, add the cream cheese and vanilla extract. 4. Continue to beat until the mix is fluffy and well combined. 5. Now, sift in the all-purpose flour and a pinch of salt. 6. Mix on low speed or gently by hand until just combined. 1. Fold in the mini chocolate chips and optional nuts if you like. 2. Make sure they are evenly mixed in the dip. 3. Transfer the dip to a serving bowl. 4. Cover it with plastic wrap and chill in the fridge. 1. Serve the dip after it has chilled for at least 30 minutes. 2. Pair it with graham crackers, pretzels, or apple slices for dipping. This simple process gives you a great treat to enjoy. For the full details, check the Full Recipe. - Ensure all ingredients are at room temperature. This helps them blend well. - Chill time enhances flavor. Let it sit for at least 30 minutes. - Skipping the chilling step can lead to a dip that's too soft. - Overmixing the batter makes it tough. Mix just until combined. - Experiment with flavored extracts like almond or hazelnut. A little goes a long way. - Adjust sweetness by varying sugar amounts. Taste as you go for the best balance. With these tips, you’ll create a dip that everyone will love! For the complete method, check the Full Recipe. {{image_2}} You can switch up the flavors to keep things fun. For a peanut butter twist, mix in ½ cup of creamy peanut butter. This adds a nutty taste that pairs great with chocolate. If you crave a coffee kick, try a mocha chocolate chip dip. Just add 1 tablespoon of instant coffee to the mix. The coffee brings a rich depth that coffee lovers will adore. If you need gluten-free options, use 1 cup of gluten-free flour. This swap works perfectly and keeps the dip tasty. For those avoiding dairy, choose a dairy-free cream cheese. Brands like Tofutti or Kite Hill offer great alternatives. They keep the creamy texture while being dairy-free. Make your dip festive with holiday-themed sprinkles. These colorful touches can brighten any dessert table. In summer, try adding dried fruit, like cranberries or apricots. This gives your dip a juicy burst and a fun twist. You can mix and match these ideas to find your favorite combo. For the full recipe, click [Full Recipe]. To keep your chocolate chip cookie dough dip fresh, store it in an airtight container. This helps prevent it from drying out. You can use any clean, sealable bowl or jar. Make sure the lid fits tight. For best results, place the dip in the fridge. This will keep it cool and tasty. The dip stays fresh for about 5 days in the fridge. After that, it may lose flavor or texture. Check for signs of spoilage. If it smells off or has a strange color, it's best to toss it. Always trust your senses when it comes to food safety. You can freeze this dip for later use. To do this, place it in a freezer-safe container. Leave some space at the top, as it will expand. When you want to enjoy it again, simply move it to the fridge to thaw overnight. This way, it stays creamy and delicious. Enjoy your dip with graham crackers, pretzels, or apple slices after thawing! You can swap the cream cheese for Greek yogurt or whipped silken tofu. Both options work well. Greek yogurt adds a nice tang, while silken tofu keeps it smooth. Make sure to choose plain yogurt. This change makes the dip lighter and still tasty. Yes, you can make this dip up to 2 days in advance. Just keep it in the fridge. This helps the flavors blend well. When you are ready to serve, just take it out and let it sit for a bit. Then, enjoy it with your favorite dippers. You have many options beyond graham crackers. Try cookies, fresh fruits, or pretzels. Each choice adds a fun crunch or sweetness. Apples and strawberries are great for a refreshing contrast. Have fun mixing and matching to find your favorite pairings! This blog post covered how to make a delightful chocolate chip cookie dough dip. You learned about essential ingredients like cream cheese, sugars, and mini chocolate chips. I shared tips for the best results and common mistakes to avoid. You also discovered flavor variations and storage tips. In my experience, this dip is fun and easy. It works well for gatherings or just a tasty snack. Enjoy trying out different dippers and flavors!](https://dailydishly.com/wp-content/uploads/2025/07/9841c43c-25b7-4553-9f85-c4e222a26afc.webp)
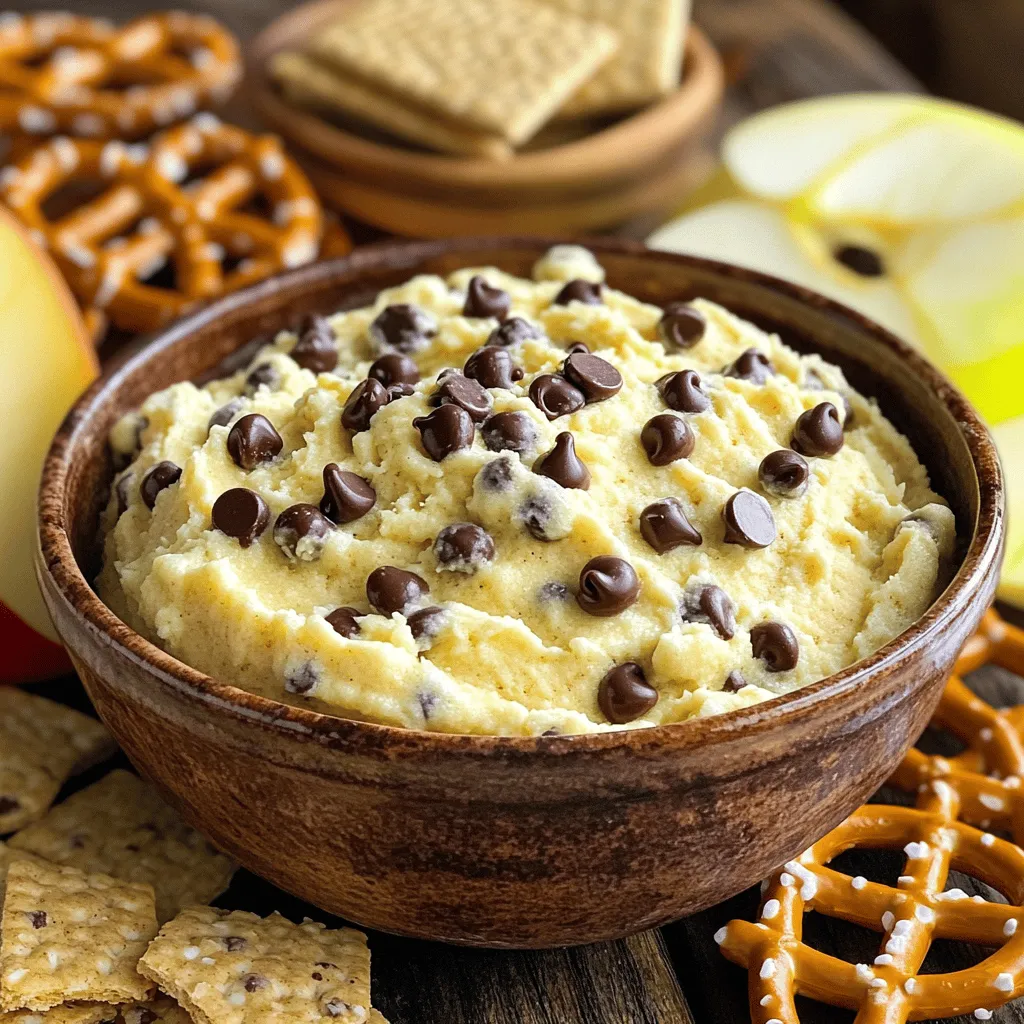
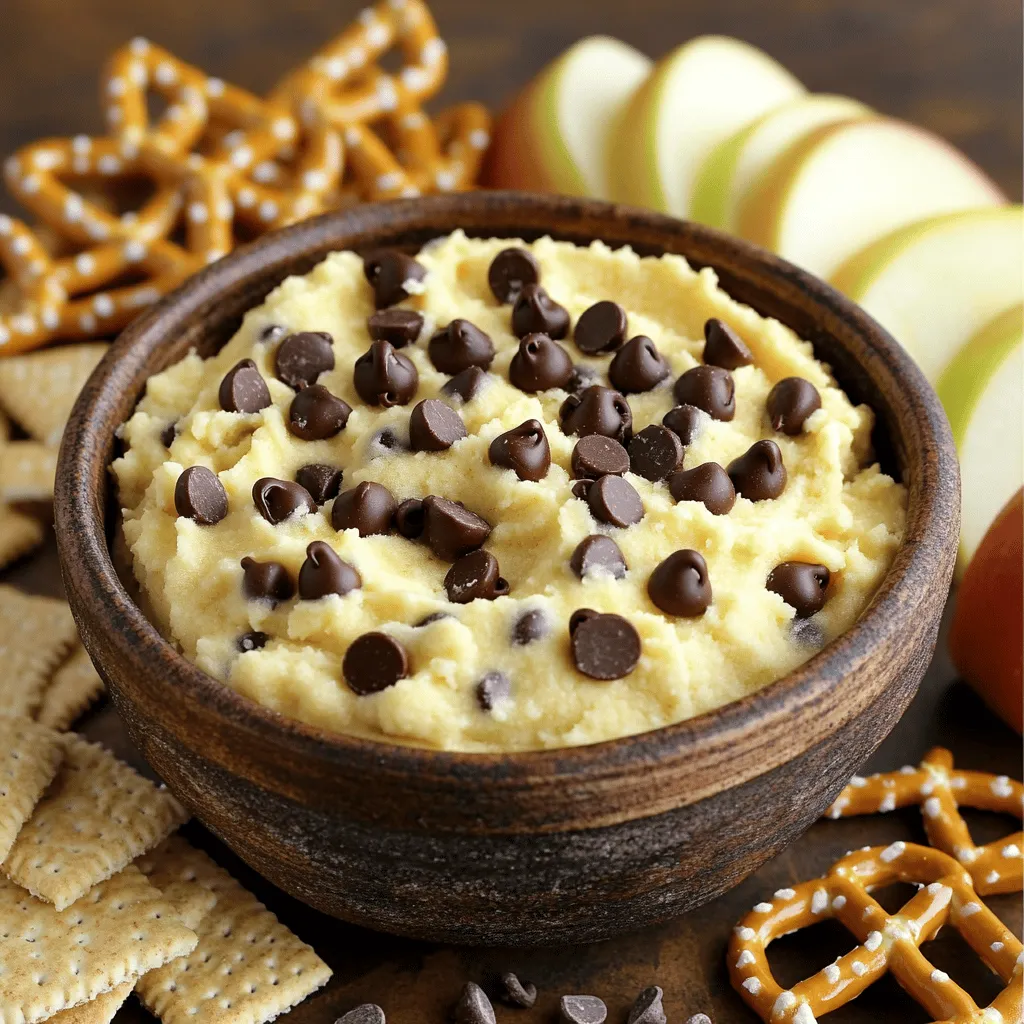
Get ready to indulge in a sweet treat like no other! This Chocolate Chip Cookie Dough Dip is an irresistible blend of creamy goodness and chocolatey delight. Perfect for parties or a cozy night in, it’s quick to make and pairs well with graham crackers, pretzels, or even apple slices. Follow me as I share this easy recipe, tips, and fun variations to make it your own!
Ingredients
Main Ingredients List
– 1 cup all-purpose flour
– ½ cup brown sugar, packed
– ½ cup granulated sugar
– ½ cup unsalted butter, softened
– 1 teaspoon vanilla extract
– 1 cup cream cheese, softened
– 1 cup mini chocolate chips
– Pinch of salt
– Optional: ½ cup chopped nuts (walnuts or pecans)
When I make Chocolate Chip Cookie Dough Dip, I love using these simple ingredients. The flour gives it that classic cookie dough texture. Brown sugar adds a deep, rich flavor, while granulated sugar adds sweetness. Softened unsalted butter makes everything creamy and smooth. Vanilla extract brings warmth and aroma that ties it all together.
Cream cheese is key here; it gives the dip its rich, creamy base. Mini chocolate chips add bursts of chocolate in every bite. If you want a little crunch, adding chopped nuts like walnuts or pecans is a great choice. The pinch of salt balances the sweetness and enhances the flavors.
Serving Options
– Graham crackers
– Pretzels
– Apple slices
Now, let’s talk about serving options. I find that graham crackers work great for dipping. They are sweet and crunchy, making them perfect for this dip. Pretzels add a salty twist that pairs well with the sweet dip. For something fresh, try apple slices. They add a nice crunch and a hint of tartness, which balances the sweetness of the dip. Each option makes eating this dip even more fun!
Step-by-Step Instructions
Preparation Steps
1. In a mixing bowl, combine softened butter, brown sugar, and granulated sugar.
2. Beat this mixture until it is creamy and smooth.
3. Next, add the cream cheese and vanilla extract.
4. Continue to beat until the mix is fluffy and well combined.
5. Now, sift in the all-purpose flour and a pinch of salt.
6. Mix on low speed or gently by hand until just combined.
Final Mixing
1. Fold in the mini chocolate chips and optional nuts if you like.
2. Make sure they are evenly mixed in the dip.
3. Transfer the dip to a serving bowl.
4. Cover it with plastic wrap and chill in the fridge.
Serving Suggestions
1. Serve the dip after it has chilled for at least 30 minutes.
2. Pair it with graham crackers, pretzels, or apple slices for dipping.
This simple process gives you a great treat to enjoy.
Tips & Tricks
Tips for Best Results
– Ensure all ingredients are at room temperature. This helps them blend well.
– Chill time enhances flavor. Let it sit for at least 30 minutes.
Common Mistakes to Avoid
– Skipping the chilling step can lead to a dip that’s too soft.
– Overmixing the batter makes it tough. Mix just until combined.
Enhancing Flavor
– Experiment with flavored extracts like almond or hazelnut. A little goes a long way.
– Adjust sweetness by varying sugar amounts. Taste as you go for the best balance.
With these tips, you’ll create a dip that everyone will love!

Variations
Flavor Variations
You can switch up the flavors to keep things fun. For a peanut butter twist, mix in ½ cup of creamy peanut butter. This adds a nutty taste that pairs great with chocolate. If you crave a coffee kick, try a mocha chocolate chip dip. Just add 1 tablespoon of instant coffee to the mix. The coffee brings a rich depth that coffee lovers will adore.
Dietary Substitutions
If you need gluten-free options, use 1 cup of gluten-free flour. This swap works perfectly and keeps the dip tasty. For those avoiding dairy, choose a dairy-free cream cheese. Brands like Tofutti or Kite Hill offer great alternatives. They keep the creamy texture while being dairy-free.
Seasonal Add-ins
Make your dip festive with holiday-themed sprinkles. These colorful touches can brighten any dessert table. In summer, try adding dried fruit, like cranberries or apricots. This gives your dip a juicy burst and a fun twist. You can mix and match these ideas to find your favorite combo.
Storage Info
How to Store
To keep your chocolate chip cookie dough dip fresh, store it in an airtight container. This helps prevent it from drying out. You can use any clean, sealable bowl or jar. Make sure the lid fits tight. For best results, place the dip in the fridge. This will keep it cool and tasty.
Shelf Life
The dip stays fresh for about 5 days in the fridge. After that, it may lose flavor or texture. Check for signs of spoilage. If it smells off or has a strange color, it’s best to toss it. Always trust your senses when it comes to food safety.
Freezing Options
You can freeze this dip for later use. To do this, place it in a freezer-safe container. Leave some space at the top, as it will expand. When you want to enjoy it again, simply move it to the fridge to thaw overnight. This way, it stays creamy and delicious. Enjoy your dip with graham crackers, pretzels, or apple slices after thawing!
FAQs
How do I make chocolate chip cookie dough dip without cream cheese?
You can swap the cream cheese for Greek yogurt or whipped silken tofu. Both options work well. Greek yogurt adds a nice tang, while silken tofu keeps it smooth. Make sure to choose plain yogurt. This change makes the dip lighter and still tasty.
Can I prepare this dip ahead of time?
Yes, you can make this dip up to 2 days in advance. Just keep it in the fridge. This helps the flavors blend well. When you are ready to serve, just take it out and let it sit for a bit. Then, enjoy it with your favorite dippers.
What can I serve with chocolate chip cookie dough dip?
You have many options beyond graham crackers. Try cookies, fresh fruits, or pretzels. Each choice adds a fun crunch or sweetness. Apples and strawberries are great for a refreshing contrast. Have fun mixing and matching to find your favorite pairings!
This blog post covered how to make a delightful chocolate chip cookie dough dip. You learned about essential ingredients like cream cheese, sugars, and mini chocolate chips. I shared tips for the best results and common mistakes to avoid. You also discovered flavor variations and storage tips.
In my experience, this dip is fun and easy. It works well for gatherings or just a tasty snack. Enjoy trying out different dippers and flavors!
. 1. In a mixing bowl, combine softened butter, brown sugar, and granulated sugar. 2. Beat this mixture until it is creamy and smooth. 3. Next, add the cream cheese and vanilla extract. 4. Continue to beat until the mix is fluffy and well combined. 5. Now, sift in the all-purpose flour and a pinch of salt. 6. Mix on low speed or gently by hand until just combined. 1. Fold in the mini chocolate chips and optional nuts if you like. 2. Make sure they are evenly mixed in the dip. 3. Transfer the dip to a serving bowl. 4. Cover it with plastic wrap and chill in the fridge. 1. Serve the dip after it has chilled for at least 30 minutes. 2. Pair it with graham crackers, pretzels, or apple slices for dipping. This simple process gives you a great treat to enjoy. For the full details, check the Full Recipe. - Ensure all ingredients are at room temperature. This helps them blend well. - Chill time enhances flavor. Let it sit for at least 30 minutes. - Skipping the chilling step can lead to a dip that's too soft. - Overmixing the batter makes it tough. Mix just until combined. - Experiment with flavored extracts like almond or hazelnut. A little goes a long way. - Adjust sweetness by varying sugar amounts. Taste as you go for the best balance. With these tips, you’ll create a dip that everyone will love! For the complete method, check the Full Recipe. {{image_2}} You can switch up the flavors to keep things fun. For a peanut butter twist, mix in ½ cup of creamy peanut butter. This adds a nutty taste that pairs great with chocolate. If you crave a coffee kick, try a mocha chocolate chip dip. Just add 1 tablespoon of instant coffee to the mix. The coffee brings a rich depth that coffee lovers will adore. If you need gluten-free options, use 1 cup of gluten-free flour. This swap works perfectly and keeps the dip tasty. For those avoiding dairy, choose a dairy-free cream cheese. Brands like Tofutti or Kite Hill offer great alternatives. They keep the creamy texture while being dairy-free. Make your dip festive with holiday-themed sprinkles. These colorful touches can brighten any dessert table. In summer, try adding dried fruit, like cranberries or apricots. This gives your dip a juicy burst and a fun twist. You can mix and match these ideas to find your favorite combo. For the full recipe, click [Full Recipe]. To keep your chocolate chip cookie dough dip fresh, store it in an airtight container. This helps prevent it from drying out. You can use any clean, sealable bowl or jar. Make sure the lid fits tight. For best results, place the dip in the fridge. This will keep it cool and tasty. The dip stays fresh for about 5 days in the fridge. After that, it may lose flavor or texture. Check for signs of spoilage. If it smells off or has a strange color, it's best to toss it. Always trust your senses when it comes to food safety. You can freeze this dip for later use. To do this, place it in a freezer-safe container. Leave some space at the top, as it will expand. When you want to enjoy it again, simply move it to the fridge to thaw overnight. This way, it stays creamy and delicious. Enjoy your dip with graham crackers, pretzels, or apple slices after thawing! You can swap the cream cheese for Greek yogurt or whipped silken tofu. Both options work well. Greek yogurt adds a nice tang, while silken tofu keeps it smooth. Make sure to choose plain yogurt. This change makes the dip lighter and still tasty. Yes, you can make this dip up to 2 days in advance. Just keep it in the fridge. This helps the flavors blend well. When you are ready to serve, just take it out and let it sit for a bit. Then, enjoy it with your favorite dippers. You have many options beyond graham crackers. Try cookies, fresh fruits, or pretzels. Each choice adds a fun crunch or sweetness. Apples and strawberries are great for a refreshing contrast. Have fun mixing and matching to find your favorite pairings! This blog post covered how to make a delightful chocolate chip cookie dough dip. You learned about essential ingredients like cream cheese, sugars, and mini chocolate chips. I shared tips for the best results and common mistakes to avoid. You also discovered flavor variations and storage tips. In my experience, this dip is fun and easy. It works well for gatherings or just a tasty snack. Enjoy trying out different dippers and flavors!](https://dailydishly.com/wp-content/uploads/2025/07/9841c43c-25b7-4553-9f85-c4e222a26afc-300x300.webp)


![- 1 ½ cups all-purpose flour - 1 teaspoon baking powder - ½ teaspoon baking soda - ¼ teaspoon salt - ½ cup unsalted butter, softened - 1 cup granulated sugar - 2 large eggs - ½ cup plain yogurt - 2 tablespoons lemon zest (from about 2 lemons) - ¼ cup fresh lemon juice - 3 tablespoons poppy seeds - Optional: Glaze made from ½ cup powdered sugar and 2 tablespoons lemon juice When making Lemon Poppy Seed Bread, I find that using fresh ingredients makes the biggest difference. Fresh lemons give your bread a bright flavor. You want ripe lemons for zest and juice. Look for lemons that feel heavy for their size and have a smooth skin. These lemons are juicy and full of flavor. For yogurt, I prefer plain yogurt. It adds moisture and a slight tang. Greek yogurt works well too, but regular plain yogurt keeps the texture light. If you want to switch things up, consider using sour cream instead. It can give your bread a rich flavor. - Selecting ripe lemons for zest and juice: Look for heavy, smooth-skinned lemons. - The best type of yogurt to use: Use plain yogurt or sour cream for moisture. If you need gluten-free options, try using a gluten-free flour blend. Mix it with a bit of xanthan gum for texture. For a vegan version, substitute unsalted butter with coconut oil or a vegan butter. You can replace eggs with a mashed banana or unsweetened applesauce. This will still keep the bread moist and tasty. Let’s make cooking easier and more fun with these simple tips! If you want to dive deeper into the recipe, check out the Full Recipe for all the steps. 1. Preheat your oven to 350°F (175°C). Grease and flour a 9x5 inch loaf pan. This step helps the bread rise well and not stick. 2. In a medium bowl, whisk together the dry ingredients: flour, baking powder, baking soda, and salt. Set this mix aside for later. 3. In a large bowl, cream the softened butter and granulated sugar together. Use an electric mixer on medium speed for about 3 to 4 minutes. This makes the mixture light and fluffy. 4. Add the eggs one at a time, mixing well after each. This helps to blend everything smoothly. 5. Stir in the yogurt, lemon zest, and lemon juice until fully mixed. Each ingredient adds a burst of flavor to the bread. 6. Gradually add the dry ingredients to the wet mixture. Stir gently until just combined. Do not overmix; this keeps the bread soft. 7. Fold in the poppy seeds, being careful not to overmix again. They add a nice crunch and visual appeal. 1. Pour the batter into the prepared loaf pan. Smooth out the top with a spatula to ensure even baking. 2. Bake in the oven for about 55 to 60 minutes. Check if it's done by inserting a toothpick into the center. If it comes out clean, your bread is ready! 1. Let the bread cool in the pan for about 10 minutes. This makes it easier to remove without breaking. 2. Transfer it to a wire rack to cool completely. This prevents sogginess and keeps the crust nice. 3. Slice the bread and serve it on a platter. If you like, drizzle the optional glaze over the top. Garnish with thin lemon slices and a sprinkle of poppy seeds for a beautiful finish. For the complete recipe, refer to the [Full Recipe]. Enjoy your baking! To bake the best Lemon Poppy Seed Bread, avoid common mistakes. First, do not skip the baking powder or baking soda. They help the bread rise and stay fluffy. Mix the dry and wet ingredients gently. Overmixing can make the bread tough. Make sure your butter is softened, not melted. This helps create the right texture. A beautiful presentation makes your bread shine. Slice the bread and arrange it on a nice platter. Drizzle a glaze on top for extra flair. You can make the glaze by mixing powdered sugar and lemon juice. Garnish with thin lemon slices and a sprinkle of poppy seeds. This adds color and makes it look fancy. Want a stronger lemon flavor? Use lemon extract in addition to fresh juice. This boosts the citrus taste. You can also add mix-ins like chopped nuts or dried fruit. These add texture and flavor. Feel free to explore your own ideas to customize your bread! For the full recipe, check out the complete guide. {{image_2}} To make gluten-free lemon poppy seed bread, start with a good flour blend. Look for blends that contain rice flour, almond flour, or tapioca starch. These work well in most recipes. You may need to adjust the liquid in your recipe. Gluten-free flours often absorb more moisture. So, add a little extra yogurt or lemon juice if needed. For a vegan version, swap out the eggs and butter. Use flaxseed meal mixed with water as an egg substitute. One tablespoon of flaxseed meal mixed with three tablespoons of water equals one egg. For butter, use coconut oil or a vegan alternative. This keeps your bread moist and tasty. To maintain the batter's texture, ensure you mix well, so it remains light and fluffy. You can add nuts or dried fruits for extra flavor. Walnuts or almonds give a nice crunch. Dried cranberries or blueberries add sweetness. If you want more citrus, try adding orange or lime zest. This will brighten the flavor of the bread. You can even mix different citrus fruits for a unique twist. Don't hesitate to experiment, and see what flavors you love best! To keep your Lemon Poppy Seed Bread fresh, you have two main options: room temperature and refrigeration. Storing it at room temperature is best if you plan to eat it within a few days. Place the bread in an airtight container. This keeps it soft and moist. If you want to store it longer, refrigeration works too. Just know that it may dry out a bit. Using airtight containers is key. They block air and moisture. This helps prevent your bread from going stale. If you choose to refrigerate it, wrap the bread tightly in plastic wrap first. Then, place it in the container. This double layer helps keep the bread fresh. Freezing is a great way to save your Lemon Poppy Seed Bread for later. To freeze it, let the bread cool completely first. Once cool, slice it into pieces if you prefer. Wrap each slice in plastic wrap. Then, place the wrapped slices in a freezer-safe bag or container. This method saves space and makes it easy to grab a slice when you want one. When you’re ready to enjoy it, thaw the bread in the fridge overnight. If you want it warm, you can reheat it in the oven. Preheat the oven to 350°F (175°C) and bake for about 10 to 15 minutes. This brings back its fresh-from-the-oven taste. For optimal flavor and freshness, Lemon Poppy Seed Bread lasts about 3 to 4 days at room temperature. If refrigerated, it can last up to a week. However, freezing extends its shelf life to about 2 to 3 months. Keep an eye out for signs of spoilage. If you see mold or if the bread smells off, it's time to toss it. Freshness is key to enjoying this delightful bread. Always trust your senses! Lemon poppy seed bread stays fresh for about 3 to 5 days at room temperature. To keep it fresh longer, store it in an airtight container. You can also wrap it tightly in plastic wrap or foil. This helps block out air and moisture. If you want to enjoy it later, freeze it for up to three months. Yes, you can make this bread ahead of time. Bake it and let it cool completely. Then, wrap it tightly and store it in the fridge for up to a week. For longer storage, freeze it. Just remember to slice it before freezing. This makes it easy to grab a slice whenever you want. Lemon poppy seed bread pairs well with many items. For breakfast, try it with fresh fruit or yogurt. You can also enjoy it with coffee or tea. For dessert, a scoop of vanilla ice cream or a dollop of whipped cream adds a nice touch. You can even drizzle some honey or jam on top for extra flavor. Absolutely! To make mini loaves, use small loaf pans. Adjust the baking time to about 30 to 40 minutes. Check for doneness with a toothpick. It should come out clean when the bread is done. This way, you can share or gift smaller portions easily. In this blog post, we've covered everything about Lemon Poppy Seed Bread. You learned the full list of ingredients and tips for choosing fresh ones. You also found step-by-step instructions for baking, plus tips and tricks for perfect results. Variations like gluten-free and vegan options were discussed, along with storage tips to keep your bread fresh. Enjoy making this tasty loaf that gives you bright flavors. With these ideas, you can bake with confidence and impress anyone who tries your bread. Happy baking!](https://dailydishly.com/wp-content/uploads/2025/06/d333cd57-b5c0-4704-bdd2-e8fc2d1dc8a6-768x768.webp)
![- 1 cup all-purpose flour - 1/2 cup granulated sugar - 2 teaspoons baking powder - 1/2 teaspoon salt - 1 teaspoon ground cinnamon (for the batter) - 1/2 teaspoon vanilla extract - 1 large egg - 1/2 cup milk - 2 tablespoons melted butter - 1/4 cup granulated sugar - 1 tablespoon ground cinnamon - 2 tablespoons unsalted butter, melted (for coating) Making homemade cinnamon sugar donuts is fun and simple. You will need a few key ingredients. First, gather your main ingredients: flour, sugar, baking powder, and salt. These form the base of your donuts. The flour gives structure, while sugar adds sweetness. Baking powder helps them rise, and salt balances flavors. Next, you’ll want flavor enhancers. Ground cinnamon in the batter gives that warm spice taste. Vanilla extract adds depth. A large egg binds everything together, while milk keeps your donuts moist. The melted butter adds richness, making every bite a treat. Finally, for the cinnamon sugar coating, mix granulated sugar and ground cinnamon. This sweet mix will cover your donuts and bring them to life. Use melted butter to help the sugar stick. For the full recipe, you can refer to the [Full Recipe]. Now, let’s get ready to whip up these irresistible delights! - Preheat your oven to 350°F (175°C) and lightly grease a donut pan. - In a large mixing bowl, whisk together dry ingredients: flour, sugar, baking powder, salt, and cinnamon. - In another bowl, combine egg, milk, melted butter, and vanilla until well blended. - Gently combine wet and dry ingredients without overmixing. - Fill each donut mold about 2/3 full with batter. - Bake for 10-12 minutes until golden and a toothpick comes out clean. You can find the Full Recipe to get all the details and tips you need! To get the best donuts, make sure your wet and dry ingredients are at room temperature. This helps them mix well and creates a smooth batter. Remember, don’t overmix the batter! Overmixing can lead to tough donuts that lack the softness we love. When baking, use a toothpick to check if the donuts are done. Insert the toothpick in the center; it should come out clean. This simple trick ensures your donuts are perfectly baked. Let the donuts cool for a few minutes before coating them. This helps the cinnamon sugar stick better, making them even more delicious. Want to add a little twist? Try adding nutmeg or a splash of vanilla extract to the batter. These small changes can create new flavors that surprise your taste buds! If you prefer deep-frying, feel free to experiment with different oils. Each oil can give your donuts a unique taste and texture. For the full recipe, check out the details above and enjoy making these treats! {{image_2}} When it comes to homemade cinnamon sugar donuts, the fun doesn't stop with the basics. You can play around with flavors, fillings, and toppings to make them truly your own. - Chocolate-Dipped Cinnamon Sugar Donuts For a sweet twist, dip your cooled donuts in melted chocolate. This adds a rich layer that pairs well with the cinnamon sugar. Just melt some chocolate and dip half of each donut. Let the chocolate set before serving. - Pumpkin Spice Cinnamon Sugar Donuts To celebrate fall, mix in some pumpkin puree and pumpkin spice into your batter. This gives a cozy flavor that everyone loves. You can add a bit more cinnamon for that extra kick! - Cream-filled options: Custard, chocolate, or fruit jam make tasty fillings. After baking, you can inject these fillings using a piping bag. Just poke a hole in the donut and fill it up. Each bite will surprise you with sweetness! - Savory versions with cheese or herbs offer a unique twist. Think of using cream cheese or even a sprinkle of herbs for a different flavor. These donuts can be great for brunch. - Glazed options with chocolate or vanilla icing add a beautiful shine. Just melt some icing sugar with a splash of milk, dip the donuts, and let them dry. This adds a sweet touch. - Use powdered sugar or toasted nuts for added texture. A light dusting of powdered sugar can make your donuts look fancy. Toasted nuts will add crunch and flavor. Feel free to experiment with these variations to find the perfect donut for you. Remember, the full recipe will guide you through every step! Store your cinnamon sugar donuts in an airtight container at room temperature. They stay fresh for up to 2 days. If you want them to last longer, place them in the fridge. They can stay good for up to a week that way. If you want to save donuts for later, freeze them uncoated. They can last up to 2 months in the freezer. When you are ready to eat them, thaw the donuts at room temperature. This will keep them tasting fresh. To enjoy warm donuts, warm them in the oven at a low temperature. A few minutes should do the trick. Avoid microwaving them, as this can make them soggy. You want to keep that perfect texture for a delightful bite. For the full recipe, check out the delightful cinnamon sugar donuts section! Yes, you can use a baking sheet to bake them as "cinnamon sugar muffins." Just pour the batter into muffin cups. This method gives you a similar taste and texture. Adjust the baking time to about 15-18 minutes. Always check with a toothpick to ensure they’re done. Substitute whole wheat flour or reduce sugar in the recipe. Whole wheat flour adds fiber and nutrients. You can also use less sugar for a lighter treat. Consider using natural sweeteners like honey or maple syrup. These changes can make your donuts a bit healthier without losing flavor. Almond or oat milk work well as dairy alternatives. These options provide similar moisture and richness. Almond milk has a mild nutty flavor, while oat milk is creamier. Both can be used in equal amounts as a milk substitute in the recipe. Look for a golden-brown color and use a toothpick test for doneness. Insert a toothpick into the center of a donut. If it comes out clean, your donuts are ready. If it has batter on it, bake them a few more minutes. This simple test helps ensure perfectly baked donuts every time. You now have a complete guide to making delicious cinnamon sugar donuts. The main ingredients bring sweetness, while the preparation steps ensure the perfect bake. Remember to experiment with flavors and toppings to make them your own. Store them properly for freshness, and enjoy them warm for the best taste. Donuts can be fun and easy to create at home. Try out this recipe today and share your results!](https://dailydishly.com/wp-content/uploads/2025/06/b4007b44-caf0-426e-8ec6-b6c4a5f754ff-768x768.webp)
