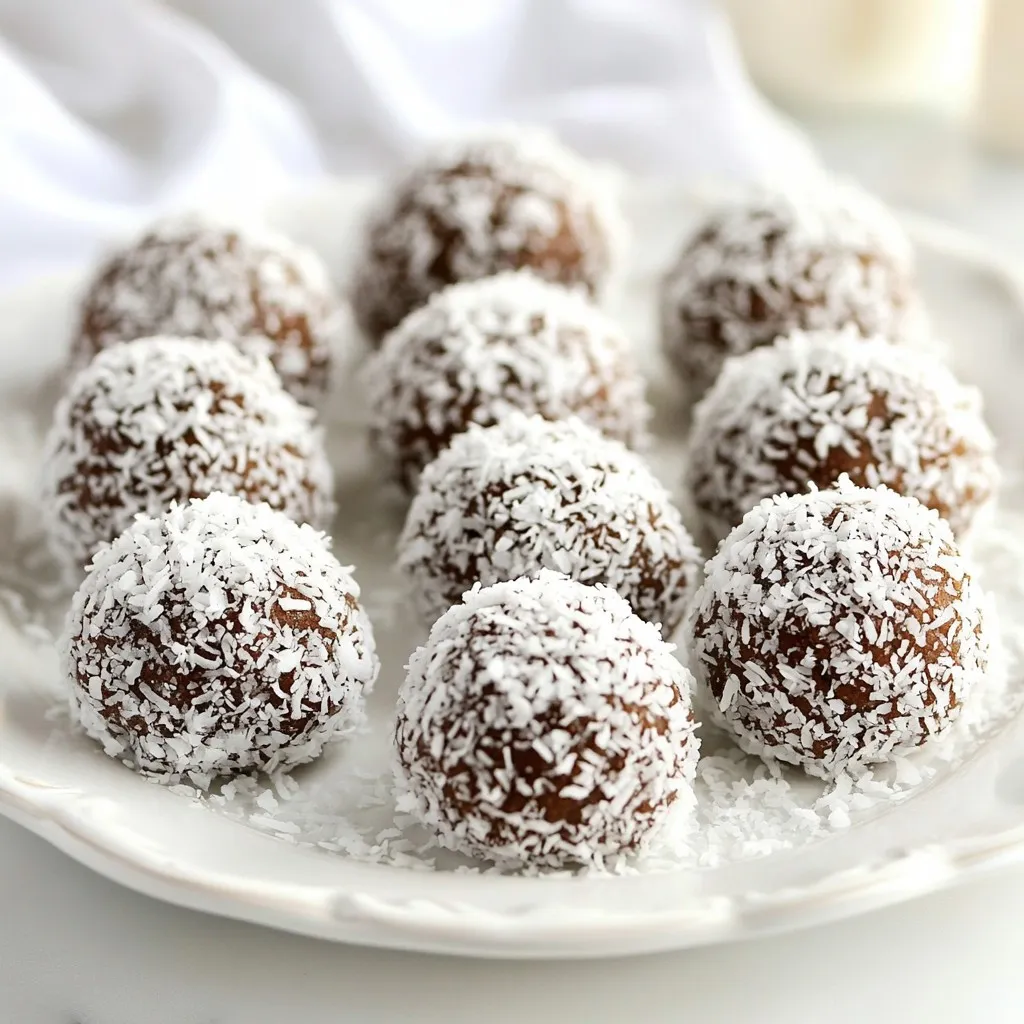
Get ready to indulge in a sweet delight with these Chocolate Coconut Snowball Cookies! These treats combine rich cocoa and sweet coconut, giving you a taste sensation in every bite. Plus, I will guide you through simple steps to create this delightful snack. Whether you want a treat for yourself or a crowd-pleasing dessert, these cookies are sure to impress. Let’s dive into the ingredients and start baking!
Why I Love This Recipe
- Delicious Combination: The rich chocolate flavor paired with the sweet coconut creates a delightful treat that satisfies every sweet tooth.
- Easy to Make: With just a few simple ingredients and quick steps, you can whip up these cookies in no time!
- Healthy Treat: Made with wholesome ingredients like almond flour and maple syrup, these cookies are a guilt-free indulgence.
- Perfect for Sharing: These cookies make a great addition to any holiday gathering, and they’re sure to impress your friends and family.
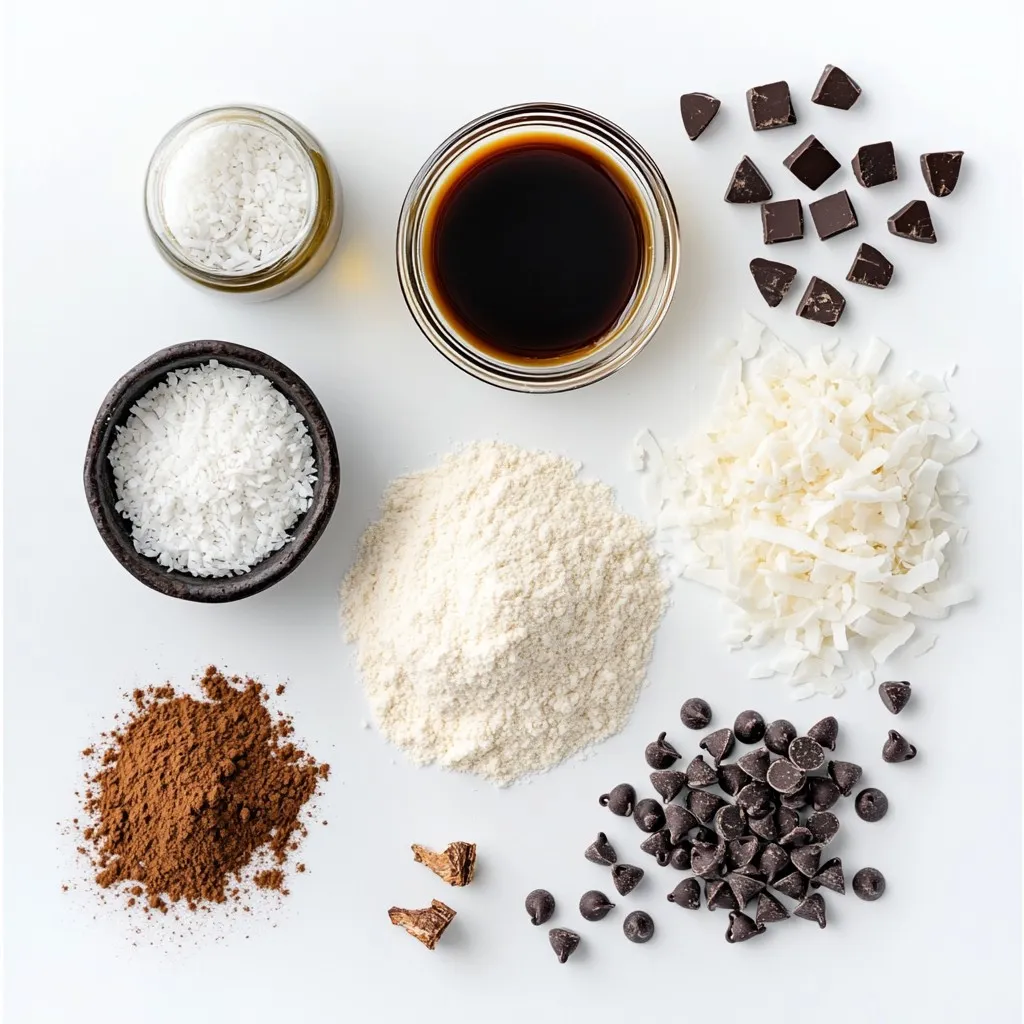
Ingredients
To make Chocolate Coconut Snowball Cookies, you need simple, wholesome ingredients. Here’s the list:
– 1 cup unsweetened shredded coconut
– 1/2 cup almond flour
– 1/2 cup cocoa powder
– 1/4 cup melted coconut oil
– 1/2 cup maple syrup
– 1 teaspoon vanilla extract
– 1/4 teaspoon salt
– 1/2 cup dark chocolate chips
– Extra shredded coconut for rolling
These ingredients come together to create a rich, chocolatey treat. The unsweetened shredded coconut adds texture and flavor. Almond flour keeps the cookies soft and chewy. Cocoa powder gives the cookies their deep chocolate taste.
Coconut oil adds healthy fats and a light coconut flavor. Maple syrup serves as a natural sweetener, enhancing the cookie’s taste. Vanilla extract adds warmth, while salt balances the sweetness. Dark chocolate chips melt beautifully into the dough, adding rich pockets of chocolate.
When you roll the cookies in extra shredded coconut, it gives them a fun and festive look. This simple yet delightful recipe uses ingredients that are easy to find. So, gather these items, and get ready to make some delicious cookies!
Step-by-Step Instructions
Preheat the Oven
Start by preheating your oven to 350°F (175°C). Line a baking sheet with parchment paper. This will keep the cookies from sticking.
Mixing the Dry Ingredients
In a large bowl, combine the following dry ingredients:
– 1 cup unsweetened shredded coconut
– 1/2 cup almond flour
– 1/2 cup cocoa powder
– 1/4 teaspoon salt
Mix these ingredients well. You want them evenly blended to ensure each cookie has great flavor.
Preparing the Wet Ingredients
In another bowl, whisk together the wet ingredients:
– 1/4 cup melted coconut oil
– 1/2 cup maple syrup
– 1 teaspoon vanilla extract
Mix until smooth. This step adds moisture and sweetness to your cookies.
Forming the Dough
Now, pour the wet mix into the dry mix. Stir with a spatula or your hands. If the dough feels too crumbly, add a teaspoon of water. You want a dough that holds together but is not sticky.
Rolling the Cookies
Fold in 1/2 cup dark chocolate chips. Then, take about 1 tablespoon of dough. Roll it into a ball in your hands. After that, coat each ball in extra shredded coconut. This gives the cookies a nice look and extra flavor.
Baking Process
Place the rolled cookie balls on the baking sheet. Leave some space between them. Bake in the oven for 10-12 minutes. Look for the edges to be set.
Cooling Instructions
Remove the cookies from the oven. Let them cool on the baking sheet for about 5 minutes. After that, transfer them to a wire rack to cool completely. Enjoy the lovely scent while they cool!
Tips & Tricks
Best Practices for Dough Consistency
For the best dough consistency, follow these simple tips. Mix your dry ingredients well. This helps all the flavors blend together. When adding the wet ingredients, do it slowly. This keeps the dough from getting too wet. If your dough feels too crumbly, add a teaspoon of water. This small amount can make a big difference. The dough should feel sticky but hold together well. Roll it into balls easily with your hands.
Substitutions for Dietary Preferences
You can adjust this recipe to fit dietary needs. For a nut-free option, try using sunflower seed flour instead of almond flour. If you want it gluten-free, check that your cocoa and baking ingredients are certified gluten-free. For a vegan twist, use maple syrup and dairy-free chocolate chips. This keeps the flavor and texture delicious while fitting various diets.
Decorating the Cookies for Presentation
Presentation matters, especially for cookies. Once your snowball cookies cool, roll them in extra shredded coconut. This gives a snowy look that matches their name. You can also sprinkle a little cocoa powder on top. Arrange the cookies on a pretty plate for serving. This simple step makes your treats look even more inviting. Show off your beautiful cookies at parties or family gatherings!
Pro Tips
- Use Fresh Coconut: For an enhanced flavor, consider using fresh shredded coconut instead of the packaged variety.
- Adjust Sweetness: Feel free to adjust the amount of maple syrup based on your sweetness preference or dietary needs.
- Store Properly: Keep the cookies in an airtight container to maintain their freshness for up to a week.
- Experiment with Add-Ins: Try adding nuts or dried fruit for a unique twist on the classic chocolate coconut flavor.
Variations
Adding Nuts or Dried Fruits
You can make these cookies even better by adding nuts or dried fruits. Try adding chopped walnuts or pecans for a crunchy bite. If you enjoy dried fruits, add small pieces of dried cherries or cranberries. These additions add flavor and texture. Just fold them into the dough with the chocolate chips. This way, you add some fun surprises in every bite.
Flavor Alternatives for Coconut or Chocolate
If you want a twist on the flavor, you can change the coconut or chocolate. Use almond extract instead of vanilla for a nutty taste. You can also swap the cocoa powder for carob powder if you want something different. For a tropical vibe, try adding lime zest. Each change gives a new taste to enjoy.
Vegan or Gluten-Free Modifications
This recipe can be made vegan or gluten-free easily. To make it vegan, ensure you use dairy-free chocolate chips. For gluten-free, just use certified gluten-free almond flour. Both options keep the cookies tasty and friendly for all diets. Look for brands that have clear labels to avoid hidden ingredients.
Storage Info
Ideal Storage Conditions
Store your Chocolate Coconut Snowball Cookies in an airtight container. Keep them in a cool, dry place. This helps maintain their soft texture and flavor. If you live in a warm area, use the fridge. The cool air will keep them fresh longer.
Freezing Instructions
To freeze these cookies, first, let them cool completely. Next, place them in a single layer on a baking sheet. Freeze them for about an hour. After that, transfer the cookies to a freezer bag. Remove any air before sealing. They will stay fresh in the freezer for up to three months.
Shelf Life
When stored properly, these cookies last about one week at room temperature. If stored in the fridge, they can last for up to two weeks. Freezing extends their life, but they are best enjoyed fresh. You’ll love their rich chocolate flavor and coconut goodness every time you bite into one!
FAQs
Can I use sweetened coconut instead of unsweetened?
Yes, you can use sweetened coconut. It will make the cookies sweeter. Keep in mind that it may change the texture slightly. You might need to adjust the amount of maple syrup to balance the sweetness.
How can I make these cookies nut-free?
To make these cookies nut-free, simply swap almond flour for oat flour or all-purpose flour. Both options work well in this recipe. They will help keep the cookies soft and delicious without nuts.
What can I substitute for maple syrup?
If you need a substitute for maple syrup, try using agave nectar or honey. Both will add sweetness and moisture. Remember that honey is not vegan, so use agave if you want a vegan option.
Can I make these in advance?
Yes, you can make these cookies in advance. They store well in an airtight container. You can also freeze the cookie dough for later use. Just roll the dough into balls and freeze them before baking.
You now know how to make delicious coconut cookies with simple ingredients. We covered each step, from mixing dry and wet ingredients to baking and cooling. I shared tips for better dough and fun variations for flavors. You learned how to store your cookies for freshness. With these steps, you can create tasty treats that everyone will love. Enjoy baking and sharing these delightful cookie