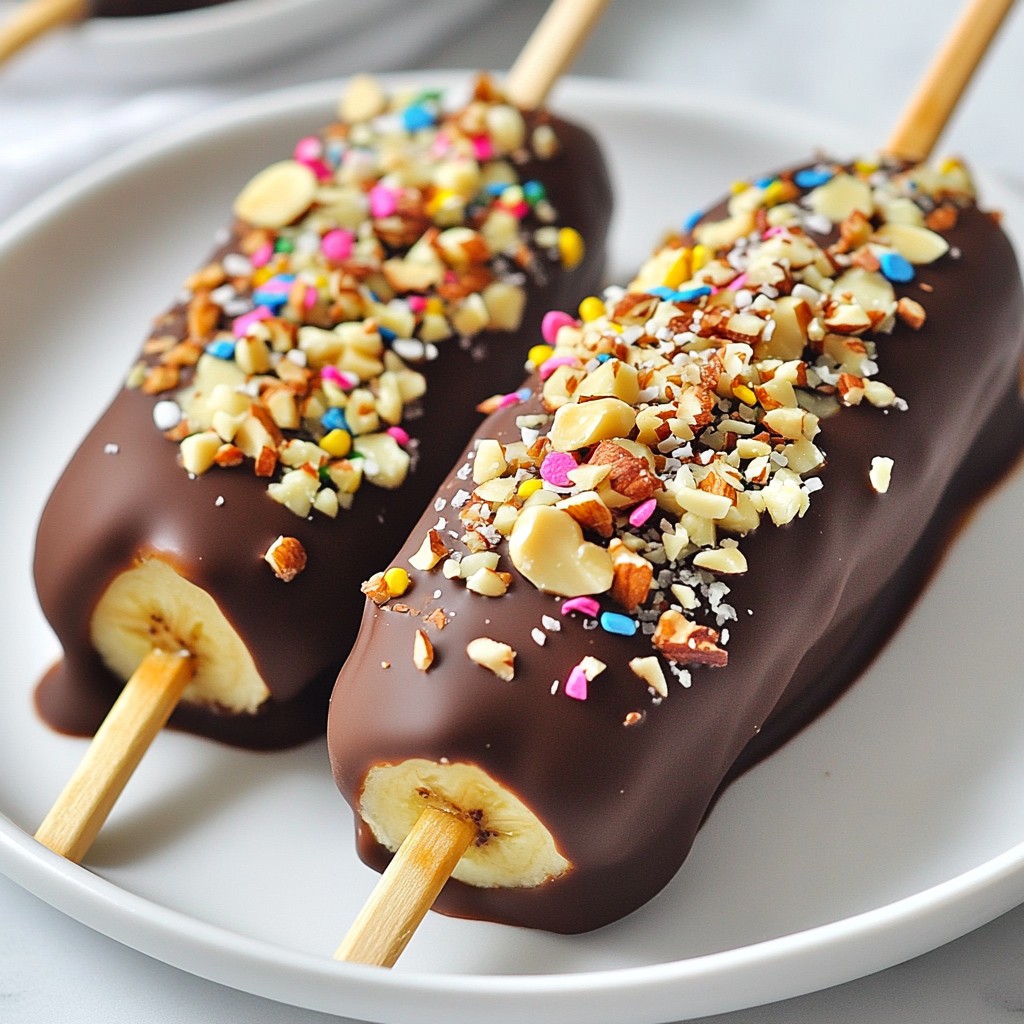
Looking for a fun treat that’s easy to make? You’ve found it! Chocolate Covered Banana Pops offer a tasty twist on a classic snack. With just a few simple ingredients, you can create a delicious dessert that kids and adults will love. Plus, they are customizable to suit your taste. Let’s dive into this sweet adventure and make some pops that you can’t resist!
Why I Love This Recipe
- Easy to Make: This recipe requires minimal ingredients and simple steps, making it perfect for all ages.
- Customizable: You can use different types of chocolate and toppings, allowing for endless variations.
- Healthy Treat: Bananas provide natural sweetness, making these pops a healthier dessert option.
- Fun for Kids: The colorful sprinkles and the process of making them are sure to delight children and adults alike!
Ingredients
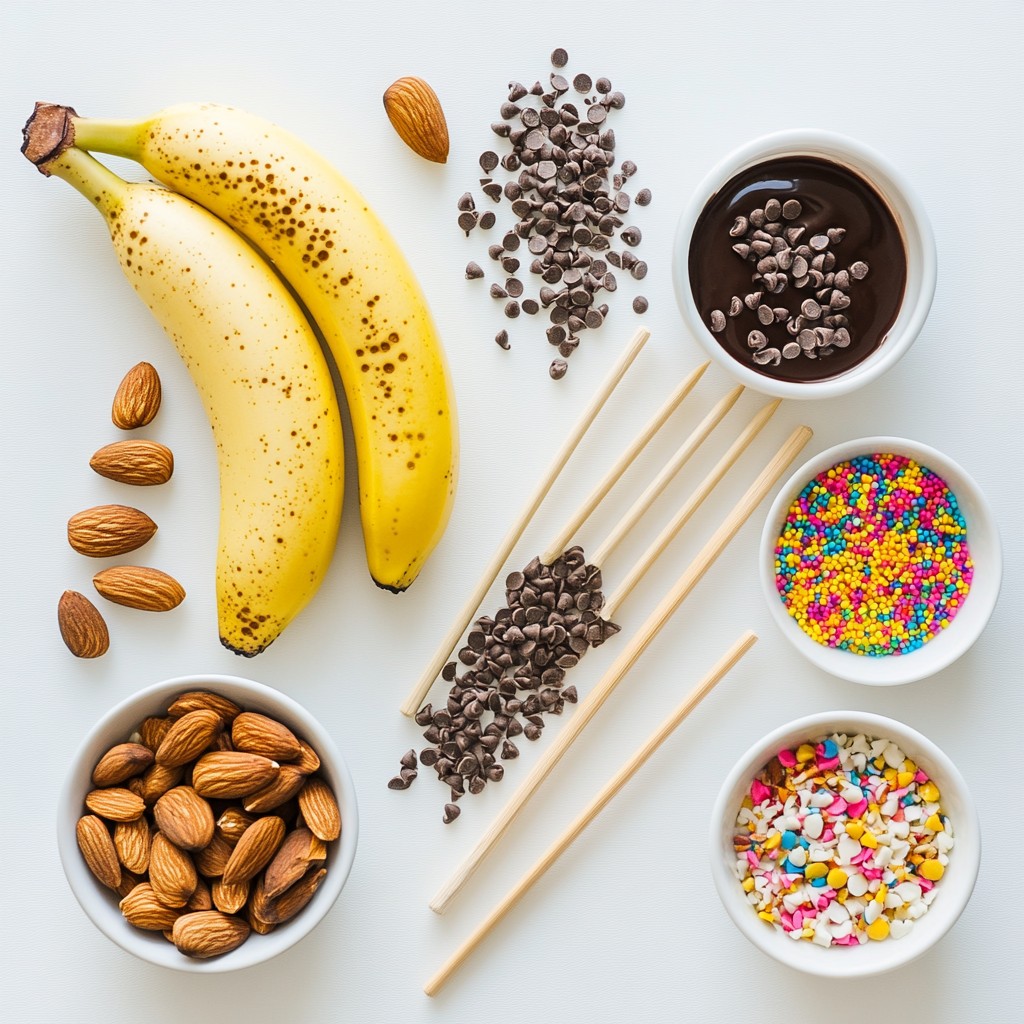
List of Ingredients
- Ripe bananas
- Dark chocolate chips
- Coconut oil (optional)
- Crushed nuts
- Colorful sprinkles (optional)
- Lollipop sticks or wooden skewers
The magic starts with ripe bananas. They should be yellow, soft, and sweet. You will need two bananas for this recipe. Next, grab one cup of dark chocolate chips. If you prefer sweeter chocolate, you can use milk chocolate chips instead.
For a smoother chocolate coat, add one tablespoon of coconut oil. This step is optional but highly recommended. Then, gather half a cup of crushed nuts. Almonds, walnuts, or peanuts all work well. You can also include a quarter cup of colorful sprinkles for fun.
Finally, get some lollipop sticks or wooden skewers. These will help you enjoy your tasty pops without mess. All these ingredients make your banana pops fun and tasty. Now, let’s get ready to make a treat that everyone will love!
Step-by-Step Instructions
Preparing the Banana
To start, you need to cut the bananas. First, peel the bananas and slice them into thirds. You will get three pieces from each banana. Next, take a lollipop stick or wooden skewer and insert it into the cut end of each piece. This will make handling the banana pops easy.
Now, it's time to freeze the bananas. Place the banana pops on a baking sheet lined with parchment paper. Put them in the freezer for about one hour. This helps the bananas get firm and ready for chocolate.
Melting the Chocolate
The next step is melting the chocolate. Grab a microwave-safe bowl and add the dark chocolate chips. If you want a smoother texture, add one tablespoon of coconut oil. Heat the bowl in the microwave. Use 30-second intervals. Stir the chocolate after each interval. Keep doing this until the chocolate is fully melted and smooth.
Coating and Decorating
Now, you can coat the bananas. Take the frozen banana pops out of the freezer. Dip each banana pop into the melted chocolate. Make sure each pop is fully coated. Allow any extra chocolate to drip off.
While the chocolate is still wet, you can add toppings. Roll the pops in crushed nuts or sprinkle colorful sprinkles on top. This adds a nice touch and makes them fun!
Final Chilling and Serving
After decorating, place the banana pops back on the baking sheet. Now, refrigerate them for about 30 minutes. This will help the chocolate harden.
When they are ready, you can serve the chocolate-covered banana pops. Enjoy them as a fun dessert or snack. If you want to save some for later, store them in an airtight container in the freezer. They make a refreshing treat anytime!
Tips & Tricks
How to Melt Chocolate Perfectly
To melt chocolate without burning, use low heat. If you choose the microwave method, place your chocolate chips in a microwave-safe bowl. Heat it in 30-second bursts. Stir after each interval until smooth. This helps prevent hot spots that can burn the chocolate.
The double boiler method is another great option. Place a heat-safe bowl over a pot of simmering water. Stir the chocolate until it melts. This method gives you more control over the heat. Both methods work well, so pick the one you like best.
Best Toppings Combinations
When it comes to toppings, the options are endless. Crushed nuts like almonds, walnuts, or peanuts add crunch and flavor. You can also use colorful sprinkles for a fun look. If you want to get creative, try crushed cookies or even mini marshmallows.
Experiment with different flavors and textures. For a tropical twist, use shredded coconut. The more toppings you try, the more fun your banana pops will be!
Ensuring a Smooth Coating
To get an even chocolate coating, dip the banana pop straight into the melted chocolate. Twirl it gently to cover all sides. Allow excess chocolate to drip off.
Use a fork or a dipping tool for better control. This helps you avoid messy hands and keeps the coating smooth. If you find chocolate hard to work with, add a bit of coconut oil when melting. It makes the chocolate smoother and easier to dip.
Pro Tips
- Choose Ripe Bananas: For the best flavor and texture, use bananas that are fully ripe but not overripe. They should be slightly firm and have a few brown spots.
- Use Quality Chocolate: Select high-quality chocolate chips for the best melting and coating experience. Dark chocolate adds a rich flavor, while milk chocolate offers a sweeter taste.
- Experiment with Toppings: Feel free to get creative with your toppings! Use different nuts, coconut flakes, or even crushed cookies for added flavor and texture.
- Store Properly: To keep your banana pops fresh, store them in an airtight container in the freezer. This way, they remain a delicious treat for several weeks!
Variations
Different Chocolate Options
You can choose different types of chocolate for your banana pops. Milk chocolate gives a sweet taste. Dark chocolate adds a rich flavor. If you want something sweeter, go for white chocolate. Each type brings its own twist to the dish.
Alternative Coatings
Think beyond chocolate! You can roll your banana pops in shredded coconut for a tropical vibe. Crushed cookies or candy bits also add a fun crunch. Use your favorite treats to make each pop unique and exciting.
Healthy Variations
Want a healthier option? Try using yogurt as a coating instead of chocolate. It gives a creamy taste and fewer calories. You can also add fruits or granola on top for extra nutrition. This way, you get a snack that is tasty and good for you!
Storage Info
How to Store Banana Pops
To keep your chocolate-covered banana pops fresh, use an airtight container. This protects them from freezer burn. Place parchment paper between layers if you stack them. This prevents them from sticking together. You can also wrap each pop in plastic wrap for extra protection.
For freezing, make sure the pops are fully frozen before storing. Place them in the freezer for longer life. The cold temperature helps maintain their yummy taste and texture.
Shelf Life
These banana pops can last up to three months in the freezer. After that, they may lose flavor and texture. To enjoy them at their best, eat them within this time frame.
When you're ready to eat, take them out of the freezer. Let them thaw in the fridge for about 30 minutes. This helps them soften without melting too fast. Enjoy your tasty treat!
FAQs
Can I use frozen bananas?
Yes, you can use frozen bananas. However, the texture changes. Frozen bananas become mushy when thawed. This affects how they hold up after coating. Fresh bananas give a firmer bite. If you prefer a softer treat, frozen can work. Just be mindful of the taste.
What can I substitute for chocolate?
If you want to avoid chocolate, there are options. You can use carob chips as a sweet swap. They offer a similar taste without dairy. You can also try yogurt. Greek yogurt adds creaminess and flavor. For a vegan option, look for dairy-free chocolate. These swaps can make your pops fit your diet.
How can I make these healthier?
You can make these treats healthier easily. Use lower sugar options like dark chocolate. It has less sugar than milk chocolate. You can also add seeds or grains. Chia seeds or oats boost fiber. This way, you add nutrition without too much work. Your pops will taste great and be better for you.
This blog post explored how to make delicious banana pops using simple ingredients. You learned about ripe bananas, chocolate options, and fun toppings. I shared tips on melting chocolate and ensuring a smooth coat. You also discovered variations and storage tips for your pops.
In the end, these treats are easy to customize and can fit any taste. Enjoy making your own banana pops at home!