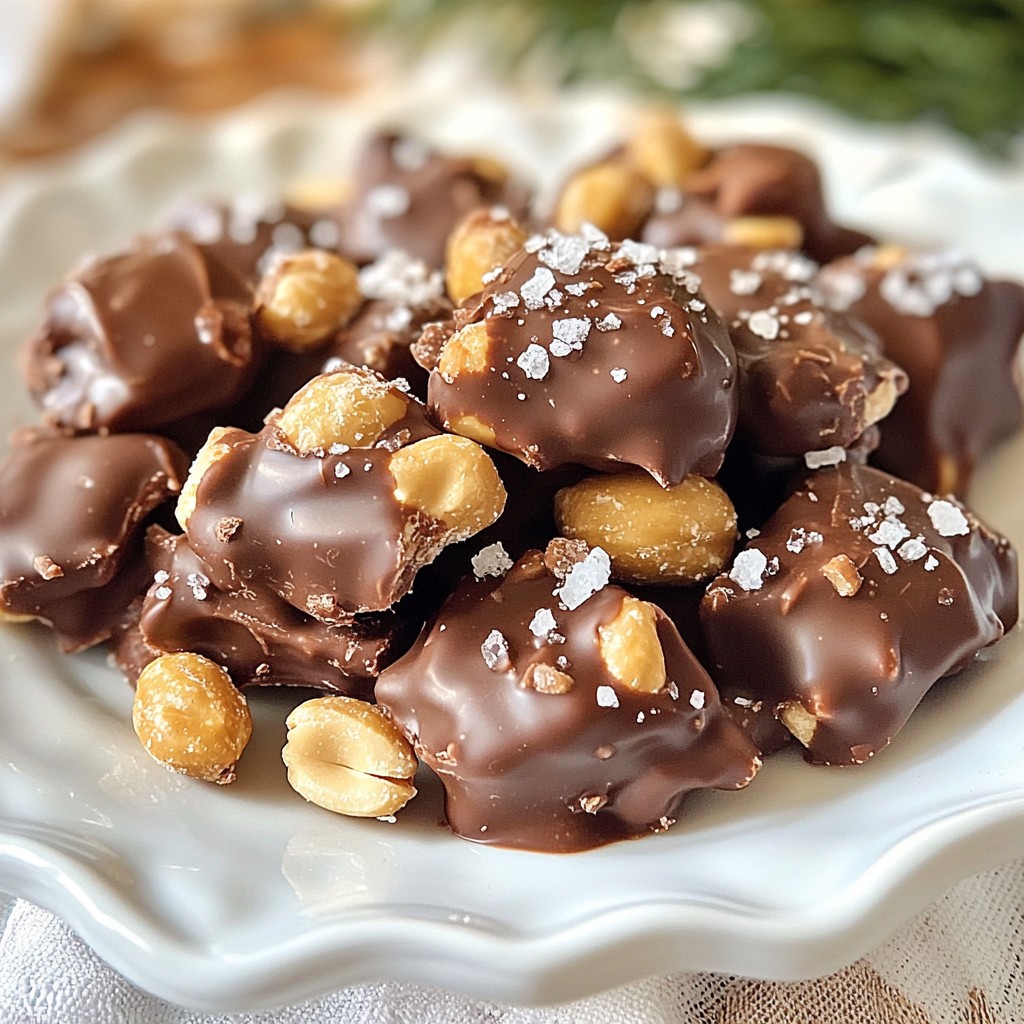
Looking for an easy and tasty treat that satisfies your sweet tooth? Chocolate covered peanut clusters are not just delicious; they’re simple to make! With just a few ingredients and straightforward steps, you can whip up these delightful snacks at home. Join me as I guide you through the process of making this perfect combination of salty and sweet goodness. Let's get started on your new favorite treat!
Why I Love This Recipe
- Quick and Easy: This recipe takes just 10 minutes of prep time, making it perfect for a last-minute treat.
- Irresistible Flavor Combination: The mix of salty peanuts and sweet chocolate creates a delightful balance that’s hard to resist.
- Customizable: You can easily adjust the type of chocolate or add extras like dried fruits or coconut for a personal touch.
- Great for Sharing: These clusters make a perfect snack for parties, gatherings, or as a thoughtful homemade gift.
Ingredients
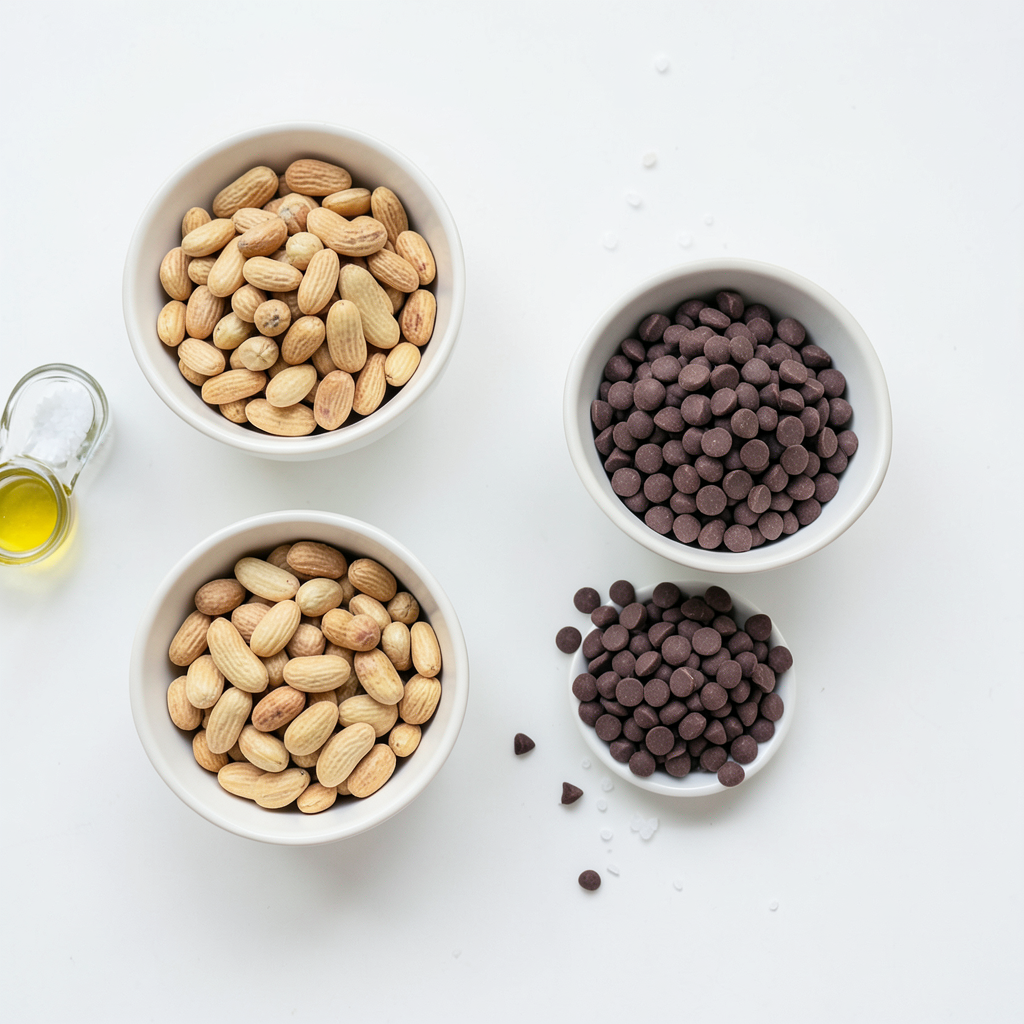
For these tasty chocolate covered peanut clusters, you will need the following:
- 2 cups roasted unsalted peanuts
- 1 cup semi-sweet chocolate chips
- 1/2 cup milk chocolate chips
- 1 teaspoon coconut oil or butter
- Sea salt for sprinkling (optional)
Each ingredient plays a key role in making these clusters delicious. The roasted unsalted peanuts give a nice crunch. The semi-sweet and milk chocolate chips create a rich, creamy coating. Coconut oil or butter helps the chocolate melt smoothly, making it easy to mix with the peanuts. You can add a sprinkle of sea salt for a sweet and salty treat.
When you gather these ingredients, you set the stage for a fun and easy cooking experience. Remember, quality matters! Choose good chocolate and fresh peanuts for the best flavor.
Step-by-Step Instructions
Preparation of Baking Sheet
To start, grab a baking sheet. Line it with parchment paper or a silicone mat. This helps the clusters not stick. Make sure the paper is smooth and flat.
Melting Chocolate
Next, we’ll melt the chocolate. In a microwave-safe bowl, mix the semi-sweet and milk chocolate chips with the coconut oil. Microwave it in 30-second bursts. Stir the chocolate after each burst. This helps it melt evenly. It should take about 1 to 2 minutes to be smooth.
Combining Peanuts with Chocolate
Now, it's time to add the peanuts. Once the chocolate is melted, take the bowl out of the microwave. Pour in the roasted peanuts. Stir gently to coat each peanut well. You want every peanut to be covered in chocolate.
Forming Clusters
Using a spoon or a cookie scoop, drop the chocolate-covered peanuts onto the lined baking sheet. Leave space between each cluster. This helps them set without sticking together.
Adding Sea Salt
For a tasty twist, sprinkle a tiny pinch of sea salt on each cluster. This adds a savory-sweet contrast that enhances the flavor. Not everyone might like salt, so feel free to skip this step if you prefer.
Chilling to Set
Finally, place the baking sheet in the fridge. Chill the clusters for about 30 to 40 minutes. This makes the chocolate harden completely. After chilling, they will be ready to enjoy!
Tips & Tricks
Ensuring Perfectly Set Chocolate
To make sure your chocolate sets just right, follow these steps. Use good quality chocolate chips. They melt smoothly and taste great. Adding coconut oil helps too. This oil makes the chocolate shiny and easy to work with. When you melt chocolate, do it slowly. Heat it in a microwave at low power. Stir it every 30 seconds. This keeps it from burning. Once melted, let it cool for a minute before mixing in the peanuts. This way, the chocolate won't get too thick.
Customizing Flavor
You can change the taste of your clusters easily. Try different types of chocolate. Dark chocolate adds a rich flavor. White chocolate gives a sweet touch. You can also mix in extras like a dash of cinnamon or a splash of vanilla. Want a fruity twist? Add dried cranberries or raisins. You can even use other nuts. Cashews or almonds can make great substitutes. The key is to have fun and try new things.
Perfecting Texture
To keep your clusters crunchy, check these tips. Use roasted peanuts; they add a nice crunch. Don’t overmix the peanuts with the chocolate. If you stir too much, they can break. Also, make sure to drop them onto the sheet in small mounds. This helps them hold their shape. If you want extra crunch, sprinkle some crushed pretzels on top before they set. Enjoying a mix of textures makes your treat even better!
Pro Tips
- Use Quality Chocolate: Opt for high-quality chocolate chips for the best taste. The flavor of your clusters will significantly depend on the chocolate you use.
- Chill for Better Texture: Ensure your clusters are placed in the refrigerator long enough to set completely. This will give them a nice snap when bitten into.
- Experiment with Nuts: Feel free to swap peanuts for other nuts like almonds or cashews for a different flavor profile and texture.
- Customize with Add-ins: Consider adding a sprinkle of crushed pretzels or dried fruits to the chocolate mixture for a unique twist on the classic cluster.
Variations
Chocolate Types
You can switch up the chocolate in this recipe. Use dark chocolate for a rich flavor. Dark chocolate has less sugar, which can add a nice touch. If you prefer white chocolate, it works well too. Just remember, it will be sweeter. Each chocolate type gives the clusters a different taste, so feel free to experiment!
Nut Combinations
While peanuts are tasty, you can use other nuts or seeds. Almonds, cashews, or walnuts make great swaps. You could even try sunflower seeds for a nut-free option. Mixing different nuts can give your clusters unique textures and flavors.
Add-ins and Mix-ins
Adding treats to your clusters can be fun! Dried fruits like cranberries or apricots add sweetness. Pretzels can bring a salty crunch that pairs well with chocolate. You might also try adding mini marshmallows or crispy rice for extra texture. Each mix-in transforms the clusters into a fun and tasty surprise!
Storage Info
Best Storage Practices
To keep your chocolate covered peanut clusters fresh, use airtight containers. This helps prevent moisture from getting in and ruining your treats. Store them in a cool, dry place. Avoid spots that get hot, like near a stove or in direct sunlight.
Shelf Life
How long do they last? When stored properly, these clusters can stay fresh for up to two weeks. If you notice any changes in texture or smell, it’s best to toss them. Always trust your senses!
Freezing Options
Want to save some for later? You can freeze your clusters for longer storage. Place them in a single layer on a baking sheet and freeze for about an hour. Once frozen, transfer them to an airtight container or freezer bag. They can last for up to three months. Just thaw them in the fridge before enjoying!
FAQs
What are Chocolate Covered Peanut Clusters?
Chocolate covered peanut clusters are tasty treats made from roasted peanuts and chocolate. They are simple to make and perfect for snacking. You mix roasted peanuts with melted chocolate, then form clusters. After they cool, you get crunchy, sweet bites that satisfy your cravings.
Can I Use Different Types of Chocolate?
Yes, you can use various chocolates! Dark chocolate adds a rich flavor. White chocolate gives a sweet, creamy taste. You can even mix different types for a unique twist. Experiment with flavors to find your favorite combination.
Are These Clusters Gluten-Free?
Absolutely! Chocolate covered peanut clusters are gluten-free. The main ingredients are peanuts and chocolate, which do not contain gluten. This makes them a great snack for those with gluten sensitivities or celiac disease.
How Do I Prevent Chocolate From Melting?
To keep chocolate from melting, store your clusters in a cool, dry place. Avoid direct sunlight and heat sources. An airtight container works best for storage. If you live in a warm area, you can refrigerate them to ensure they stay firm.
You now know how to make delicious chocolate-covered peanut clusters. You learned about ingredients like roasted peanuts and various chocolates. The step-by-step guide showed you how to melt chocolate and form clusters with a unique salty kick. I shared tips for perfecting texture and customizing flavors. Lastly, I provided storage tips to keep them fresh. Enjoy making these tasty treats for yourself or to share with friends! Happy snacking!