Cinnamon Streusel Coffee Cake Tempting and Tasty Recipe

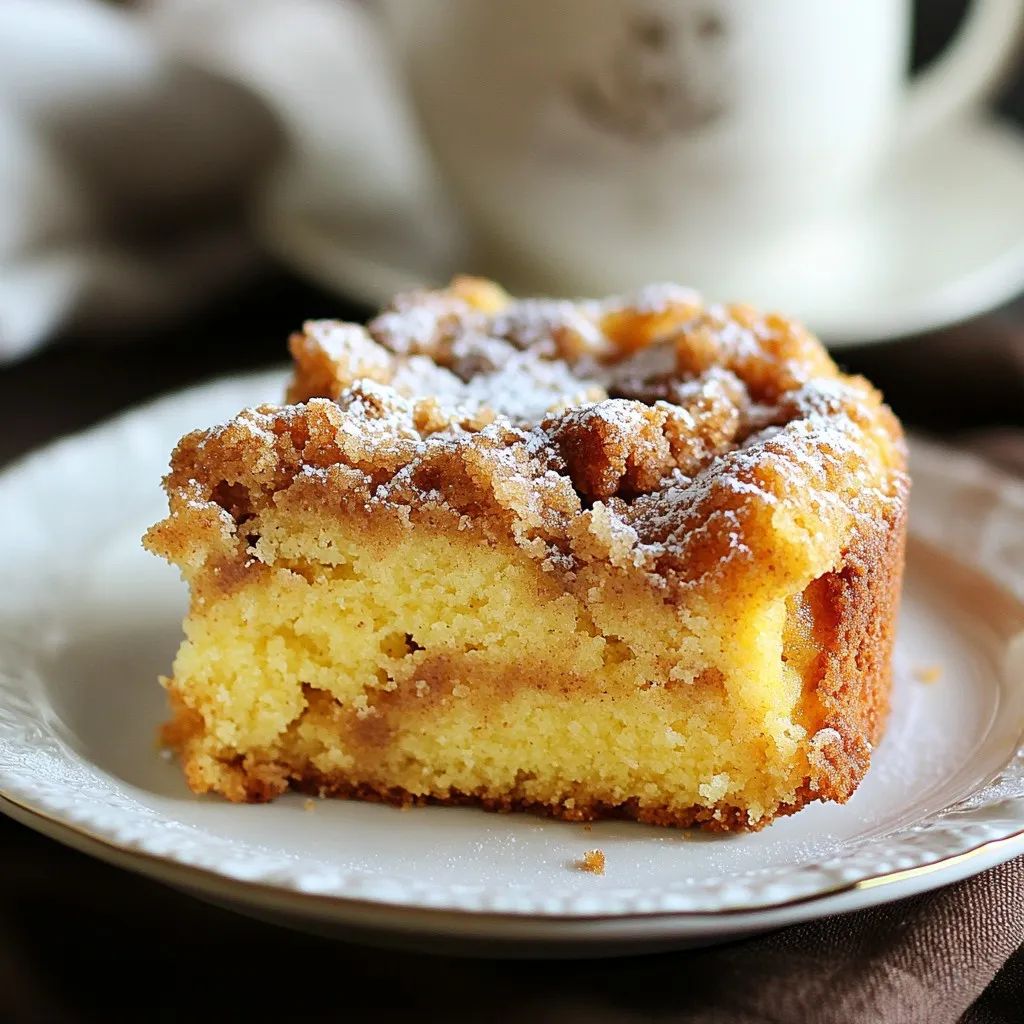
Are you ready to indulge in a warm slice of Cinnamon Streusel Coffee Cake? This tempting recipe will have your taste buds dancing. With a crunchy cinnamon topping and a tender crumb, it’s perfect for breakfast or dessert. I’ll walk you through simple steps and share my best tips. Get your apron on, and let’s make a delicious treat that’s sure to impress!
Why I Love This Recipe
- Delicious Flavor Combination: The blend of cinnamon and brown sugar creates a warm and inviting flavor that pairs perfectly with coffee.
- Moist and Tender Texture: The addition of sour cream ensures a moist cake, making every bite a delightful experience.
- Easy to Make: This recipe is straightforward, allowing even novice bakers to create a stunning coffee cake with ease.
- Perfect for Any Occasion: Whether it’s breakfast, brunch, or dessert, this coffee cake is versatile enough to be enjoyed at any time.
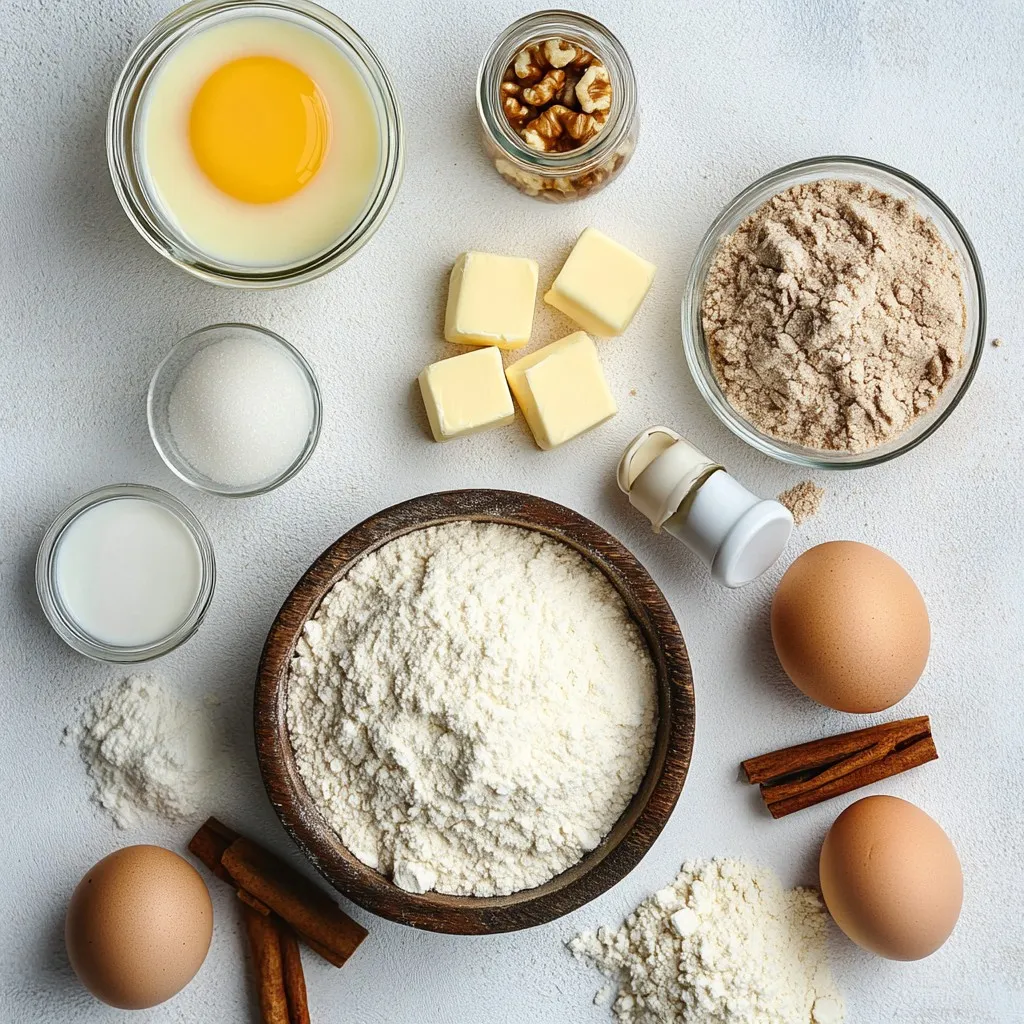
Ingredients
Dry Ingredients
– 2 cups all-purpose flour
– 1 teaspoon baking powder
– 1/2 teaspoon baking soda
– 1/2 teaspoon salt
– 1 tablespoon ground cinnamon
Wet Ingredients
– 1/2 cup unsalted butter, softened
– 1 cup granulated sugar
– 1/2 cup sour cream
– 3 large eggs
– 1 teaspoon vanilla extract
Topping Ingredients
– 1/2 cup packed brown sugar
– 1/2 cup chopped walnuts or pecans (optional)
To make a great Cinnamon Streusel Coffee Cake, you need a mix of dry and wet ingredients. Start with all-purpose flour, baking powder, baking soda, salt, and ground cinnamon for the dry part. These give the cake its structure and flavor.
For the wet ingredients, soften your unsalted butter first. Then mix in granulated sugar until fluffy. Add sour cream, eggs, and vanilla extract to make the batter rich and moist.
Finally, for that yummy topping, mix packed brown sugar and ground cinnamon. If you like nuts, toss in chopped walnuts or pecans. This adds a nice crunch and flavor to your coffee cake.
Now, you have everything ready for your delicious baking adventure!

Step-by-Step Instructions
Preparation Steps
1. Preheat your oven to 350°F (175°C). This heat is perfect for baking.
2. Grease and flour a 9×13-inch baking pan. This helps the cake come out easily.
3. In a large bowl, cream together the softened butter and granulated sugar. Mix until it is light and fluffy.
Batter Preparation
1. Add the eggs to the butter mixture. Mix well after each egg. This makes the cake rich.
2. Stir in the vanilla extract for added flavor.
3. In another bowl, whisk together the flour, baking powder, baking soda, and salt.
4. Gradually add this dry mix to the wet ingredients. Alternate adding sour cream too. Mix until just combined.
Assembling the Cake
1. Pour half of the cake batter into the prepared pan. Spread it evenly.
2. Sprinkle half of the streusel mixture over the batter. This adds a sweet crunch.
3. Add the remaining batter on top. Spread it gently.
4. Top with the rest of the streusel mixture. Use a knife or toothpick to swirl it into the batter. This creates a marbled effect.
Baking
1. Bake in the preheated oven for 35-40 minutes. You know it’s done when a toothpick comes out clean.
2. Allow the cake to cool in the pan for about 10 minutes.
3. Transfer it to a wire rack to cool completely. This helps the cake set before you serve it.
Tips & Tricks
Best Practices
– How to achieve a fluffy texture
To make your coffee cake fluffy, use softened butter. Beat it well with sugar. Incorporate eggs one at a time. Mix gently when adding dry ingredients. This keeps air in the batter.
– Tips for measuring ingredients accurately
Use dry measuring cups for flour and sugar. Spoon the ingredients into the cup and level off with a knife. Avoid packing the flour down, as this adds extra weight.
Flavor Enhancements
– Adding spices for extra flavor
You can add nutmeg or ginger for a warm twist. Just a pinch can really elevate the taste. Try mixing these spices with the cinnamon.
– Using different nuts or fruit
Swap walnuts for pecans or almonds. You can also add fruits like apples or berries for a fresh taste. Just fold them gently into the batter before baking.
Presentation Ideas
– Serving suggestions
Serve the coffee cake warm or at room temperature. It pairs well with coffee or tea. Cut it into squares for easy serving at gatherings.
– Dusting options for visual appeal
For a beautiful finish, dust the top with powdered sugar. You can also drizzle a simple glaze made from powdered sugar and milk. This adds a sweet touch and looks great!
Pro Tips
- Use Room Temperature Ingredients: Ensure that your butter and eggs are at room temperature for better incorporation into the batter, resulting in a lighter texture.
- Don’t Overmix: Mix the batter just until combined to avoid a dense cake. Overmixing can develop gluten in the flour, leading to a tougher crumb.
- Variations on Nuts: Feel free to substitute walnuts or pecans with almonds or even chocolate chips for a different flavor profile in your streusel topping.
- Storing Leftovers: Store any leftover coffee cake in an airtight container at room temperature for up to 3 days, or refrigerate for longer freshness.

Variations
Flavor Variations
You can easily switch up this recipe for more fun. Try a pumpkin spice version to enjoy warm, cozy flavors. Just add pumpkin puree and some nutmeg to the batter. This twist makes the cake perfect for fall. Another great option is a chocolate chip cinnamon coffee cake. Add a cup of chocolate chips to the batter for a sweet surprise in every bite.
Dietary Alternatives
If you need gluten-free options, use a gluten-free flour blend. It works well and keeps the cake light. For a vegan twist, replace the eggs with flax eggs and use a plant-based sour cream. You can also swap butter for coconut oil to keep it dairy-free. These options ensure everyone can enjoy this tasty treat.
Seasonal Twists
Make the cake festive by adding cranberries or using peppermint extract for the holidays. These flavors brighten up the season. You can also incorporate seasonal fruits like apples or pears. Chopped fruit adds moisture and flavor, making the cake even more delightful. Experiment with these ideas to keep your coffee cake exciting all year round!
Storage Info
Storing the Cake
To keep your coffee cake fresh, wrap it well in plastic wrap. You can also place it in an airtight container. This helps prevent it from drying out. Store it at room temperature for up to three days. If you want it to last longer, put it in the fridge for about a week.
Freezing Instructions
You can freeze this coffee cake to enjoy later. First, let the cake cool completely. Then, wrap it tightly in plastic wrap, followed by aluminum foil. This keeps out air and moisture. You can freeze it for up to three months. When you are ready to eat it, move it to the fridge overnight to thaw. For the best taste, let it sit at room temperature for about an hour before serving.
Reheating Tips
To reheat your coffee cake, use the oven for the best results. Preheat the oven to 350°F. Place the cake in the oven for about 10-15 minutes. This warms it through and keeps the texture nice. If you’re in a hurry, you can use the microwave. Heat it for about 20-30 seconds. Just be careful not to overheat, as it can dry out the cake. Enjoy your warm cake with your favorite cup of coffee!
FAQs
Common Questions
How can I make my coffee cake moist?
To keep your coffee cake moist, use sour cream. It adds richness and moisture. Make sure not to overmix the batter. This can make the cake dry. Bake it at the right temperature and check for doneness.
Can I use a different pan size?
Yes, you can use a different pan size. If you use a smaller pan, the cake will be thicker. This may need more baking time. If you use a larger pan, the cake will be thinner and bake faster. Always check for doneness with a toothpick.
Ingredient Substitutes
Can I replace sour cream?
You can replace sour cream with plain yogurt. Greek yogurt works well too. It gives a similar tang and moisture. You can also use buttermilk if that is handy.
What can I use instead of nuts?
If you want to skip nuts, try using seeds. Pumpkin seeds or sunflower seeds add crunch. You can also add more cinnamon for flavor. Dried fruit like raisins or cranberries can add sweetness.
Baking Tips
Why is my cake sinking?
A sinking cake may be due to too much leavening. This can happen if you add too much baking powder. Make sure to measure accurately. Another reason could be opening the oven door too early.
How to check if the coffee cake is done?
To check if your coffee cake is done, insert a toothpick into the center. If it comes out clean, the cake is ready. If it has wet batter, bake a few more minutes.
This blog post covered everything you need to create a perfect coffee cake. We looked at key ingredients, step-by-step instructions, and essential tips. I shared flavor variations and dietary alternatives for all preferences. Proper storage will keep your cake fresh longer. Remember, mastering these techniques ensures a moist and delicious treat. Now, it’s time to bake and enjoy! You have the tools to make a delightful coffee cake that will impress everyone. Happy bakin

Cinnamon Streusel Coffee Cake
Ingredients
- 2 cups all-purpose flour
- 1 cup granulated sugar
- 0.5 cup unsalted butter, softened
- 0.5 cup sour cream
- 3 large eggs
- 1 teaspoon vanilla extract
- 1 teaspoon baking powder
- 0.5 teaspoon baking soda
- 0.5 teaspoon salt
- 1 tablespoon ground cinnamon
- 0.5 cup packed brown sugar
- 0.5 cup chopped walnuts or pecans (optional)
Instructions
- Preheat your oven to 350°F (175°C). Grease and flour a 9x13-inch baking pan.
- In a large mixing bowl, cream together the softened butter and granulated sugar until light and fluffy.
- Add the eggs one at a time, mixing well after each addition, then stir in the vanilla extract.
- In a separate bowl, whisk together the flour, baking powder, baking soda, and salt. Gradually add this mixture to the wet ingredients, alternating with sour cream. Mix until just combined.
- In another small bowl, combine the brown sugar, ground cinnamon, and chopped nuts (if using) to make the streusel topping.
- Pour half of the cake batter into the prepared pan, spreading it evenly. Sprinkle half of the streusel mixture over the batter.
- Add the remaining batter on top and spread it out gently, followed by the rest of the streusel topping.
- Using a knife or toothpick, gently swirl the topping into the batter for a marbled effect.
- Bake in the preheated oven for 35-40 minutes, or until a toothpick inserted into the center comes out clean.
- Allow the cake to cool in the pan for about 10 minutes before transferring to a wire rack to cool completely.


![To make these chocolate-covered banana bites, you will need simple, fresh ingredients. Here is the list: - 2 large bananas - 1 cup dark chocolate chips (or semi-sweet) - 1 tablespoon coconut oil - 1/4 cup chopped nuts (walnuts, almonds, or pistachios) - Sea salt for sprinkling - Optional toppings: 1/4 cup shredded coconut or mini marshmallows These ingredients work together for a tasty treat. The bananas add natural sweetness, while the dark chocolate provides rich flavor. Coconut oil helps the chocolate melt smoothly and adds a hint of tropical taste. The nuts give a nice crunch, and sea salt balances the sweetness. You can also mix in optional toppings like shredded coconut or mini marshmallows for fun twists. When choosing bananas, look for ones that are ripe but not too soft. This way, they will hold their shape when coated. For chocolate, dark chocolate chips melt well and taste great, but you can pick semi-sweet if you prefer. Once you gather your ingredients, you’re ready to make a delightful snack. For the complete process, check the Full Recipe. - Peel and slice bananas into bite-sized rounds. - Arrange banana slices on a parchment-lined baking sheet. Start with ripe bananas. They should be firm but not too soft. Slice them about one inch thick. This size helps them hold their shape when coated in chocolate. Lining the baking sheet with parchment paper keeps the bites from sticking. - Combine chocolate chips and coconut oil in a microwave-safe bowl. - Microwave in intervals, stirring, until smooth. Use dark chocolate chips for a rich taste. The coconut oil makes the chocolate smooth and shiny. Heat in short bursts of thirty seconds. Stir after each burst to prevent burning. When melted, the chocolate should be silky and easy to dip. - Use a fork or toothpick to coat banana slices in chocolate. - Allow excess chocolate to drip off. Hold the banana slice with a fork or toothpick. Dip it fully into the melted chocolate. Let any extra chocolate fall back into the bowl. This step ensures a nice, even coat. - Sprinkle nuts onto chocolate-coated banana bites. - Optionally, add shredded coconut or mini marshmallows. While the chocolate is still wet, add your favorite toppings. Nuts give a nice crunch. Coconut and marshmallows add a fun twist. Get creative with your choices! - Place the baking sheet in the freezer. - Chill for 15-20 minutes until the chocolate sets. Freezing helps the chocolate harden quickly. This step gives you a perfect bite. Keep an eye on them to make sure they don’t freeze too long. - Arrange on a serving platter. - Sprinkle with sea salt for extra flavor. Once chilled, place the banana bites on a nice platter. A light sprinkle of sea salt can enhance the flavor. These treats are perfect for sharing with friends or family. For the complete recipe, check out the [Full Recipe]. For melting, I recommend dark chocolate or semi-sweet chocolate. Both types melt well and give a rich flavor. Avoid chocolate with added ingredients, as they may not melt smoothly. To stop chocolate from seizing, add a bit of coconut oil. This helps keep the chocolate smooth and shiny while you dip your bananas. You can get creative with toppings! Try adding chopped nuts like walnuts or almonds for crunch. For a fun twist, sprinkle on shredded coconut or mini marshmallows. Bananas pair well with peanut butter too. Drizzle some on top after dipping for a tasty combo. If you're feeling adventurous, add a pinch of cinnamon for warmth. Present your chocolate-covered banana bites on a colorful platter. For a fun touch, use mini cupcake liners. They look cute and make for easy serving. Pair these bites with a glass of cold milk or a warm cup of tea. They also go well with vanilla ice cream for a sweet dessert combo. Enjoy your tasty creation! {{image_2}} You can easily make these bites vegan or dairy-free. Use plant-based chocolate chips instead of dark chocolate. Look for brands that are labeled dairy-free. You can also skip the nuts if you need a nut-free version. Simply leave them out or choose seeds like pumpkin or sunflower for crunch. You can switch up the chocolate for fun. Try white chocolate for a sweet twist. Milk chocolate is another tasty choice. If you want to get creative, add spices like cinnamon or nutmeg. Extracts like vanilla or almond also bring unique flavors. These small changes make a big impact on taste. Bananas are great, but other fruits work well too. Strawberries and apples both taste amazing with chocolate. You can even mix bananas with berries. Slice them small to make bite-sized treats. This way, you get a variety of flavors in one bite. Enjoy experimenting with different fruits! To keep your chocolate-covered banana bites fresh, store them in the fridge. Use an airtight container to prevent odors. Place parchment paper between layers if stacking them. This keeps the chocolate from sticking. If you want to store them longer, freezing works well too. Just place them on a baking sheet first. Once frozen, transfer them to a freezer-safe bag. This prevents them from clumping together. To thaw, just leave them in the fridge for a few hours before enjoying. When stored well in the fridge, these treats last about a week. If you freeze them, they can last up to two months. Check for signs of spoilage like brown spots on the bananas or a change in texture. If they look or smell off, it’s best to toss them. If you have leftover melted chocolate, don’t waste it! You can reuse it for other treats. Drizzle it on popcorn, or dip pretzels for a sweet and salty snack. You can also make chocolate-covered strawberries or marshmallows. Just be sure to reheat it gently to keep it smooth. For the best results, use the Full Recipe to make your banana bites. Enjoy the fun of creating delicious snacks while managing your storage effectively! Yes, you can use milk chocolate. It adds a sweeter taste. Dark chocolate has a richer flavor. Dark chocolate also has more health benefits, like antioxidants. It has less sugar than milk chocolate, making it a better choice for some. If you prefer sweet, go for milk chocolate. If you want a deeper flavor, stick with dark. To keep the chocolate firm, store the bites in a cool place. A fridge works great, but avoid the freezer after setting. You can also use a chocolate with a higher cocoa content. This type melts less easily. If you serve them warm, try using coconut oil. It helps the chocolate stay solid longer. Yes, you can make these bites ahead of time. They store well in the fridge for about a week. Just place them in an airtight container. If you want to keep them longer, you can freeze them. Make sure to separate layers with parchment paper to avoid sticking. Thaw them in the fridge before serving for the best taste. Chocolate-covered banana bites can be healthy in moderation. Bananas provide potassium and fiber. Dark chocolate has antioxidants, which are good for you. However, watch your portions. Eating too many can add extra sugar and calories. Pair these bites with a balanced diet for better health. Enjoy them as a treat rather than a daily snack. For the full recipe, check out the details above. You learned how to make tasty chocolate-covered banana bites. We covered the simple steps, from slicing bananas to melting chocolate. You can mix and match ingredients for fun variations. Remember, storing them well keeps them fresh and tasty for longer. Whether serving these bites at a party or enjoying them yourself, they are a delightful treat. Experiment with toppings and flavors to make them yours. Enjoy creating your own chocolate-covered banana bites!](https://dailydishly.com/wp-content/uploads/2025/06/88d9cc62-4f1a-4e00-b9c6-f86f49f25fdc-768x768.webp)
