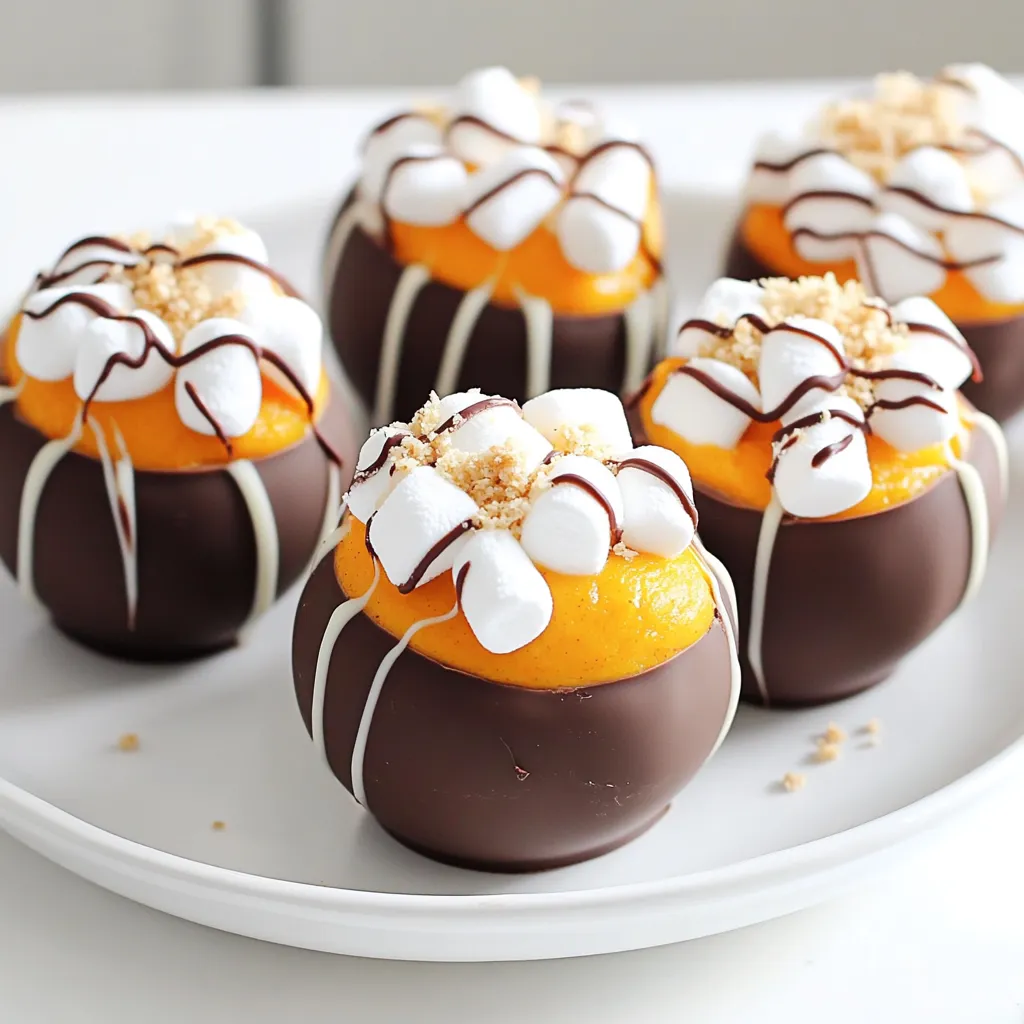
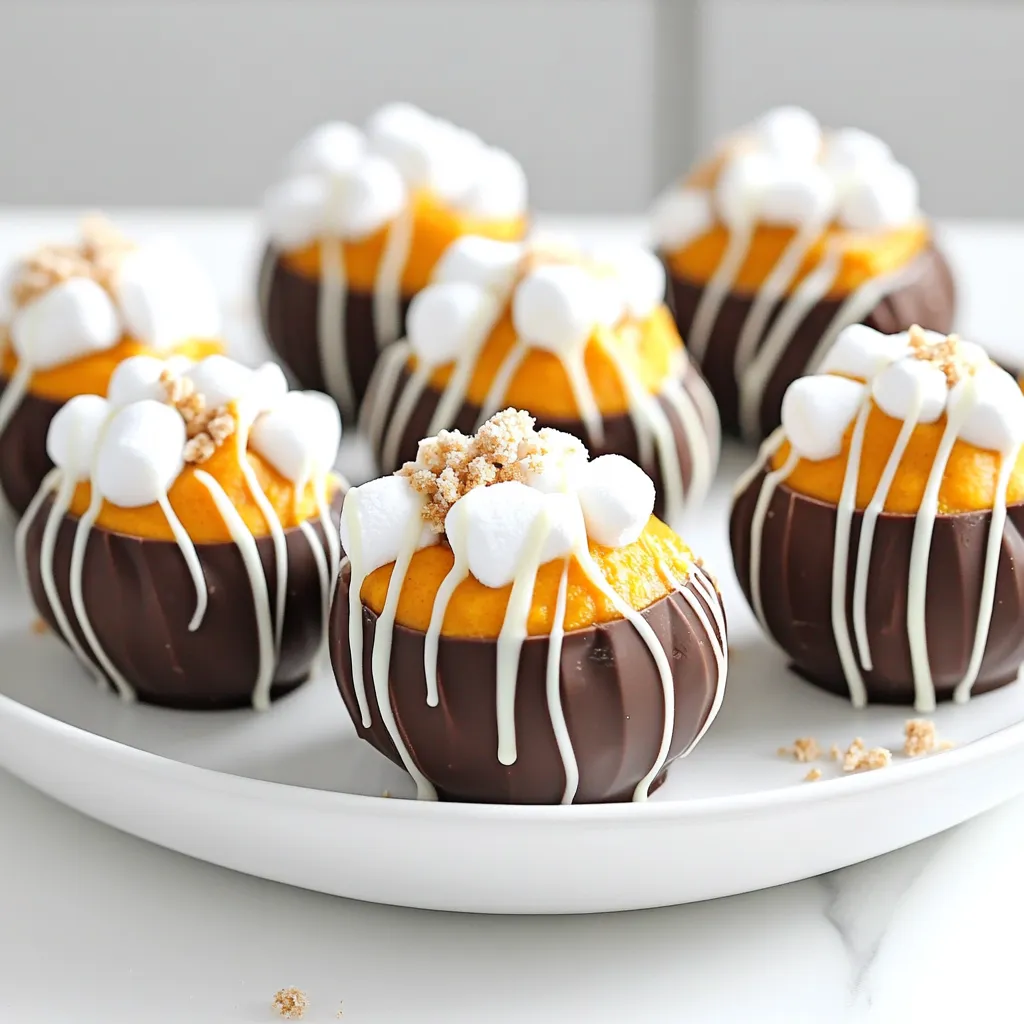
Fall is here, and there’s nothing better than cozying up with a warm drink. My favorite? Pumpkin spice hot cocoa bombs! These delightful treats are easy to make and perfect for sharing. With a few simple ingredients and straightforward steps, you can create a sweet, creamy cocoa surprise. Join me as we dive into making these awesome bombs and explore fun flavors and tips along the way!
Ingredients
Essential Ingredients for Hot Cocoa Bombs
To make cozy pumpkin spice hot cocoa bombs, you will need:
– 1 cup milk chocolate chips
– 1 cup white chocolate chips
– 1 teaspoon coconut oil
– 1 cup hot cocoa mix
– ½ cup pumpkin puree
– 1 teaspoon pumpkin spice blend (cinnamon, nutmeg, ginger)
– Mini marshmallows
– Optional: whipped cream and crushed graham crackers for topping
These ingredients create a warm and rich drink. The pumpkin puree adds a nice texture and flavor. The mix of spices brings out the cozy fall vibes.
Recommended Brands for Quality Chocolate
For the best flavor, I recommend using high-quality chocolate. Here are some brands I trust:
– Ghirardelli: Their chocolate chips melt well and taste rich.
– Callebaut: This brand offers a smooth melt with great flavor.
– Guittard: Known for its fine chocolate, it works perfectly for bombs.
Using quality chocolate makes a big difference in taste and texture. So, choose wisely for the best results.
Potential Add-ins
Feel free to get creative with your hot cocoa bombs! Here are some fun ideas:
– Peppermint extract for a minty twist.
– Caramel sauce for extra sweetness.
– Crushed Oreos for a cookie crunch.
– Chopped nuts for added texture.
These add-ins can enhance the flavor and make your cocoa bombs unique. Try mixing and matching to find your favorite combo!
Step-by-Step Instructions
Preparing the Chocolate Shells
To start, gather your tools. You need a microwave-safe bowl and a silicone sphere mold. First, measure 1 cup of milk chocolate chips and add 1 teaspoon of coconut oil to the bowl. Heat this in the microwave. Do it in 30-second bursts. Stir well after each burst until the mix is smooth.
Next, pour the melted chocolate into the mold. Use the back of a spoon to spread it evenly. Make sure to fill the mold up to the rim. Once all molds are filled, place them in the fridge. Chill for about 10-15 minutes or until the chocolate is hard.
Creating the Pumpkin Filling
While the chocolate sets, it’s time to make the pumpkin filling. In a mixing bowl, combine 1 cup of hot cocoa mix, ½ cup of pumpkin puree, and 1 teaspoon of pumpkin spice blend. This blend includes cinnamon, nutmeg, and ginger. Stir everything together until it’s smooth and well mixed. Set your filling aside for later.
Assembling and Sealing the Cocoa Bombs
Once the chocolate shells are ready, carefully remove them from the molds. Take half of the shells and fill each one with a spoonful of your pumpkin filling. Add a few mini marshmallows on top of the filling for extra sweetness.
Now, warm the edges of the remaining chocolate shells. You can do this by briefly placing them over a hot pan. This will help the shells stick together. Place them on top of the filled shells and press gently to seal the edges.
For a fun twist, melt the white chocolate chips with another teaspoon of coconut oil. Drizzle this over the top of the bombs. You can also sprinkle crushed graham crackers on top for a s’mores feel. Finally, chill the bombs again in the fridge for another 10-15 minutes.
Now you are ready to enjoy your cozy pumpkin spice hot cocoa bombs!
Tips & Tricks
Best Practices for Melting Chocolate
To melt chocolate well, use a microwave-safe bowl. Combine your chocolate chips with coconut oil. The oil helps keep the chocolate smooth. Heat in 30-second bursts. Stir each time to avoid burning. If you notice a few lumps, keep stirring. The heat from the melted chocolate will melt the lumps. This method keeps your chocolate rich and glossy.
How to Achieve a Perfect Seal
For a strong seal on your cocoa bombs, warm the edges before you press them together. You can use a hot pan for this. Gently touch the edges of each half to the pan. This softens the chocolate just enough. Quickly place the warm half on the filled half. Press down gently to seal. Make sure the edges touch completely. This prevents any filling from leaking out.
Decorative Ideas for Serving
Make your cocoa bombs pop with fun decorations! After sealing, melt white chocolate and drizzle it over the top. This adds a lovely contrast to the dark chocolate. For extra flair, sprinkle crushed graham crackers on top. This gives it a s’mores vibe. You can also add mini marshmallows on top. They look cute and taste great! Serve your cocoa bomb in a mug with hot milk for a cozy treat.
Variations
Different Flavor Combinations
You can play with flavors to make your hot cocoa bombs unique. Try using dark chocolate for a richer taste. For a minty twist, add peppermint extract to your filling. You can even switch pumpkin puree for other purees like raspberry or almond. Each change adds a new layer of delight.
Alternative Toppings and Fillings
Toppings can elevate your cocoa bombs. Instead of mini marshmallows, use chocolate chips or toffee bits. Drizzling caramel or chocolate sauce adds a tasty touch. You can also sprinkle crushed nuts or candy pieces for crunch. Get creative and mix your favorite treats!
Vegan or Dairy-Free Options
You can easily make these cocoa bombs vegan. Use dairy-free chocolate chips and almond or oat milk. Replace regular cocoa mix with a vegan version. For the filling, you can use coconut cream instead of pumpkin puree. It gives a lovely texture while keeping it plant-based. Enjoy these cozy delights no matter your dietary needs!
Storage Info
How to Store Homemade Cocoa Bombs
To keep your cocoa bombs fresh, place them in an airtight container. You can use a glass jar or a plastic box with a tight lid. It is best to store them in a cool, dry place, away from heat and sunlight. This helps maintain their shape and flavor. Avoid stacking them on top of each other to prevent breaks.
Shelf Life and Signs of Spoilage
Homemade cocoa bombs can last about two weeks when stored properly. Check for any signs of spoilage. If you see any white spots or a change in texture, it’s best to throw them away. A strange smell is also a sign that they are no longer fresh.
Freezing and Thawing Instructions
You can freeze cocoa bombs for longer storage. Wrap each bomb in plastic wrap and place them in a freezer bag. They can last up to three months in the freezer. To use, take them out and let them thaw at room temperature for about 30 minutes. This keeps them from melting too quickly when you pour hot milk over them. Enjoy your cozy treat!
FAQs
What is a hot cocoa bomb?
A hot cocoa bomb is a chocolate sphere filled with cocoa mix and toppings. When you pour hot milk over it, the shell melts. This releases the cocoa mix and marshmallows inside, creating a rich drink. It’s a fun treat, perfect for chilly days!
Can I use different types of chocolate?
Yes, you can use different types of chocolate! Dark, milk, or even white chocolate all work great. Each type gives a unique flavor. Just remember to adjust the sweetness based on your choice. Dark chocolate will taste more bitter, while white chocolate is very sweet.
How do I serve the hot cocoa bombs?
To serve, place a hot cocoa bomb in a mug. Heat your milk until it’s hot but not boiling. Pour the hot milk over the bomb. Watch as it dissolves! Stir it well to mix everything up. You can top it with whipped cream or crushed graham crackers for extra fun. Enjoy your cozy treat!
Hot cocoa bombs are fun and easy to make. This post covered essential ingredients, like quality chocolate and tasty add-ins. We shared step-by-step instructions to craft these treats, from making the shells to sealing them tight. You learned helpful tips for Melt chocolate and serving ideas. We also explored different flavor combos, vegan options, and how to store them well. In the end, hot cocoa bombs offer a warm and customizable drink experience. Try making them your way for a special treat!