Cranberry Orange Cheesecake Dip Creamy and Bold Treat

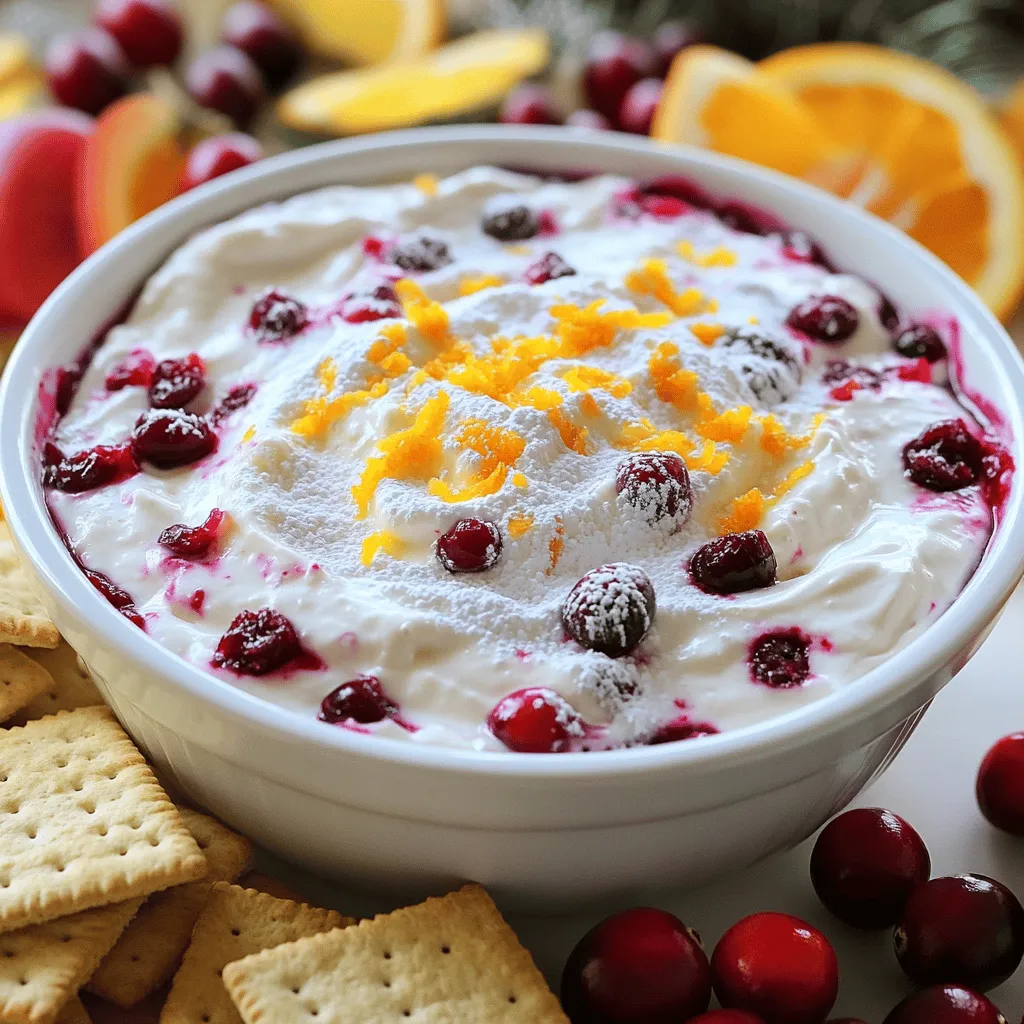
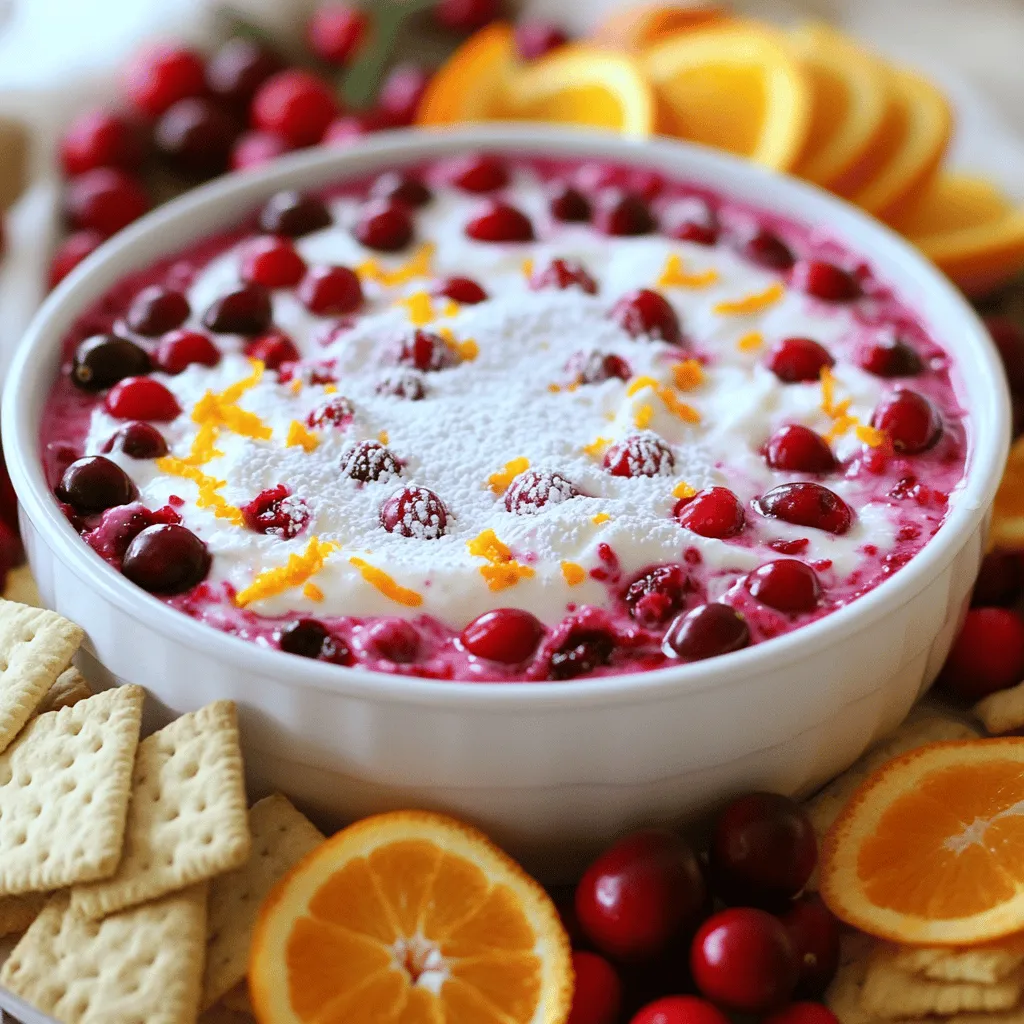
Get ready to impress your guests with a bold and creamy treat: Cranberry Orange Cheesecake Dip! This easy recipe combines sweet and tangy flavors, perfect for any gathering. I’ll guide you through the simple steps to create a dip that will steal the show. Whether it’s a holiday party or a game night, this dip is sure to be a hit. Let’s dive into the ingredients and get started!
Ingredients
List of Essential Ingredients
To make this delicious cranberry orange cheesecake dip, gather these key items:
– 8 oz cream cheese, softened
– 1 cup powdered sugar
– 1 teaspoon vanilla extract
– 1/4 cup Greek yogurt
– Zest of 1 orange
– 1/2 cup fresh cranberries, chopped (or cranberry sauce)
– 1 tablespoon orange juice
– Graham crackers or sliced fruit for serving
These ingredients create a creamy and tangy base. The cream cheese gives it richness, while the cranberries add a bold zing.
Optional Ingredients for Variation
Feel free to get creative! You can add a few fun twists. Here are some optional ingredients:
– A pinch of cinnamon for warmth
– Chopped nuts for crunch
– A dash of almond extract for extra flavor
These additions can make your dip unique and exciting.
Substitutions and Alternatives
If you need to swap out any ingredients, here are some easy alternatives:
– Use mascarpone cheese instead of cream cheese for a richer taste.
– Swap Greek yogurt with sour cream if you prefer.
– For a sweeter note, consider maple syrup instead of powdered sugar.
These substitutions still keep the spirit of the dip while changing its flavor and texture.
Step-by-Step Instructions
Mixing the Cream Cheese Base
Start by taking your softened cream cheese and powdered sugar. Place them in a mixing bowl. Use an electric mixer to beat them together. Mix until the cream cheese is smooth and creamy. This step is key for a great texture.
Adding Flavor and Texture
Now it’s time to add flavor. Pour in the vanilla extract and Greek yogurt. Mix these in until they blend well. Next, add the zest of one orange and a tablespoon of fresh orange juice. Stir until all the flavors mix together. Finally, gently fold in the chopped cranberries or cranberry sauce. This adds a nice burst of color and taste.
Preparing and Refrigerating the Dip
Transfer your creamy mixture to a serving bowl. Use a spatula to smooth the top. Cover the bowl tightly with plastic wrap. Refrigerate the dip for at least one hour. This chilling time helps the flavors meld beautifully. Serve it cold with graham crackers or fresh fruit for a tasty treat.
Tips & Tricks
How to Achieve the Best Consistency
To make your dip smooth, start with softened cream cheese. Cold cream cheese will not mix well. Beat the cream cheese and powdered sugar until creamy. This step is key for a light texture. Adding Greek yogurt helps keep it creamy and adds a slight tang. If the dip feels too thick, mix in a bit more orange juice. This will help you get that perfect dip consistency.
Flavor Enhancements
You can boost the flavor of your dip in simple ways. Adding more orange zest will make it brighter and fresher. Consider using a dash of cinnamon for warmth. This complements the orange and cranberry flavors nicely. For an extra kick, a splash of almond extract can add depth. If you love a sweet dip, try adding more powdered sugar to taste.
Presentation Tips for Serving
A beautiful dip makes serving more fun! Use a pretty bowl to hold your dip. Once you transfer the dip into the bowl, smooth the top for a neat look. Garnish with a few whole cranberries or a sprinkle of orange zest. This makes it pop! Serve your dip with graham crackers or sliced fruit on a colorful platter. This not only looks nice but also invites guests to dive in.

Variations
Seasonal Ingredient Swaps
You can change the ingredients based on what is in season. In winter, use fresh cranberries. In summer, try fresh strawberries or blueberries. You can also swap the orange zest for lemon zest for a different taste. This keeps the dip fresh and exciting.
Alternative Dippers
While graham crackers are great, try other dippers too. Sliced apples or pears work well. You can also use pretzels for a salty crunch. Even cookies can add a fun twist. Just think about what you enjoy dipping!
Different Flavor Profiles
The base of this dip is creamy and sweet. But you can add other flavors. Try a pinch of cinnamon for warmth. Or mix in some chocolate chips for a sweet touch. You can even add nutmeg for a holiday vibe. Don’t be afraid to experiment!
Storage Info
Best Practices for Refrigeration
To keep your cranberry orange cheesecake dip fresh, store it in the fridge. Use an airtight container. This helps prevent any strong smells from other foods in your fridge. The dip can stay fresh for up to five days. Before serving, check for any changes in texture or smell. If it looks or smells off, it’s best to toss it.
Freezing Guidelines
You can freeze this dip if you want to save some for later. Use a freezer-safe container to keep it fresh. Leave some space at the top for expansion. The dip can last in the freezer for about three months. When you’re ready to eat it, thaw it in the fridge overnight. This helps keep the texture nice.
How to Reheat or Refresh
Cranberry orange cheesecake dip is best served cold, but you can refresh it if needed. If it’s too thick after being in the fridge, mix in a little more Greek yogurt or orange juice. This will bring back its creamy texture. Always taste before serving to make sure it still tastes great.
FAQs
Can I use low-fat cream cheese?
Yes, you can use low-fat cream cheese. It will make the dip lighter. The taste may change slightly. Make sure it is softened for easy mixing. This swap keeps the dip creamy while cutting some fat.
How long can the dip be stored?
You can store the dip in the fridge for up to five days. Be sure to keep it in an airtight container. This will help keep it fresh and tasty. If you want to enjoy it later, check for any changes in smell or texture before serving.
What are some serving ideas?
Serve your dip with graham crackers or sliced fruit like apples. You can also use pretzels for a sweet and salty mix. For a fun twist, try using mini pancakes or waffles as dippers. This adds a unique touch to your dessert spread!
This blog post covered how to make a delicious dip. You learned the key ingredients, step-by-step instructions, and helpful tips. We also explored fun variations and smart storage methods.
Remember, you can always switch ingredients to match your taste. With these ideas, you can wow your friends and family. Enjoy every bite, and have fun making your dip!


![- 1 cup (2 sticks) unsalted butter, softened - 1 cup brown sugar, packed - 1/2 cup granulated sugar - 2 large eggs - 2 teaspoons vanilla extract These ingredients form the base of your cookie bars. The butter adds richness, while the sugars provide sweetness and moisture. Eggs help bind everything together, and vanilla adds that warm, sweet flavor we all love. - 3 cups all-purpose flour - 1 teaspoon baking soda - 1/2 teaspoon salt The flour gives structure to the bars. Baking soda is a leavening agent, which helps them rise and become soft. Salt enhances flavor and balances the sweetness, making each bite even better. - 2 cups chocolate chips (semi-sweet or milk chocolate) - 1/2 cup chopped walnuts or pecans (optional) Chocolate chips are the star of these bars! You can choose semi-sweet for a balanced taste or milk chocolate for a sweeter bite. If you like a little crunch, add walnuts or pecans for extra texture. Don’t forget to check the [Full Recipe] for precise measurements. - Preheat the oven to 350°F (175°C). - Grease a 9x13-inch baking dish or line it with parchment paper. Start by setting your oven. This step is key. A hot oven helps the bars rise nicely. Greasing or lining the dish makes it easy to remove the bars later. - Cream together butter, brown sugar, and granulated sugar until fluffy. Next, grab a big bowl. Add your softened butter, brown sugar, and granulated sugar. Mix them well. You want the mixture light and fluffy. This step adds air, making your bars soft. - Add eggs and vanilla extract, mix well. - Blend in dry ingredients and fold in chocolate chips and nuts. Now, it’s time for the eggs and vanilla. Add them one at a time. Mix well after each one. In another bowl, whisk the flour, baking soda, and salt. Slowly add this mix to the butter mix. Stir gently. Finally, fold in your chocolate chips and nuts. This is where the magic happens! - Spread dough in the prepared dish and bake for 25-30 minutes. - Cool before cutting into squares. Spread your dough evenly in the dish. Bake it for 25 to 30 minutes. The edges should turn golden brown. Use a toothpick to check if it’s done. After baking, let the bars cool for about 10 minutes. Then transfer them to a wire rack. Once cooled, cut them into squares. Enjoy your sweet treat or share with friends! For the full recipe, check the details above. To get the best cookie bars, measure your flour right. Too much flour makes them dry. Use a spoon to scoop the flour into your measuring cup. Level it off with a knife. This way, you get just the right amount. Also, let your butter and eggs sit out for a bit. Room temperature helps the mix blend better. It makes your bars soft and chewy. When baking, always check if your bars are done. A toothpick works great for this. Stick it in the center of the bars. If it comes out clean or with a few crumbs, they are ready. If it’s wet, give them more time. After baking, cool the bars in the pan for about ten minutes. Then move them to a wire rack. This keeps them from getting soggy. How you serve your cookie bars matters. Use a wooden platter for a nice touch. It makes your dessert look inviting. You can sprinkle powdered sugar on top for a sweet look. For extra delight, drizzle melted chocolate over the bars. This makes them even more tempting. Enjoy these tasty treats with friends and family! For the full recipe, check out the details above. {{image_2}} You can make these cookie bars gluten-free. Just swap all-purpose flour with a gluten-free flour blend. Many blends work well. Look for ones that have a good mix of flours. This will give your bars a nice texture. Follow the same recipe steps. The taste will still be amazing! If you want vegan cookie bars, it’s simple! Use vegan butter instead of regular butter. For eggs, you can use applesauce or flaxseed meal. Mix one tablespoon of flaxseed with three tablespoons of water. Let it sit for five minutes to thicken. This works as a great egg replacement. The bars will taste just as good! You can also change the flavors of your cookie bars. Try adding spices like cinnamon for a warm taste. You can also mix different types of chocolate. Dark chocolate, white chocolate, or even mint chocolate can add a fun twist. Feel free to get creative! Each variation brings a new taste to enjoy. To keep your chocolate chip cookie bars fresh, use airtight containers. You can store them at room temperature for about three days. If you want them to last longer, put them in the fridge. They will stay good there for about a week. Make sure to let them cool completely before storing. This helps keep their soft texture. Freezing cookie bars is easy and smart for longer shelf life. First, cut the bars into squares. Then, wrap each square in plastic wrap. After that, place the wrapped bars in a freezer bag. Remove as much air as possible before sealing. You can freeze them for up to three months. When you’re ready to eat, simply thaw in the fridge overnight. To reheat your cookie bars, use the oven or microwave. If using the oven, set it to 350°F (175°C). Place the bars on a baking sheet for about 5-7 minutes. This helps restore their chewy texture. If you prefer the microwave, heat for about 10-15 seconds. Watch closely so they don’t overheat. Enjoy your warm, gooey treat again! To check if your chocolate chip cookie bars are done, use a toothpick. Insert it into the center of the bars. If it comes out clean or with a few moist crumbs, they are ready. You can also look at the edges. They should be golden brown. The center may still look soft but will set as it cools. Remember, it's better to slightly underbake than to overbake. This keeps them chewy and soft. Yes, you can substitute some ingredients in this recipe. If you don't have brown sugar, you can use white sugar instead. It will change the flavor, but the bars will still taste good. You can also swap out the butter for coconut oil. This gives a nice flavor and makes them dairy-free. If you want a gluten-free option, use a gluten-free flour blend. Just keep in mind that the texture may vary slightly. To make your chocolate chip cookie bars even more delicious, try adding extra treats. You can mix in caramel bits for a sweet surprise. Chopped candy bars like Snickers or Reese's can add fun flavors. You can also use flavored chips, like butterscotch or peanut butter chips, for variety. Experiment with different nuts or dried fruit for more texture. These additions make the bars unique and tasty! To make delicious chocolate chip cookie bars, we focused on key ingredients, mixing steps, and storage tips. By using simple methods and variations, anyone can create their perfect treat. Remember, measuring flour right and cooling your bars properly are essential for success. Whether you prefer classic, gluten-free, or vegan options, the enjoyment of baking is universal. Follow these steps and tips for tasty results every time. You’ll impress friends and family with your skills!](https://dailydishly.com/wp-content/uploads/2025/05/88326a6b-fa01-43d4-bb00-6171d5f3f1c3-768x768.webp)

