Cranberry White Chocolate Blondies Simple Sweet Treat

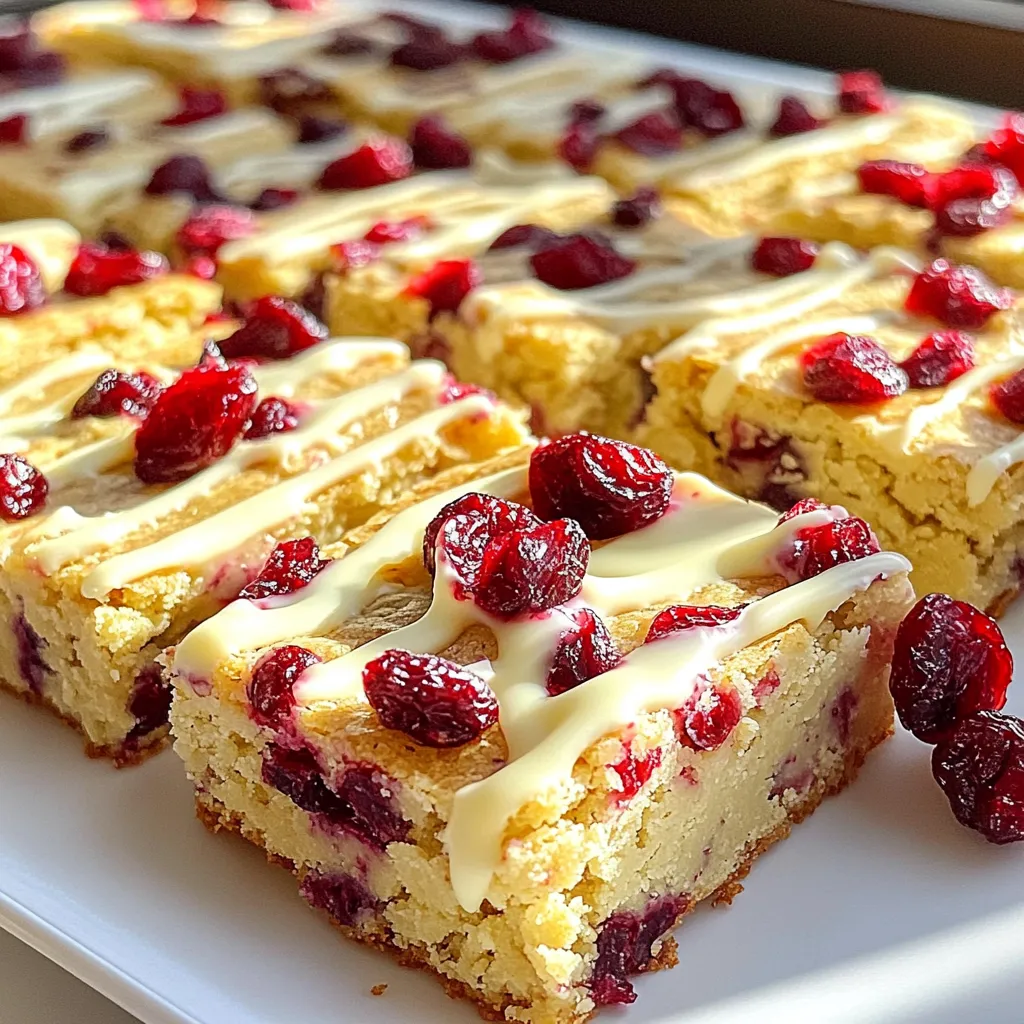
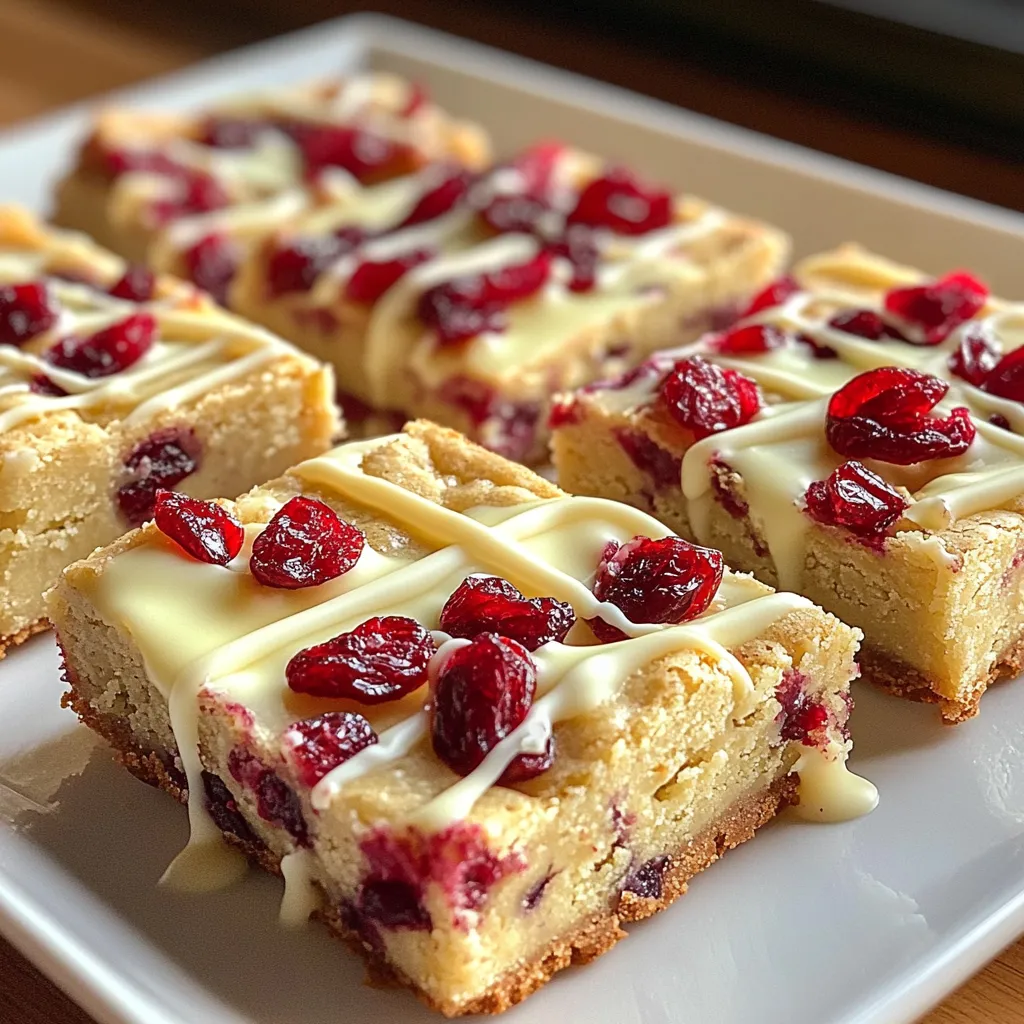
Are you ready for a sweet adventure? These Cranberry White Chocolate Blondies are a simple yet delightful treat that will wow your taste buds. With creamy white chocolate and tart cranberries, they strike the perfect balance between sweet and tangy. Whether you’re a baking expert or a beginner, these blondies are easy to make. Let’s dive into the ingredients and get started on this delicious journey!
Ingredients
List of Ingredients
– 1 cup unsalted butter, melted
– 1 cup packed light brown sugar
– 1/2 cup granulated sugar
– 2 large eggs
– 2 teaspoons vanilla extract
– 2 cups all-purpose flour
– 1 teaspoon baking powder
– 1/2 teaspoon baking soda
– 1/4 teaspoon salt
– 1 cup white chocolate chips
– 1 cup dried cranberries (chopped if large)
To make cranberry white chocolate blondies, gather these simple ingredients. First, we use unsalted butter. It gives the blondies a rich flavor. Next, light brown sugar adds sweetness and moisture. Granulated sugar balances this out. Eggs make the texture soft and chewy. Vanilla extract brings warmth and depth.
For the dry mix, we need all-purpose flour, baking powder, baking soda, and salt. The baking powder and soda help the blondies rise. Salt enhances all the flavors.
Now, the stars of the show: white chocolate chips and dried cranberries. They add sweetness and a pop of tartness. You can chop the cranberries if they are large. This helps distribute them better in the batter.
You can find these ingredients at your local grocery store. Get ready to whip up these delightful treats!
Step-by-Step Instructions
Preparation Steps
1. Preheat your oven to 350°F (175°C). This step helps your blondies bake evenly.
2. Grease and line an 8×8-inch baking dish with parchment paper. Leave some overhang. This makes removing the blondies easy.
3. In a large mixing bowl, whisk together the melted butter, brown sugar, and granulated sugar until the mixture is smooth and well combined.
4. Add the eggs, one at a time, mixing well after each addition. Stir in the vanilla extract for flavor.
5. In another bowl, sift together the flour, baking powder, baking soda, and salt. This helps the dry mix blend well.
Blending the Mixtures
1. Gradually add the dry ingredients to the wet mixture. Stir until just combined. Be careful not to overmix, or your blondies may become tough.
2. Fold in the white chocolate chips and dried cranberries. This gives a sweet and tart flavor to every bite.
Baking Process
1. Pour the batter into the prepared baking dish. Spread it evenly with a spatula. This helps ensure even baking.
2. Bake in the preheated oven for 25-30 minutes. Check for doneness by inserting a toothpick into the center. It should come out with a few moist crumbs.
3. Once baked, remove from the oven and let the blondies cool in the pan for about 10-15 minutes. Use the parchment paper to lift them out.
4. Transfer to a wire rack to cool completely. Slice into squares for serving.
Tips & Tricks
Perfecting Your Blondies
How to avoid overmixing
To keep your blondies soft, mix gently. When combining wet and dry ingredients, stir just until no flour is visible. Overmixing can make them tough. I often use a spatula to fold the batter. This method helps keep the texture light.
Ensuring even baking
For even baking, spread the batter evenly in the pan. Use a spatula to smooth the top. Check your oven’s temperature with an oven thermometer. Sometimes, ovens can be off by a few degrees. Rotate the pan halfway through baking. This step helps all sides bake evenly.
Serving Suggestions
Presentation tips with white chocolate drizzle
Serve the blondies on a pretty platter. Drizzle melted white chocolate over the top for a nice touch. You can use a spoon or a piping bag to create designs. Sprinkle some extra chopped cranberries on top for color.
Ideas for accompaniments or toppings
Pair the blondies with vanilla ice cream for a tasty treat. You can also serve them with whipped cream or a scoop of yogurt. A sprinkle of sea salt can enhance the sweet flavors. Enjoy these blondies as a snack or dessert!

Variations
Flavor Variations
You can easily change the taste of your cranberry white chocolate blondies. Here are a few fun ideas:
– Adding nuts for crunch: Chopped walnuts or pecans add a nice crunch. Just mix in about half a cup when you add the white chocolate chips and cranberries. The nuts give extra flavor and texture.
– Using different types of chocolate or fruits: Instead of white chocolate, try dark or milk chocolate chips. You can also swap dried cranberries for dried cherries or blueberries. This change gives a new twist to each bite.
Dietary Adjustments
You can make these blondies fit special diets too:
– Making it gluten-free: Use a gluten-free flour blend instead of all-purpose flour. This swap will keep the blondies soft and chewy without gluten.
– Vegan substitutions for eggs and butter: Replace the eggs with 1/4 cup of unsweetened applesauce for each egg. For the butter, use vegan butter or coconut oil. These swaps keep the blondies tasty and plant-based.
Storage Info
How to Store
To keep your cranberry white chocolate blondies fresh, store them in an airtight container. This method helps to maintain their soft texture and flavor. Make sure to cool the blondies completely before storing them. If you stack them, place parchment paper between layers to prevent sticking.
– Use a glass or plastic container with a tight lid.
– Keep them at room temperature for up to 3 days.
– For longer storage, refrigerate them for about a week.
Freezing Instructions
If you want to save some blondies for later, freezing is a great option. Start by wrapping each blondie tightly in plastic wrap. This step prevents freezer burn and keeps them moist. Then, place the wrapped blondies in a freezer-safe bag or container.
– Freeze for up to 3 months for the best taste.
– To thaw, move them to the fridge overnight.
– For quicker thawing, leave them at room temperature for about an hour.
This way, your delicious blondies stay tasty and ready to enjoy whenever you like!
FAQs
Common Questions About Cranberry White Chocolate Blondies
Can I use fresh cranberries instead of dried?
Yes, you can use fresh cranberries. Fresh cranberries add a tart flavor. However, they have more moisture. You may need to adjust the baking time slightly. Chop the fresh cranberries into smaller pieces. This helps them mix well in the batter.
How do I make my blondies more fudgy?
To make your blondies fudgier, reduce the flour by a quarter cup. This change adds more moisture. You can also bake them for a shorter time. Start checking for doneness around 20 minutes. The edges should be set, but the center stays soft.
What can I substitute for white chocolate chips?
If you want a substitute for white chocolate chips, try using butterscotch chips. They add a nice sweetness. You can also use dark chocolate chips for a richer taste. Another option is to use chopped nuts for added texture.
This blog post covered how to make delicious cranberry white chocolate blondies. You learned about the key ingredients, step-by-step instructions, and baking tips. I shared helpful storage info and common FAQs too.
Making blondies is fun and easy. You can adjust flavors and even try gluten-free or vegan options. Experiment with toppings to make your blondies special. Enjoy sharing your tasty treats with friends and family!


![To make the Viral Blueberry Lemon Loaf, gather these ingredients for a fresh and tasty treat: - 1 ½ cups all-purpose flour - 1 teaspoon baking powder - ½ teaspoon baking soda - ¼ teaspoon salt - ½ cup unsalted butter, softened - 1 cup granulated sugar - 2 large eggs - 1 teaspoon vanilla extract - Zest of 1 lemon - ¼ cup fresh lemon juice - ½ cup plain Greek yogurt - 1 ½ cups fresh blueberries (plus extra for garnish) Each item plays a key role in building flavor and texture. The all-purpose flour gives structure. The baking powder and baking soda help the loaf rise. Butter and sugar add richness and sweetness. Eggs bind the mixture and add moisture. Vanilla extract brings warmth, while lemon zest and juice give a bright, zesty flavor. Greek yogurt keeps the loaf moist and tender. Fresh blueberries provide bursts of sweetness in every bite. To follow the full recipe, you can refer to the detailed instructions provided earlier. Enjoy the process of mixing these ingredients to create a delicious loaf! 1. Preheating the oven Start by preheating your oven to 350°F (175°C). This step ensures even baking, which is key for your loaf. 2. Greasing the loaf pan Grease a 9x5 inch loaf pan. Use butter or cooking spray. You can also line it with parchment paper for easy removal. 3. Mixing dry ingredients In a medium bowl, whisk together the all-purpose flour, baking powder, baking soda, and salt. Set this mixture aside to keep it fresh. 1. Creaming butter and sugar In a large bowl, cream together the softened butter and granulated sugar. Use an electric mixer for about 3-4 minutes until it’s light and fluffy. 2. Adding eggs and flavorings Add the eggs one at a time. Mix well after each addition. Then stir in the vanilla extract, lemon zest, and lemon juice. 3. Incorporating dry and wet mixtures Gradually add the dry ingredients to the wet mixture. Alternate with Greek yogurt. Start and end with the flour mix. Mix just until combined. 1. Pouring batter into the pan Carefully pour the batter into your prepared loaf pan. Use a spatula to smooth the top. 2. Baking time and checking for doneness Bake in the preheated oven for 55-60 minutes. To check if it’s done, insert a toothpick into the center. If it comes out clean, your loaf is ready! Now, you have a delicious Viral Blueberry Lemon Loaf ready to impress. For the complete recipe, check the [Full Recipe]. Enjoy your baking adventure! To make your loaf fluffy, follow these tips: - Use room temperature butter: Softened butter mixes better with sugar, creating air pockets. - Don’t overmix: Mix until just combined. This helps keep the loaf light. When folding in blueberries, be gentle: - Use a rubber spatula: This lets you lift the batter without squishing the berries. - Fold in batches: Add a few blueberries at a time, ensuring they stay whole. For a beautiful presentation: - Slice the loaf evenly: Use a sharp knife for clean cuts. - Add garnishes: Place fresh blueberries on top and dust with powdered sugar. When it comes to pairing, consider these ideas: - Beverages: Serve with iced tea or lemonade for a refreshing combo. - Sides: A dollop of whipped cream adds richness and balance to the tangy loaf. For the full recipe, check out the [Full Recipe]. {{image_2}} You can make your blueberry lemon loaf even more exciting. One fun way is to add nuts. Chopped walnuts or pecans bring a nice crunch. They also add a rich flavor. You can mix in ½ cup of nuts when you fold in the blueberries. You can also try adding other fruits. Fresh raspberries or strawberries work well too. They will change the taste a bit, but they still pair nicely with lemon and blueberries. If you want to adjust the sweetness, you can cut back on sugar. Use ¾ cup instead of 1 cup. This makes the loaf less sweet. If you like tartness, add more lemon juice or zest. A teaspoon more can brighten the loaf. For those who need gluten-free options, you can swap the all-purpose flour. Use a gluten-free flour blend instead. Make sure it has xantham gum to help with texture. This keeps the loaf fluffy and moist. If you have allergies, you can replace the butter with coconut oil. This also gives a nice flavor. For egg allergies, use a flax egg. Mix 1 tablespoon of ground flaxseed with 2.5 tablespoons of water. Let it sit for five minutes before adding it to your mix. These simple changes let everyone enjoy the blueberry lemon loaf. You can find the full recipe to see how all these ingredients come together. To keep your blueberry lemon loaf fresh, let it cool completely. This step is key. Place it on a wire rack for even cooling. Once cool, wrap the loaf tightly in plastic wrap. This keeps moisture in and prevents drying. You can also use aluminum foil for added protection. Store the wrapped loaf in the fridge for up to one week. This method keeps it moist and tasty. If you want to save some for later, freezing is a great option. Wrap the cooled loaf tightly in plastic wrap and then in aluminum foil. This double-wrap prevents freezer burn. Label the loaf with the date to track freshness. You can freeze it for up to three months. When you’re ready to enjoy it, take it out of the freezer. Let it thaw in the fridge overnight. For a quick thaw, leave it on the counter for a few hours. Once thawed, enjoy your delicious loaf with a cup of tea or coffee. You can use sour cream instead of Greek yogurt. It gives a similar texture and taste. If you want a dairy-free option, try using coconut yogurt. Both will keep your loaf moist and flavorful. To check if the loaf is done, insert a toothpick in the center. If it comes out clean or with a few crumbs, the loaf is ready. If the toothpick has wet batter, bake it a little longer. Yes, you can use frozen blueberries! Just toss them in a bit of flour before adding to the batter. This helps prevent them from sinking to the bottom while baking. Keep in mind that frozen blueberries may make the batter a bit more purple. If you want vibrant colors, try adding them straight from the freezer. For the full recipe, check the details above. You learned how to bake a delicious loaf using simple ingredients and steps. We covered each stage, from mixing to baking and serving. Remember to follow the tips for texture and presentation. Feel free to explore variations to make the recipe yours. Store leftovers properly to keep them fresh. Baking is fun and rewarding. Enjoy your tasty loaf with family and friends. Your baking adventure starts now!](https://dailydishly.com/wp-content/uploads/2025/07/415bfa61-4575-4544-97a5-bb1f598d6192-768x768.webp)

. To make blueberry almond overnight oats, start by gathering all your ingredients. This recipe takes just 10 minutes to prep. You can make two servings, perfect for a quick breakfast. In a medium bowl or a mason jar, add these base ingredients: - 1 cup rolled oats - 1 cup almond milk (or any plant-based milk) - ½ cup Greek yogurt (or plant-based yogurt) - 2 tablespoons honey or maple syrup - 1 teaspoon vanilla extract - ½ teaspoon cinnamon - A pinch of salt Mix all these items well. Make sure they blend together smoothly. This mix is the heart of your oats. Now, gently fold in 1 cup of blueberries. If you want, save a few for topping later. Then, add ¼ cup of sliced almonds for crunch. Stir carefully so you don’t mash the blueberries. Cover the bowl or seal the jar, then put it in the fridge. Let it chill overnight. This helps the oats soak up the flavors. The next morning, stir the oats. If they are too thick, add a splash of almond milk. Top with the reserved blueberries and sliced almonds for extra flavor and crunch. You can find the full recipe for this delicious dish above. Enjoy your tasty and nutritious breakfast! To make great overnight oats, follow these steps: - Use rolled oats. They soak up liquid well. - Choose a container you can seal tight. A mason jar works well. - Mix all the base ingredients first. This helps flavors blend. - Refrigerate for at least six hours. This allows the oats to soften. - Stir before serving to combine everything. Add more milk if needed. Personalize your overnight oats easily. Here are some ideas: - Swap almond milk for coconut or oat milk. - Use different fruits like strawberries or bananas. - Add seeds like chia or flax for extra nutrition. - Try nut butters for creaminess and flavor. - Experiment with spices like nutmeg or cardamom. Let’s look at the benefits of the main ingredients: - Rolled oats: They provide fiber, which is good for digestion. - Almond milk: It is low in calories and rich in vitamins. - Greek yogurt: This adds protein and probiotics for gut health. - Blueberries: They are full of antioxidants and vitamins. - Almonds: They offer healthy fats and help keep you full. Each ingredient brings something special to your meal. Enjoy the great taste while knowing you are eating well. For the full recipe, check out the details above. {{image_2}} You can change the taste of your Blueberry Almond Overnight Oats easily. Here are some ideas: - Mixed Berries: Swap blueberries for strawberries, raspberries, or blackberries. - Nut Butters: Stir in a spoon of almond or peanut butter for creaminess. - Chocolate: Add cocoa powder or chocolate chips for a fun twist. - Coconut: Sprinkle in some shredded coconut for a tropical flair. These variations will make your oats more exciting and tasty. If you have special dietary needs, you can still enjoy this recipe. Here are some substitutes: - Dairy-free: Use almond milk and plant-based yogurt for a vegan option. - Sugar-free: Skip the honey or maple syrup. Use ripe bananas for sweetness. - Gluten-free: Make sure you choose certified gluten-free rolled oats. These changes let everyone enjoy this dish. Want to make more servings? Scaling the recipe is simple. Just multiply each ingredient: - For 4 servings, use 2 cups of oats and 2 cups of almond milk. - For 6 servings, use 3 cups of oats and 3 cups of almond milk. You can prepare these oats in a large bowl or several jars. This way, you have breakfast ready for days! For the full recipe, check out the Berry Delights: Blueberry Almond Overnight Oats section. To keep your blueberry almond overnight oats fresh, store them in an airtight container. A mason jar works great because it's easy to seal. Make sure the oats are covered well with the lid. This keeps out air and moisture. If you make a big batch, divide them into individual servings. This way, you grab just what you need. When stored properly in the fridge, blueberry almond overnight oats can last for up to five days. This means you can meal prep for the week! Just remember to check for any changes in smell or texture before eating. If it looks or smells off, it’s best to toss it. You can also freeze your oats for longer storage. To do this, place the oats in a freezer-safe container. Leave some space at the top, as the oats will expand when frozen. They will stay good for up to three months. When you’re ready to eat them, thaw in the fridge overnight. You can warm them up or enjoy them cold. This is a great option for quick breakfasts! For the full recipe, check out the details above. Yes, you can! Other fruits work well too. Try strawberries, raspberries, or bananas. Each fruit adds its unique flavor and texture. Just make sure to adjust the amount based on the fruit’s sweetness. For example, use less honey if your fruit is sweet. Overnight oats stay fresh for up to five days. Store them in a sealed jar or container. This makes them great for meal prep. Just keep an eye on the texture. If they get too thick, add a splash of almond milk before serving. No, sweeteners are not a must. The oats and fruit add natural sweetness. If you prefer less sugar, skip the honey or maple syrup. You can also use ripe bananas or applesauce for sweetness. Adjust it to fit your taste! Blueberry almond overnight oats are simple to make and delicious. We covered the key and optional ingredients, plus tips on choosing the best. The step-by-step instructions guide you from mixing to adding fruit. I shared tips for customizing and highlighted the nutritional benefits of oats. Don't forget the variations you can try to suit your taste. Lastly, we discussed how to store your oats safely. With these insights, you're ready to enjoy a healthy breakfast that keeps you full and satisfied.](https://dailydishly.com/wp-content/uploads/2025/07/39185b14-c6b2-4e99-b0b5-ab17b9785ad3-768x768.webp)
. 1. In a mixing bowl, combine softened butter, brown sugar, and granulated sugar. 2. Beat this mixture until it is creamy and smooth. 3. Next, add the cream cheese and vanilla extract. 4. Continue to beat until the mix is fluffy and well combined. 5. Now, sift in the all-purpose flour and a pinch of salt. 6. Mix on low speed or gently by hand until just combined. 1. Fold in the mini chocolate chips and optional nuts if you like. 2. Make sure they are evenly mixed in the dip. 3. Transfer the dip to a serving bowl. 4. Cover it with plastic wrap and chill in the fridge. 1. Serve the dip after it has chilled for at least 30 minutes. 2. Pair it with graham crackers, pretzels, or apple slices for dipping. This simple process gives you a great treat to enjoy. For the full details, check the Full Recipe. - Ensure all ingredients are at room temperature. This helps them blend well. - Chill time enhances flavor. Let it sit for at least 30 minutes. - Skipping the chilling step can lead to a dip that's too soft. - Overmixing the batter makes it tough. Mix just until combined. - Experiment with flavored extracts like almond or hazelnut. A little goes a long way. - Adjust sweetness by varying sugar amounts. Taste as you go for the best balance. With these tips, you’ll create a dip that everyone will love! For the complete method, check the Full Recipe. {{image_2}} You can switch up the flavors to keep things fun. For a peanut butter twist, mix in ½ cup of creamy peanut butter. This adds a nutty taste that pairs great with chocolate. If you crave a coffee kick, try a mocha chocolate chip dip. Just add 1 tablespoon of instant coffee to the mix. The coffee brings a rich depth that coffee lovers will adore. If you need gluten-free options, use 1 cup of gluten-free flour. This swap works perfectly and keeps the dip tasty. For those avoiding dairy, choose a dairy-free cream cheese. Brands like Tofutti or Kite Hill offer great alternatives. They keep the creamy texture while being dairy-free. Make your dip festive with holiday-themed sprinkles. These colorful touches can brighten any dessert table. In summer, try adding dried fruit, like cranberries or apricots. This gives your dip a juicy burst and a fun twist. You can mix and match these ideas to find your favorite combo. For the full recipe, click [Full Recipe]. To keep your chocolate chip cookie dough dip fresh, store it in an airtight container. This helps prevent it from drying out. You can use any clean, sealable bowl or jar. Make sure the lid fits tight. For best results, place the dip in the fridge. This will keep it cool and tasty. The dip stays fresh for about 5 days in the fridge. After that, it may lose flavor or texture. Check for signs of spoilage. If it smells off or has a strange color, it's best to toss it. Always trust your senses when it comes to food safety. You can freeze this dip for later use. To do this, place it in a freezer-safe container. Leave some space at the top, as it will expand. When you want to enjoy it again, simply move it to the fridge to thaw overnight. This way, it stays creamy and delicious. Enjoy your dip with graham crackers, pretzels, or apple slices after thawing! You can swap the cream cheese for Greek yogurt or whipped silken tofu. Both options work well. Greek yogurt adds a nice tang, while silken tofu keeps it smooth. Make sure to choose plain yogurt. This change makes the dip lighter and still tasty. Yes, you can make this dip up to 2 days in advance. Just keep it in the fridge. This helps the flavors blend well. When you are ready to serve, just take it out and let it sit for a bit. Then, enjoy it with your favorite dippers. You have many options beyond graham crackers. Try cookies, fresh fruits, or pretzels. Each choice adds a fun crunch or sweetness. Apples and strawberries are great for a refreshing contrast. Have fun mixing and matching to find your favorite pairings! This blog post covered how to make a delightful chocolate chip cookie dough dip. You learned about essential ingredients like cream cheese, sugars, and mini chocolate chips. I shared tips for the best results and common mistakes to avoid. You also discovered flavor variations and storage tips. In my experience, this dip is fun and easy. It works well for gatherings or just a tasty snack. Enjoy trying out different dippers and flavors!](https://dailydishly.com/wp-content/uploads/2025/07/9841c43c-25b7-4553-9f85-c4e222a26afc-768x768.webp)
