
Welcome to a delightful journey into comfort food with my Creamed Corn Casserole recipe! This simple dish is bursting with sweet corn flavor and creamy goodness. Whether you’re hosting guests or enjoying a cozy night in, this casserole is sure to satisfy. I’ll guide you through easy steps and tips to make it just right. Grab your apron and let’s create a tasty treat that everyone will love!
Why I Love This Recipe
- Deliciously Creamy: This casserole is packed with rich flavors from the heavy cream and cream cheese, making every bite a delightful indulgence.
- Easy to Prepare: With simple ingredients and straightforward steps, this recipe is perfect for both novice and experienced cooks alike.
- Versatile Side Dish: This casserole pairs wonderfully with a variety of main dishes, making it a great addition to any meal.
- Perfect for Gatherings: With its generous serving size, this dish is ideal for family get-togethers and potlucks, ensuring everyone will enjoy it.
Ingredients
Key Ingredients for Creamed Corn Casserole
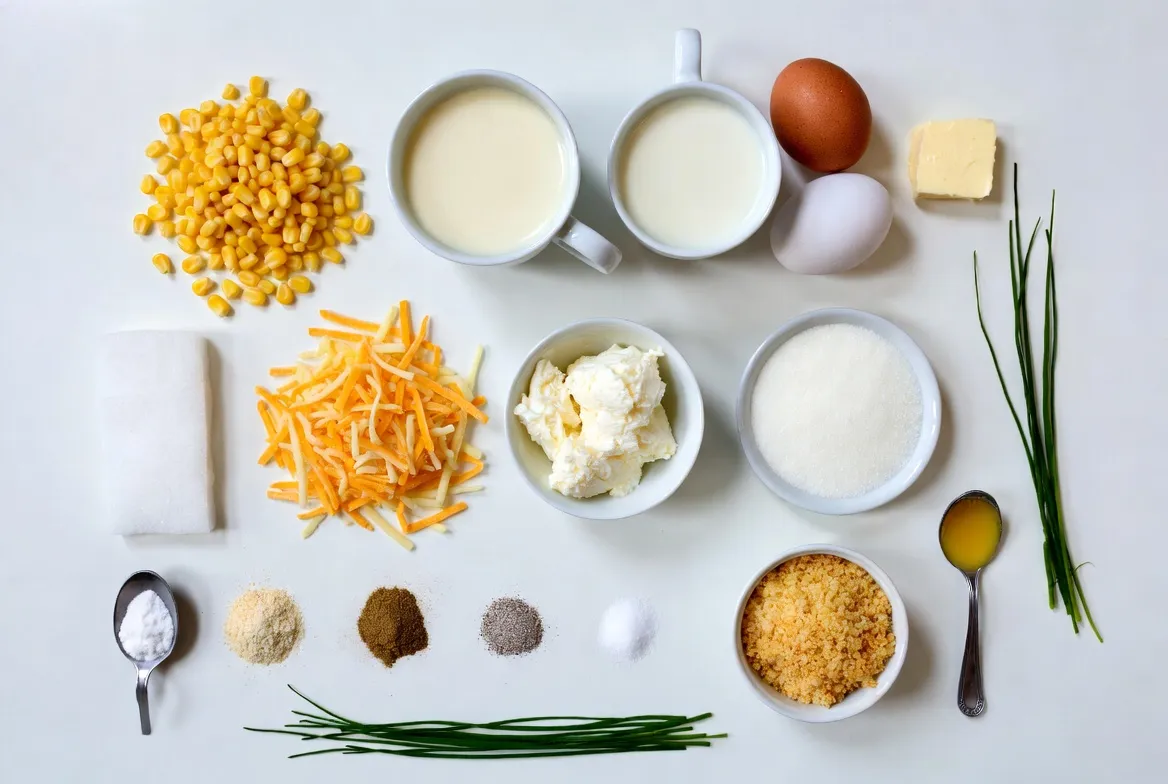
To make a great creamed corn casserole, you need some simple items. Here’s a list of key ingredients:
– 2 cups fresh or frozen corn kernels
– 1 cup heavy cream
– 1 cup milk
– 1/2 cup sharp cheddar cheese, shredded
– 1/2 cup cream cheese, softened
– 2 large eggs
– 1/4 cup sugar
– 1 teaspoon baking powder
– 1/2 teaspoon garlic powder
– 1/2 teaspoon onion powder
– Salt and pepper to taste
– 1/2 cup breadcrumbs
– 2 tablespoons melted butter
– Fresh chives for garnish (optional)
These ingredients blend well to create a creamy, tasty dish that everyone loves.
Suggested Fresh or Frozen Corn
You can use either fresh or frozen corn for this recipe. Fresh corn gives a sweet, crisp taste. If you use fresh corn, make sure to cut it off the cob. Frozen corn is just as good. It is quick and easy, and you don’t have to cook it first. Both types work well, so pick what you like best.
Dairy Choices: Heavy Cream and Milk
Heavy cream and milk add richness to the casserole. Heavy cream gives a thick, creamy texture. It makes the dish extra smooth. Milk balances the thickness and keeps it light. You can use whole milk for a richer flavor or low-fat milk for a lighter option. Both will work well in this recipe.
Step-by-Step Instructions
Prepping the Casserole Dish
First, you want to get your baking dish ready. I like using a 9×9-inch dish. Grease it well. This helps the casserole come out easily. Set it aside while you mix the other ingredients.
Mixing the Corn and Cream Base
In a large bowl, combine the corn kernels, heavy cream, and milk. Use a spoon to stir it all together. Make sure the corn is coated well. This mixture gives the casserole its rich and creamy base.
Incorporating Cream Cheese and Eggs
Now, take another bowl and add the softened cream cheese. Beat it with a mixer until it’s smooth. Then, add the eggs, sugar, baking powder, garlic powder, onion powder, salt, and pepper. Mix this well until there are no lumps. Fold this mixture gently into the corn mix. Be careful not to overmix. You want a nice blend of flavors. Finally, stir in the cheddar cheese, saving some for the top.
Tips & Tricks
How to Prevent a Watery Casserole
To keep your casserole from being watery, use fresh corn or well-drained frozen corn. If you use frozen corn, let it thaw and squeeze out extra moisture. Another great tip is to add a bit more cheese or breadcrumbs. This helps absorb any liquid. The cream and eggs also thicken the dish as it bakes.
Best Baking Techniques for Even Cooking
Make sure to preheat your oven to a steady 350°F. This ensures even cooking throughout the casserole. Place your dish in the center of the oven for the best heat distribution. Using a glass or ceramic dish helps with even baking. Check the casserole a few minutes before the timer goes off. It should be golden and firm in the center.
Recommendations for Cheese Type and Flavor
I love using sharp cheddar cheese for its strong flavor. It pairs well with the sweet corn. You can also try pepper jack for a spicy kick. If you’re feeling adventurous, mix in some crumbled feta or creamy goat cheese. These cheeses add depth and a unique twist to your dish. Always reserve a bit of cheese to sprinkle on top for a tasty crust.
Pro Tips
- Use Fresh Corn: For the best flavor and texture, opt for fresh corn when it’s in season. If using frozen, ensure it’s good quality and thawed before use.
- Experiment with Cheeses: While sharp cheddar gives a great flavor, feel free to mix in other cheeses like Monterey Jack or Gruyère for a unique twist.
- Adjust the Sweetness: Depending on your preference, you can reduce the sugar or replace it with honey or maple syrup for a different sweetness profile.
- Let it Rest: Allow the casserole to sit for a few minutes after baking. This helps it to set better, making it easier to serve.
Variations
Adding Proteins: Chicken or Bacon Options
You can boost this dish by adding protein. Chicken or bacon works great. Cook the chicken first and chop it into small pieces. Stir it in with the corn mix. For bacon, cook until crispy, then crumble it. Mix it in or sprinkle on top before baking. Both options add flavor and make it even more filling.
Vegetarian Additions: Peppers or Spinach
If you want a vegetarian twist, try adding peppers or spinach. Dice sweet bell peppers and fold them into the corn mix. They add color and a nice crunch. Spinach is another great choice. Use fresh or frozen spinach. Just be sure to drain it well before mixing. This not only adds nutrients but also enhances the dish’s taste.
Gluten-Free Breadcrumb Alternatives
For a gluten-free option, swap regular breadcrumbs for gluten-free ones. You can also use crushed rice cereal or corn flakes. Both give a nice crunch. Just mix them with melted butter and sprinkle on top as you would with regular breadcrumbs. This keeps the texture while making the dish suitable for gluten-free diets.
Storage Info
How to Store Leftover Casserole
To store leftover creamed corn casserole, let it cool first. Then, place it in an airtight container. This keeps it fresh for up to three days in the fridge. Label the container with the date. This way, you know when to use it.
Freezing Instructions for Longer Shelf Life
For longer storage, you can freeze the casserole. Cut it into individual portions. Wrap each piece tightly in plastic wrap, then place it in a freezer bag. Make sure to remove as much air as possible. This helps prevent freezer burn. You can freeze it for up to three months.
Reheating Tips to Maintain Texture
When you’re ready to eat the casserole, reheat it carefully. For best results, use the oven. Preheat it to 350°F (175°C). Place the casserole in an oven-safe dish, cover with foil, and heat for about 20 minutes. This keeps the casserole moist. If using a microwave, heat in short bursts. Stir in between to avoid hot spots. Enjoy your delicious dish!
FAQs
Can I make Creamed Corn Casserole ahead of time?
Yes, you can prepare Creamed Corn Casserole in advance. Mix the ingredients and place them in your baking dish. Cover it with plastic wrap and store it in the fridge for up to 24 hours. When you’re ready to bake, take it out and let it sit for about 30 minutes to reach room temperature. Then, bake as directed. This makes it perfect for busy days or holiday meals.
What can I serve with Creamed Corn Casserole?
Creamed Corn Casserole pairs well with many dishes. Here are some tasty options:
– Grilled chicken or turkey
– Barbecued ribs
– Roasted vegetables
– A fresh green salad
– Mashed potatoes
These sides enhance your meal and create a colorful plate.
Can I substitute ingredients for a healthier option?
Yes, you can make some swaps for a healthier dish. Here are a few ideas:
– Use low-fat milk instead of whole milk
– Replace heavy cream with unsweetened almond milk
– Try Greek yogurt instead of cream cheese
– Use less sugar or a sugar substitute
These changes can help reduce calories while still keeping the dish creamy and delicious.
Creamed Corn Casserole offers a tasty mix of flavors and textures. We explored key ingredients like fresh corn, cream, and cheese. You learned the step-by-step process for making it and tips for a perfect bake. We also discussed fun variations, from adding proteins to gluten-free options. Finally, I shared how to store and reheat your casserole. This dish is simple, rewarding, and can fit any meal. Enjoy your cooking adventure and make it your ow


