Creamy Avocado Chicken Salad Flavorful and Fresh Dish

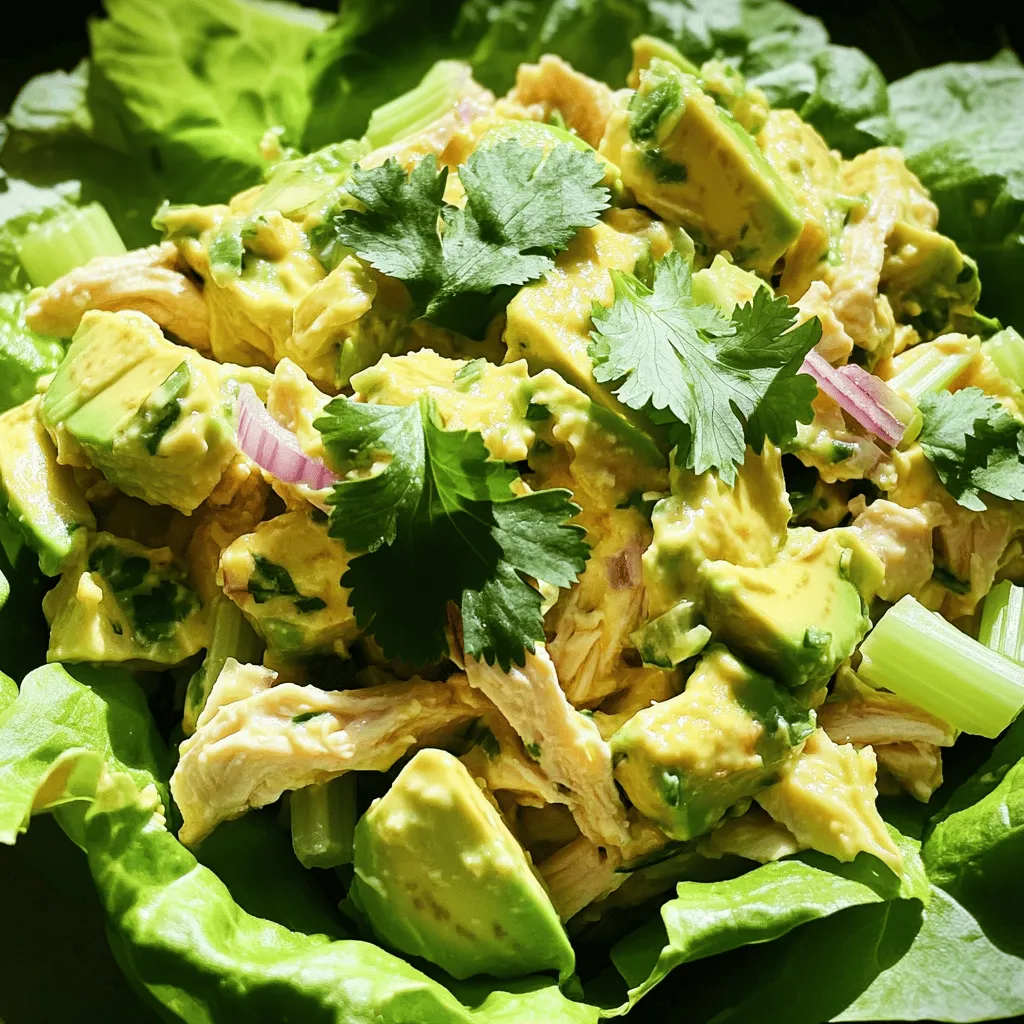
Looking for a fresh and creamy salad? This Creamy Avocado Chicken Salad is your answer! It’s easy to make and packed with flavor. With ripe avocados and shredded chicken, it offers a tasty twist on a classic dish. Perfect for lunch, picnics, or meal prep, this salad can fit any circumstance. Get ready to enjoy a delightful bowl of goodness that’s good for you too! Let’s dive into the details.
Ingredients
To make a tasty creamy avocado chicken salad, gather these simple ingredients:
– 2 cups cooked chicken, shredded
– 1 ripe avocado, halved and pitted
– 1/4 cup plain Greek yogurt
– 1 tablespoon Dijon mustard
– 1 tablespoon lemon juice
– 1/4 cup celery, finely chopped
– 1/4 cup red onion, finely chopped
– 1/4 cup cilantro, chopped (or parsley)
– Salt and pepper to taste
– 1/4 teaspoon garlic powder
– Lettuce leaves or whole grain wraps for serving
Each ingredient plays a part in making this dish bright and fresh. The shredded chicken gives it protein. The avocado adds creaminess and healthy fats. Greek yogurt keeps it light and tangy. Dijon mustard and lemon juice bring zest. Celery and red onion add crunch. Fresh herbs like cilantro or parsley give it a pop of flavor.
This creamy avocado chicken salad is perfect for a quick lunch or picnic.
Step-by-Step Instructions
Preparation Process
Step 1: Mash the avocado
Start by cutting the avocado in half. Remove the pit and scoop the flesh into a bowl. Use a fork to mash it until smooth. This gives your salad a creamy base.
Step 2: Combine creamy dressing ingredients
In the bowl with the mashed avocado, add the plain Greek yogurt, Dijon mustard, and lemon juice. Mix these together well. This creates a rich, tangy dressing for the salad.
Step 3: Mix chicken and vegetables
In a separate large bowl, combine the shredded chicken, chopped celery, red onion, and cilantro. Stir this mixture gently. You want all the flavors to blend.
Step 4: Combine all ingredients
Pour the creamy avocado mixture over the chicken and vegetable mix. Carefully fold everything together. Make sure all the chicken and veggies are coated with the dressing.
Step 5: Adjust seasoning
Sprinkle garlic powder, salt, and pepper over the salad. Taste and adjust the seasoning as needed. This step ensures your salad has the perfect flavor.
Now you have a delicious and fresh creamy avocado chicken salad!
Tips & Tricks
Perfecting the Salad
– Choose ripe avocados for creaminess: Select avocados that are slightly soft when you press them. This ensures they mash well and add a rich texture.
– Use pre-cooked chicken for quicker prep: Using rotisserie chicken saves time and adds flavor. It also makes this recipe a breeze on busy days.
– Adjust dressing ingredients to taste: If you like it tangy, add more lemon juice. For a creamier taste, increase the Greek yogurt.
Serving Suggestions
– Best served fresh: This salad tastes best the day you make it. Freshness keeps the flavors bright and vibrant.
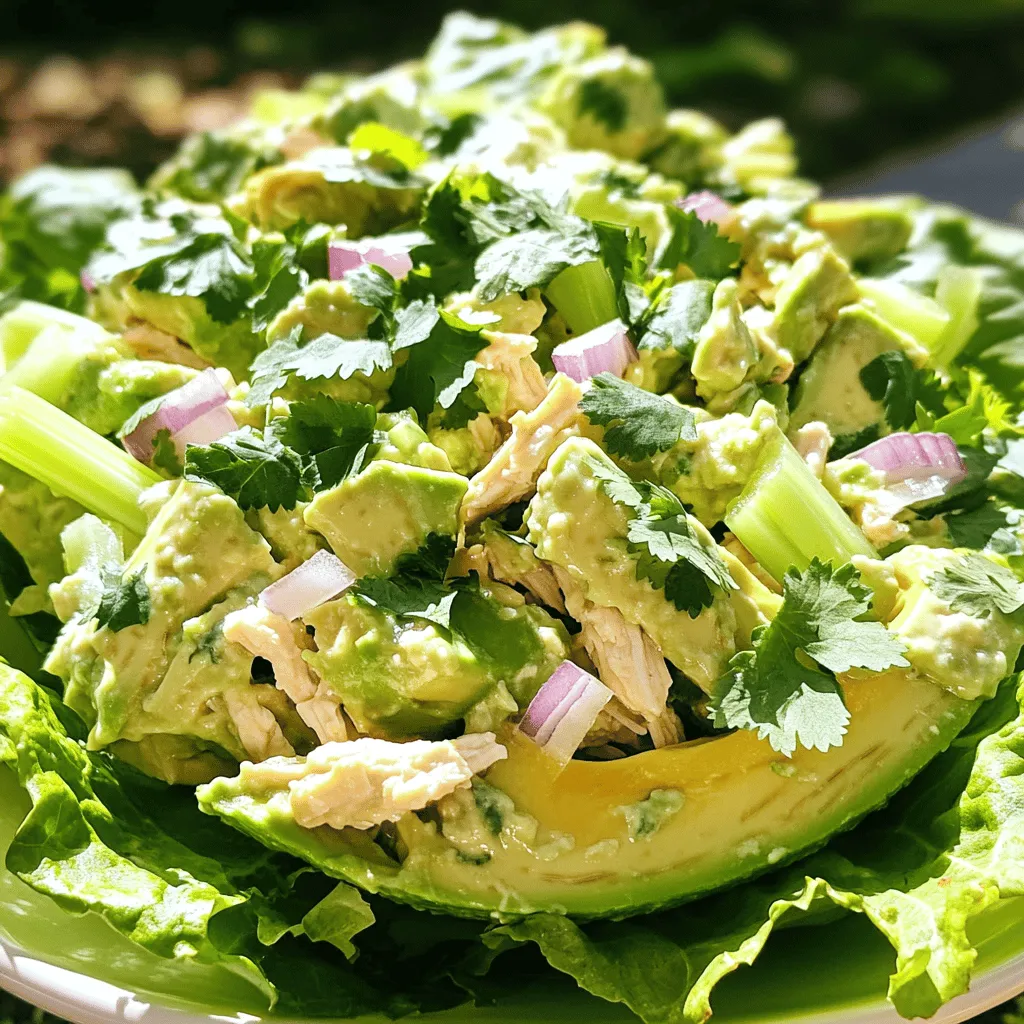
– Pair with whole grain bread or tortilla wraps: Spread it on a wrap or sandwich for a hearty meal. You can also serve it in lettuce for a lighter option.
– Ideal for meal prep or picnics: Pack this salad for lunch or enjoy it at a picnic. It stays tasty and is easy to transport.

Variations
Dietary Considerations
– Gluten-free options: This salad is already gluten-free. Just use fresh ingredients.
– Low-carb alternatives: To keep it low-carb, serve in lettuce wraps. Skip any bread or wraps.
– Vegan substitutions: Swap chicken for chickpeas or tofu. Use vegan yogurt in place of Greek yogurt.
Flavor Enhancements
– Adding spices like cumin or paprika: A sprinkle of cumin adds warmth. Paprika gives a nice color and taste.
– Incorporating nuts or seeds: Chopped walnuts or sunflower seeds add crunch and healthy fats.
– Mixing in additional vegetables like bell peppers or corn: Diced bell peppers add sweetness. Corn brings a nice pop of flavor.
These variations let you customize your creamy avocado chicken salad. You can make it your own with the options that suit your taste and diet.
Storage Info
Refrigeration Tips
To keep creamy avocado chicken salad fresh, store leftovers in the fridge. Use an airtight container to keep it from getting dry. Make sure the lid is tight. This helps keep the salad cool and tasty. You can enjoy it for up to three days. If you see any browning on the avocado, just stir it back in. It’s still good!
Freezing Instructions
You can freeze creamy avocado chicken salad, but it may change in texture. The avocado may get mushy when thawed. To freeze, put the salad in a freezer-safe container. Leave space at the top for expansion. When you want to eat it, move it to the fridge overnight to thaw.
When ready to serve, give it a stir. You can add a bit of lemon juice to freshen the flavor. Enjoy your creamy avocado chicken salad with lettuce leaves or in a wrap!
FAQs
Common Questions
Can I use canned chicken instead of cooked?
Yes, you can use canned chicken. Just drain it well. Canned chicken saves time and adds protein.
How long does the chicken salad last in the fridge?
The salad lasts up to three days in the fridge. Store it in an airtight container for best results.
What can I use instead of Greek yogurt?
You can use sour cream or mayonnaise. Both options will still give you a creamy texture.
Can I make creamy avocado chicken salad ahead of time?
Yes! You can prepare it a day in advance. Just store it in the fridge to keep it fresh.
Related Queries
What’s the best way to store avocados?
Store avocados at room temperature. Once ripe, keep them in the fridge to slow down ripening.
How to prevent avocados from browning?
Use lemon juice to prevent browning. It helps keep the fresh green color longer.
Ideas for adding more protein to the salad?
Try adding chopped hard-boiled eggs or nuts. Both boost protein and add great texture.
Creamy Avocado Chicken Salad Flavorful and Fresh Dish
What makes creamy avocado chicken salad special? It combines rich flavors and textures. The creamy avocado adds a smoothness that makes every bite delightful. You get protein from the chicken, crunch from the celery, and a fresh taste from the herbs.
How do you make it taste amazing? Start with ripe avocados. They blend better and give a creamy texture. I suggest using plain Greek yogurt instead of mayo. It adds creaminess without extra fat. The Dijon mustard and lemon juice give a zesty kick. You can adjust these to make it more tangy or mild, depending on your taste.
What about the chicken? You can use any cooked chicken you like. Grilled, roasted, or even rotisserie chicken works well. The key is to shred it well so it mixes easily with the other ingredients.
How do you serve it? This salad is versatile. You can serve it in crisp lettuce leaves for a low-carb option. If you prefer, wrap it in whole grain tortillas. I love it as a quick lunch or a picnic treat.
For a boost of flavor, try adding spices like cumin or paprika. You can also mix in nuts or seeds for extra crunch. This salad is not just tasty; it’s nutritious and fun to make.
This blog post covered how to make a tasty creamy avocado chicken salad. We went over the key ingredients, step-by-step prep, and useful tips. You can customize it for different diets or tastes. Remember, fresh ingredients make the best salad. Store leftovers well or prep them for busy days. Enjoy this meal as a quick snack or picnic option. Overall, this salad is simple, healthy, and versatile. You’ll impress your friends and family with this easy dish.


![- 2 medium zucchinis - 1 cup breadcrumbs (preferably whole wheat) - 1/2 cup grated parmesan cheese - 2 tablespoons fresh parsley, chopped - 1 tablespoon fresh basil, chopped - 1 teaspoon garlic powder - 1/2 teaspoon onion powder - Salt and pepper to taste - 2 large eggs - Olive oil spray or 2 tablespoons olive oil The ingredients for herb crusted zucchini sticks are simple yet flavorful. Zucchini is a great base because it’s mild and absorbs spices well. You want to use fresh herbs like parsley and basil to boost taste. Whole wheat breadcrumbs add a nice crunch, and parmesan brings a cheesy depth. For the coating, garlic and onion powder add savory notes. Make sure to season with salt and pepper to enhance all the flavors. You will need eggs to help the breadcrumbs stick to the zucchini. Olive oil ensures the sticks get crispy in the oven. I recommend you gather everything before you start cooking. This will help you stay organized and make the process smoother. You can find the full recipe below to guide you through this delicious snack. 1. Preheat your oven to 425°F (220°C). This step is vital for crispiness. 2. Line a baking sheet with parchment paper. It helps with easy cleanup. 3. In a shallow bowl, combine the breadcrumbs, parmesan cheese, chopped parsley, basil, garlic powder, onion powder, salt, and pepper. Mix well to blend the flavors. 4. In a separate bowl, whisk the eggs until smooth and fully combined. 1. Take each zucchini stick and dip it in the egg mixture. Let the extra egg drip off. 2. Next, roll the zucchini stick in the breadcrumb mixture. Press gently to coat evenly. 1. Arrange the coated zucchini sticks on the prepared baking sheet. Give them space to crisp. 2. Lightly spray the zucchini sticks with olive oil or drizzle them with olive oil. This adds flavor and helps with browning. 3. Bake in the preheated oven for 20-25 minutes. Turn them halfway through for even crispiness. Look for a golden color as a sign they are done. 4. Remove from the oven and let them cool slightly before serving. Enjoy these crispy delights! For the complete recipe, refer to the [Full Recipe]. To make your herb crusted zucchini sticks crispy, use fresh herbs. Fresh parsley and basil add great flavor. Dried herbs can work, but fresh gives a better taste. For the perfect coating, press the zucchini sticks into the breadcrumb mix. This helps the crumbs stick well. A light spray of olive oil before baking also boosts crispiness. You can bake zucchini sticks or try an air fryer. An air fryer cooks them faster and can make them even crispier. If you use an air fryer, set it to 400°F (200°C) for about 10-15 minutes. Turn them halfway for even cooking. If you prefer baking, keep the temperature at 425°F (220°C) and bake for 20-25 minutes. Adjust the cook time based on how crispy you want them. For dips, ranch dressing or marinara sauce pairs well with zucchini sticks. You can also try a spicy aioli for a kick. As for side dishes, serve them with a fresh salad or alongside grilled chicken for a nice meal. These sticks can be a great snack or a fun side to any dish. {{image_2}} You can make your herb crusted zucchini sticks even tastier! Try adding spices like paprika or chili flakes. This gives a nice kick and makes them more exciting. You can also mix in cheese variations. Feta adds a tangy flavor, while mozzarella gives a creamy touch. Both options will enhance your dish and please your taste buds. Want to make this recipe fit your diet? You can use gluten-free breadcrumbs to keep it safe for those with gluten issues. Just look for certified gluten-free brands. If you’re vegan, replace the eggs with a mixture of ground flaxseed and water. This will help the breadcrumbs stick without using eggs. These zucchini sticks work great as appetizers or party snacks. Serve them with dips like ranch or marinara for extra fun. You can also mix them with other veggies for a colorful platter. Carrots, bell peppers, and cucumbers pair well and add variety to your snack table. Check out the Full Recipe for more ideas! To keep your zucchini sticks fresh, place them in an airtight container. This helps lock in moisture and flavor. If you want the best taste, eat them within three days. After that, they may lose some crispiness and flavor. For the best results, reheat your zucchini sticks in the oven. Preheat the oven to 375°F (190°C). Place the sticks on a baking sheet for about 10 minutes. This method keeps them crispy and tasty. If you need a quick option, the microwave works too. Heat them for 30 seconds. Check if they need more time. Note that they may not be as crispy in the microwave. Yes, you can freeze zucchini sticks! To do this properly, first, let them cool completely. Next, place them in a single layer on a baking sheet. Freeze for about two hours. Once frozen, transfer them to a freezer bag. Make sure to remove as much air as possible. They can last up to three months in the freezer. Just remember to bake them straight from frozen when you are ready to enjoy! For more details, check the Full Recipe. How do I know when the zucchini sticks are done? You can tell the zucchini sticks are done when they turn golden brown and crispy. They should feel firm to the touch. Bake them for 20 to 25 minutes at 425°F (220°C), turning them halfway through cooking. This helps them cook evenly. If you want extra crunch, keep an eye on them during the last few minutes. Can I use frozen zucchini for this recipe? I do not recommend using frozen zucchini for this recipe. Frozen zucchini tends to lose water and becomes mushy when cooked. Fresh zucchini gives the best texture and flavor. If you only have frozen zucchini, try to drain it well before using it. However, it may still not give you the same crispy result. What can I substitute for parmesan cheese? If you want to substitute parmesan cheese, try using nutritional yeast for a vegan option. It adds a nice cheesy flavor. You can also use other cheeses like Pecorino Romano or Grana Padano. Just remember that different cheeses may change the flavor a bit. Can I use regular breadcrumbs instead of whole wheat? Yes, you can use regular breadcrumbs instead of whole wheat. Both types will work well in this recipe. Just remember that whole wheat breadcrumbs add a bit more fiber and a heartier taste. Use what you have on hand for the best results. How can I make my zucchini less watery? To make zucchini less watery, you can salt the sticks before cooking. Cut them and sprinkle salt on them. Let them sit for about 15 minutes, then rinse and pat them dry. This helps remove excess moisture. You can also try using smaller zucchinis, as they tend to be firmer. Can I bake these zucchini sticks without oil? Yes, you can bake zucchini sticks without oil. Just be aware that they may not be as crispy. You can use a light spray of cooking oil for better results, but if you want to skip it, they will still cook fine. Keep an eye on them to prevent burning. In this blog post, we explored how to make crispy zucchini sticks. We covered the ingredients needed, the step-by-step process, and various tips to ensure great results. I shared methods for baking, storing, and serving your zucchini sticks. These versatile snacks are easy to adjust for different diets and flavors. Remember, fresh herbs and the right cooking methods will enhance your dish. Enjoy your cooking and get creative with your serving ideas!](https://dailydishly.com/wp-content/uploads/2025/07/e6e4c2e6-85fe-4d28-829b-ce9ad5e19088-768x768.webp)


![- 2 pounds baby potatoes, halved - 1/2 cup grated Parmesan cheese - 3 tablespoons olive oil These main ingredients form the base of your dish. The baby potatoes bring a creamy texture when cooked. Grated Parmesan adds a rich, salty flavor. Olive oil helps the potatoes crisp up nicely in the oven. - 2 teaspoons dried oregano - 2 teaspoons dried thyme - 1 teaspoon garlic powder - Salt and pepper to taste The herbs and seasonings elevate the taste. Oregano and thyme provide earthy notes. Garlic powder adds a punch of flavor. Adjust salt and pepper to your liking for the best balance. - Fresh parsley or chives for garnish Using fresh parsley or chives as a garnish adds color and freshness. It makes the dish look more appealing. You can skip this step if you prefer a simpler look. For the full recipe, check out [Full Recipe]. - Preheat the oven to 425°F (220°C). - Prepare the baking sheet with parchment paper. First, set your oven. This will help the potatoes cook well. Next, line your baking sheet with parchment paper. This keeps the potatoes from sticking and makes cleaning easy. - Combine baby potatoes and olive oil. - Add herbs, spices, and stir until well-coated. In a large bowl, add the halved baby potatoes. Pour the olive oil over them. Next, sprinkle in the dried oregano, dried thyme, garlic powder, salt, and pepper. Now, toss everything together. You want the potatoes to be well-coated in the oil and spices. - Sprinkle Parmesan cheese and distribute evenly. - Spread on baking sheet and roast. Now, it's time for the cheese! Sprinkle the grated Parmesan over the potatoes. Stir gently to make sure it spreads evenly. Then, spread the seasoned potatoes on your baking sheet. Make sure they are in a single layer. Roast them in the oven for 25 to 30 minutes. Halfway through, toss the potatoes to ensure even cooking. When they turn golden brown and crispy, they are done. Enjoy these tasty bites with your favorite meal. For the full recipe, check out the link. To get those potatoes nice and crispy, you should toss them halfway through cooking. This helps them brown evenly. Spread the potatoes in a single layer on your baking sheet. Crowding them will make them steam instead of roast, which means less crunch. Before roasting, taste your potato mix. Adjust the salt and pepper to your liking. Don’t be afraid to try new herbs! You can add rosemary or basil for a fun twist. Each herb brings its unique flavor to the dish. The best potatoes for roasting are baby potatoes. Their small size makes them tender and quick to cook. You can also use Yukon Gold or red potatoes for a different texture. Baby potatoes are waxy, while other types may be more starchy. This difference affects how they cook and taste. {{image_2}} You can change the taste of your Parmesan herb roasted potatoes by adding different cheeses. Try cheddar or mozzarella for a creamy twist. You can also spice things up. Adding smoked paprika gives a nice smoky flavor. Cumin adds a warm, earthy taste. Experiment with these options to find your favorite. Mixing in other root vegetables can add color and flavor. Carrots and sweet potatoes roast well and taste great. You can also slice bell peppers or onions to include. These vegetables not only add taste but also make the dish more colorful and fun. Want to make it vegan? Use nutritional yeast instead of Parmesan cheese. This gives a cheesy flavor without dairy. You can also swap olive oil for other oils. Avocado or coconut oil can add unique flavors. These tweaks make the dish fit your diet while keeping it tasty. For the full recipe, you can refer to the main recipe section. To store your leftover Parmesan herb roasted potatoes, let them cool first. Place them in an airtight container. This helps keep them fresh. Glass or plastic containers with tight lids work best. You can also use a resealable bag. Just make sure to squeeze out the air. If you want to save your roasted potatoes for later, freezing is a great option. Spread the cooled potatoes in a single layer on a baking sheet. Freeze them for about an hour until they are firm. Then transfer them to a freezer bag. This helps prevent them from sticking together. When you are ready to eat, thaw them in the fridge overnight. Reheat in the oven at 350°F (175°C) until hot and crispy. Roasted potatoes can last in the fridge for about 3 to 5 days. Check for signs of spoilage before eating. Look for a strange smell or an off texture. If they feel mushy or slimy, it’s best to throw them out. Enjoy your Parmesan herb roasted potatoes with peace of mind! You can find the full recipe [here](#). To get your potatoes crispy, follow these tips: - Cut even pieces: Make sure all potato halves are the same size. This helps them cook evenly. - Dry the potatoes: Before mixing with oil, pat them dry. Less moisture means more crispiness. - Use high heat: Roasting at 425°F (220°C) creates a nice crunch. - Toss halfway: Stir the potatoes halfway through cooking for even browning. - Don’t crowd the pan: Spread the potatoes in a single layer. This allows hot air to reach all sides. Yes, you can prep ahead. Here’s how: - Wash and cut potatoes: You can halve the potatoes a few hours before cooking. Store them in cold water to keep them fresh. - Mix with oil and spices: You can combine the potatoes with olive oil and seasonings up to a day in advance. Just keep them in the fridge. - Add cheese later: Sprinkle the Parmesan right before roasting for best results. These potatoes make a great side for many meals: - Grilled chicken: The herbs complement the chicken's flavors. - Steak: The rich flavors of steak pair nicely with the crispy potatoes. - Roasted vegetables: Serve with mixed roasted veggies for a colorful plate. - Fish: Light fish dishes, like salmon, balance the hearty potatoes. You can find the full recipe for Parmesan Herb Roasted Potatoes in the [Full Recipe]. This will guide you through each step to achieve perfect potatoes! This blog post covered how to make delicious Parmesan Herb Roasted Potatoes. We discussed the key ingredients like baby potatoes, Parmesan cheese, and essential herbs. I shared step-by-step instructions for perfect results, along with tips for crispiness and seasoning. You can even make tasty variations and store leftovers properly. Enjoying this dish is easy and fun. With these simple steps, you’ll impress at any meal. Happy cooking!](https://dailydishly.com/wp-content/uploads/2025/07/9ae8b793-096d-4d00-8893-cd2d2c486076-768x768.webp)