Creamy Avocado Pasta Simple and Quick Recipe

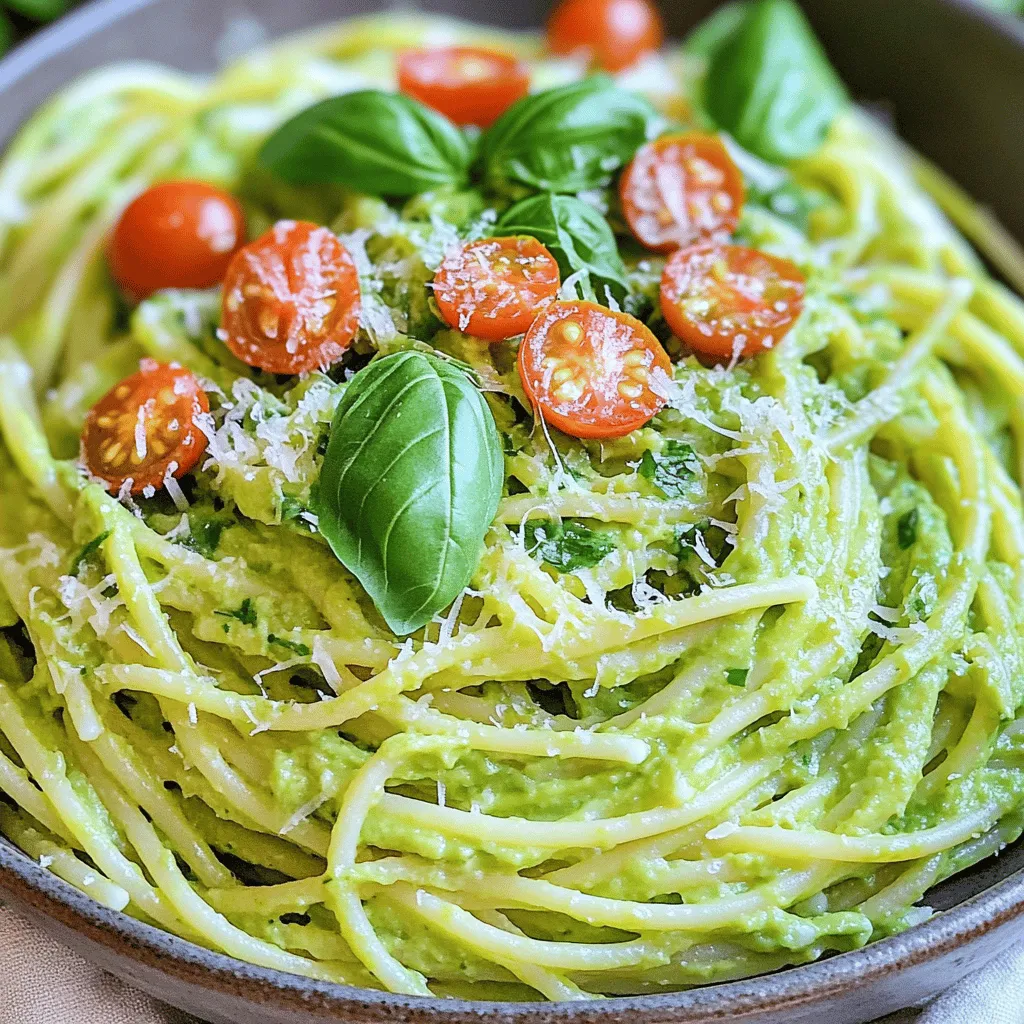
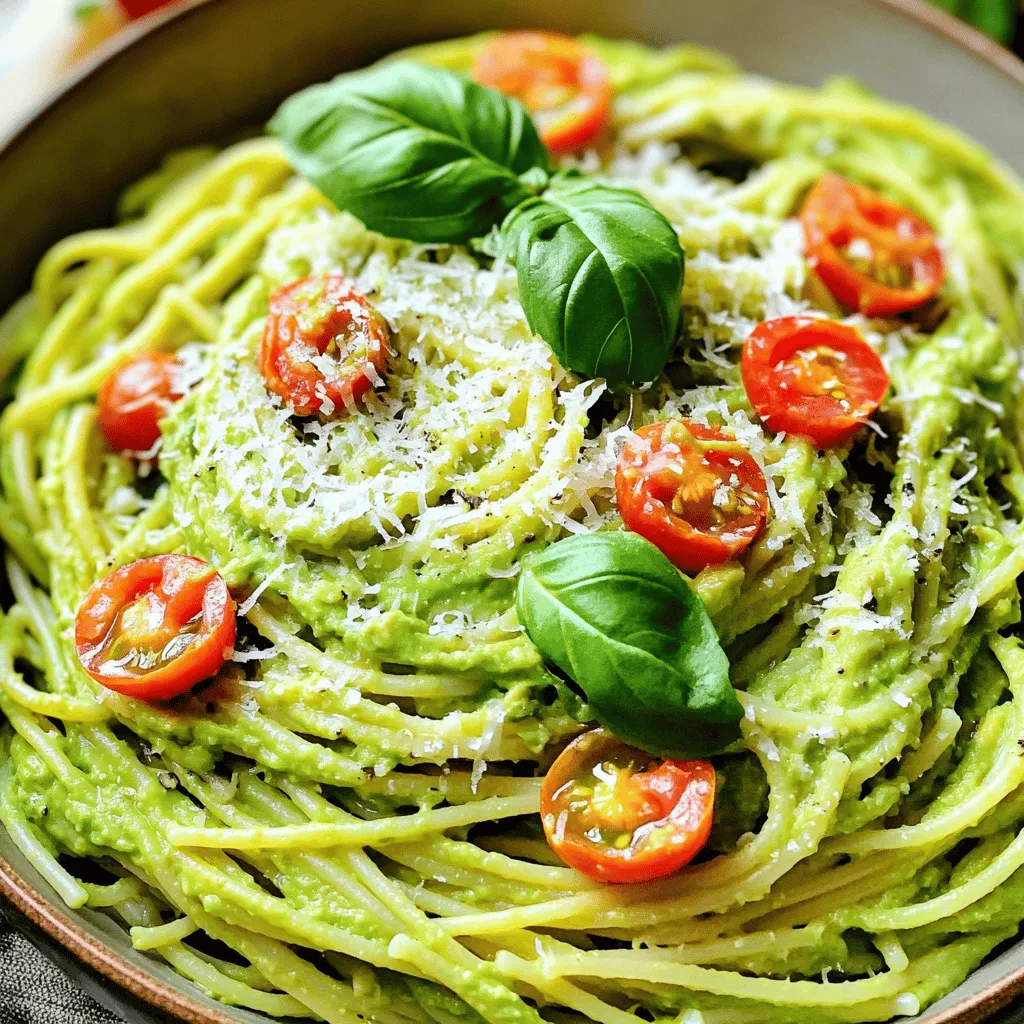
Looking for a quick and tasty meal? Let me introduce you to Creamy Avocado Pasta! This easy recipe blends simple ingredients like ripe avocados, garlic, and fresh basil for a delicious sauce. It’s perfect for busy nights when you need a healthy dish in under 30 minutes. Grab your pasta and let’s make something creamy, rich, and satisfying that’s sure to impress your family or friends!
Ingredients
Main Ingredients
– 12 oz spaghetti or favorite pasta
– 2 ripe avocados
– 2 cloves garlic
– ¼ cup fresh basil
Optional Add-ins
– ½ cup cherry tomatoes
– Grated Parmesan cheese or nutritional yeast
Seasonings
– 2 tablespoons lemon juice
– ¼ cup olive oil
– Salt and pepper to taste
In this creamy avocado pasta recipe, the main ingredients work together to create a rich, velvety dish. The spaghetti serves as a perfect base, while the ripe avocados provide creaminess. Fresh garlic adds flavor, and basil brings a nice herbal note.
If you want to add more texture and color, cherry tomatoes are a great choice. They add a burst of freshness. You can also sprinkle some grated Parmesan cheese or nutritional yeast for a cheesy flavor.
To make the sauce pop, we use lemon juice and olive oil. They add brightness and richness. Don’t forget to season with salt and pepper to taste. This will enhance all the flavors in the dish.
Step-by-Step Instructions
Cooking the Pasta
To cook spaghetti to al dente, start with a large pot. Fill it with water and add salt. Bring the water to a boil. Add your spaghetti and stir it gently. Cook according to the package instructions, usually around 8 to 10 minutes. You want the pasta to be firm but not hard when you bite it.
Why is reserving pasta water important?
Reserving pasta water helps to create a smooth sauce. The starchy water adds creaminess and helps the sauce stick to the pasta. Make sure to save about one cup before draining the pasta.
Making the Avocado Sauce
For the avocado sauce, grab a food processor. Add two ripe avocados, minced garlic, and fresh basil leaves. Then, pour in lemon juice and olive oil. Blend until everything is smooth and creamy. If the sauce is too thick, add some reserved pasta water. This helps you get the right texture for your sauce.
Combining Ingredients
Now, it’s time to mix everything. In a large bowl or back in the pot, add your cooked spaghetti. Pour the avocado sauce over the pasta. Use tongs to toss it all together. If the sauce seems dry, add more pasta water until it coats the spaghetti well.
You can also incorporate optional ingredients. If you like, gently fold in halved cherry tomatoes. They add color and a fresh taste to your dish.
Tips & Tricks
Achieving Creaminess
To make your avocado pasta super creamy, use ripe avocados. They blend easily and give that smooth texture we all love. Cut the avocados into smaller pieces before blending. This helps them mix well with garlic and basil. When blending, make sure to scrape down the sides of the bowl. This ensures everything gets mixed evenly.
For seasoning, start with salt and pepper. Taste the sauce as you mix. If it needs more flavor, add a little lemon juice. This gives brightness to the dish.
Presentation Ideas
Garnishing makes your dish look special. Fresh basil leaves add a pop of color. You can also sprinkle some grated cheese on top. This adds a nice touch and flavor.
Serve your pasta in bowls or on plates. A simple, clean plate makes the food stand out. You can add some cherry tomatoes for color and freshness. They make your dish look even better.
Common Mistakes to Avoid
One big mistake is overcooking the pasta. This makes it mushy and less tasty. Cook it just until it is al dente.
Another mistake is using unripe avocados. They won’t blend well and can taste bitter. Always choose ripe avocados for the best results. If you’re unsure, gently press the avocado. It should have a little give.

Variations
Dietary Alternatives
You can make this creamy avocado pasta vegan and gluten-free. Use gluten-free pasta to make it safe for those with gluten allergies. For a vegan option, skip the Parmesan cheese and use nutritional yeast instead. This gives a cheesy taste without dairy.
If you have nut allergies, avoid any nut-based substitutes. You can still enjoy a creamy sauce using ripe avocados.
Flavor Enhancements
Add spices or herbs for a twist. A pinch of red pepper flakes adds heat. Fresh parsley or cilantro can change the flavor profile.
Mix in alternative sauces for more variety. Try a splash of soy sauce for umami or a dollop of pesto for a fresh taste. These small changes can make a big difference.
Seasonal Ingredients
You can adapt this recipe with seasonal produce. In spring, add asparagus or peas for a fresh crunch. In summer, mix in zucchini or bell peppers for color and taste.
For a heartier dish, consider adding cooked chicken or shrimp. This turns your creamy avocado pasta into a filling meal. Adjusting with what’s in season makes it fun and tasty.
Storage Info
Storing Leftovers
To keep creamy avocado pasta fresh, store it in the fridge. Place it in an airtight container. This helps prevent the sauce from browning. You can store it for up to three days. Make sure to cover it well to keep the flavors intact.
Reheating Tips
When you want to enjoy leftovers, reheat them gently. The best method is using a pan on low heat. Add a splash of olive oil or a bit of pasta water. This helps keep the sauce creamy. Avoid using a microwave as it can separate the sauce.
Freezing the Dish
You can freeze creamy avocado pasta, but it may change texture. If you want to freeze it, do so right after making it. Use an airtight container and press out as much air as possible. When you’re ready to eat, thaw it in the fridge overnight. Reheat gently to restore creaminess.
FAQs
What type of pasta works best for creamy avocado pasta?
You can use any pasta you like. I recommend spaghetti for its long strands. Fettuccine also works well, as it holds the sauce nicely. If you prefer a gluten-free option, try brown rice pasta or zucchini noodles. Both choices taste great and give a fun twist to the dish.
Can I make creamy avocado pasta in advance?
Yes, you can prepare this dish ahead of time. Cook the pasta and make the avocado sauce separately. Store them in airtight containers in the fridge. When you are ready to eat, mix them together. You may need to add a splash of pasta water to refresh the sauce.
How do I keep the avocado sauce from browning?
To keep your avocado sauce green, use lemon juice right away. The acidity helps slow down browning. Cover the sauce tightly with plastic wrap, pressing it against the surface. This minimizes air exposure. You can also store it in an airtight container to keep it fresh longer.
This blog post guided you through making a creamy avocado pasta. You learned about key ingredients, like fresh avocados and garlic. I shared step-by-step instructions to cook the pasta and blend an easy sauce. We explored tips for perfecting creaminess and avoiding common mistakes.
Trying different flavors and ingredients can keep this dish exciting. Remember to store leftovers properly to maintain freshness. Enjoy your cooking adventure, and make the most of this tasty, simple meal!


![- 1 lb boneless, skinless chicken breasts, diced - 2 cups cooked brown rice - 1 cup black beans, drained and rinsed - 1 cup corn (fresh or frozen) - 1 medium tomato, diced - 1 avocado, sliced The chicken is the star here. I prefer boneless, skinless chicken breasts for their ease. They cook fast and are tender. Dice them into small pieces for even cooking. Brown rice adds fiber and nice texture. If you want, you can use white rice too. Black beans and corn bring a sweet, hearty touch to the dish. Fresh tomatoes and avocado add color and creaminess. - 1 tablespoon olive oil - 1 teaspoon cumin - 1 teaspoon chili powder - 1 teaspoon garlic powder - Salt and pepper to taste Spices make the burrito bowls come alive. I start with olive oil to cook the chicken. Cumin gives a warm, earthy taste. Chili powder adds a bit of heat, while garlic powder adds depth. A sprinkle of salt and pepper enhances all the flavors. - 1/2 cup shredded cheese (cheddar or taco blend) - 1/4 cup fresh cilantro, chopped - 1 lime, cut into wedges Don’t skip the toppings! Shredded cheese melts nicely over the warm chicken. I love using a taco blend for extra flavor. Fresh cilantro adds brightness. Squeeze fresh lime over everything for a zesty finish that brightens up the dish. For the full recipe, check out the [Full Recipe]. First, grab a large skillet. Pour in one tablespoon of olive oil. Heat the oil over medium heat. Once hot, add one pound of diced chicken breasts. Now, let’s add some flavor! Sprinkle one teaspoon each of cumin, chili powder, and garlic powder over the chicken. Don’t forget to add salt and pepper to taste. Cook the chicken for about six to eight minutes. Stir occasionally. You want it to turn golden brown and be fully cooked. While the chicken cooks, it’s time to prepare the brown rice. If you don’t have it cooked yet, just follow the package instructions. You’ll need two cups of cooked brown rice for this recipe. This step is simple, but it gives the bowl a great base. Once the chicken is ready, reduce the heat. Add one cup of black beans and one cup of corn to the skillet. Stir everything together and heat for another two to three minutes. Now for the fun part! Grab your bowls. Place a portion of brown rice at the bottom of each one. Spoon the chicken mixture over the rice. Next, add diced tomatoes and sliced avocado on top. Finish it off with some shredded cheese and a sprinkle of fresh cilantro. Don’t forget the lime wedges! Serve them on the side for a zesty squeeze. For the full recipe, check out the detailed instructions. To ensure your chicken is cooked through, always check the internal temperature. It should reach 165°F. Use a meat thermometer for the best results. Cook the chicken for about 6-8 minutes. Stir it often to get an even golden brown color. For flavor enhancements, don't be afraid to add extras. Consider adding fresh lime juice while cooking for a zesty kick. Try marinating the chicken in spices for an hour before cooking. This will add depth to the taste and make it more juicy. Pair your burrito bowls with sides for a complete meal. Chips and salsa are a great choice. A fresh side salad can add crunch and color. You can also serve with guacamole for extra creaminess. For presentation ideas, use clear bowls to show off the layers. Arrange each ingredient in sections for a colorful look. Add a sprinkle of cilantro on top for a fresh pop of color. A wedge of lime on the side adds a nice touch. To make it kid-friendly, consider simple swaps. Use plain cheese instead of a blend if your kids are picky. Swap diced tomatoes for mild salsa for some added flavor. You can also use less spice in the chicken seasoning. If your kids prefer, serve the ingredients separately. Let them build their own burrito bowls. This way, they can choose what they like. Making it fun can help them try new foods! {{image_2}} You can switch up the protein in your burrito bowls for fun. Try using ground turkey instead of chicken for a leaner option. Turkey cooks fast and tastes great with the spices. If you want a meatless meal, swap the chicken for tofu. Firm tofu absorbs flavors well. Just press it first to remove water and then cube it. Both options keep the dish tasty and satisfying. Rice is great, but you can change it up! Quinoa is a smart choice. It’s high in protein and has a nice nutty taste. Just cook it like rice. If you’re looking for a low-carb option, use cauliflower rice. Simply pulse cauliflower florets in a food processor until they look like rice. Sauté it lightly for a fresh, veggie-packed base. Want to kick up the flavor? Add hot sauce to your chicken while it cooks. This gives it a spicy kick. You can also mix in different spices. Try paprika for a smoky taste or oregano for a fresh, herbal note. Experimenting with flavors can make each bowl unique and exciting. For the full recipe, check out Easy Chicken Burrito Bowls . After enjoying your meal, store leftovers right away. Let the food cool first. Place the chicken burrito bowl in an airtight container. This keeps it fresh and safe. You can store it in the fridge for up to three days. Use clear containers. This helps you see what’s inside. When reheating, use the microwave for quick results. Place your bowl in the microwave for about two minutes. Stir halfway through to heat evenly. If you want to keep the flavor, add a splash of water. This will help it stay moist. You can also reheat on the stove. Place the mixture in a pan over low heat. Stir often until warmed through. Want to save some for later? You can freeze the chicken burrito bowls! Pack them in freezer-safe containers. Make sure to leave some space for expansion. You can freeze them for up to three months. To thaw, move the bowl to the fridge overnight. Reheat as mentioned above. This way, you’ll enjoy the same great flavors later. Yes, you can prep this meal in advance. Cook the chicken, rice, and veggies. Store them separately in airtight containers. This way, you can mix and heat them when ready to eat. To reheat, place the bowl in the microwave for 1-2 minutes. Stir halfway through to heat evenly. You can also use a skillet on medium heat for a few minutes, stirring often. You can use turkey or tofu for a different protein. Grilled shrimp or beans work well too. Just adjust the cooking time based on what you choose. Leftovers last about 3-4 days in the fridge. Make sure to store them in airtight containers. Always check for any signs of spoilage before eating. Yes, you can serve the burrito bowls cold. They make a great salad-like dish. Just add some extra lime juice for fresh flavor. Enjoy it on a hot day! This article covered how to make tasty burrito bowls. We looked at the main ingredients like chicken, rice, and veggies. Spices like cumin and chili powder add great flavor. Cooking tips help ensure your meal is delicious and fun for kids. You can also try different proteins or grains for variety. Remember, store leftovers properly to enjoy later. With these steps and ideas, you can create a meal everyone will love. Enjoy your cooking adventure!](https://dailydishly.com/wp-content/uploads/2025/07/17ff2273-159b-4b6c-be57-1cae59bb2708-768x768.webp)
![To start, let's gather the key ingredients for your spicy black bean tacos. Here’s what you need: - 2 cans (15 oz each) black beans, rinsed and drained - 1 tablespoon olive oil - 1 small onion, finely chopped - 2 cloves garlic, minced - 1 jalapeño, finely chopped (seeds removed for less heat) - 1 teaspoon ground cumin - 1 teaspoon smoked paprika - 1/2 teaspoon cayenne pepper (adjust to taste) - Salt and pepper to taste - 8 small corn tortillas - 1 avocado, sliced - 1 cup shredded cabbage (purple or green) - Fresh cilantro, chopped, for garnish - Lime wedges, for serving These ingredients create a tasty and healthy meal that is easy to make. The black beans are the main star. They are full of fiber and protein. The spices add great flavor, while the vegetables provide crunch. Once you've made your tacos, you can customize them with optional toppings. Here are some ideas: - Salsa or pico de gallo - Sour cream or Greek yogurt - Shredded cheese - Pickled onions - Hot sauce for extra heat Feel free to mix and match toppings. This lets you create your own perfect taco. These spicy black bean tacos are great for many diets. They are vegetarian and can be made vegan by skipping any dairy toppings. The black beans are high in protein, making them filling. If you are gluten-free, make sure to use corn tortillas. For those watching their salt intake, you can adjust the amount of salt and use low-sodium beans. You can enjoy this recipe with confidence, knowing it fits different dietary needs. Check out the Full Recipe for a delicious meal that everyone will love. To make your black bean filling, start with a medium skillet. Heat one tablespoon of olive oil over medium heat. Add one small, finely chopped onion. Sauté it for about three to four minutes until it turns soft and clear. Then, add two minced garlic cloves and one chopped jalapeño. If you want less heat, remove the seeds from the jalapeño. Cook this mix for another two minutes. Next, it’s time for the black beans. Use two cans of black beans, rinsed and drained. Add them to the pan along with one teaspoon of ground cumin, one teaspoon of smoked paprika, and half a teaspoon of cayenne pepper. Season with salt and pepper to taste. Stir everything well and let it cook for five to seven minutes. This helps blend the flavors. You can slightly mash some beans to make the filling creamier. Now, let’s get the corn tortillas ready. Take eight small corn tortillas. Heat a dry skillet over medium heat. Place one tortilla in the skillet, cooking it for about 30 seconds on each side. You want them warm and soft, not crisp. Once they are pliable, place them on a plate. Cover them with a clean towel to keep them warm while you finish your filling. Now comes the fun part—assembling your tacos! Take one warm tortilla and spoon some of the black bean mixture into the center. Don’t overfill; a few spoonfuls will do. Top it with slices of avocado, a handful of shredded cabbage, and some fresh chopped cilantro. Repeat this for each tortilla. Serve your tacos with lime wedges on the side for a zesty kick. If you want the full recipe, you can find it above. Enjoy your tasty creation! To make your spicy black bean tacos pop, you can adjust the spices. Start with the basic recipe, then taste and modify. If you like heat, add more cayenne pepper. If you want a smoky flavor, increase the smoked paprika. You can also add fresh herbs like cilantro for extra freshness. Always remember to mix well and let the flavors blend. Soggy tacos are a common problem. To avoid this, warm your tortillas just before filling them. Use a dry skillet for about 30 seconds on each side. This makes them soft but not wet. Also, add your toppings right before serving. This keeps the tortillas crisp, allowing you to enjoy every bite. Meal prep can save you time. You can make the black bean filling ahead of time. Store it in the fridge for up to three days. When you're ready to eat, just heat it in a pan. Warm your tortillas while the filling heats. This way, you can enjoy fresh tacos in just minutes. Follow the [Full Recipe] for quick and easy steps! {{image_2}} You can easily make these tacos vegetarian and vegan. The black beans are already plant-based, which makes them a great choice. To keep it vegan, skip any dairy toppings like cheese or sour cream. Instead, add more fresh toppings like guacamole or diced tomatoes. These additions give a burst of flavor and keep the meal fresh and light. If you want to change up the protein, try using lentils or quinoa. Both options are filling and work well with the spices. Lentils cook quickly and soak up flavors well. Quinoa adds a nice crunch and a different texture. You can also use shredded jackfruit for a meatier feel. This option is great for adding more variety to your tacos. You can adjust the spice level to fit your taste. For a milder taco, remove the jalapeño seeds and use less cayenne pepper. You can also add sweet peppers for flavor without heat. If you love spice, add more cayenne or even some chili powder. For a smoky flavor, consider adding chipotle peppers in adobo sauce. This gives the tacos a different twist and a deeper taste. Experimenting with these variations can lead to new favorites. You can find the full recipe for Spicy Black Bean Tacos to get started on your cooking adventure! To store leftover black bean filling, let it cool first. Use an airtight container to keep it fresh. Place the filling in the container and seal it tightly. It will stay good for up to three days in the fridge. If you want to enjoy it later, freezing is a great option. When you’re ready to eat, you can reheat the black bean filling. Transfer it to a skillet over medium heat. Stir it often until it's hot throughout. You can also use the microwave. Place the filling in a microwave-safe bowl and heat for about one to two minutes. Stir it halfway to ensure even heating. If you want to freeze the tacos, it’s best to do it before adding fresh toppings. Wrap each taco tightly in plastic wrap. Then place them in a freezer-safe bag. They can stay frozen for up to two months. When you want to eat them, thaw in the fridge overnight. Reheat in the oven or a skillet for a crispy finish. You can then add your favorite toppings fresh before serving. Make sure to check out the Full Recipe for more details! To make Spicy Black Bean Tacos less spicy, you can remove the jalapeño seeds. You can also use less cayenne pepper. Another option is to add more beans to the mix. This will balance the heat. You can also serve the tacos with sour cream or yogurt. These toppings help cool the spice level. Yes, you can use other beans for this recipe. Pinto beans work well and have a nice flavor. Kidney beans are another option, adding a different taste. You can even use lentils for a fun twist. Just make sure to adjust cooking times if needed. The key is to keep the texture hearty and satisfying. You can serve many things with Spicy Black Bean Tacos. Some tasty sides include rice or quinoa. A fresh salad with lime dressing pairs well too. You might also enjoy guacamole or salsa for extra flavor. Chips are a great snack on the side. For drinks, try a light beer or refreshing lemonade. You can find the Full Recipe to make these delicious tacos and more! Spicy Black Bean Tacos are a tasty and easy meal to make. You now know the key ingredients, plus fun toppings and dietary options. I showed you how to prepare the filling, heat the tortillas, and assemble the tacos. Our tips help boost flavor and keep them fresh. You can also explore variations and find storage ideas to enjoy later. Remember, tacos are flexible; adjust spices or toppings to fit your taste. Enjoy creating your perfect Spicy Black Bean Tacos!](https://dailydishly.com/wp-content/uploads/2025/07/c52f9e49-68ab-4e28-8267-2347654248bf-768x768.webp)


