Creamy Avocado Ranch Dip Tasty and Easy Recipe

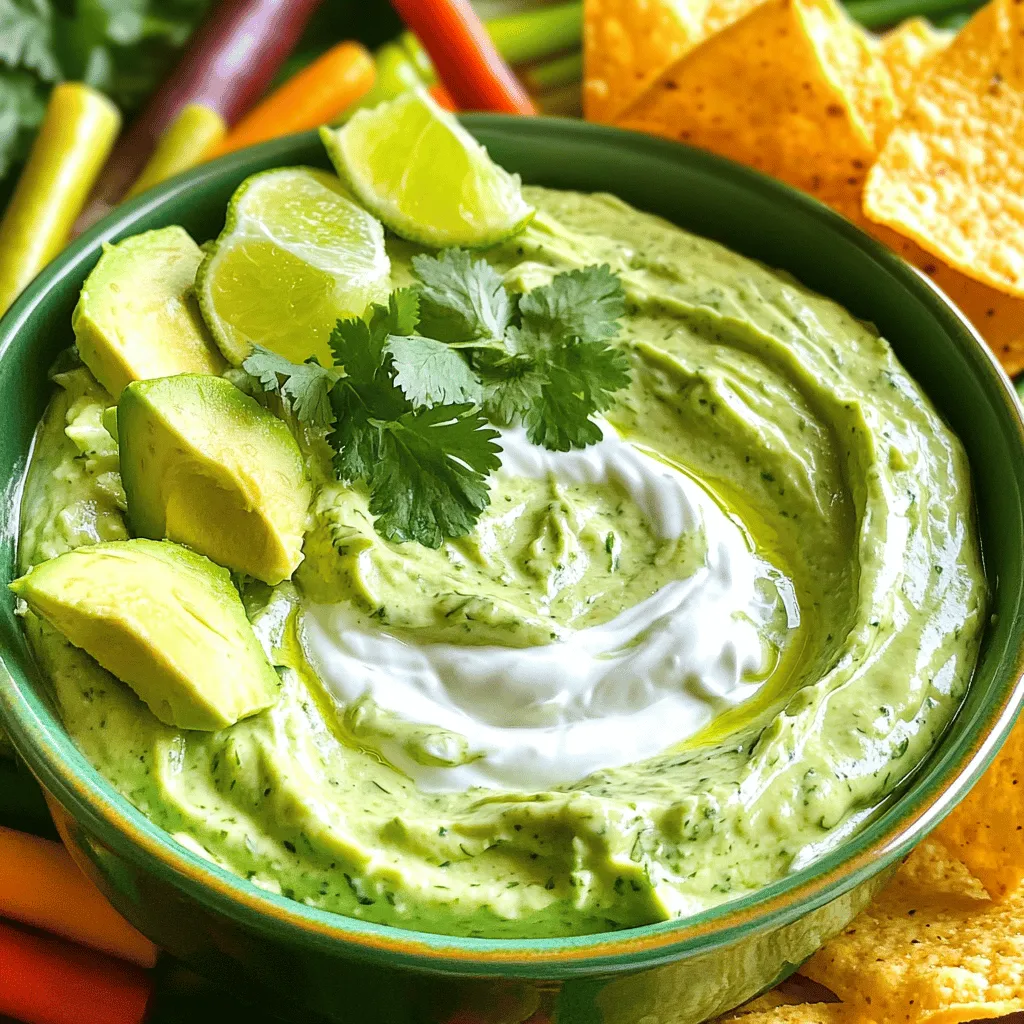
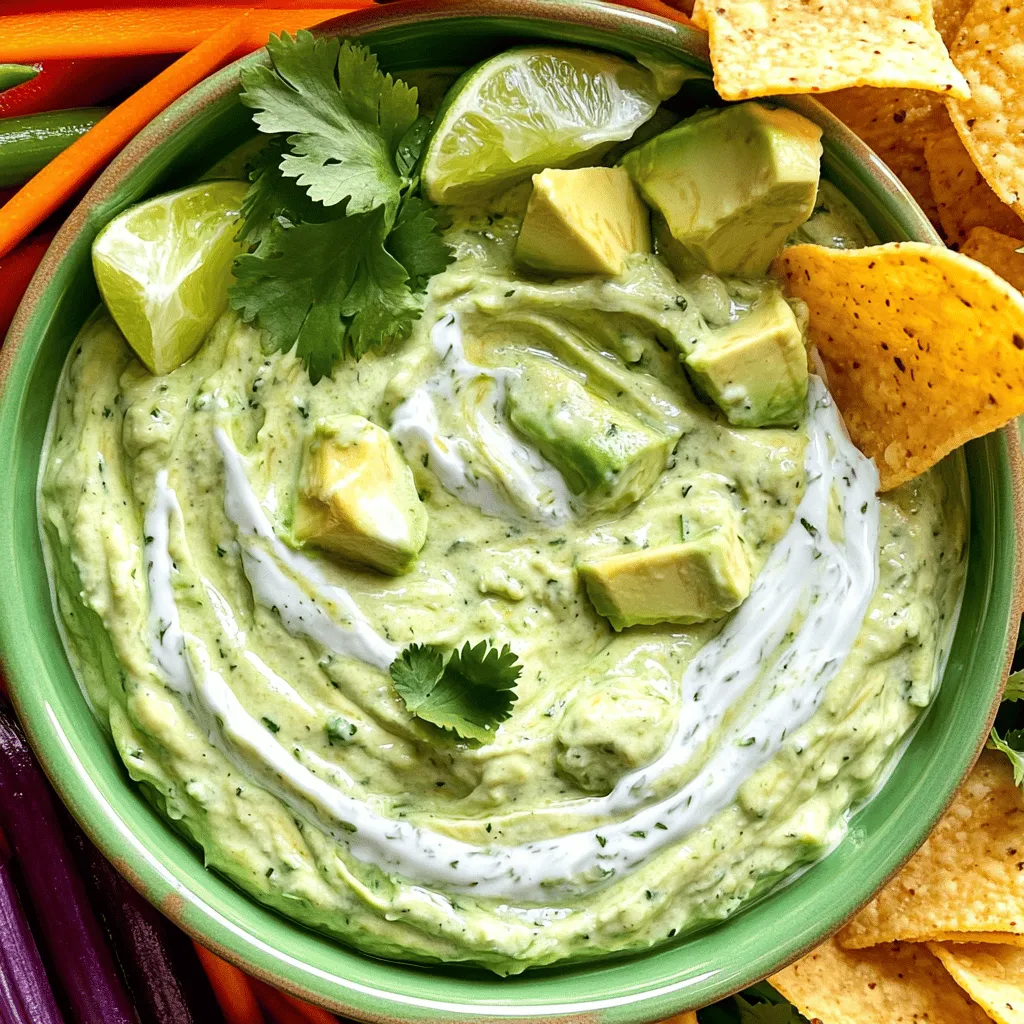
Are you craving a dip that’s both tasty and easy to make? Look no further! This Creamy Avocado Ranch Dip combines ripe avocados, Greek yogurt, and ranch seasoning for a flavor explosion. It’s perfect for veggie sticks or tortilla chips. Plus, you can customize it with extra ingredients like lime juice and garlic. Get ready to impress your friends and family with this simple, crowd-pleasing recipe!
Ingredients
Main Ingredients for Creamy Avocado Ranch Dip
– 2 ripe avocados, peeled and pitted
– 1 cup Greek yogurt
– 1 packet ranch seasoning mix
These three main ingredients create a rich and creamy base. The ripe avocados bring healthy fats and a smooth texture. Greek yogurt adds creaminess and a slight tang. The ranch seasoning mix gives the dip its bold flavor, making it irresistible.
Optional Ingredients
– 1 tablespoon fresh lime juice
– 1 clove garlic, minced
– 1/4 cup fresh cilantro, chopped
Adding optional ingredients can enhance the dip’s taste. Fresh lime juice adds brightness and keeps the avocados green. Minced garlic gives a nice kick, while chopped cilantro adds freshness. You can mix and match based on your taste!
Serving Suggestions
– Veggie sticks
– Tortilla chips
This dip pairs well with many snacks. Serve it with crunchy veggie sticks like carrots or cucumbers for a healthy treat. Tortilla chips add a fun crunch and are perfect for scooping. Both options make for a tasty and fun way to enjoy the dip.
Step-by-Step Instructions
Preparation of Ingredients
1. Start by taking the ripe avocados. Cut them in half and remove the pit.
2. Use a fork or a potato masher to mash the avocados in a medium bowl. Aim for a smooth texture.
3. Measure one cup of Greek yogurt and add it to the mashed avocados. It helps make the dip creamy.
4. Next, gather your seasonings. Measure one packet of ranch seasoning mix and set it aside for mixing later.
Combining Ingredients
1. Mix the mashed avocado with the Greek yogurt until well combined. The two should blend seamlessly.
2. Now, sprinkle in the ranch seasoning mix. Add one tablespoon of fresh lime juice to brighten the flavor.
3. Stir the mixture well to ensure the ranch flavor spreads evenly throughout the dip.
Final Touches
1. Finely chop one clove of garlic and 1/4 cup of fresh cilantro. Add them to the bowl.
2. Mix everything together, letting the garlic and cilantro blend into the dip.
3. Season with salt and pepper to taste. Adjust according to your preference.
4. You can serve it right away or chill it for an hour. This lets the flavors meld together nicely.
Tips & Tricks
Choosing the Perfect Avocados
Identifying ripeness
To choose ripe avocados, look for ones that are slightly soft. Press gently; if it yields to pressure, it’s ready. Avoid avocados that feel mushy or have dark spots. Dark green skin often means it’s ripe. If you find hard avocados, leave them at room temperature for a few days. They will ripen, and you can check them daily.
How to store avocados before use
If your avocados are ripe but you are not ready to use them, store them in the fridge. This slows down the ripening process. If you have cut an avocado, brush the flesh with lime or lemon juice to prevent browning. Wrap it tightly with plastic wrap and place it in the fridge.
Enhancing Flavor
Variations of seasoning
You can switch up the flavor of your dip by adding different seasonings. Try mixing in chili powder or smoked paprika for a smoky touch. If you like herbs, fresh dill or parsley can brighten the flavor. Experiment to find your favorite mix, and don’t be afraid to be bold!
Adding heat with peppers
For those who enjoy a kick, add diced jalapeños or crushed red pepper flakes. Start with a small amount and taste as you go. You can always add more heat, but it’s tough to take it out once it’s in!
Serving Recommendations
Best pairings for the dip
This creamy avocado ranch dip goes well with many snacks. Pair it with veggie sticks like carrots, celery, or bell peppers. Tortilla chips are also a hit, offering that nice crunch. You can even use it as a spread on sandwiches or wraps for added flavor.
Creative serving ideas
Get creative with how you serve the dip! Try it in a hollowed-out avocado skin for a fun twist. You could also serve it in a mason jar for a picnic. Add some colorful veggies around the dip to create a beautiful spread. Don’t forget to taste as you go!

Variations
Creamy Avocado Ranch Dip with Greek Yogurt
Using Greek yogurt in this dip adds creaminess and protein. It makes the dip thicker and richer. Greek yogurt is lower in fat than sour cream, making it a healthier choice. If you want a dairy-free option, try coconut yogurt or almond yogurt. Both can give a nice texture while keeping it plant-based.
Avocado Ranch Dip with Added Ingredients
You can easily jazz up your dip by adding cheese or sour cream. Cream cheese works well too if you want a richer taste. You can also sprinkle in your favorite herbs or spices. Chopped chives or dill can add nice flavors. For some heat, try adding a dash of cayenne or smoked paprika.
Kid-Friendly Versions
For kids, mild flavors work best. You can use plain yogurt instead of Greek yogurt for a lighter taste. Try adding a bit of honey to sweeten the dip. This can help make it more appealing. You can sneak in finely chopped veggies like carrots or bell peppers. This adds nutrition without changing the flavor.
Storage Info
How to Store Leftovers
To keep your creamy avocado ranch dip fresh, use an airtight container. Glass or plastic containers work well. Make sure to seal the lid tightly to prevent air from getting in. This helps avoid browning and keeps the flavors intact. If you have leftover dip, press plastic wrap directly onto the surface before sealing. This extra step keeps it fresh longer.
Freezing Options
Can you freeze avocado dip? Yes, you can freeze it, but the texture may change. Freezing can make the dip watery when thawed. If you decide to freeze it, use a freezer-safe container. Leave some space at the top for expansion. To use frozen dip, thaw it in the fridge overnight. Stir it well before serving to help restore some creaminess.
Shelf Life
How long does the dip last in the fridge? Properly stored, it lasts about 3 to 5 days. Always check for signs that the dip has gone bad. Look for discoloration or an off smell. If it has a strange taste or a watery layer on top, it’s best to toss it. Freshness is key to enjoying this dip at its best!
FAQs
What dips are good with tortilla chips?
Tortilla chips pair well with many dips. Here are some tasty options:
– Salsa: Fresh and zesty, it adds great flavor.
– Guacamole: Creamy and rich, it’s a classic choice.
– Cheese dip: Warm and cheesy, it’s always a hit.
– Hummus: A healthy option that adds nice texture.
– Creamy Avocado Ranch Dip: This dip is smooth and full of flavor. It works well with tortilla chips and adds a fresh twist.
How do I make my avocado dip thicker?
To make your avocado dip thicker, try these tips:
– Add more avocado: Use an extra avocado to boost thickness.
– Use less yogurt: Cut down the Greek yogurt for a creamier mix.
– Chill the dip: Refrigerate for about an hour. This helps it firm up.
– Include cream cheese: Blend in a little cream cheese for added body.
Is Creamy Avocado Ranch Dip healthy?
Yes, Creamy Avocado Ranch Dip is healthy for many reasons:
– Avocados: They provide healthy fats and fiber.
– Greek yogurt: This adds protein and probiotics.
– Fresh herbs: Cilantro boosts flavor and nutrients.
– Low in calories: Compared to many other dips, it is lighter.
This dip is a great choice for snacking or parties!
This blog post covered how to make a tasty Creamy Avocado Ranch Dip. We discussed the main and optional ingredients, along with easy steps to prepare it. You learned tips for choosing avocados and creative variations to try. At the end, we explored storage options to keep your dip fresh. This dip is both fun to make and enjoyable to eat. I hope you try it and find ways to make it your own!


![Chipotle lime shrimp skewers bring bold flavors to your plate. This dish shines with grilled shrimp marinated in a zesty mix of lime and chipotle. You can enjoy these skewers at any gathering or even a quiet dinner at home. To make chipotle lime shrimp skewers, gather these ingredients: - 1 pound large shrimp, peeled and deveined - 2 tablespoons olive oil - 2 tablespoons lime juice (freshly squeezed) - 1 tablespoon chipotle powder - 1 teaspoon garlic powder - 1 teaspoon paprika - 1 teaspoon ground cumin - Salt and pepper to taste - Fresh cilantro, chopped (for garnish) - Lime wedges (for serving) To cook these shrimp skewers, you need a few simple tools: - Medium bowl for mixing - Whisk for blending marinade - Grill or grill pan - Wooden or metal skewers - Tongs for flipping shrimp - Serving platter for presentation These tools make the cooking process easy and fun. With the right ingredients and tools, you can create a dish that bursts with flavor and impresses everyone at the table. For the full recipe, check out the [Full Recipe]. To start, mix the marinade. In a medium bowl, combine the olive oil, lime juice, chipotle powder, garlic powder, paprika, cumin, salt, and pepper. Whisk these ingredients well to create a smooth blend. This marinade gives the shrimp a zesty kick. The chipotle adds a nice smoky flavor, while the lime brings freshness. Next, it's time to marinate the shrimp. Add the shrimp to the bowl, making sure each piece is well coated. Cover the bowl and place it in the fridge. Let it sit for about 30 minutes. This step helps the shrimp absorb all those great flavors. You can even give the bowl a gentle shake now and then to mix things up. Now for the exciting part—grilling! Preheat your grill on medium-high heat. If you're using wooden skewers, soak them in water for 15-20 minutes. This prevents them from burning. Thread the marinated shrimp onto the skewers, about four to five per skewer. Make sure to leave some space between the shrimp for even cooking. Place the skewers on the grill. Cook them for 2-3 minutes on each side. The shrimp should turn pink and opaque when done. Avoid overcooking; you want them juicy. After grilling, let the skewers rest for a minute. Garnish with chopped cilantro and serve with lime wedges. For the full recipe, check back to the ingredient list above. Enjoy your flavorful dish! To cook shrimp perfectly, you need to watch the time closely. Cook them for about 2 to 3 minutes per side. They turn pink when done. If they curl tightly, they may be overcooked. Always check for a firm texture. Perfectly cooked shrimp should feel soft yet firm. You can switch up the marinade to suit your taste. Instead of lime juice, use lemon juice for a different zing. Swap chipotle powder for smoked paprika for a milder flavor. You can also add honey for sweetness. If you like heat, add more chipotle powder or some diced jalapeños. Fresh herbs like parsley or dill can also brighten the dish. For the best results, heat your grill to medium-high. This gives the shrimp a nice char without burning. If you have a gas grill, preheat it for about 10 minutes. For charcoal grills, make sure the coals are glowing and ashy. If using a grill pan, heat it on medium-high until hot. This helps to sear the shrimp quickly and evenly! For the full recipe, check out the complete instructions and tips. {{image_2}} For a kick, add more chipotle powder. You can also mix in cayenne pepper. This boosts the heat level without losing flavor. You can also use fresh jalapeños for a fresh twist. Chop them finely and stir them into the marinade. This will give your skewers an extra spicy surprise. To make BBQ shrimp skewers, swap the chipotle powder for your favorite BBQ spice mix. Use smoked paprika to keep that smoky flavor. Brush the shrimp with BBQ sauce while grilling for extra glaze. This gives a sweet and smoky flavor that everyone will love. Pair these skewers with coleslaw for a fun summer dish. Serve your chipotle lime shrimp skewers with tasty sides. A fresh mango salsa adds a bright, sweet touch. You can also serve them with a side of cilantro lime rice. This dish complements the shrimp’s flavor perfectly. For drinks, try a cold limeade or iced tea. Both will balance the spicy notes in the dish. For full steps, refer to the Full Recipe. To store leftover shrimp skewers, place them in an airtight container. Make sure the skewers are cool before sealing. This helps keep them fresh. You can store them in the fridge for up to two days. If you want to keep them longer, consider freezing. When you're ready to enjoy the leftovers, you can easily reheat them. The best way is to use a skillet. Heat the skillet over medium heat. Add a little olive oil to prevent sticking. Place the skewers in the skillet for about 3-4 minutes. Turn them occasionally until they are warm. You can also use a microwave, but they might lose some texture. If you plan to freeze the shrimp skewers, wrap them tightly in plastic wrap. Then, place them in a freezer-safe bag. They are good for up to three months in the freezer. When you want to eat them, let them thaw in the fridge overnight. After thawing, follow the reheating tips above to enjoy. For skewers, large shrimp work best. They hold up well on the grill. I prefer using shrimp that are peeled and deveined. This saves time and makes eating easier. Fresh shrimp is great, but frozen shrimp can also be good. Just thaw them before using. Yes, you can prepare the skewers ahead of time. Marinate the shrimp early in the day or even the night before. This lets the flavors soak in better. Just keep them in the fridge until you are ready to grill. You can also thread the shrimp onto the skewers in advance. Just cover them and store them in the fridge. These skewers pair well with many sides. Try serving them with rice or quinoa for a filling meal. A fresh salad adds a nice crunch too. You can also serve them with grilled veggies for extra flavor. Don’t forget lime wedges to squeeze over the shrimp. For a fun touch, serve with tortillas for a shrimp taco night. For the full recipe, check out the Chipotle Lime Shrimp Skewers guide. You learned how to make delicious shrimp skewers. We covered the main ingredients, tools, and the full recipe. I shared tips for cooking the shrimp just right and some tasty variations to try. Remember to store any leftovers properly and reheat them for best flavor. Keep these ideas in mind for your next grill night. Enjoy making these skewers perfect for any meal!](https://dailydishly.com/wp-content/uploads/2025/07/afe97868-406d-431b-a167-315cff30dffa-768x768.webp)
![For these grilled veggie skewers, you will need: - 1 large zucchini, sliced into thick rounds - 1 red bell pepper, cut into squares - 1 yellow bell pepper, cut into squares - 1 red onion, cut into chunks - 8 cherry tomatoes - 1 cup mushrooms, halved These vegetables bring color and flavor to your skewers. You can mix and match based on your taste. Try using eggplant or asparagus for a twist. The marinade adds zest and depth to the veggies. You will need: - 3 tablespoons olive oil - 2 teaspoons dried oregano - 1 teaspoon garlic powder - Salt and pepper to taste This simple mix enhances the natural flavors of the vegetables. Adjust the salt and pepper to fit your liking. Garnishes can make your skewers pop! Consider using: - Fresh parsley, chopped Adding parsley gives a fresh touch. It also adds a nice green color to the dish. You can also sprinkle feta cheese for a creamy bite. For the full recipe, check the Grilled Mediterranean Veggie Skewers. Start by gathering your veggies. Use a large bowl to combine: - 1 large zucchini, sliced into thick rounds - 1 red bell pepper, cut into squares - 1 yellow bell pepper, cut into squares - 1 red onion, cut into chunks - 8 cherry tomatoes - 1 cup mushrooms, halved Make sure to wash all your vegetables well. This keeps them fresh and clean. Cut them into even pieces. This helps them cook evenly on the grill. Next, we make the marinade. In a small bowl, whisk together: - 3 tablespoons olive oil - 2 teaspoons dried oregano - 1 teaspoon garlic powder - Salt and pepper to taste Mix until well combined. Pour this mixture over your veggies in the large bowl. Toss gently. Make sure every piece is coated. This will add great flavor to your skewers. Now it’s time to grill! First, preheat your grill to medium-high heat. While it heats, thread the marinated vegetables onto the skewers. Alternate between different types for a colorful look. Once the grill is hot, place the skewers on it. Grill for about 10-12 minutes. Turn the skewers occasionally. You want nice grill marks and tender veggies. When they are done, remove them from the grill. Let them cool slightly before serving. You can garnish with fresh parsley for an extra burst of flavor. For the full recipe, check out [Full Recipe]. Enjoy your grilled Mediterranean veggie skewers! To grill veggie skewers well, start with a clean grill. This helps prevent sticking. Preheat your grill to medium-high heat. This temperature cooks veggies evenly and keeps them crisp. Soak wooden skewers in water for at least 30 minutes. This step helps them not burn on the grill. When placing skewers on the grill, leave space between them. This promotes even heat flow. Keep a close eye on them. Turn the skewers every few minutes. This way, every side gets that nice grill mark. To get that perfect char, use high heat for a short time. Grill your skewers for about 10-12 minutes. Turn them often to avoid burning. The goal is tender veggies with those lovely grill lines. You want a bit of caramelization for extra flavor. Don’t forget to watch for the color change, too. When the veggies are brightly colored and tender, they are done. If you want a deeper char, leave them on a bit longer. Just be careful not to overcook them. Serve your grilled Mediterranean veggie skewers warm. They shine on their own, but pair nicely with dips. Try hummus or a yogurt sauce for added flavor. You can also serve them on a bed of fresh greens. This adds a nice crunch and vibrancy. For a fun twist, chop up leftovers and add them to salads. You can also use them in wraps or sandwiches. They keep well, making them a great meal prep option. For the full recipe, check out the details above. Enjoy your grilling! {{image_2}} You can swap in many other veggies for your skewers. Try using eggplant, asparagus, or even cauliflower. Each brings a unique taste and texture. For a sweeter note, add butternut squash or carrots. These flavors will shine when grilled. Don't be afraid to mix and match. The more colorful, the better! For a heartier meal, add protein to your skewers. Chicken or shrimp work well here. Cut them into bite-sized pieces for even cooking. You can marinate them just like the veggies. For a vegan option, try tofu or tempeh. They soak up flavors beautifully. Adding protein makes your skewers more filling and nutritious. While the olive oil and oregano mix is great, you can get creative. Try adding lemon juice or balsamic vinegar for extra zing. A bit of honey can bring a sweet touch. Experiment with spices like smoked paprika or cumin for warmth. Each marinade will change the flavor profile. Feel free to explore and find your favorite! Check out the Full Recipe for more details on creating the perfect skewers. After enjoying your Grilled Mediterranean Veggie Skewers, store leftovers in an airtight container. This keeps the flavors fresh. You can keep them in the fridge for three to four days. Make sure they cool down before sealing. Layer them with paper towels to absorb extra moisture. To reheat your skewers, use a skillet or grill. This helps maintain the charred flavor. Heat them on medium for about five minutes. Turn them gently to warm all sides. You can also use a microwave, but it may make them soft. If you choose the microwave, heat in short bursts to avoid overcooking. Freezing grilled skewers is a great option for meal prep. Let them cool completely first. Then, wrap each skewer in plastic wrap. Place the wrapped skewers in a freezer bag, removing as much air as possible. They can stay fresh for up to three months. To enjoy, thaw in the fridge overnight before reheating. Yes, you can use many types of vegetables. Try eggplant, asparagus, or even corn. Mixing colors and shapes makes your dish fun and tasty. Each vegetable adds its unique flavor. Experiment to find your favorites! Soak wooden skewers for at least 30 minutes. This helps prevent them from burning on the grill. If you forget to soak them, use metal skewers instead. They work great and need no soaking at all. Many sauces taste great with these skewers. Tzatziki sauce adds a cool, creamy bite. A balsamic glaze gives a sweet twist. You can also try a spicy harissa sauce for heat. Each sauce adds its own special touch to the dish. For the full recipe, check it out! Grilled Mediterranean Veggie Skewers are fun and easy to make. We looked at the best veggies, how to prepare them, and tasty marinades. I shared tips for grilling and great serving ideas. You can try different veggies and proteins to mix things up. Remember to store leftovers well so you can enjoy them later. With these guidelines, your grilling efforts will be a hit. Enjoy every bite and happy grilling!](https://dailydishly.com/wp-content/uploads/2025/07/4b70700e-9f85-4317-b9e4-a855a04e592b-768x768.webp)

