
If you crave a dish that’s both hearty and packed with flavor, you’re in for a treat! Creamy Mushroom Risotto combines rich, earthy mushrooms with perfectly cooked rice, making it a true comfort food. In this post, I’ll guide you through simple steps and tips for achieving that perfect creaminess. Whether you’re a beginner or a seasoned cook, you’ll find valuable insights to elevate your risotto game. Let’s dive in!
Ingredients
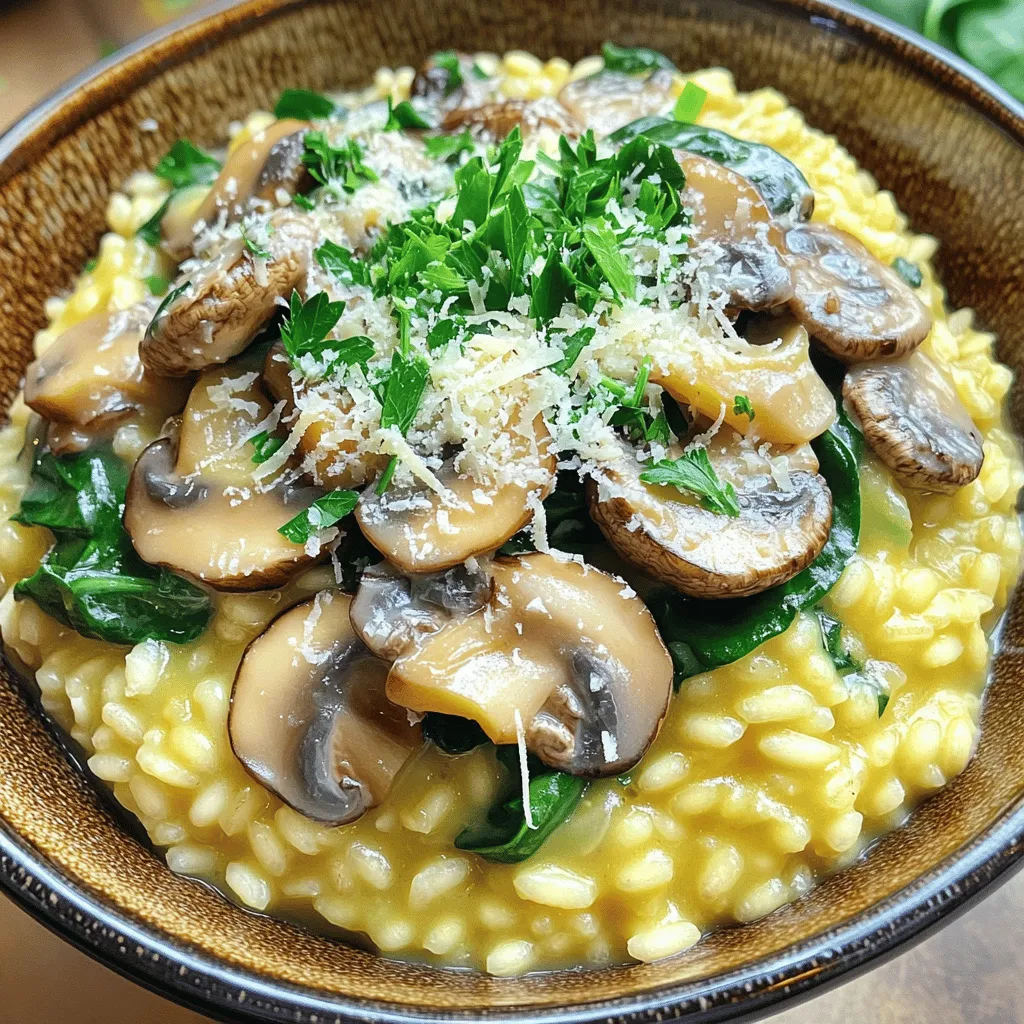
List of Ingredients
To make a perfect creamy mushroom risotto, you’ll need some key ingredients:
– 1 cup Arborio rice
– 4 cups vegetable broth
– 1 cup mushrooms (mixed varieties like cremini, shiitake, and button), sliced
– 1 small onion, finely chopped
– 2 cloves garlic, minced
– 1 cup fresh spinach, roughly chopped
– 1/2 cup heavy cream
– 1/2 cup grated Parmesan cheese
– 2 tablespoons olive oil
– 1 tablespoon unsalted butter
– Salt and freshly ground black pepper to taste
– Fresh parsley, chopped, for garnish
These ingredients create depth and richness in the dish. The Arborio rice gives it that creamy texture. The mushrooms add umami, while the onion and garlic provide a strong flavor base.
For optional garnishes and enhancements, you can consider:
– Extra grated Parmesan cheese on top
– A drizzle of truffle oil for a gourmet touch
– Toasted pine nuts for crunch
– Lemon zest for a fresh kick
Feel free to mix and match these ideas to make your risotto even more special!
Step-by-Step Instructions
Preparation Steps
Heating the vegetable broth
Start by pouring the vegetable broth into a saucepan. Heat it over low heat. You want it warm, but not boiling. This helps the rice cook evenly.
Sautéing onions and mushrooms
In a large skillet, add olive oil and butter. Heat it over medium heat. Once hot, toss in the chopped onion. Sauté it for about 3 to 4 minutes. The onion should be soft and clear. Next, add minced garlic and sliced mushrooms. Cook for another 5 to 7 minutes. Stir until the mushrooms are soft and their juices release.
Toasting the Arborio rice
Now, stir in the Arborio rice. Make sure each grain gets coated in the oil and butter mix. Toast the rice for 1 to 2 minutes. This step adds a nice nutty flavor to the risotto.
Cooking Process
Adding broth gradually and stirring
It’s time to add the warm vegetable broth. Use a ladle to scoop it out. Pour one ladle of broth into the rice. Stir as the rice absorbs the broth. Repeat this process, adding broth one ladle at a time. Keep stirring until the rice is creamy and slightly firm. This takes about 18 to 20 minutes.
Incorporating cream and cheese
When the rice is cooked, add the heavy cream. Then, mix in the grated Parmesan cheese. Stir well until everything is smooth and creamy.
Folding in spinach and seasoning
Now, fold in the chopped spinach. Stir it in gently. Let it cook for 2 to 3 minutes. The spinach should wilt and mix well. Finally, add salt and black pepper to taste. Make sure the flavors are balanced and delicious.
Tips & Tricks
Achieving Creaminess
To make your risotto creamy, use Arborio rice. This rice has high starch content, which helps create a rich texture. Start by heating your vegetable broth in a separate pot. Keep it warm, but do not let it boil.
When cooking the rice, add the broth slowly. Use a ladle and add one scoop at a time. Stir the rice often. This helps the rice absorb the broth and release its starch. Keep stirring until the rice is soft and creamy. This takes about 18-20 minutes.
Enhancing Flavor
Choosing the right mushrooms boosts the flavor of your risotto. I like to mix cremini, shiitake, and button mushrooms. Each type adds its own unique taste. Slice the mushrooms thinly for even cooking and better texture.
Seasoning is key. Use salt and freshly ground black pepper to taste. Add them gradually. Taste your risotto as you go. This way, you can find the perfect balance. Don’t forget to add fresh parsley at the end for a pop of color and flavor.
Variations
Mushroom Variations
You can change up the mushrooms in this dish for fun and flavor. Try using a mix of cremini, shiitake, and button mushrooms. Each type brings its unique taste.
– Cremini mushrooms add a rich, earthy flavor.
– Shiitake mushrooms offer a smoky, meaty taste.
– Button mushrooms have a mild flavor, perfect for balance.
You can also add other vegetables to your risotto. Spinach is a great option, as it wilts nicely. You can try peas, asparagus, or even zucchini. These veggies add color and more nutrients.
Dietary Adjustments
If you want a vegan risotto, you can easily adapt this recipe. Use vegetable broth and skip the heavy cream. Instead, use coconut cream or cashew cream for richness. Nutritional yeast is a great substitute for Parmesan. It adds a cheesy flavor without dairy.
For a gluten-free risotto, make sure your broth is certified gluten-free. Arborio rice is naturally gluten-free, so you are safe there. This way, anyone can enjoy your creamy mushroom risotto!
Storage Info
Refrigeration
To store leftover risotto, let it cool first. Place it in an airtight container. This keeps it fresh and prevents drying out. You can store it in the fridge for up to three days. After that, the taste and texture may change.
Freezing
Freezing risotto is a great option if you want to save it for later. First, let the risotto cool completely. Then, transfer it into freezer-safe bags or containers. Remove as much air as possible to avoid freezer burn. It can last in the freezer for about one month.
When you’re ready to eat it, thaw the risotto in the fridge overnight. To reheat, add a splash of broth or water. Warm it on the stove over low heat. Stir often until it’s heated through. This helps restore its creamy texture. Enjoy your tasty risotto again!
FAQs
Common Questions
How to make risotto creamy?
To make risotto creamy, use Arborio rice. This rice has high starch content. Stir the rice often while cooking. This helps release the starch and creates a rich, creamy texture. Adding warm broth slowly also helps. Keep stirring until the rice absorbs each ladle of broth. At the end, mix in heavy cream and Parmesan cheese for extra creaminess.
Can risotto be made ahead of time?
Yes, you can make risotto ahead of time. Cook the risotto until it is just al dente. Let it cool and store it in an airtight container in the fridge. When ready to serve, warm it on low heat. Add a splash of broth or cream to loosen it up. Stir well until heated and creamy again.
What to serve with creamy mushroom risotto?
Creamy mushroom risotto pairs well with many dishes. Serve it with a fresh green salad for balance. Grilled chicken or shrimp adds protein and flavor. You can also enjoy it with roasted vegetables. For a special touch, serve it with a glass of white wine. This elevates the meal and enhances the flavors.
In this blog post, we explored how to make a creamy mushroom risotto. We covered key ingredients, simple steps, and helpful tips. You learned about variations and dietary options too. Remember, the right mushrooms and stirring techniques make a big difference. You can store and even freeze leftover risotto easily. Enjoy experimenting with flavors to make the dish your own. I hope this guide helps you create a rich, hearty meal!


