Creamy Sun-Dried Tomato Spinach Pasta One Pot Delight

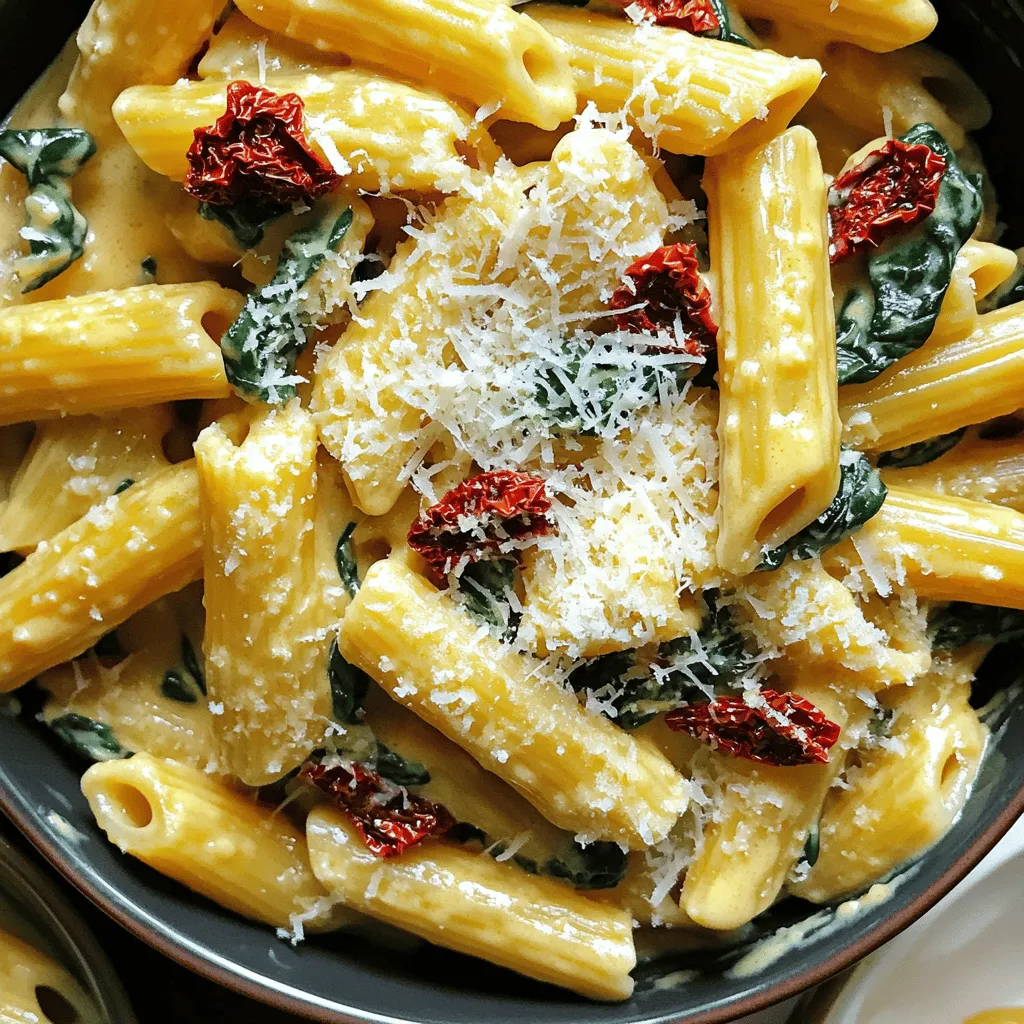
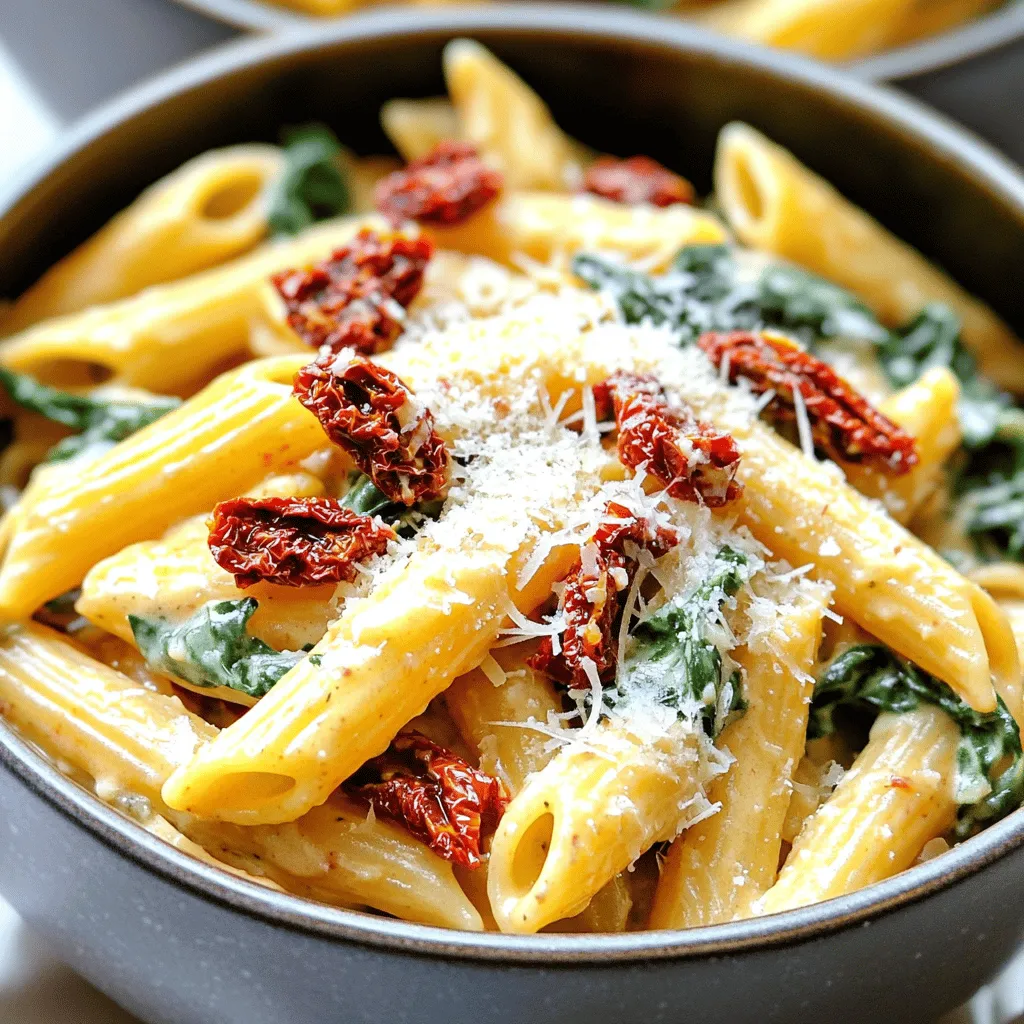
Welcome to your next favorite meal: Creamy Sun-Dried Tomato Spinach Pasta! This one-pot dish combines simple ingredients to create a rich and flavorful experience. With fresh spinach, tangy sun-dried tomatoes, and creamy goodness, you’ll love how easy it is to make. Whether you’re cooking for family or just treating yourself, this recipe is both delicious and satisfying. Let’s dive into the details and whip up this delightful pasta!
Ingredients
Main Ingredients List
– Pasta options:
– 12 oz (340g) penne pasta works great here. You can use any pasta shape you like, but penne holds the sauce well.
– Fresh vegetables:
– 1 cup sun-dried tomatoes in oil, drained and sliced adds a burst of flavor.
– 3 cups fresh spinach gives color and nutrients to the dish.
– Dairy and alternatives:
– 1 cup heavy cream makes the sauce rich and creamy. Use a dairy-free alternative if you prefer.
– ½ cup grated Parmesan cheese adds a cheesy finish. For vegan, try nutritional yeast.
– Seasonings and oils:
– 2 tablespoons olive oil is perfect for sautéing.
– 1 teaspoon dried oregano and 1 teaspoon dried basil enhance the flavors.
– Salt and pepper to taste bring everything together.
– Broth and seasonings:
– 4 cups vegetable broth provide the base for cooking the pasta.
– Red pepper flakes are optional if you like a bit of heat.
These ingredients blend to create a creamy delight that is quick and easy to make. You’ll love how they come together in one pot. Happy cooking!
Step-by-Step Instructions
Preparing the Base
Start by heating olive oil in a large pot over medium heat. Add the diced onion and sauté for about 3-4 minutes. You want the onion to turn clear. Next, toss in the minced garlic for one more minute. Keep stirring so it won’t burn.
Now, add the sun-dried tomatoes, dried oregano, and dried basil. Cook this mix for about 2 minutes to let those flavors come together. The aroma will make your kitchen feel warm and inviting.
Cooking the Pasta
Pour in the vegetable broth and bring it to a boil. Once it bubbles, add 12 ounces of penne pasta. Stir well so the pasta is fully covered. Lower the heat to a simmer and cook uncovered for 10-12 minutes. Stir occasionally to keep the pasta from sticking. You want it to be al dente, with some liquid still left in the pot.
Finalizing the Dish
When the pasta is nearly done, add 3 cups of fresh spinach and 1 cup of heavy cream. Stir until the spinach wilts and the mixture turns creamy. This step adds a lovely color and richness to your dish.
Season with salt, pepper, and red pepper flakes if you like heat. Stir in ½ cup of grated Parmesan cheese until it melts completely. Remove the pot from heat and let it sit for a few minutes to thicken. Taste and adjust seasoning if needed.
Now, your creamy sun-dried tomato spinach pasta is ready to serve! Enjoy every bite of this one-pot delight.
Tips & Tricks
Achieving the Perfect Creaminess
To make your pasta creamy, adjust the liquid. If it seems too thick, add a bit more broth or cream. The right balance ensures a smooth texture. For cream alternatives, you can use coconut cream or cashew cream. Both add a nice flavor without dairy.
Enhancing Flavor
Spices and herbs can take your dish up a notch. Try adding garlic powder, thyme, or even a squeeze of lemon juice. They add depth to the taste. For serving, garnish with extra Parmesan cheese and fresh basil. A sprinkle of red pepper flakes gives it a nice kick, too.
Cooking Tips
Timing is key for al dente pasta. Cook the penne for about 10-12 minutes. Stir occasionally to prevent sticking. This keeps your pasta from getting mushy. Stirring during cooking helps mix in the flavors. It also ensures an even cook. Enjoy the process and watch your dish come alive!

Variations
Protein Add-ins
You can easily add protein to your creamy sun-dried tomato spinach pasta. If you want meat, try chicken or shrimp. Cook the chicken in cubes until golden brown. Then, add the sun-dried tomatoes and herbs. For shrimp, toss them in during the last few minutes of cooking. They cook quickly and add great flavor.
If you prefer plant-based options, consider chickpeas or tofu. Cook cubed tofu until crispy, then mix it in. Chickpeas add nice texture and protein. They pair well with the creamy sauce.
Vegetarian and Vegan Options
For a vegetarian dish, you can swap heavy cream for plant-based cream. Almond or coconut cream works great. It keeps the dish creamy while being dairy-free.
If you’re vegan, use nutritional yeast instead of Parmesan cheese. It adds a cheesy flavor without any dairy. Mix it in just before serving for the best taste.
Ingredient Swaps
Feel free to switch pasta shapes. While penne is great, fusilli or farfalle also work well. These shapes hold the sauce nicely.
You can also add different vegetables. Try bell peppers, zucchini, or mushrooms. They add color and nutrition. Just sauté them with the onions and garlic for extra flavor.
Storage Info
Storing Leftovers
To keep your creamy sun-dried tomato spinach pasta fresh, follow these tips:
– Store leftovers in airtight containers.
– Let the pasta cool before sealing.
– Refrigerate within two hours of cooking.
– Use leftovers within three days for best taste.
Freezing for Later Use
If you want to save some for later, freezing is a great option:
– Place cooled pasta in freezer-safe containers.
– Leave a little space for expansion.
– Label containers with the date.
– Use within three months for best quality.
Reheating Instructions
When it’s time to enjoy your pasta again, reheating is easy:
– Heat in a pot over low heat.
– Add a splash of vegetable broth or cream to keep it moist.
– Stir often to avoid sticking.
– For microwave reheating, cover with a lid to keep moisture in.
By following these storage tips, your creamy sun-dried tomato spinach pasta will taste just as good the next time you serve it!
FAQs
How long does it take to prepare this dish?
This dish takes about 30 minutes total. You need about 10 minutes for prep. The cooking time is around 20 minutes. This includes the time to sauté, boil, and simmer everything in one pot.
Can I make this dish gluten-free?
Yes, you can! Look for gluten-free penne or any pasta made from rice or lentils. Many brands offer tasty options that work well in this recipe. Just remember to check the cooking time on the package. Gluten-free pasta may need a bit longer to cook.
What can I substitute for sun-dried tomatoes?
If you can’t find sun-dried tomatoes, try using fresh tomatoes. Chop them and sauté until soft. You can also use roasted red peppers for a different flavor. Both options will give your dish a nice taste.
Can I use frozen spinach instead of fresh?
Yes, you can use frozen spinach! Just remember to thaw it first. Squeeze out excess water before adding it to the pot. It will blend well with the cream and other ingredients. This option saves time and still gives great flavor.
This blog post covered how to make a delicious one-pot pasta dish. We explored the key ingredients, from fresh veggies to creamy options. I shared step-by-step instructions to create the base, cook the pasta, and finalize the dish. You also learned tips for perfect creaminess and flavor enhancements. With variations for protein and storage advice, you can customize your meal. Keep these ideas in mind for your next dinner. Enjoy cooking and delighting in your tasty creation!


![To make the sweet potato and black bean enchiladas, gather the following ingredients: - 2 medium sweet potatoes, peeled and diced - 1 can (15 oz) black beans, rinsed and drained - 1 cup corn kernels (fresh, frozen, or canned) - 1 teaspoon cumin - 1 teaspoon smoked paprika - ½ teaspoon chili powder - Salt and pepper to taste - 1 cup shredded cheddar cheese (or a vegan alternative) - 8 large tortillas (corn or flour) - 1 cup enchilada sauce (store-bought or homemade) - 2 tablespoons olive oil - Fresh cilantro and avocado slices for garnish These ingredients create a colorful and tasty meal. Sweet potatoes bring natural sweetness and nutrition. Black beans add protein and fiber, making these enchiladas hearty. Corn gives a nice crunch, while spices add depth. You can use different types of cheese to fit your taste. Also, consider adding more veggies like spinach or bell peppers for extra flavor. The enchilada sauce can be homemade or store-bought, depending on your time. Be sure to prep your ingredients before you start cooking. This makes the assembly easy and quick. For the full recipe, check out the instructions I provided earlier. Enjoy creating a dish that is both satisfying and fun to eat! To start, I cook the sweet potatoes. I peel and dice them into small cubes. Then, I boil water in a medium pot. Once boiling, I add the sweet potato cubes. I cook them for about 10 minutes, or until they are tender. After that, I drain them and mash them slightly with a fork. I like to leave some chunks for texture. Next, I flavor the sweet potato mixture. In a large bowl, I combine the mashed sweet potatoes with black beans, corn, cumin, smoked paprika, chili powder, salt, and pepper. I mix it well until everything combines. This mixture is full of flavor and nutrition. Now, I begin assembling the enchiladas. I spread ½ cup of enchilada sauce on the bottom of a 9x13 inch baking dish. This step helps keep the enchiladas from sticking. I take a tortilla and place it on a flat surface. I add about ¼ cup of the sweet potato and black bean mixture down the center. I sprinkle a little cheese on top. Then, I roll the tortilla tightly and place it seam-side down in the baking dish. I repeat this process until I use all the tortillas and filling. It's time to bake the enchiladas. I cover the dish with foil and bake them for 20 minutes. This keeps them moist while cooking. After 20 minutes, I remove the foil and bake for another 10 minutes. This last step makes the cheese bubbly and slightly golden. Once baked, I let the enchiladas cool for a few minutes. They are ready to be served. You can garnish them with fresh cilantro and avocado slices for extra flavor. For the full recipe, refer to the provided instructions. Choosing the right tortillas is key. I prefer using corn tortillas for a classic taste. They hold the filling well and get soft in the oven. If you like flour tortillas, they work too. Just warm them up first to make them more flexible. For cheese melting tips, choose a cheese that melts easily. Cheddar is a great option. You can mix it with Monterey Jack for a creamier texture. To help your cheese melt better, cover the enchiladas with foil while baking. This traps steam and keeps the cheese gooey. Preparing the filling in advance is a great time-saver. You can cook the sweet potatoes and mix them with the beans and spices the day before. Just store it in the fridge until you are ready to assemble. When it comes to storing assembled enchiladas, cover them tightly with plastic wrap or foil. You can keep them in the fridge for up to two days. If you want to freeze them, do so before baking. Just wrap them well and they can last up to three months. When you're ready to eat, bake them straight from the freezer; just add some extra time for cooking. For the full recipe, check out the Sweet Potato & Black Bean Enchiladas . {{image_2}} For a vegan twist, skip the cheese. Use a vegan cheese substitute. Nutritional yeast also adds a cheesy flavor. Instead of regular enchilada sauce, choose a vegan option or make your own. You can add more veggies, too. Try bell peppers, zucchini, or spinach for extra nutrition. These additions make the dish colorful and tasty. Want more heat? Add diced jalapeños to the filling. You can also increase the chili powder. If you prefer milder flavors, use less chili powder. Swap it for smoked paprika for a smoky taste without the heat. Try adding cumin or coriander for added depth. These spices can bring new flavors to your enchiladas. Making your own enchilada sauce is easy and fun. Combine tomatoes, onions, and spices for a fresh taste. You can also try green sauce for a zesty change. If you're short on time, store-bought sauces work well too. Just pick a brand you like. Experimenting with different sauces can really change the dish. For the full recipe and detailed instructions, check out the [Full Recipe]. To store leftover enchiladas, let them cool down first. Place them in an airtight container. This keeps them fresh for up to three days. When storing, try not to stack them. This helps avoid breaking the tortillas. You can also cover them with plastic wrap before sealing the container. To freeze enchiladas, wrap them well in foil or plastic wrap. You can also use a freezer-safe container. They will stay good for about three months. When you want to eat them, take them out and thaw overnight in the fridge. To reheat, bake them in the oven at 350°F (175°C) for about 25 minutes. You can also add a bit of sauce to keep them moist. Enjoy them like they are fresh! For the full recipe, check out Sweet Potato & Black Bean Enchiladas. Yes, you can use other beans in this recipe. Some great options include: - Pinto beans - Kidney beans - Chickpeas - White beans These beans add unique flavors and textures. Just make sure to rinse and drain them well. Each type of bean offers a different taste, so feel free to experiment! To make these enchiladas gluten-free, choose the right tortillas. You can use: - Corn tortillas - Gluten-free flour tortillas Both options work well. Make sure to check the labels for any gluten-containing ingredients. Gluten-free tortillas hold the filling nicely, giving you that perfect bite. When serving enchiladas, consider these tasty sides: - Mexican rice - Refried beans - A fresh salad - Guacamole - Salsa These sides enhance the meal and add more flavor. Enjoy your enchiladas with your favorite accompaniments for a complete dining experience. For the full recipe, check out the details above! This guide covered making tasty enchiladas with sweet potatoes, black beans, and spices. You learned how to prepare and assemble, plus tips for the best results. Keep your enchiladas fresh with proper storage or freeze them for later. Explore variations to suit your taste. Enjoy these dishes with your favorite sides. Now you’re ready to create delicious enchiladas anytime!](https://dailydishly.com/wp-content/uploads/2025/06/7d965e75-a030-40f0-bb8d-330850614dc3-768x768.webp)


![- Chicken and Vegetables - 2 boneless, skinless chicken breasts, sliced into thin strips - 1 red bell pepper, sliced - 1 cup broccoli florets - 1 cup snap peas - 1 carrot, julienned - Sauces and Seasonings - 2 tablespoons honey - 4 cloves garlic, minced - 2 tablespoons soy sauce (low sodium) - 1 tablespoon sesame oil - 2 tablespoons vegetable oil - Salt and pepper to taste - Optional Garnishes - Sesame seeds - Green onions, sliced This dish shines with fresh ingredients. Each one adds a unique flavor and texture. The chicken provides protein, while the vegetables give crunch and color. Honey and garlic create a sweet and savory sauce that ties everything together. Using low sodium soy sauce keeps the dish healthy. Sesame oil adds depth and richness. Don’t skip the garnishes; they add a lovely finish. You can find the full recipe in the detailed section above. Enjoy your cooking! Whisking the Honey Garlic Sauce In a small bowl, combine honey, minced garlic, soy sauce, and sesame oil. Use a whisk to mix until smooth. This sauce gives the dish a sweet and savory flavor. Set it aside for later. Seasoning the Chicken Take your sliced chicken and sprinkle salt and pepper over it. This adds flavor and prepares the chicken for cooking. Make sure to coat all sides evenly. Preparing the Vegetables Wash and chop your vegetables. Slice the red bell pepper, julienne the carrot, and get the broccoli florets and snap peas ready. Fresh veggies add color and crunch to the dish. Sautéing the Chicken Heat one tablespoon of vegetable oil in a large skillet or wok over medium-high heat. Once hot, add the seasoned chicken strips. Cook for 5 to 7 minutes, stirring often. The chicken should turn golden and be fully cooked. Remove it from the skillet and set aside. Stir-Frying the Vegetables In the same skillet, add the remaining tablespoon of vegetable oil. Toss in the red bell pepper, broccoli, snap peas, and carrot. Stir-fry for about 3 to 4 minutes. You want them crisp-tender, not mushy. Combining Chicken and Sauce Return the cooked chicken to the skillet with the veggies. Pour your prepared honey garlic sauce over everything. Stir well to coat all the ingredients evenly. Cook for an additional 2 to 3 minutes to let the sauce thicken slightly. Plating the Dish Serve your honey garlic chicken stir fry in shallow bowls. A bed of fluffy rice or noodles makes it even better. This adds substance and absorbs the sauce. Garnishing Tips Top your dish with sesame seeds and sliced green onions for extra flavor and color. A wedge of lime on the side gives a nice citrus kick. For the complete recipe, check out the [Full Recipe]. Optimal Cooking Temperature Heat is key for a great stir fry. Start with medium-high heat. This temperature helps brown the chicken and keeps veggies crisp. Too low, and your food stews instead of fries. Too high, and you might burn everything. Keep an eye on the pan! Avoiding Overcooked Chicken and Vegetables Cook the chicken until it's just done. It should be golden, not dry. Remove it from the pan as soon as it’s cooked. For the veggies, stir-fry for 3-4 minutes. They should be bright and a bit crunchy. Overcooked veggies lose their color and nutrients. Choosing the Best Chicken Cuts I always use boneless, skinless chicken breasts for this dish. They cook quickly and stay juicy. You can also use thighs if you prefer more flavor. Just cut them into thin strips for even cooking. Freshness of Vegetables Fresh veggies make a big difference. Look for bright colors and firm textures. Bell peppers, broccoli, and snap peas should feel crisp. Avoid any limp or brown spots. The better the veggies, the better your stir fry will taste. Pairing Suggestions (Rice, Noodles, etc.) Serve this stir fry over fluffy rice or noodles. Both absorb the honey garlic sauce well. For rice, jasmine or basmati works great. If you choose noodles, try egg noodles or rice noodles for a nice touch. Customizing for Dietary Preferences You can easily adapt this recipe. Want it vegetarian? Use firm tofu instead of chicken. Gluten-free? Swap soy sauce for tamari or coconut aminos. Make it your own while keeping the flavor! For more ideas, check out the Full Recipe. {{image_2}} You can mix it up with different proteins. Tofu works great for a vegetarian option. Beef strips add a rich flavor. Just remember to adjust cooking times for each protein. When it comes to veggies, the options are endless. You can add mushrooms for an earthy touch. Zucchini gives a nice crunch. Carrots, bell peppers, and snap peas are also good choices. Feel free to use what you have in your fridge. Want to boost the flavor? Try adding new sauces or spices. A splash of sriracha can add heat. Ginger adds a nice zing. Experiment with different flavors to find your perfect mix. Adjust the sweetness to your liking too. If you prefer less sweetness, cut the honey by half. For a sweeter taste, add more honey. Taste as you go to find what works best for you. You can make this dish in an Instant Pot or slow cooker. For the Instant Pot, sauté first, then pressure cook for quick results. In a slow cooker, let it simmer for a few hours. Grilling or baking can also work well. Grill the chicken for a smoky flavor. Bake it in the oven for a hands-off approach. No matter the method, the taste will still be amazing. If you're looking for the full recipe, check out the Honey Garlic Chicken Stir Fry ! To keep your honey garlic chicken stir fry fresh, store any leftovers in an airtight container. Place the container in the fridge right after the meal. This helps lock in flavors and prevent bacteria growth. You should enjoy your leftovers within 3 to 4 days for the best taste. If you want to save your stir fry for later, freezing is a great option. First, let the dish cool completely before packing it. Use freezer-safe bags or containers for best results. Be sure to remove as much air as possible to prevent freezer burn. Your honey garlic chicken stir fry can last up to 3 months in the freezer. When you're ready to eat, thaw the stir fry overnight in the fridge. Then, reheat it on the stovetop over low heat. Stir occasionally until it’s hot. You can also microwave it, but ensure you stir it every minute to heat evenly. Enjoy your meal all over again! Can I use frozen vegetables? Yes, you can use frozen vegetables. They save time and are easy to find. Just add them directly to the pan. You might need to cook them a bit longer. This will help them get warm and tender. How to make this dish gluten-free? To make this dish gluten-free, use tamari instead of soy sauce. Tamari is a great gluten-free option. Check the labels to ensure no gluten ingredients are included. What to do if the sauce is too thick? If the sauce is too thick, add a little water or chicken broth. Stir it in slowly. This will help loosen the sauce and keep it tasty. How do I know when the chicken is fully cooked? Check the chicken's color and texture. It should be white and firm. The safest way is to use a meat thermometer. The internal temperature should reach 165°F (75°C). Can this recipe be made ahead of time? Yes, you can prepare the chicken and sauce ahead of time. Store them in the fridge for up to two days. Then, cook the stir fry when you are ready to eat. What's the best way to reheat stir fry? Reheat the stir fry in a skillet over medium heat. Add a splash of water to keep it moist. Stir often until it’s hot. This will help keep the flavors fresh. For the full recipe, check out the Honey Garlic Chicken Stir Fry. To make a great Honey Garlic Chicken Stir Fry, we discussed all the key ingredients, steps, and tips. Start with fresh chicken and vibrant vegetables. Whisk together a yummy sauce and cook everything just right. Don’t forget to play with flavors or cooking methods to suit your taste. Proper storage keeps leftovers tasty for later. With a few variations, this dish can easily fit your dietary needs. Enjoy your stir-fry and impress family or friends with your new skills!](https://dailydishly.com/wp-content/uploads/2025/07/ad7e2fa8-e610-4152-a96e-e496d4740468-768x768.webp)