Creamy Tomato Basil Pasta Flavorful and Simple Recipe

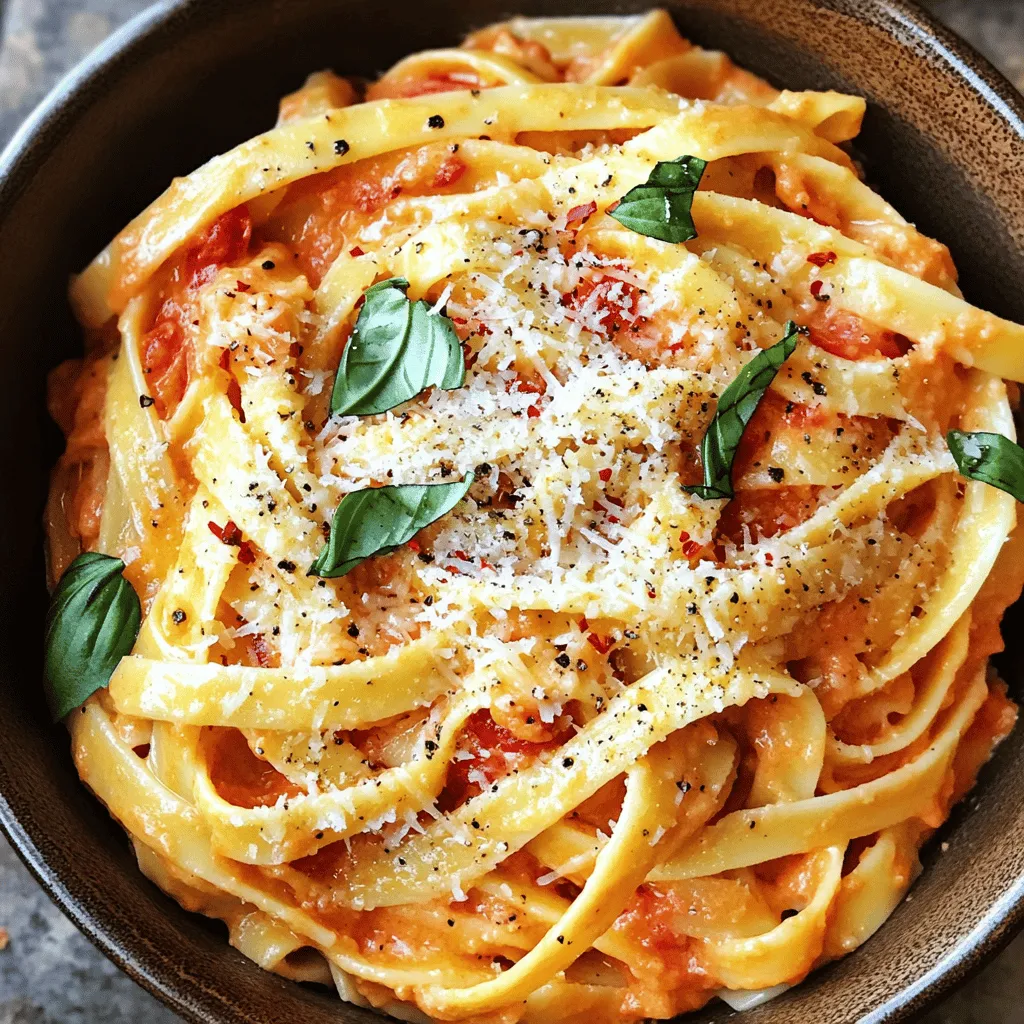
Looking for a simple, flavorful dish that’s sure to impress? You’ll love this creamy tomato basil pasta! With fresh ingredients like garlic, crushed tomatoes, and Parmesan cheese, I’ll guide you through each step to create a comforting, homemade meal. Whether you’re cooking for yourself or inviting guests, this recipe is easy to make and packed with taste. Let’s dive in and make pasta night unforgettable!
Ingredients
Essential Ingredients for Creamy Tomato Basil Pasta
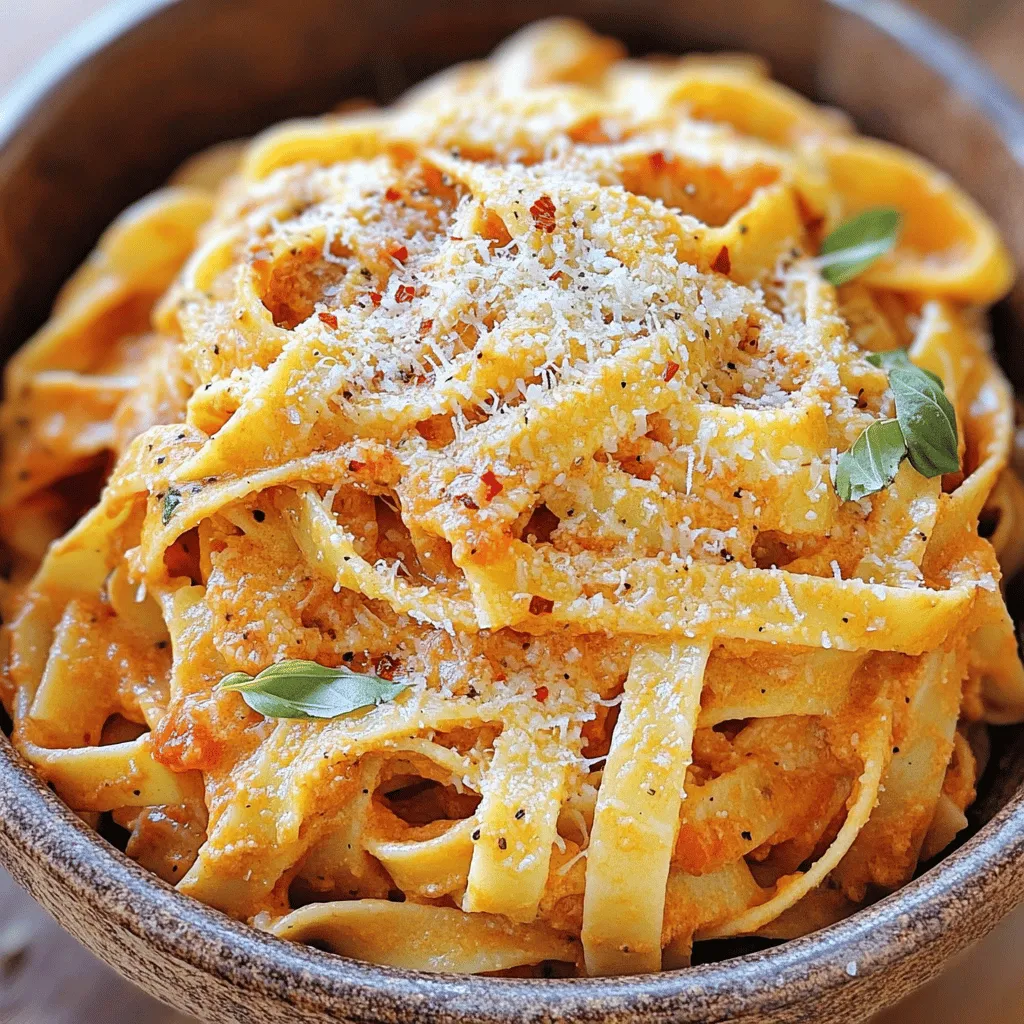
To make creamy tomato basil pasta, you need a few key items. Start with your choice of pasta. Fettuccine or penne works great. Next, gather the flavorings that will make your dish pop. You will need garlic, crushed tomatoes, and fresh basil. These ingredients bring out the best flavors.
For the creamy base, you will need heavy cream and Parmesan cheese. Heavy cream gives the sauce richness, while Parmesan adds a savory touch.
Here’s your list of essential ingredients:
– 12 oz pasta (fettuccine or penne)
– 2 tablespoons olive oil
– 3 cloves garlic, minced
– 1 can (14 oz) crushed tomatoes
– 1 cup heavy cream
– 1 cup fresh basil leaves, chopped
– 1 teaspoon sugar
– Salt and pepper to taste
– ½ cup grated Parmesan cheese
Optional Ingredients
Feel like spicing things up? You can add red pepper flakes for some heat. This small addition can transform your dish. If you love herbs, feel free to include other spices. Oregano or thyme can enhance the flavor even more.
Here’s a quick look at optional ingredients:
– Red pepper flakes for heat
– Additional herbs or spices
Step-by-Step Instructions
Cooking the Pasta
Start by boiling a large pot of salted water. Bring the water to a rolling boil. Add 12 ounces of your chosen pasta, like fettuccine or penne. Cook according to the package instructions until the pasta is al dente. This means it should still have a slight bite when you eat it. After cooking, drain the pasta, but remember to save some of that pasta water. This water is starchy and will help thicken your sauce later.
Preparing the Sauce
In a large skillet, heat 2 tablespoons of olive oil over medium heat. Once the oil is hot, add 3 cloves of minced garlic. Sauté the garlic for about one minute. You want it fragrant but not burnt. Next, pour in one can of crushed tomatoes. Stir in one teaspoon of sugar to balance the acidity. Season with salt and pepper to taste. Let the sauce simmer for about five minutes. This allows the flavors to blend nicely.
Final Sauce Adjustments
Now, reduce the heat to low. Add one cup of heavy cream to the tomato mixture. Stir well to combine and let it cook for another 3-4 minutes. This will make your sauce creamy and rich. Then, add one cup of chopped fresh basil to the sauce and stir. If the sauce seems too thick, add a little bit of the reserved pasta water. This helps reach your desired consistency without losing flavor.
Combining Pasta and Sauce
Now, it’s time to combine everything. Add the cooked pasta to the sauce in the skillet. Toss the pasta with the sauce to coat it evenly. Cook for an additional two minutes on low heat. This helps the pasta absorb the sauce. Finally, remove the skillet from heat and stir in half a cup of grated Parmesan cheese. This adds a nice cheesy flavor. Adjust the seasoning if needed. Your creamy tomato basil pasta is now ready to serve!
Tips & Tricks
Best Practices for Creamy Tomato Basil Pasta
To make your creamy tomato basil pasta perfect, focus on the sauce’s texture. Start with the heavy cream. Pour it in slowly. Stir well and let it cook gently. This gives you that rich, creamy feel. If it feels too thick, use some reserved pasta water. This helps you find the right balance.
Adjusting the seasoning is key. Taste as you cook. If it needs more flavor, add a pinch of salt or a dash of pepper. A little sugar can help cut the acidity of the tomatoes. This small step makes a big impact on taste.
Time-Saving Tips
Want to save time? Use pre-cooked or refrigerated pasta. This cuts your cooking time in half. Just warm it up in the sauce for a few minutes.
Prepare your ingredients ahead of time. Chop the garlic and basil before you start. This way, you can focus on cooking and mix everything smoothly. It helps make your cooking experience more enjoyable and less stressful.

Variations
Healthy Alternatives
You can make this creamy tomato basil pasta lighter and healthier. Start by swapping heavy cream with lighter options. Try using Greek yogurt or cashew cream for a creamy texture with fewer calories. You can also use almond milk or coconut milk as a dairy-free alternative.
Another great choice is using whole grain or gluten-free pasta. Whole grain pasta adds fiber and nutrients. Gluten-free pasta allows those with gluten intolerance to enjoy the dish. Both options work well with the creamy sauce and enhance the meal.
Flavor Enhancements
To make your pasta more exciting, you can add vegetables like spinach or mushrooms. Fresh spinach adds color and nutrients, while mushrooms bring a rich, earthy taste. Sauté these veggies with your garlic for a flavorful boost.
If you want to add protein, consider chicken or shrimp. Grilled chicken provides a hearty addition, while shrimp cooks quickly and adds a sweet flavor. Both pair well with the creamy sauce and make the dish more filling.
Unique Pairings
For side dishes, consider a light salad. A simple green salad with vinaigrette complements the rich pasta. You might also serve garlic bread for a classic touch. It’s great for soaking up the extra sauce.
When it comes to wine, a crisp white wine like Sauvignon Blanc works well. Its acidity cuts through the creaminess of the sauce. If you prefer red, a light Pinot Noir can also be a good match. Enjoying these pairings elevates your dining experience with creamy tomato basil pasta.
Storage Info
Proper Storage Techniques
After you enjoy your creamy tomato basil pasta, store leftovers correctly. First, let the pasta cool to room temperature. Then, place it in an airtight container. In the fridge, it stays fresh for about three to four days. Make sure to label your container with the date.
If you want to save it longer, freezing is a great option. Use freezer-safe bags or containers. You can freeze the pasta for up to three months. Just remember to divide it into portions for easy thawing later.
Reheating Tips
When it’s time to reheat, keep it creamy and delicious. The best method is to use the stovetop. Add a splash of water or milk to the pan. Heat it over low to medium heat. Stir often to prevent sticking.
If you use the microwave, cover the bowl. Heat in short bursts, stirring in between. This helps keep the creaminess intact. Avoid cooking it too long to prevent overcooked pasta. Enjoy your meal just as good as the first time!
FAQs
How can I make this recipe vegetarian?
You can make this recipe vegetarian by skipping meat products. Instead of chicken or sausage, use vegetables like mushrooms, zucchini, or bell peppers. These add great flavor and texture. You can also toss in some cooked lentils or chickpeas for protein.
Can I make this recipe ahead of time?
Yes, you can prep this dish ahead of time! Cook the pasta and sauce separately. Store them in the fridge for up to two days. When ready to eat, just reheat the sauce and mix it with the pasta. This saves time on busy days.
What can I substitute for heavy cream?
If you want a lighter dish, use half-and-half or whole milk instead of heavy cream. You can also try coconut cream for a dairy-free option. Silken tofu blended with a bit of milk works well too. These alternatives keep the creaminess without the full calories.
How long does the dish last in the fridge?
This creamy tomato basil pasta lasts in the fridge for about three days. Store it in an airtight container to keep it fresh. When you want to enjoy it again, just reheat it on low heat.
What other herbs can I use besides basil?
You can use many herbs to change the flavor of this dish. Try oregano for an Italian twist or thyme for a warm taste. Fresh parsley adds a nice touch too. For a bit of spice, use cilantro. Each herb brings its unique flavor, making your meal special.
This blog post explored how to make creamy tomato basil pasta. We discussed key ingredients like pasta, garlic, and fresh basil. I shared step-by-step instructions for cooking and preparing the sauce. You learned tips for achieving the perfect creamy consistency, and variations to make it lighter or add flavors.
In conclusion, enjoy this dish in any way you wish. Its versatility makes it easy to personalize. Remember to experiment with flavors and ingredients to suit your taste. Your pasta creation will surely impress anyone who tries it!


. To start, grab a large mixing bowl. Open the can of black beans, rinse, and drain them. Use a fork or potato masher to mash the beans. Aim for a mostly smooth texture but leave some chunks for bite. Next, add the cooked quinoa, breadcrumbs, and chopped red onion. Toss in the finely chopped bell pepper, minced garlic, and spices: chili powder, cumin, smoked paprika, salt, and pepper. Finally, squeeze in the lime juice. Mix everything until it feels well combined. If the mixture is too wet, sprinkle in more breadcrumbs until it can hold its shape. Once your mixture is ready, divide it into four equal parts. Shape each part into a patty that is about one inch thick. Heat olive oil in a non-stick skillet over medium heat. When the oil is hot, carefully place the patties in the skillet. Cook each side for about 4-5 minutes. Look for a golden brown color and ensure they are heated through. This step gives the burgers a nice crispy edge. Now it's time to serve your spicy black bean burgers! Place each patty on a hamburger bun. Top with your favorite ingredients, like avocado slices, lettuce, tomato, and spicy mayo. For a beautiful plate, pair the burgers with sweet potato fries or a mixed greens salad. The colors will look great together and make your meal even more appetizing. For the full recipe, check the details above. To get the best texture, mash your black beans well. Leave some chunks for that hearty bite. Add cooked quinoa to bind everything together. Use breadcrumbs or oat flour for a firmer patty. If the mix feels too wet, just add more breadcrumbs. This helps the burgers hold their shape. Want more heat? Try adding chopped jalapeños or a dash of cayenne pepper. You can also mix in some hot sauce or sriracha for an extra kick. Don’t forget to taste as you go! Adjust the spices until you get the flavor you want. Fresh herbs like cilantro can brighten up the taste too. Store cooked burgers in an airtight container. They will stay fresh for about three days in the fridge. To reheat, use the skillet on medium heat. Cook for about three minutes on each side. You can also microwave them for a quicker option; just cover them to keep moisture. If you want longer storage, freeze the uncooked patties. They’ll last up to three months in the freezer. Enjoy them anytime with the full recipe! {{image_2}} You can swap black beans for other beans. Chickpeas or kidney beans work well. Each bean brings a unique flavor and texture. For example, chickpeas add a nutty taste. Kidney beans give a softer bite. Just mash them like you do with black beans. Follow the same recipe steps for great results. Want more nutrition? Add grains or veggies to your burger mix. Cooked brown rice or farro can boost fiber. You can also mix in grated carrots or zucchini. These add moisture and flavor. Just remember to squeeze out excess water from veggies. This keeps your burger from getting too wet. Experimenting with spices can change your burger game. Try adding smoked chipotle for heat. Or mix in fresh herbs like cilantro or parsley. For a Mediterranean twist, add oregano and feta cheese. These spices and herbs change the flavor and make it exciting. Don't be afraid to get creative with what you have! For the full recipe, check out the detailed steps above. To keep your cooked spicy black bean burgers fresh, let them cool first. Place them in an airtight container. Store them in the fridge for up to three days. This helps maintain their flavor and texture. Freezing your burgers is a great option for meal prep. After they cool, wrap each burger in plastic wrap. Then, place them in a freezer-safe bag. They can last up to three months in the freezer. When you’re ready to eat, just thaw them in the fridge overnight. Use glass or BPA-free plastic containers for best results. These containers seal tightly and prevent air from entering. This keeps your burgers from drying out. If you’re freezing, look for heavy-duty freezer bags. They help protect against freezer burn. To make your Spicy Black Bean Burgers stick, you need the right balance. Start by mashing the black beans well. Leave some chunks for texture. Mix in breadcrumbs or oat flour. This helps hold the burgers together. If the mix feels too wet, add more breadcrumbs. You want a moldable consistency. This simple trick ensures your burgers stay intact while cooking. You can serve many tasty sides with Spicy Black Bean Burgers. Here are some great options: - Sweet potato fries - Mixed greens salad - Coleslaw - Grilled vegetables - Corn on the cob These sides add color and flavor to your meal. They also complement the burgers well. Feel free to mix and match to find what you like best! Yes, you can bake black bean burgers! Baking is a healthier option. Preheat your oven to 375°F (190°C). Line a baking sheet with parchment paper. Place the shaped patties on it. Bake for about 20-25 minutes. Flip them halfway for even cooking. You’ll still get a nice texture without frying. This method works well and keeps the burgers light! To sum up, we explored how to make tasty spicy black bean burgers. We looked at key ingredients, cooking steps, and tips for the perfect texture. You can try fun variations and learn how to store leftovers. These burgers are easy to tweak for your tastes. They are delicious and healthy. Enjoy making them your own, and share with friends!](https://dailydishly.com/wp-content/uploads/2025/06/bb742c5e-0c76-419c-af3f-f1da08f0abd3-768x768.webp)
![- 1 lb boneless, skinless chicken breasts - 2 tablespoons olive oil - Seasonings: chili powder, cumin, smoked paprika, garlic powder - Salt and pepper - Vegetables: red bell pepper, green bell pepper, yellow onion - Tortillas: flour or corn - Garnishes: fresh cilantro, lime wedges When you make easy chicken fajitas, you need fresh and tasty ingredients. Start with 1 pound of boneless, skinless chicken breasts. Cut them into thin strips for quick cooking. Next, add 2 tablespoons of olive oil. This oil helps the flavors stick. For the seasonings, use: - 1 teaspoon chili powder - 1 teaspoon cumin - 1 teaspoon smoked paprika - 1 teaspoon garlic powder These spices give the chicken a bold taste. Don't forget salt and pepper to enhance the flavor. Now, gather your vegetables. You will need: - 1 red bell pepper, sliced - 1 green bell pepper, sliced - 1 yellow onion, sliced These veggies add color and crunch. You will also need tortillas. Choose either 8 small flour or corn tortillas. Finally, fresh cilantro and lime wedges make great garnishes. The cilantro adds freshness, and the lime gives a zesty kick. With these ingredients, you can create a flavorful family dinner that everyone will enjoy. Check the Full Recipe for more tips! Start by mixing the marinade. In a large bowl, combine the olive oil with chili powder, cumin, smoked paprika, garlic powder, salt, and pepper. Stir it well until all the spices blend into the oil. Next, add the sliced chicken to the bowl. Toss the chicken strips in the marinade. Make sure each piece gets coated. Let it sit for 15 to 20 minutes. If you have more time, marinate it in the fridge for up to 2 hours. This gives the chicken great flavor. Heat a large skillet over medium-high heat. Once hot, add the marinated chicken to the skillet. It should sizzle when it hits the pan. Cook for about 5 minutes. Stir occasionally to make sure it cooks evenly. You want the chicken to be cooked through and browned. Check that it is no longer pink in the center. Now it’s time for the veggies! Add the sliced bell peppers and onions to the skillet with the chicken. Stir everything together. Cook for another 5 to 7 minutes. You want the vegetables to be tender but still crisp. This adds a nice texture to the dish. The colors from the peppers and onion will make your fajitas look amazing. For the complete recipe, check the [Full Recipe]. To make the best chicken fajitas, marinating is key. I suggest marinating the chicken for at least 15-20 minutes. If you have more time, try marinating for up to 2 hours in the fridge. This extra time allows the flavors to soak in deeply. For cooking, use medium-high heat. This ensures the chicken gets a nice sear without drying out. When it's time to serve, think about how to make your fajitas pop. I like to serve them on a large platter. You can layer the filling beautifully. Add a sprinkle of fresh cilantro on top for a bright touch. Lime wedges are a must-have for squeezing. They add a nice zing! For sides, consider guacamole, salsa, or a fresh salad. These pair well and add more flavors to your meal. One common mistake is overcooking the chicken. This can make it dry and tough. Keep an eye on it while it cooks. You want juicy, tender pieces. Another mistake is not choosing the right tortillas. Flour tortillas are soft and chewy, while corn tortillas are more traditional. Make sure to warm them up before serving. This step makes them easier to fold and enjoy. For the full recipe, check out the Easy Chicken Fajitas section above. {{image_2}} You can easily swap chicken for other proteins. Beef works great if you slice it thin. Use flank steak or sirloin for the best flavor. Shrimp is another tasty option. Just make sure to cook shrimp until it turns pink. Both options keep the dish fun and delicious. If you want a meatless meal, try using plant-based proteins. Tofu or tempeh can be great choices. You can also load up on veggies. Try mushrooms, zucchini, or even eggplant for a hearty bite. The mix of colors makes your fajitas look as good as they taste. To amp up the flavor, add jalapeños. They give a nice heat to the dish. You can also play with different spices. Try adding oregano or coriander for a unique twist. A squeeze of lime juice brightens the flavors, making your fajitas even more amazing. For the full recipe, check out the Easy Chicken Fajitas. To keep your leftover fajitas fresh, store them in airtight containers. Make sure the fajitas cool down to room temperature first. This helps prevent condensation, which can make them soggy. If you have extra tortillas, store them separately to keep them soft. Reheating chicken fajitas is easy. You can do this in a skillet over medium heat. Add a splash of water to steam them slightly and keep them moist. Stir occasionally for about 5 minutes. If you prefer the microwave, place them in a microwave-safe dish and cover with a damp paper towel. Heat for 1 to 2 minutes, checking every 30 seconds. Freezing chicken fajitas is a great way to save time. First, let the cooked fajitas cool completely. Then, portion them into freezer bags or containers. Remove as much air as possible to prevent freezer burn. You can freeze both the chicken and vegetables together. When you’re ready to eat them, thaw overnight in the fridge. Reheat as mentioned above for a quick meal. To add heat, you can use jalapeños. Slice them thin and toss in with the chicken. You could also add a pinch of cayenne pepper to the marinade. If you want more flavor, try a chipotle in adobo sauce. Just a small amount packs a punch. Adjust the spice to your taste. Yes, you can add many vegetables. Here are some great options: - Zucchini - Mushrooms - Corn - Asparagus - Cherry tomatoes These veggies will add color and flavor to your fajitas. Fajitas are great with various sides. Here are some tasty ideas: - Mexican rice - Refried beans - Guacamole - Salsa - Sour cream - Fresh corn salad These sides will complement your chicken fajitas well. You can find the full recipe for Easy Chicken Fajitas in the earlier section. You’ve learned how to make easy chicken fajitas that burst with flavor. We covered the key ingredients, easy steps, and helpful tips. You can customize your fajitas with different proteins and veggies, too. Remember, the right cooking method and storage will keep them fresh. Enjoy crafting your own delicious meals at home! Now, go ahead and impress your family or friends with your fajita skills!](https://dailydishly.com/wp-content/uploads/2025/06/bddc0842-410c-41cd-a0e7-7c4486f739b3-768x768.webp)
