If you crave a snack that’s crispy, cheesy, and packed with flavor, you’re in the right place! My Crispy Parmesan Ranch Potato Skins are a crowd-pleasing delight. With just a few simple ingredients, you can transform everyday potatoes into a savory treat. Whether you’re watching a game or hosting friends, these potato skins will be the star of the show. Let’s dive into the delicious details together!
Ingredients
Main Ingredients
– 4 large russet potatoes
– 1 cup shredded sharp cheddar cheese
– 1/2 cup grated Parmesan cheese
Seasoning and Toppings
– 2 tablespoons ranch seasoning mix
– 1/4 cup sour cream
– Optional: hot sauce for serving
Cooking Essentials
– 3 tablespoons olive oil
– Salt and pepper to taste
When making crispy Parmesan ranch potato skins, the ingredients matter a lot. Start with four large russet potatoes. These potatoes are perfect for their size and texture. They hold up well during baking. Next, use one cup of shredded sharp cheddar cheese. This cheese adds a rich flavor that complements the ranch seasoning. You’ll also need half a cup of grated Parmesan cheese. This cheese gives the skins that extra crunchy bite.
To season these tasty treats, you’ll use two tablespoons of ranch seasoning mix. This mix brings a burst of flavor with herbs and spices. A quarter cup of sour cream is also essential. It adds a cool creaminess that balances the rich flavors. If you like heat, add some hot sauce when serving.
Don’t forget the cooking essentials. Use three tablespoons of olive oil to keep the skins crispy. Finally, season with salt and pepper to taste. These simple ingredients come together for a delightful snack.Happy cooking!
Step-by-Step Instructions
Preparation Steps
– Scrub the russet potatoes under cold water.
– Preheat the oven to 400°F (200°C).
– Prick each potato several times with a fork.
First, clean the potatoes well. This step ensures you remove any dirt. Next, preheat your oven. This helps get the potatoes nice and crispy. Finally, use a fork to poke holes in each potato. This allows steam to escape while baking.
Baking Instructions
– Bake the potatoes for 45-60 minutes.
– Cool, halve, and scoop out the flesh.
Now, place the potatoes directly on the oven rack. Bake them for about 45 to 60 minutes. They should feel soft when pierced with a fork. Once done, let them cool for about 10 minutes. This cooling time helps you handle them safely. Then, cut each potato in half. Scoop out the flesh, leaving about a quarter-inch of potato. This keeps the skins strong and ready for stuffing.
Final Baking
– Brush skins and season.
– Add cheese and bake for an additional time.
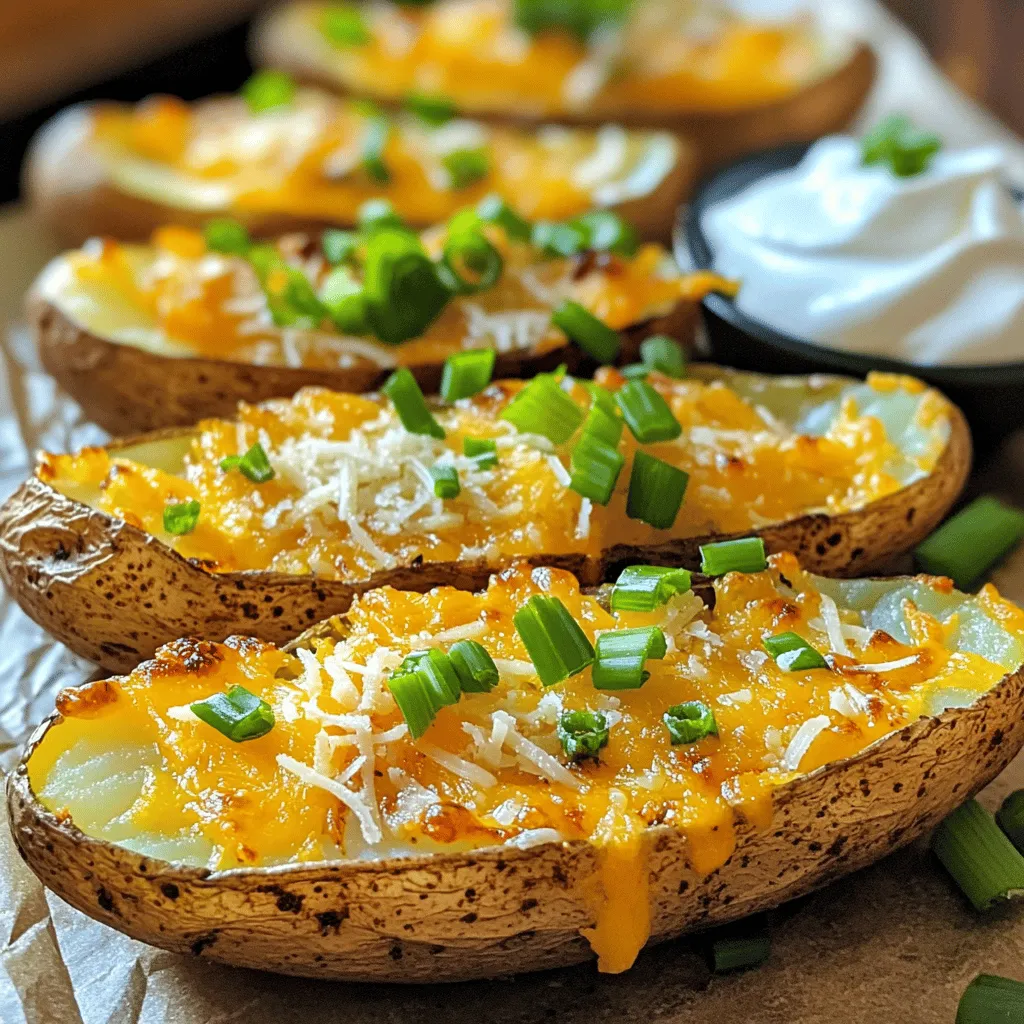
Next, brush the insides of the potato skins with olive oil. Sprinkle with salt and pepper for flavor. Now, add the cheddar cheese and half of the Parmesan cheese inside each skin. Return the skins to the oven, cut-side up. Bake for another 10-15 minutes until they are crispy and golden. While they bake, mix the remaining Parmesan cheese with ranch seasoning and green onions. After the skins are crispy, take them out and sprinkle the ranch mix on top. Bake for another 5 minutes to melt the cheese and combine the flavors. Enjoy your crispy Parmesan ranch potato skins!
Tips & Tricks
Achieving Perfect Crispy Skin
To make the best crispy potato skins, start with the right baking temperature. I recommend using 400°F (200°C). This heat makes sure the skins turn golden and crisp. The next step is to scoop out the potato flesh correctly. Leave about 1/4 inch of potato around the skin. This helps them hold their shape and stay sturdy when baked.
Flavor Enhancements
To boost the flavor, add spices to the inside of the skins. A sprinkle of garlic powder or paprika can work wonders. You can also try adding a bit of cayenne for heat. As for dips, sour cream is a classic choice. Hot sauce adds a nice kick, too. You can even make a ranch dip with sour cream and ranch seasoning.
Common Mistakes to Avoid
One big mistake is not cooling the potatoes before scooping. Let them cool for about 10 minutes after baking. This makes them easier to handle and helps prevent soggy skins. Also, make sure to avoid putting too much filling in the skins. Overfilling can lead to a mushy texture. Keeping these tips in mind will ensure your potato skins are crispy and delicious.

Variations
Cheese Combinations
You can switch up the cheese in these potato skins for fun. Gouda and Monterey Jack are great choices. They melt well and add unique flavors. For a creamier texture, try mixing in some cream cheese. This will give your skins an extra rich taste that feels special.
Incorporating Vegetables
Veggies can take your crispy potato skins to the next level. Jalapeños add a nice kick, and bell peppers give a sweet crunch. You can also add cooked bacon or shredded chicken for meat lovers. These additions make every bite more exciting and tasty.
Vegetarian and Vegan Options
If you want a plant-based snack, there are many options! Use dairy-free cheese instead of regular cheese. Many brands make great vegan cheese that melts well. You can top your potato skins with avocado or fresh herbs for flavor. These variations keep the dish fun and inclusive for all diets.
Storage Info
Short-term Storage
After enjoying your Crispy Parmesan Ranch Potato Skins, store any leftovers in the fridge. Place them in an airtight container. This keeps them fresh and tasty for up to three days. You can also use a glass dish with a lid. Make sure to let them cool before sealing.
Long-term Storage
If you want to keep them longer, you can freeze the potato skins. Wrap each skin in plastic wrap. Then, place them in a freezer-safe bag. They will stay good for about two months. When you’re ready to eat them, reheat in the oven. Bake at 375°F (190°C) for about 15-20 minutes. This helps keep them crispy and delicious.
Reusing Ingredients
Don’t let leftover ingredients go to waste! You can use extra cheese in a casserole or sprinkle it on salads. The leftover potatoes can make great mashed potatoes or potato salad. Combine them with other veggies to create a tasty hash. These ideas give new life to your ingredients and add variety to your meals.
FAQs
How do I make Crispy Parmesan Ranch Potato Skins?
To make these tasty snacks, follow these steps:
1. Preheat your oven to 400°F (200°C).
2. Scrub and dry 4 large russet potatoes.
3. Prick each potato with a fork.
4. Rub them with 3 tablespoons of olive oil and sprinkle with salt.
5. Bake the potatoes for 45-60 minutes.
6. Cool, then halve them and scoop out some flesh.
7. Brush insides with olive oil, season with salt and pepper.
8. Fill with 1 cup of cheddar cheese and 1/4 cup of Parmesan cheese.
9. Bake the skins for another 10-15 minutes until crispy.
10. Mix remaining Parmesan, ranch seasoning, and green onions.
11. Sprinkle this mix on the skins and bake 5 more minutes.
12. Serve hot with 1/4 cup sour cream and optional hot sauce.
Can I make these potato skins ahead of time?
Yes, you can prepare these potato skins in advance. Bake the potatoes and scoop out the flesh. Store the skins in the fridge for up to 2 days. When ready to bake, brush with oil, season, and add cheese. Bake until crispy. This makes meal prep easy and saves time!
What are some good dipping sauces for potato skins?
For dipping sauces, consider these options:
– Sour cream is a classic choice.
– Ranch dressing adds extra flavor.
– Hot sauce gives a spicy kick.
– You can also try salsa or guacamole for a twist.
These dips enhance the taste and make the snack even better.
Are there alternative seasonings I can use?
Absolutely! You can switch up the flavors with different seasonings:
– Try taco seasoning for a fun twist.
– Garlic powder adds a savory touch.
– Italian herbs can give a fresh taste.
– For heat, add cayenne pepper or chili powder.
Feel free to mix and match to find your favorite combo!
You’ve learned how to make delicious Crispy Parmesan Ranch Potato Skins. We explored key ingredients, cooking steps, and tips for success. Remember, choosing the right cheese and seasoning can elevate your dish. Avoid common mistakes for the best results. Whether you want to customize with vegetables or go vegan, options abound. Store leftovers properly for later enjoyment. Enjoy your tasty creation!


