
If you’re craving Pad Thai, stop right there! This Crispy Tofu Pad Thai is better than takeout and super easy to make at home. I’ll show you how to make crispy tofu, prepare the perfect noodles, and combine tasty ingredients for an amazing dish. Whether you want it vegan or gluten-free, I’ve got you covered. Ready to impress your taste buds? Let’s dive in!
Ingredients
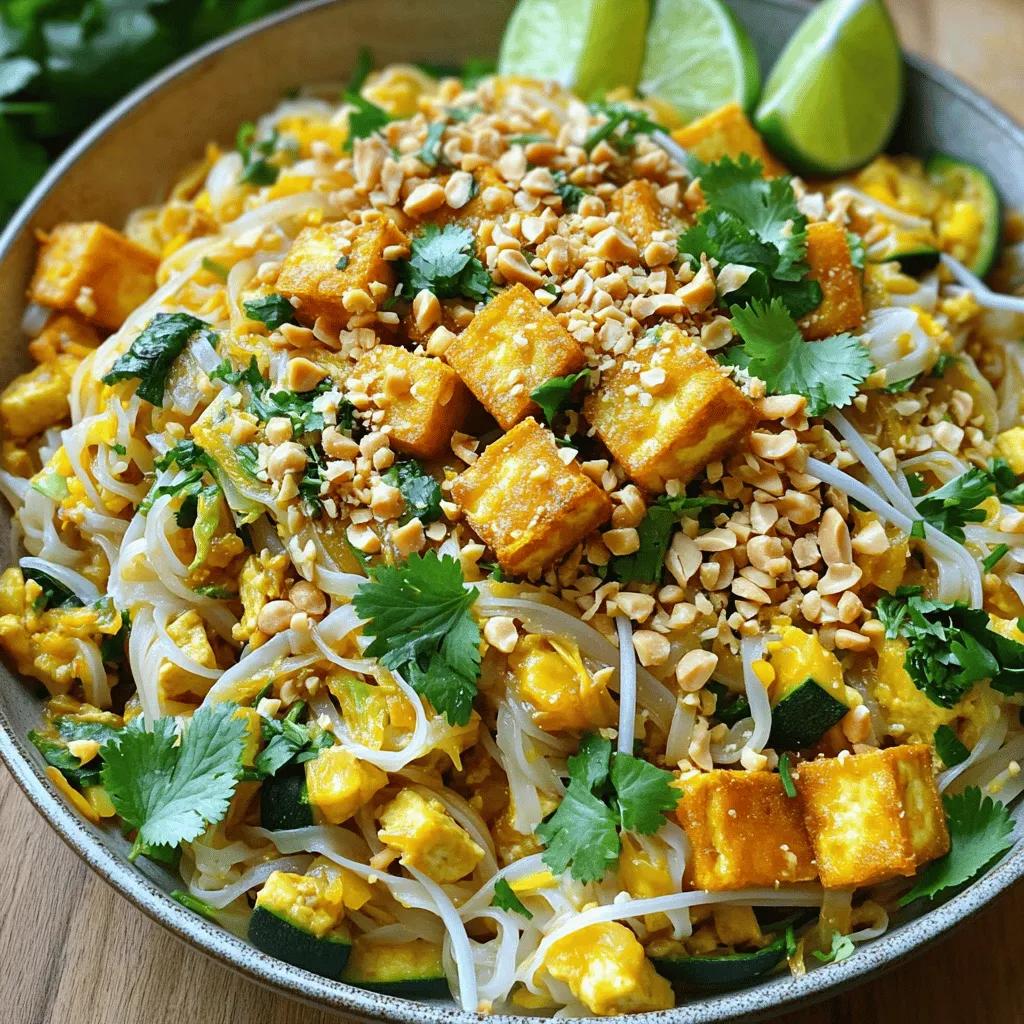
Key Ingredients for Crispy Tofu Pad Thai
To make this dish, gather these key ingredients:
– 14 oz firm tofu, pressed and cubed
– 8 oz rice noodles
– 2 tablespoons cornstarch
– 3 tablespoons vegetable oil (for frying)
– 2 eggs, lightly beaten
– 1 cup bean sprouts
– 3 green onions, chopped
– 1 carrot, julienned
– 1/4 cup crushed peanuts
– 3 tablespoons soy sauce
– 1 tablespoon tamarind paste
– 1 tablespoon sugar
– 2 cloves garlic, minced
– 1 tablespoon lime juice
– Fresh cilantro for garnish
– Lime wedges for serving
These ingredients work together to create a rich, flavorful Pad Thai. The tofu offers protein and texture, while the noodles serve as the dish’s base. The combination of soy sauce and tamarind paste gives that classic sweet and savory taste.
Cooking Oil Options
For frying the tofu, you can use different oils. I prefer vegetable oil for its neutral flavor. However, you can also use:
– Peanut oil for a nutty taste
– Canola oil for a light flavor
– Coconut oil for a hint of sweetness
Each oil adds a unique touch to the dish. Choose one that fits your taste or what you have on hand.
Alternative Ingredients for Dietary Restrictions
If you need to make adjustments, here are some options:
– Use gluten-free soy sauce or tamari for a gluten-free dish.
– Swap tofu for tempeh or seitan if you want a different protein.
– Use zucchini noodles instead of rice noodles for a low-carb version.
– Replace eggs with flax eggs for a vegan option.
These alternatives keep the spirit of the dish while catering to your needs. Always check labels to ensure they meet your dietary requirements.
Step-by-Step Instructions
Preparing the Noodles
To start, grab 8 oz of rice noodles. Place them in a big bowl. Cover them with hot water. Let them soak for about 15 minutes. This softens the noodles. After they are soft, drain and set them aside.
Making the Crispy Tofu
Next, take 14 oz of firm tofu. Press it and cut it into cubes. Toss the tofu cubes in 2 tablespoons of cornstarch. Coat them well. This coating helps make the tofu crispy. Heat 3 tablespoons of vegetable oil in a large skillet. Use medium-high heat. Add the tofu cubes once the oil is hot. Fry them for 4-5 minutes. Look for golden and crispy sides. When done, remove them and let them drain on paper towels.
Cooking the Eggs and Vegetables
In the same skillet, push the crispy tofu to one side. Pour 2 beaten eggs into the empty space. Scramble the eggs until fully cooked. Then, mix them with the tofu. Next, add 2 cloves of minced garlic, 1 cup of bean sprouts, 1 julienned carrot, and 3 chopped green onions. Sauté these for 2-3 minutes. You want the veggies to soften but still stay bright.
Combining the Dish
Now it’s time to bring everything together. Add the softened noodles to the skillet. Pour in 3 tablespoons of soy sauce, 1 tablespoon of tamarind paste, 1 tablespoon of sugar, and 1 tablespoon of lime juice. Toss everything in the skillet over medium heat. Mix until well combined and heated through, about 3-4 minutes. Gently fold in the crispy tofu. Taste and adjust seasoning if needed.
Now your Crispy Tofu Pad Thai is ready to serve!
Tips & Tricks
Achieving the Perfect Crispy Tofu Texture
To get crispy tofu, start with firm tofu. Press it first to remove extra water. This step is key. Once pressed, cut the tofu into even cubes. Toss these cubes in cornstarch. This coats the tofu and helps it fry up nice and crispy. When frying, use hot oil in a non-stick skillet. Make sure to fry the tofu in a single layer. Avoid crowding the pan. Fry until golden and crispy, about 4-5 minutes on each side.
How to Avoid Overcooking the Noodles
To prevent overcooking the noodles, soak them in hot water. This softens them just right. Be careful not to let them soak too long. Around 15 minutes is perfect. After soaking, drain the noodles well. When you add them to the skillet, keep the heat medium. Toss gently with the other ingredients. This keeps them from breaking apart. Stir often but gently.
Flavor Enhancements for Better Taste
To boost the flavor of your Pad Thai, use fresh ingredients. Fresh lime juice adds brightness. Crushed peanuts give a nice crunch. You can also add more garlic for a bolder taste. For extra depth, try some red pepper flakes. They add spice without overpowering the dish. Lastly, fresh cilantro adds a pop of color and flavor. Use it as a garnish when serving.
Variations
Vegetarian and Vegan Options
For a vegetarian or vegan Crispy Tofu Pad Thai, you can keep it simple. Tofu is a great source of protein. It fits perfectly into this dish. You can skip the eggs or replace them with scrambled tofu. This keeps the meal vegan. Add more veggies like bell peppers or mushrooms for extra nutrition.
Gluten-Free Alternatives
If you need a gluten-free option, use rice noodles. They are naturally gluten-free. Make sure to choose a gluten-free soy sauce. Tamari is a good choice here. This way, you can enjoy your Pad Thai without any worries about gluten.
Adding Proteins and Other Vegetables
You can customize your Pad Thai by adding proteins. Shrimp or chicken can work well if you eat meat. Just cook them before the tofu. Adding other vegetables can boost flavor and nutrition. Try snap peas, zucchini, or broccoli. These will add color and make your dish more exciting. Don’t forget to keep the cooking time in mind for each ingredient!
Storage Info
Refrigeration Tips for Leftovers
Store your leftover Crispy Tofu Pad Thai in an airtight container. This keeps it fresh. Place it in the fridge within two hours of cooking. It can last up to three days. To prevent sogginess, keep the tofu separate if possible.
Freezing Instructions and Best Practices
You can freeze Pad Thai for longer storage. Use a freezer-safe container or bag. Make sure to remove as much air as you can. This helps avoid freezer burn. The dish can stay good for up to two months. When ready to eat, thaw it overnight in the fridge.
Reheating Methods for Optimal Texture
For the best texture, reheat your Pad Thai in a skillet. Add a splash of water or oil. Heat over medium until warmed through, stirring often. This helps keep the noodles from getting too soft. You can also microwave it in short bursts, stirring in between. Enjoy your delicious meal as if it were fresh!
FAQs
How can I make my Pad Thai less spicy?
To make your Pad Thai less spicy, reduce the amount of garlic. You can also skip spicy sauces. Use regular soy sauce instead of a spicy version. Add more sugar to balance the heat. Finally, serve with lime wedges. Lime can add a fresh taste without spice.
Can I use a different protein instead of tofu?
Yes! You can use chicken, shrimp, or beef. Just make sure to cook these proteins fully. For a vegetarian option, try tempeh or seitan. These options will give you a similar texture and flavor. Just adjust the cooking time as needed.
What is the best way to serve Pad Thai?
Serve Pad Thai in large bowls. Fluff the noodles for a nice look. Top with crushed peanuts and fresh cilantro. Lime wedges on the side add a nice touch. This makes the dish colorful and inviting.
How do I make Pad Thai sauce from scratch?
To make Pad Thai sauce, mix soy sauce, tamarind paste, and sugar. Use equal parts soy sauce and tamarind paste. Add a bit of lime juice for freshness. Stir well until the sugar dissolves. This sauce will bring all the flavors together.
This article covered how to make crispy tofu Pad Thai. You learned about key ingredients, step-by-step cooking, and helpful tips. We also explored variations for different diets and how to store leftovers.
In my view, mastering this dish can elevate your cooking. With practice, you can create a tasty Pad Thai that suits everyone. Enjoy the process and have fun experimenting with flavors!


