
Looking for a fresh, vibrant dish that’s both tasty and healthy? You’re in the right place! This Easy Roasted Beet Salad combines earthy beets with crisp greens and delicious toppings. I’ll share my favorite ingredients and simple steps to create a salad that’s bursting with flavor. Whether you’re a beet lover or a newcomer, this recipe will be a delightful addition to your meals. Let’s dive in!
Ingredients
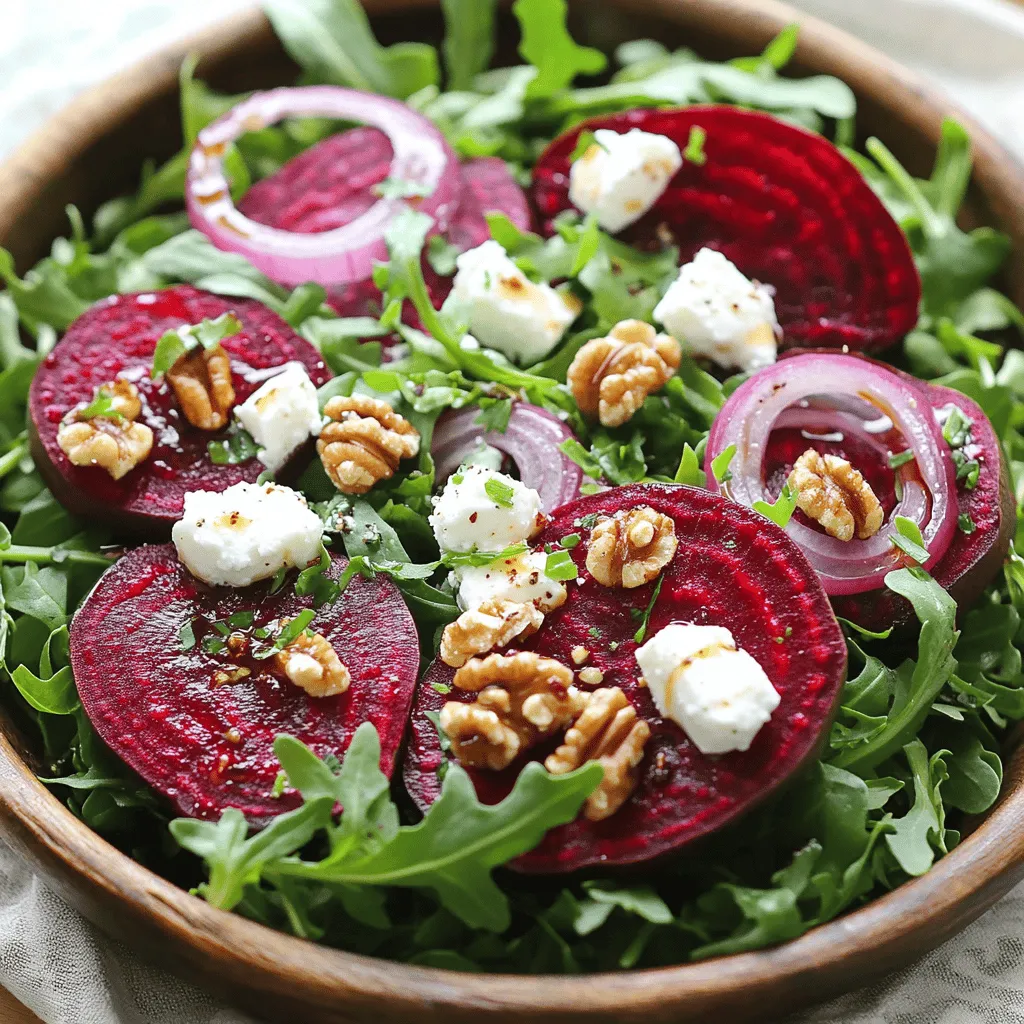
Essential Ingredients for Easy Roasted Beet Salad
For a tasty roasted beet salad, you need a few key items. Here’s what to gather:
– 4 medium-sized beets, scrubbed and trimmed
– 4 cups arugula or mixed greens
– 1/2 cup feta cheese, crumbled
– 1/4 cup walnuts, toasted and roughly chopped
– 1/4 cup red onion, thinly sliced
– 2 tablespoons balsamic vinegar
– 2 tablespoons olive oil
– Salt and pepper to taste
– Fresh herbs (such as parsley or chives) for garnish
These ingredients will create a bright and colorful dish. The beets add sweetness, while the feta gives it a creamy touch.
Optional Add-ins for Extra Flavor
Want to take your salad to the next level? Here are some great add-ins:
– Sliced apples or pears for a bit of crunch
– Crumbled goat cheese for a tangy flavor
– Avocado for creaminess and healthy fats
– Toasted sunflower seeds for extra crunch
– Fresh citrus segments, like orange or grapefruit, for brightness
Feel free to mix and match these add-ins. Each one will add a new layer of flavor and texture.
Tips for Selecting Fresh Beets
Choosing the right beets is key. Here are some tips to help you pick the best ones:
– Look for beets that are firm and smooth. Avoid any that feel soft or look shriveled.
– Choose smaller beets for sweeter flavor. Larger beets can be woody and less tasty.
– Check the greens, if they are still attached. Fresh greens should be bright and crisp.
– Pick beets with similar sizes for even cooking. This helps them roast perfectly.
When you select high-quality beets, your salad will shine.Enjoy your cooking!
Step-by-Step Instructions
Prepping the Beets for Roasting
To start, gather your beets. You will need four medium-sized beets. Make sure to scrub them well under cold water. Trim off the tops and roots. This will help the beets roast better. Once cleaned, you can wrap each beet in aluminum foil. This keeps them moist while they cook. Place the wrapped beets on a baking sheet for easy handling.
Roasting Beets to Perfection
Now, preheat your oven to 400°F (200°C). Once the oven is hot, put the baking sheet with the beets inside. Roast them for about 45 to 60 minutes. The time may change based on how big your beets are. Check if they are done by poking them with a fork. If it goes in easily, they are ready. Take them out and let them cool for a few minutes. Carefully unwrap the foil. Then, use paper towels to rub off the skins. Cut the beets into wedges or slices.
Assembling the Salad
In a large bowl, add four cups of arugula or your favorite mixed greens. Next, toss in the sliced roasted beets. Crumble half a cup of feta cheese on top. Add a quarter cup of toasted walnuts and a quarter cup of thinly sliced red onions. For the dressing, whisk together two tablespoons of balsamic vinegar and two tablespoons of olive oil in a small bowl. Sprinkle with salt and pepper to taste. Drizzle this mixture over the salad. Gently toss everything together. Garnish with fresh herbs like parsley or chives. Enjoy your beautiful salad!
Tips & Tricks
How to Make the Best Dressing for Beet Salad
For a great dressing, mix balsamic vinegar and olive oil. I use two tablespoons of each. Add salt and pepper to taste. Whisk them in a bowl until smooth. This simple mix brings out the beet’s sweet flavor. You can add a touch of honey for sweetness, too.
Seasoning Techniques to Enhance Flavor
Seasoning can make or break your salad. I always sprinkle salt over the beets after roasting. This step helps to highlight their natural sweetness. You can also add fresh herbs like parsley or chives for a fresh taste. If you like a kick, try adding a pinch of chili flakes.
Serving Suggestions and Presentation Ideas
When serving, use a large bowl for a beautiful display. Start with the greens, then layer the roasted beets on top. Sprinkle feta cheese and walnuts for texture. I like to garnish with fresh herbs for color. Serve the salad with extra dressing on the side. This keeps it fresh and crisp.
Variations
Adding Protein: Chickpeas, Chicken, or Quinoa
You can add protein to your salad for more nutrition. Chickpeas are a great choice. They add texture and flavor. Just rinse a can of chickpeas or cook dried ones. You can also add grilled chicken. Slice it thin and mix it in. Quinoa is another option. Cooked quinoa adds a nutty taste and fits well with beets.
Exploring Different Greens for Your Salad
While arugula is tasty, you can try other greens too. Spinach is soft and mild, perfect for pairing with beets. Kale adds a hearty crunch. Just chop it finely to make it easier to chew. Mixed greens give a variety of flavors and textures. Feel free to experiment until you find your favorite blend.
Flavor Boosts: Nuts, Seeds, and Dried Fruits
To make your salad pop, add nuts or seeds. Walnuts are great, but almonds or pecans work well too. They provide a nice crunch. You can toast them for an extra flavor boost. Dried fruits like cranberries or raisins can add sweetness. They balance the earthy taste of the beets. Mix and match these ideas to create your perfect salad.
Storage Info
How to Store Leftover Beet Salad
To store leftover beet salad, place it in an airtight container. This keeps the salad fresh and prevents odors. You can store it in the fridge for up to three days. The flavors will meld together, making it taste even better. However, beets can stain other foods, so keep that in mind.
Best Practices for Storing Roasted Beets
If you have leftover roasted beets, let them cool first. Then, wrap them tightly in plastic wrap or foil. You can also place them in a sealed container. Store them in the fridge for up to a week. Roasted beets are great for salads or snacks.
Reheating Tips for Versatile Use
Reheat roasted beets by placing them in a microwave-safe dish. Heat them for about 30 seconds to one minute. Check if they are warm enough for your taste. You can also sauté them in a pan with a little olive oil. This adds extra flavor. You can use roasted beets in other recipes, too, like grain bowls or sandwiches.
FAQs
How long to roast beets for salad?
Roasting beets takes about 45 to 60 minutes. Wrap them in foil and place them on a baking sheet. The beets are done when a fork slides in easily. The time can change based on beet size. I recommend checking them at the 45-minute mark.
Can I use canned beets instead of fresh?
Yes, you can use canned beets. They are already cooked, so they save time. Just drain and slice them. However, fresh beets have a better flavor and texture. If you want the best taste, I suggest using fresh beets from the store.
What can I pair with roasted beet salad?
You can pair this salad with many foods. Try grilled chicken or fish for protein. It also goes well with whole grains like quinoa. For a crunchy touch, add seeds or nuts. Serve it with a warm crusty bread to complete the meal. Enjoy exploring flavors with this Easy Roasted Beet Salad!
This blog post covers how to make an easy roasted beet salad. We looked at essential ingredients, options for add-ins, and tips for picking fresh beets. I shared steps for prepping, roasting, and assembling your salad. Plus, I offered dressing ideas and seasoning tips for better taste.
Finally, we discussed variations, storage methods, and answered common questions. You now have the tools to create a tasty salad that suits your taste. Enjoy making this dish and sharing it with others!


