Fall Bruschetta with Butternut and Apple Delight

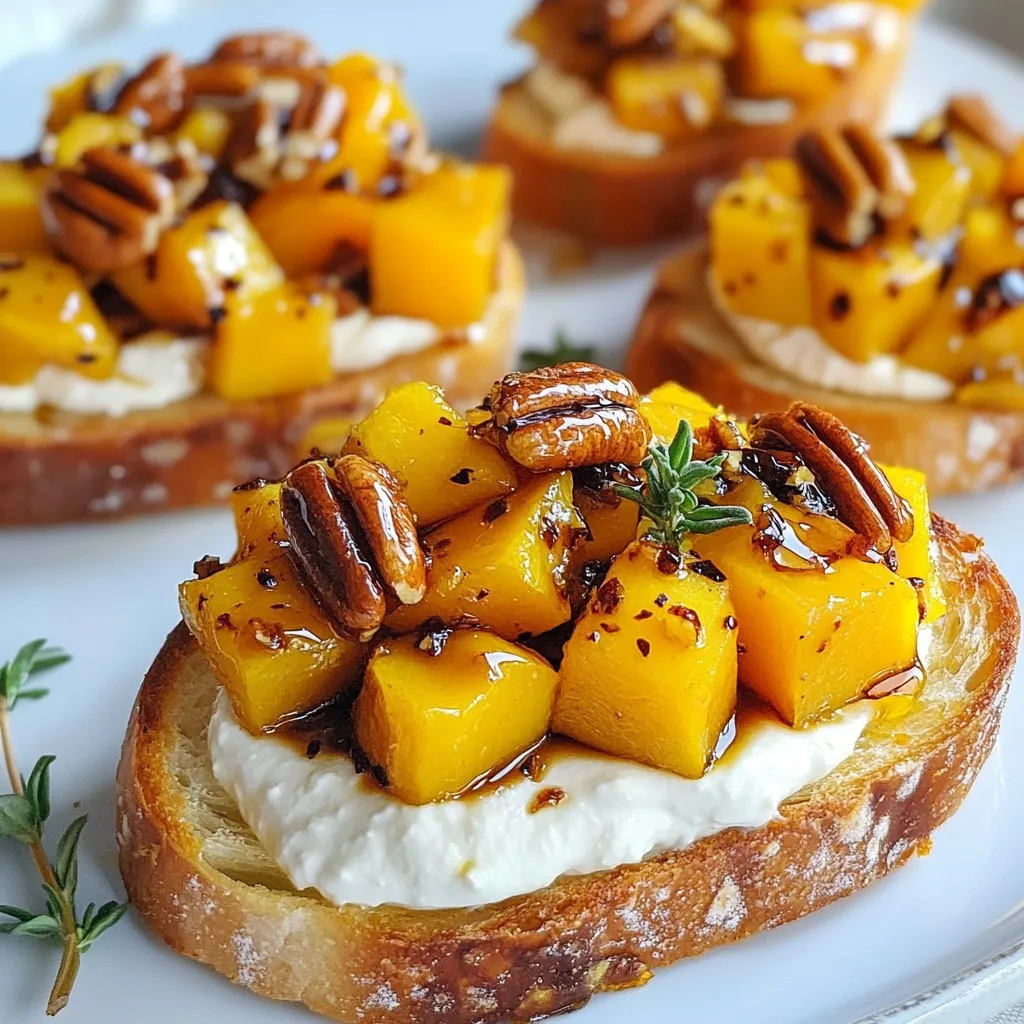
As the leaves turn and the air cools, it’s time for cozy flavors. My Fall Bruschetta with Butternut and Apple Delight promises to brighten your autumn table. This dish combines the sweet taste of roasted apples with nutty squash on crunchy baguette slices. Whether you’re hosting a gathering or just enjoying a quiet night, this recipe is sure to impress. Ready to make a seasonal classic that everyone will love? Let’s dive in!
Why I Love This Recipe
- Seasonal Flavors: This bruschetta captures the essence of fall with its warm spices and the sweetness of roasted butternut squash and apples.
- Easy to Prepare: With a short prep time and simple roasting method, this recipe is perfect for both novice and experienced cooks.
- Versatile Appetizer: Ideal for gatherings, this dish can be served as a starter or a light snack, pleasing both vegetarians and meat-lovers alike.
- Beautiful Presentation: The vibrant colors and textures make it visually appealing, making it a standout dish on any table.
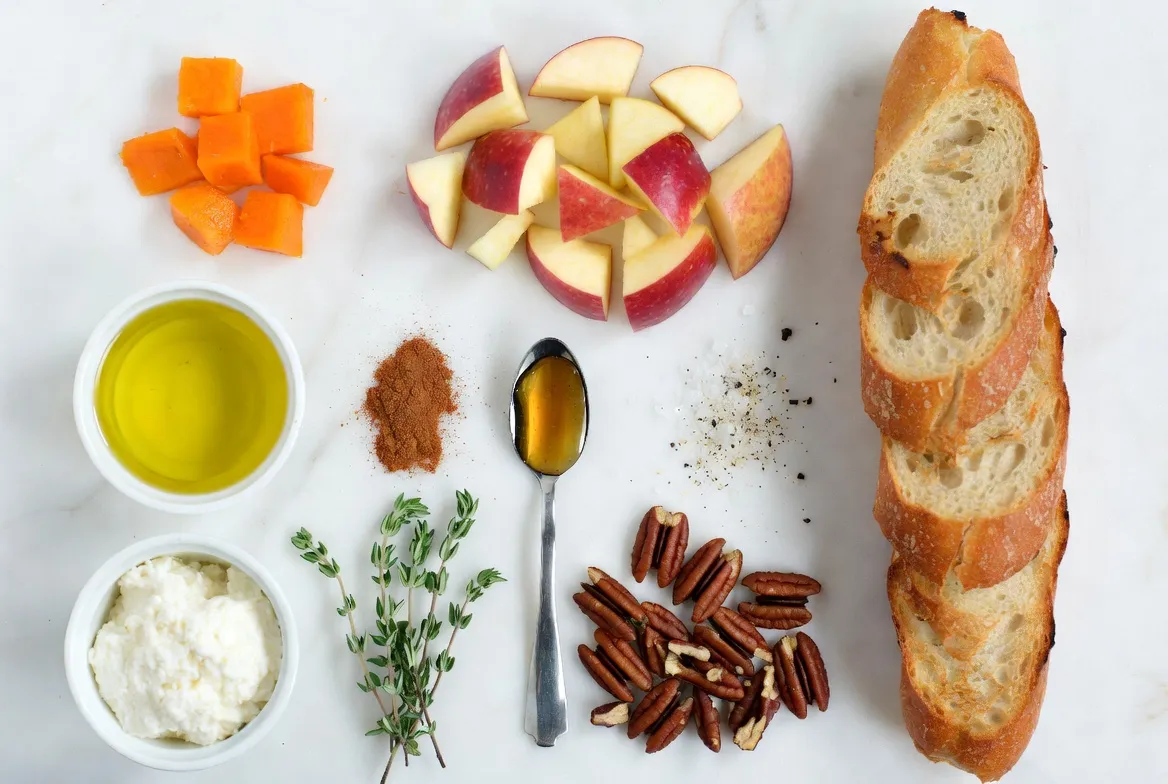
Ingredients
List of Ingredients
– 1 small butternut squash, peeled and diced
– 1 large apple (such as Honeycrisp or Granny Smith), cored and diced
– 2 tablespoons olive oil
– 1 teaspoon maple syrup
– 1 teaspoon ground cinnamon
– Salt and pepper to taste
– 1 cup ricotta cheese
– 1 tablespoon fresh thyme leaves (plus extra for garnish)
– 1 baguette, sliced into 1/2-inch pieces
– 1/4 cup pecans, toasted and roughly chopped
– Balsamic glaze, for drizzling
Measurement Details
When cooking, using the right amounts is key. For this recipe, the butternut squash should be small. It should weigh about one pound. Choose a large apple, which should be around eight ounces. You’ll need two tablespoons of olive oil to coat the squash and apple well. Just one teaspoon of maple syrup adds a sweet touch. Use one teaspoon of ground cinnamon for that warm fall flavor. Salt and pepper are to taste, so adjust to your liking. The ricotta cheese should be one cup, which gives a creamy base. For the thyme, you need one tablespoon. Lastly, a standard baguette will work fine. You will slice it into twelve pieces.
Suggested Ingredient Substitutions
If you don’t have butternut squash, you can use sweet potatoes. They add a similar sweetness and texture. Instead of Honeycrisp or Granny Smith apples, feel free to try Fuji or Gala apples. If you want a dairy-free option, use cashew cheese or a plant-based spread instead of ricotta. For a nut-free version, skip the pecans or replace them with sunflower seeds. You can use any bread, like ciabatta or whole grain, if you don’t have a baguette.

Step-by-Step Instructions
Prepping the Butternut Squash and Apple
Start by peeling and dicing the butternut squash. You want small, even cubes. Next, core and dice the apple. I love using Honeycrisp for its sweetness, but Granny Smith works well too. In a large bowl, combine the squash and apple. Add two tablespoons of olive oil, one teaspoon of maple syrup, and one teaspoon of ground cinnamon. Sprinkle in salt and pepper to taste. Toss everything until it’s well coated.
Roasting Instructions
Preheat your oven to 400°F (200°C). Spread the squash and apple mixture on a baking sheet. Make sure they are in a single layer for even cooking. Roast for 25 to 30 minutes. Halfway through, stir the mixture. You want the squash to be tender and slightly caramelized. Once done, take it out and let it cool for a bit.
Preparing the Baguette
While the squash and apple roast, get the baguette ready. Slice it into half-inch pieces. Place the slices on a baking sheet. Brush each piece lightly with olive oil. Toast them in the oven for 5 to 7 minutes. They should turn golden and crispy. Keep an eye on them to avoid burning!
Tips & Tricks
How to Perfectly Roast Butternut Squash
To roast butternut squash, start by cutting it into small cubes. This helps it cook evenly. Toss the cubes with olive oil, maple syrup, cinnamon, salt, and pepper. Spread them on a baking sheet in a single layer. Bake at 400°F for 25-30 minutes. Stir halfway through for even roasting. Look for a tender texture and caramelized edges. These steps ensure a sweet and flavorful squash for your bruschetta.
Best Practices for Toasting Baguette
To toast baguette slices, first cut the baguette into half-inch pieces. Brush each slice with olive oil for flavor. Arrange them on a baking sheet. Toast them in the oven at 400°F for about 5-7 minutes. Watch them carefully to avoid burning. You want them to be golden and crispy, perfect for holding your toppings.
Serving Suggestions for Fall Atmosphere
For a cozy fall vibe, serve your bruschetta on a rustic wooden board. This adds charm and warmth. You can also use a white platter for a nice contrast. Drizzle extra balsamic glaze over the top for a touch of sweetness. Scatter some fresh thyme leaves around for color. Add a few toasted pecans for crunch. This presentation makes your dish inviting and perfect for gatherings.
Pro Tips
- Choose the Right Apple: Opt for a firm apple variety like Honeycrisp or Granny Smith for a perfect balance of sweetness and tartness.
- Perfectly Toasted Baguette: Keep an eye on the baguette slices while toasting; they can burn quickly. Aim for a golden-brown color for the best crunch!
- Enhance the Flavor: For an extra layer of flavor, consider adding a pinch of nutmeg to the butternut squash and apple mixture while roasting.
- Make Ahead: Prepare the roasted butternut and apple mixture in advance and store it in the refrigerator. Assemble the bruschetta just before serving for maximum freshness.

Variations
Alternative Toppings
You can change the toppings for more fun flavors. Try topping your bruschetta with crumbled feta cheese for a salty kick. You can also use goat cheese if you like a tangy taste. For a sweeter touch, add a drizzle of honey. You might even mix in some dried cranberries for extra flavor. These swaps keep your Fall Bruschetta fresh and exciting.
Different Types of Bread
While a baguette works great, try other breads too. Ciabatta or sourdough can add different textures. You can use gluten-free bread if you need it. Each type brings its own unique taste to the bruschetta. Toast them the same way for a great crunch.
Seasonal Ingredient Swaps
Feel free to swap ingredients based on what’s in season. Instead of butternut squash, you could use sweet potatoes. Pears can replace apples for a twist. Fresh sage can take the place of thyme for a deeper flavor. These swaps let you enjoy seasonal produce and keep your bruschetta fresh.
Storage Info
How to Store Leftover Bruschetta
To store leftover bruschetta, first, let it cool down. Place the bruschetta in an airtight container. Keep a layer of parchment paper between the bruschetta and the lid to prevent sogginess. Store it in the fridge for up to three days. When you are ready to eat, it’s best to serve it fresh.
Freezing Tips for Components
If you want to save some components, you can freeze them. Freeze the roasted butternut squash and apple mixture in a single layer on a baking sheet. Once frozen, transfer it to a freezer bag. It can last up to two months. Do not freeze the ricotta or toasted baguette, as they don’t freeze well.
Reheating Instructions
To reheat the frozen butternut squash and apple, thaw it overnight in the fridge. Warm it in a skillet over medium heat for about 5-7 minutes. For the leftover bruschetta, you can pop it in the oven at 350°F (175°C) for about 10 minutes. This will help regain some crispiness. Enjoy your delicious bruschetta just as if it were fresh!
FAQs
Can I make Fall Bruschetta in advance?
Yes, you can prepare some parts ahead. Roast the butternut squash and apple the day before. Store them in the fridge. You can also mix the ricotta with thyme in advance. Just assemble the bruschetta a few hours before serving. This keeps the bread from getting soggy.
What type of apples work best for this recipe?
I recommend Honeycrisp or Granny Smith apples. Honeycrisp offers sweet and crisp bites. Granny Smith gives a tart flavor that contrasts well. Both types hold their shape when cooked. This makes them perfect for roasting with the butternut squash.
How long does leftover bruschetta last in the fridge?
Leftover bruschetta stays fresh for about two days in the fridge. Store it in an airtight container. The bread may get soft, but the flavors will still be good. You can reheat the toppings if you want to enjoy them warm.
This blog shared key details to make a great fall bruschetta. You learned about the right ingredients, easy steps, and helpful tips. I provided options for variations and storage, too.
Bruschetta is perfect for cozy gatherings. It adds flavor to your table and warms hearts. Enjoy trying new ingredients to make it truly yours. Have fun cookin

Fall Bruschetta with Butternut and Apple
Ingredients
- 1 small butternut squash, peeled and diced
- 1 large apple (such as Honeycrisp or Granny Smith), cored and diced
- 2 tablespoons olive oil
- 1 teaspoon maple syrup
- 1 teaspoon ground cinnamon
- to taste salt and pepper
- 1 cup ricotta cheese
- 1 tablespoon fresh thyme leaves (plus extra for garnish)
- 1 baguette sliced into 1/2-inch pieces
- 1/4 cup pecans, toasted and roughly chopped
- for drizzling balsamic glaze
Instructions
- Preheat the oven to 400°F (200°C).
- On a baking sheet, toss the diced butternut squash and apple with olive oil, maple syrup, ground cinnamon, salt, and pepper until evenly coated. Spread them out in a single layer.
- Roast in the oven for about 25-30 minutes, or until the squash is tender and caramelized, stirring halfway through. Remove from the oven and let it cool slightly.
- While the vegetables are roasting, prepare the baguette slices. Arrange them on another baking sheet and brush lightly with olive oil. Toast in the oven for about 5-7 minutes until golden and crispy.
- In a small bowl, mix the ricotta cheese with fresh thyme leaves, and season with salt and pepper.
- Assemble the bruschetta: spread a generous layer of the ricotta mixture on each toasted baguette slice, then top with a spoonful of the roasted butternut and apple mixture.
- Sprinkle the chopped pecans on top for added crunch and flavor.
- Finish with a drizzle of balsamic glaze and a few extra thyme leaves for garnish.


. If you need a substitute for quinoa, try these options: - Brown rice - Bulgur wheat - Couscous - Farro - Barley These grains provide a similar texture and can carry flavors well. Each option has its own taste and cooking time, so pick what you like best! Yes, Lemon Garlic Quinoa Salad is very healthy! Quinoa is a complete protein, meaning it has all nine essential amino acids. It is also gluten-free and high in fiber. The fresh vegetables add vitamins and minerals. Olive oil gives healthy fats, while lemon juice adds vitamin C. This salad is low in calories and full of nutrients. It’s a great choice for a light meal or side dish. Yes, you can make this salad in advance! It tastes even better after sitting for a while. Prepare it a few hours before serving. Just keep it in the fridge. The salad can marinate, letting the flavors mix well. If you plan to make it one day ahead, wait to add the feta cheese until serving. This keeps it fresh and tasty. This blog post covered how to make a delicious quinoa salad. We explored main ingredients like quinoa, fresh vegetables, and tasty dressings. I shared tips for cooking quinoa and ways to prep veggies. You learned how to make the dressing and assemble the salad for the best results. Plus, I provided ideas for variations and storage methods. Making this salad can be easy and fun. Trying different flavors can keep it exciting. Enjoy every bite and make it your own!](https://dailydishly.com/wp-content/uploads/2025/07/e42a7f06-4d66-46b9-9caa-936cc7f21d46-768x768.webp)

![For the best garlic butter steak bites, I recommend using sirloin steak. Sirloin is tender and flavorful, making it perfect for this dish. Cut the steak into 1-inch cubes. This size cooks quickly and evenly. Make sure to pat the steak dry with paper towels. This step removes moisture and helps achieve a nice sear. The flavors come alive with fresh herbs. I use 1 teaspoon of fresh rosemary and 1 teaspoon of fresh thyme. You can also use dried herbs if you prefer. Just use half the amount. Don't forget salt and pepper! Season the steak well on all sides to enhance its natural taste. You’ll need 4 tablespoons of unsalted butter and 5 cloves of minced garlic. The butter adds richness, and the garlic brings a wonderful aroma. Finally, garnish with fresh parsley for a pop of color. This simple ingredient list makes the garlic butter steak bites shine. For the full recipe, check out the [Full Recipe]. First, you need to prepare the steak. Take 1 lb of sirloin and cut it into 1-inch cubes. Pat these cubes dry with paper towels. This step helps to make a great sear. Now, season the cubes with salt and pepper on all sides. Use enough seasoning, so the flavor shines through. Next, heat a large skillet over medium-high heat. Add 2 tablespoons of unsalted butter. Wait until the butter is foamy and starts to brown. Then, add half of the steak cubes to the skillet. Sear the steak bites for about 2-3 minutes on each side. Look for a nice brown color. Once done, take them out and set them aside. Repeat for the other half, adding more butter if needed. Now it's time to bring it all together. Lower the heat to medium-low and return all the steak bites to the skillet. Add 5 minced garlic cloves, 1 teaspoon of chopped fresh rosemary, and 1 teaspoon of chopped fresh thyme. Cook for 1-2 minutes while stirring often. You want the garlic to be fragrant but not burnt. Finally, remove the skillet from heat. Stir in the last tablespoon of butter until it melts and mixes well with the steak bites. Adjust the seasoning if needed. Garnish with chopped fresh parsley before you serve. For a complete guide, check the Full Recipe. To get a great sear, start with dry steak cubes. Patting them dry helps. Next, heat your skillet until it’s hot. Add butter when the skillet is ready and foamy. Place the steak cubes in the skillet without crowding them. This allows each piece to brown well. Cook for about 2-3 minutes on each side. Look for a nice brown color. This gives you that tasty crust. To boost the flavor, use fresh herbs like rosemary and thyme. Chop them finely and add them to the skillet with garlic. The garlic adds a lovely aroma. You can also add a splash of Worcestershire sauce for extra depth. Adjust salt and pepper to your taste. Don’t forget to garnish with fresh parsley before serving. This adds a pop of color and freshness. Cooking steak bites to the right temperature is key. For medium-rare, aim for about 130°F. Use a meat thermometer to check. If you prefer medium, go for 140°F. Remember, the steak will keep cooking after you take it off the heat. Let it rest for a few minutes. This helps the juices settle. Enjoy your garlic butter steak bites with the perfect doneness! For the complete recipe, check out the [Full Recipe]. {{image_2}} You can use many cuts of steak for this dish. Sirloin is great, but try ribeye for more flavor. Tenderloin offers a soft bite, while flank steak gives a nice chew. Each cut brings a unique texture and taste. Just remember, adjust the cooking time based on the cut. Thicker cuts need longer cooking, while thinner ones cook faster. The seasonings can change the taste of garlic butter steak bites. Want a spicy kick? Add red pepper flakes or smoked paprika. For a sweeter touch, try a bit of honey or brown sugar. You can swap out rosemary and thyme for herbs like oregano or basil. Each herb adds its own twist, so feel free to experiment. If you want a vegetarian version, use mushrooms instead of steak. Portobello or cremini mushrooms work well. They soak up the garlic butter and give a rich flavor. You can also use tofu or tempeh for plant-based protein. Just make sure to press out any extra water before cooking. This helps them get crispy and tasty. For the full recipe, check out the Garlic Butter Steak Bites section. Store leftover garlic butter steak bites in an airtight container. Make sure they cool first. They will last for 3 to 4 days in the fridge. If you plan to eat them later, try to separate them from the sauce. This keeps the steak from getting too soggy. To reheat, place the steak bites in a skillet over low heat. Add a splash of beef broth or water to keep them moist. Stir often for about 5 minutes until heated through. You can also use a microwave. Heat in short bursts, about 30 seconds each, checking often. You can freeze garlic butter steak bites for up to 3 months. Place them in a freezer-safe container. Make sure to label the container with the date. When you’re ready to eat, thaw them in the fridge overnight. Reheat as mentioned above for the best taste. If you want the full recipe, check the link for more details! It takes about 20 minutes to cook garlic butter steak bites. The prep time is 10 minutes, and cooking takes around 10 minutes. You want to sear the steak for about 2-3 minutes on each side. This gives it a nice brown color. Adjust the time for more doneness if needed. Yes, you can use frozen steak, but it needs to be thawed first. Thaw the steak overnight in the fridge for best results. This keeps the meat juicy and tender. If you hurry, you can use the microwave to defrost it. Just be careful to avoid cooking the edges. Garlic butter steak bites go well with many sides. Try these options: - Sautéed vegetables - Mashed potatoes - Rice pilaf - Crispy roasted potatoes - Fresh salad These sides add flavor and balance to your meal. Feel free to mix and match! For the full recipe, check the earlier section. In this blog post, we covered how to make garlic butter steak bites. We discussed choosing the right meat and using tasty herbs. I shared step-by-step instructions for getting that perfect sear and mixing in garlic butter. We also looked at tips to enhance flavors and suggested variations for different diets. Remember to store leftovers properly and reheat them well. Now you have all the tools to enjoy this simple dish. Cooking is fun, so try it out!](https://dailydishly.com/wp-content/uploads/2025/06/daf37226-e56f-491f-87e9-6665894a306e-768x768.webp)