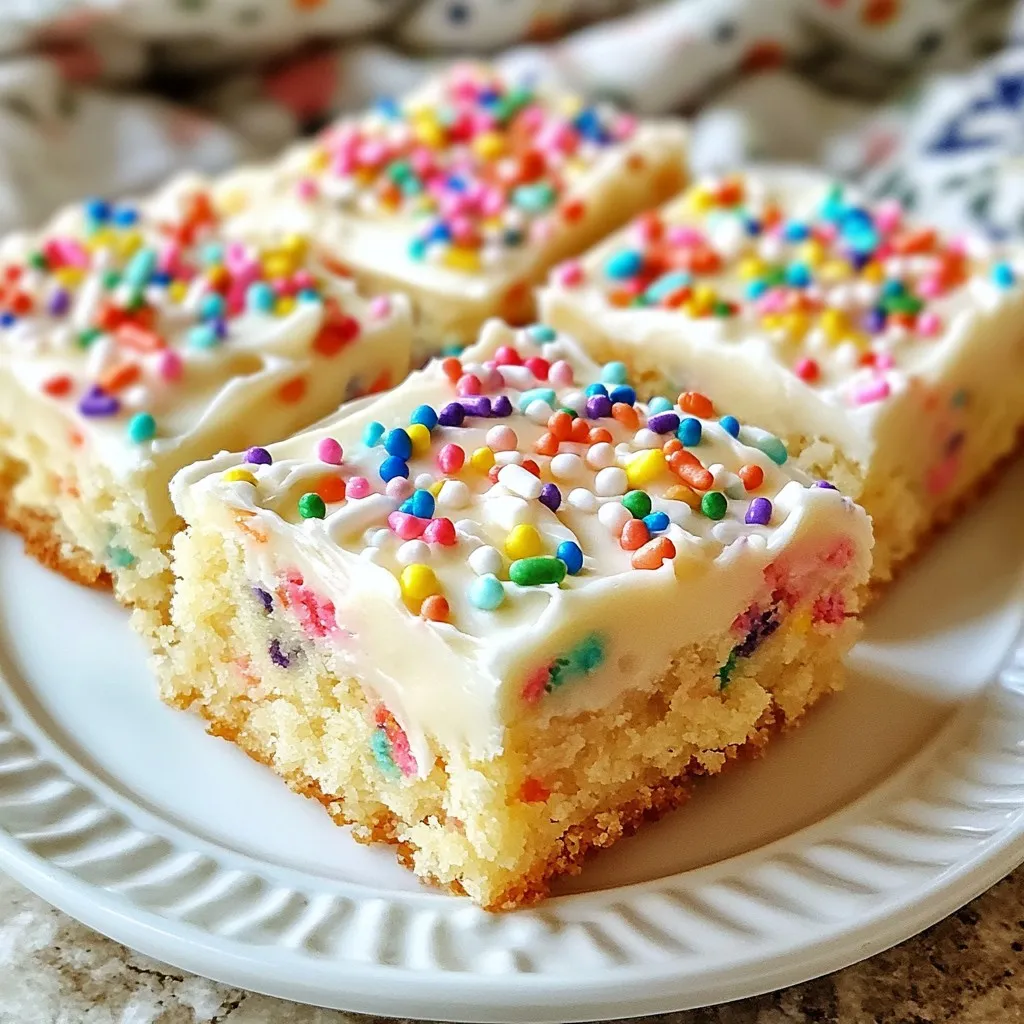
Get ready to satisfy your sweet tooth with my irresistible Funfetti Sugar Cookie Bars! These delightfully chewy treats are packed with sprinkles and topped with creamy frosting. In this blog post, I’ll walk you through each step to create these colorful, fun desserts. Plus, I’ll share tips for perfect texture and delicious variations. Let’s dive into this baking adventure that will brighten any occasion!
Why I Love This Recipe
- Fun for Any Occasion: These funfetti sugar cookie bars are perfect for celebrations, birthdays, or just a sweet treat to brighten your day!
- Easy to Make: With simple ingredients and straightforward steps, this recipe is accessible for bakers of all skill levels.
- Soft and Chewy Texture: The combination of butter and sugar creates a delightful soft and chewy cookie bar that everyone loves.
- Customizable Toppings: Feel free to get creative with your sprinkles or frosting to match any theme or personal preference!
Ingredients
Detailed List of Ingredients
– 2 ¾ cups all-purpose flour
– 1 teaspoon baking powder
– ½ teaspoon baking soda
– ½ teaspoon salt
– 1 cup unsalted butter, softened
– 1 ½ cups granulated sugar
– 2 large eggs
– 2 teaspoons vanilla extract
– ½ cup sprinkles (plus more for topping)
– 1 cup cream cheese frosting (store-bought or homemade)
When I make Funfetti Sugar Cookie Bars, I love to gather the ingredients first. This helps me stay organized and focused.
First, I need all-purpose flour. It gives the bars their structure and chewiness. Then, I grab baking powder, baking soda, and salt. These three work together to help the bars rise and taste great.
Next, I use unsalted butter. It should be softened for easy mixing. I mix that with granulated sugar. The sugar adds sweetness and helps create a light texture.
I always include two large eggs. They bind the ingredients and add moisture. Vanilla extract comes next. It adds a lovely flavor that makes the bars taste amazing.
Don’t forget the sprinkles! I use half a cup for the batter and save some for the top. They add fun colors and a festive touch.
Finally, I use cream cheese frosting. It adds richness and creaminess. You can use store-bought frosting or make your own. Either way, it makes these bars even more special.

Step-by-Step Instructions
Preparation Steps
1. Preheat your oven to 350°F (175°C).
2. Grease and line a 9×13 inch baking pan with parchment paper. Leave some overhang to help lift the bars out later.
3. In a medium bowl, whisk together 2 ¾ cups of all-purpose flour, 1 teaspoon of baking powder, ½ teaspoon of baking soda, and ½ teaspoon of salt. Set this bowl aside for later.
4. Take a large mixing bowl and cream together 1 cup of softened unsalted butter and 1 ½ cups of granulated sugar. Use an electric mixer on medium speed. Mix until the mixture is light and fluffy, which should take about 3-4 minutes.
Mixing the Batter
5. Crack 2 large eggs into the bowl one at a time. Mix well after each egg.
6. Next, add in 2 teaspoons of vanilla extract, mixing until everything is combined.
7. Gradually add the dry ingredient mix from the first bowl to the wet ingredients. Mix just until combined. Avoid overmixing; this keeps the bars chewy.
8. Gently fold in ½ cup of sprinkles. Make sure the sprinkles are evenly distributed throughout the batter.
Baking and Cooling
9. Pour the batter into your prepared baking pan. Use a spatula to spread it evenly.
10. Bake in the preheated oven for 20-25 minutes. Check doneness by inserting a toothpick in the center. It should come out clean when they are done.
11. Once baked, remove the pan from the oven. Let the cookie bars cool in the pan for about 10 minutes. Then, lift them out using the parchment paper and let them cool completely on a wire rack.
12. After they cool, spread 1 cup of cream cheese frosting over the top.
13. For a fun touch, add more sprinkles on top before cutting the bars into squares.
Tips & Tricks
Perfecting Textures
To get chewy bars, avoid overmixing the dough. Mix just until the dry ingredients blend in. If you overmix, your bars will turn out tough. For a golden edge, bake until the edges are light brown. This gives the bars a nice contrast to the soft center.
Baking Time Adjustments
To test for doneness, insert a toothpick into the center. If it comes out clean, your bars are ready. Ovens can vary, so watch them closely. If your oven runs hot, check a few minutes early. Adjust the time based on how your oven behaves.
Frosting Application
When spreading frosting, use a spatula for an even layer. Start in the center and work your way out. This prevents the frosting from sliding off. To make it fun, add extra sprinkles on top. This gives a bright and festive look.
Pro Tips
- Cool Before Frosting: Allow the cookie bars to cool completely before adding frosting to prevent it from melting and sliding off.
- Customize Your Sprinkles: Use a mix of different colored sprinkles to match the occasion, whether it’s a birthday or a holiday!
- Store Properly: Keep the frosted bars in an airtight container in the refrigerator to maintain freshness for up to a week.
- Use Room Temperature Ingredients: Ensure your butter and eggs are at room temperature for a smoother batter and better texture.
Variations
Flavor Variations
You can change the flavor of your Funfetti Sugar Cookie Bars with different extracts. Try almond extract for a nutty touch, or use coconut extract for a tropical vibe. Adding chocolate chips or nuts can also enhance the taste. Mix in ½ cup of your favorite chocolate chips or chopped walnuts for a fun twist.
Dietary Adjustments
If you need gluten-free options, substitute all-purpose flour with a gluten-free blend. This keeps the texture chewy and tasty. For vegan versions, swap eggs for flax eggs. Use 1 tablespoon of ground flaxseed mixed with 2.5 tablespoons of water for each egg. Use vegan butter and dairy-free frosting to complete the recipe.
Decorating Ideas
Make your cookie bars stand out by customizing the sprinkles. Choose colors based on holidays or themes. For a birthday, use bright colors; for Halloween, use orange and black. You can also switch up the frosting. Instead of cream cheese frosting, try vanilla or chocolate frosting for a different flavor. Make it fun and personal!
Storage Info
Best Storage Practices
To keep your Funfetti sugar cookie bars fresh, store them at room temperature. Use an airtight container to keep out air and moisture. This helps the bars stay soft and chewy. If you live in a hot or humid place, consider refrigerating them. Just remember to bring them back to room temperature before serving.
Freezing Instructions
You can freeze these cookie bars for later. First, let them cool completely. Then, wrap each square in plastic wrap. Place the wrapped bars in a freezer bag or container. This keeps them fresh for up to three months. To thaw, take them out and leave them at room temperature. You can also warm them in the microwave for a few seconds for that fresh-baked taste.
Shelf Life
These cookie bars last about a week at room temperature. If stored in the fridge, they can last up to two weeks. Look for signs of spoilage, like a dry texture or off smell. If they feel hard or crumbly, it’s best to toss them. Enjoy your treats while they are fresh and tasty!
FAQs
How do I achieve soft and chewy Funfetti Sugar Cookie Bars?
To make your Funfetti Sugar Cookie Bars soft and chewy, follow a few key steps:
– Use room temperature butter.
– Do not overmix the dough. This helps keep them tender.
– Bake just until the edges turn golden. The center should look slightly underbaked.
These steps yield a delightful texture that melts in your mouth.
Can I use less sugar in this recipe?
You can reduce the sugar, but it may change the texture. Sugar adds moisture and helps with browning. If you cut back, try reducing by ¼ cup. You might still get a tasty treat, but it may lack the same sweetness and soft texture.
What can I use instead of cream cheese frosting?
If you want an alternative to cream cheese frosting, consider these options:
– Buttercream frosting for a sweeter taste.
– Whipped cream for a lighter touch.
– A simple glaze made from powdered sugar and milk.
Each option adds a unique flavor, so choose what you like best!
How do I prevent the bars from spreading too much while baking?
To prevent spreading, keep these tips in mind:
– Chill the dough for 30 minutes before baking.
– Use parchment paper to help shape the bars.
– Ensure your baking powder and baking soda are fresh.
These steps help your bars hold their shape while baking.
Can I make these cookie bars ahead of time?
Yes, you can make these cookie bars ahead of time. Bake and cool them, then store them in an airtight container. They stay fresh for about three days at room temperature. You can also freeze them for up to a month. Just thaw before serving!
In this recipe, we covered all the key steps to make Funfetti Sugar Cookie Bars. I shared the ingredients, easy instructions, and tips for the best results. Remember, small changes can lead to unique flavors or textures. These bars are fun to bake and share. Store them properly to enjoy them for a longer time. Experiment with flavors and toppings to make them truly yours. Have fun in the kitchen and enjoy your delicious trea