Garlic Butter Mushroom Rice Simple and Flavorful Dish
![To make garlic butter mushroom rice, you will need: - 1 cup jasmine rice - 2 cups vegetable broth - 2 tablespoons unsalted butter - 1 tablespoon olive oil - 3 cups mushrooms, sliced - 4 cloves garlic, minced - 1 small onion, diced - 1 teaspoon dried thyme - Salt and pepper to taste - Fresh parsley, chopped These ingredients work together to create a rich and tasty dish. Jasmine rice gives a lovely aroma and texture. The mushrooms add depth, while garlic brings a bold flavor. You can switch some ingredients if you want: - Use brown rice, basmati, or quinoa instead of jasmine rice. - Try different mushrooms like shiitake or portobello for a new taste. - Use vegan butter if you prefer a dairy-free option. These swaps let you enjoy the dish your way! Want to take your dish up a notch? Consider these ideas: - Add grated Parmesan cheese for a creamy finish. - A splash of soy sauce or Worcestershire sauce adds umami. - Crushed red pepper flakes give a nice kick of heat. These enhancements let you customize the flavor to suit your taste. For the full recipe, check out the details above! - Rinse jasmine rice until water runs clear. This step helps make the rice fluffy. - In a medium pot, bring vegetable broth to a gentle boil. Add the rinsed rice. Stir once, lower the heat, and cover. Let it simmer for about 15 minutes. The rice will absorb the broth. After that, let it sit for 5 more minutes with the lid on. - While the rice cooks, heat olive oil and 1 tablespoon of butter in a large skillet over medium heat. - Add diced onion and sauté until it turns translucent, about 3-4 minutes. This brings out the sweet flavor of the onion. - Then, stir in sliced mushrooms. Cook for about 5-7 minutes until they turn golden brown. This step enhances the mushrooms' taste and texture. - Next, add minced garlic and dried thyme to the skillet and cook for about 1 minute. You want the garlic to become fragrant but not burn. - Once the rice is done, fluff it with a fork. Then, add it to the skillet with the mushroom mixture. Stir everything together. - Add the remaining tablespoon of butter and mix well. Season with salt and pepper to taste. Make sure the butter melts and coats the rice evenly. - Now, you can serve this dish hot. For extra flair, garnish with freshly chopped parsley. For the full recipe, check out the instructions above! To make your rice fluffy, rinse it first. Rinse jasmine rice under cold water until the water runs clear. This step removes excess starch. It helps keep the rice from being sticky. When you cook the rice, use vegetable broth. This adds flavor. Bring it to a gentle boil before adding the rice. Stir once, then cover and reduce heat. Let it simmer for about 15 minutes. After that, let it sit for 5 more minutes. This resting time is key for fluffiness. For the mushrooms, choose fresh ones. I like cremini and button mushrooms for their taste. Sauté them until they are golden brown. This usually takes 5 to 7 minutes. Make sure to cook them in olive oil and butter. This combo gives them great flavor. When you add garlic and thyme, cook for just one more minute. This brings out their aromas. Serve garlic butter mushroom rice with grilled chicken or fish. The flavors complement each other well. You can also pair it with steak or vegetable stir-fry. It works as a side dish or a main meal. The rice adds a nice texture to your plate. Presentation matters! Garnish your dish with fresh parsley for color. It makes the dish look appealing. Use a large bowl for family-style serving. This helps everyone to help themselves easily. For extra flair, add some whole sautéed mushrooms on top. It makes your dish look even more special. The bright colors will catch everyone’s eye. For the full recipe, check out the details above. {{image_2}} You can boost your garlic butter mushroom rice by adding protein. Cooked chicken, shrimp, or tofu work great. For a meaty option, grilled chicken adds flavor and texture. Shrimp brings a nice seafood twist, while tofu is perfect for a vegetarian or vegan meal. For a vegan dish, use firm tofu and sauté it until golden. It absorbs flavors well. This keeps your meal hearty without losing the rice's charm. Change up your vegetable game with seasonal swaps. In spring, add fresh peas for a pop of color. In summer, sweet corn brings sweetness and crunch. You can also experiment with herbs. Try fresh basil in summer or rosemary in winter for a new twist. These small changes make the dish exciting and fresh. Take your rice on a global journey! For Asian flavors, add ginger or sesame oil. This gives the dish warmth and richness. If you prefer an Italian flair, sprinkle in extra herbs like oregano or thyme. A bit of Parmesan cheese can also elevate the dish. Mixing cultures opens up a world of taste and creativity. Feel free to explore these variations to fit your taste. Each option brings its own twist to the dish while keeping it simple and flavorful. For the full recipe, check out the [Full Recipe]. To store leftover garlic butter mushroom rice, let it cool first. Place it in an airtight container. This helps keep the rice fresh. Store it in the fridge for up to four days. When reheating, add a splash of broth or water. This keeps the rice moist and flavorful. Heat it in a skillet over medium heat or in the microwave. Garlic butter mushroom rice is great for freezing! Let the rice cool completely before packing it. Use freezer-safe bags or containers. Remove as much air as possible to prevent freezer burn. It can last up to three months in the freezer. To thaw, place it in the fridge overnight. You can reheat it straight from frozen, but add a bit of liquid. In the fridge, your garlic butter mushroom rice lasts about four days. In the freezer, it can stay fresh for up to three months. Check for signs of spoilage before using. If it smells sour or has a change in color, it’s best to toss it. Keeping track of how long it’s stored helps reduce waste. Enjoy your delicious dish without worry! Yes, you can make this dish ahead of time. Cook the rice and mushroom mixture separately. Let them cool, then store in the fridge. When ready to serve, reheat them together in a skillet. This keeps the rice fluffy and the mushrooms fresh. No broth? No problem! You can use water instead. For added flavor, add a splash of soy sauce or a few herbs. You can also make a quick homemade broth. Boil water with onion, garlic, and herbs for about 20 minutes. Strain and use it in the recipe. To make this dish gluten-free, use gluten-free vegetable broth. Always check labels on broth and seasonings. You can also add gluten-free soy sauce or tamari for that extra flavor. Absolutely! Rinse the rice and add it to the rice cooker with broth. Follow your rice cooker's instructions. While the rice cooks, sauté the mushrooms and garlic in a skillet on the stove. Once the rice is done, mix it with the mushroom mixture for a delicious meal. In this post, we explored a simple recipe for Garlic Butter Mushroom Rice. You learned about the ingredients, step-by-step cooking instructions, and various tips to make it better. I shared ways to adjust the recipe, add protein, and make it seasonal. Remember, you can store leftovers well and enjoy them later. This dish is tasty and easy to customize. With a few changes, it can fit any meal. Cooking at home can be fun and rewarding, so give it a try!](https://dailydishly.com/wp-content/uploads/2025/07/29514873-f8b8-4454-af35-97a6bac317ac.webp)
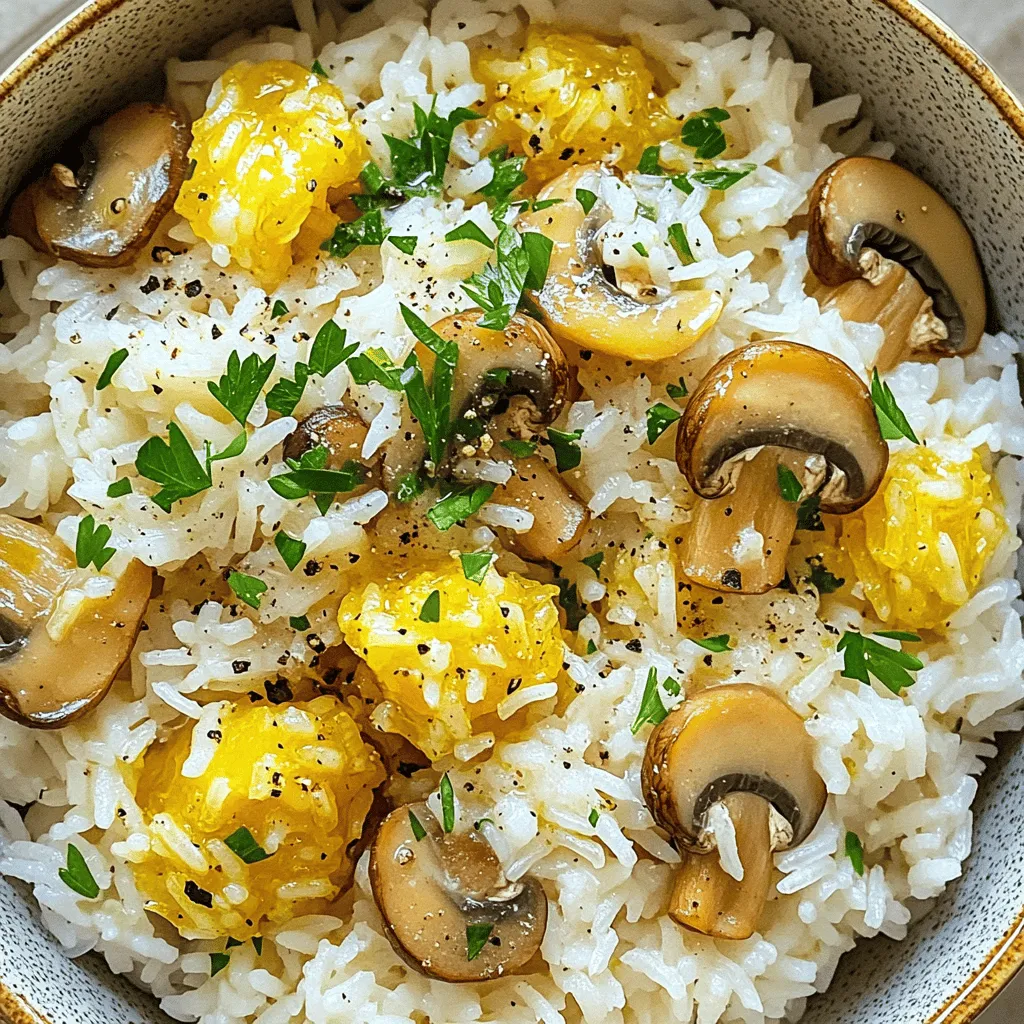
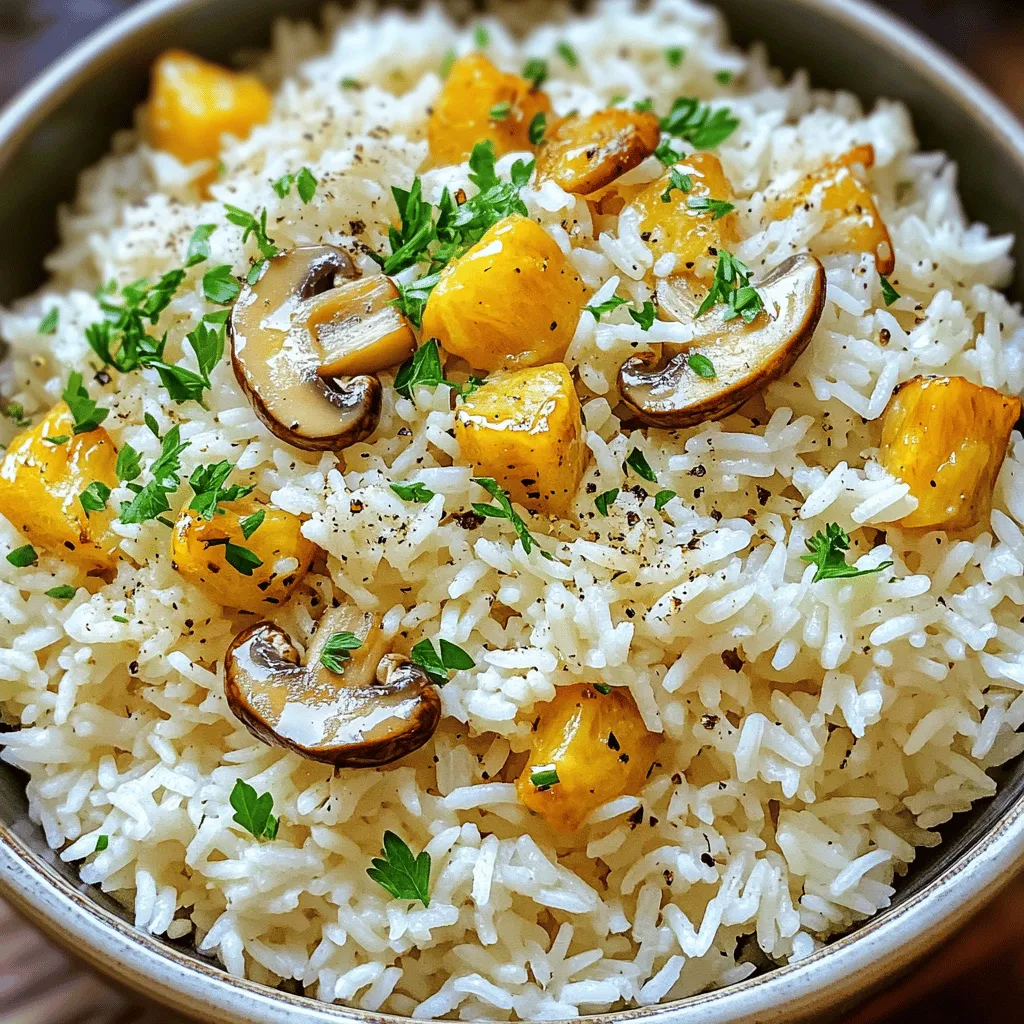
Looking for an easy yet tasty side dish? Garlic Butter Mushroom Rice is your answer! This simple recipe bursts with flavor and combines the earthiness of mushrooms with the richness of garlic and butter. Perfect as a stand-alone dish or a complement to your favorite proteins, it’s a meal you’ll want to make again and again. Let’s dive into the ingredients and steps to create this delightful dish!
Ingredients
Main Ingredients
To make garlic butter mushroom rice, you will need:
– 1 cup jasmine rice
– 2 cups vegetable broth
– 2 tablespoons unsalted butter
– 1 tablespoon olive oil
– 3 cups mushrooms, sliced
– 4 cloves garlic, minced
– 1 small onion, diced
– 1 teaspoon dried thyme
– Salt and pepper to taste
– Fresh parsley, chopped
These ingredients work together to create a rich and tasty dish. Jasmine rice gives a lovely aroma and texture. The mushrooms add depth, while garlic brings a bold flavor.
Possible Substitutions
You can switch some ingredients if you want:
– Use brown rice, basmati, or quinoa instead of jasmine rice.
– Try different mushrooms like shiitake or portobello for a new taste.
– Use vegan butter if you prefer a dairy-free option.
These swaps let you enjoy the dish your way!
Flavor Enhancements
Want to take your dish up a notch? Consider these ideas:
– Add grated Parmesan cheese for a creamy finish.
– A splash of soy sauce or Worcestershire sauce adds umami.
– Crushed red pepper flakes give a nice kick of heat.
These enhancements let you customize the flavor to suit your taste.
Step-by-Step Instructions
Preparing the Rice
– Rinse jasmine rice until water runs clear. This step helps make the rice fluffy.
– In a medium pot, bring vegetable broth to a gentle boil. Add the rinsed rice. Stir once, lower the heat, and cover. Let it simmer for about 15 minutes. The rice will absorb the broth. After that, let it sit for 5 more minutes with the lid on.
Cooking the Mushroom Mixture
– While the rice cooks, heat olive oil and 1 tablespoon of butter in a large skillet over medium heat.
– Add diced onion and sauté until it turns translucent, about 3-4 minutes. This brings out the sweet flavor of the onion.
– Then, stir in sliced mushrooms. Cook for about 5-7 minutes until they turn golden brown. This step enhances the mushrooms’ taste and texture.
– Next, add minced garlic and dried thyme to the skillet and cook for about 1 minute. You want the garlic to become fragrant but not burn.
Combining Ingredients
– Once the rice is done, fluff it with a fork. Then, add it to the skillet with the mushroom mixture. Stir everything together.
– Add the remaining tablespoon of butter and mix well. Season with salt and pepper to taste. Make sure the butter melts and coats the rice evenly.
– Now, you can serve this dish hot. For extra flair, garnish with freshly chopped parsley.
Tips & Tricks
Cooking Tips
To make your rice fluffy, rinse it first. Rinse jasmine rice under cold water until the water runs clear. This step removes excess starch. It helps keep the rice from being sticky. When you cook the rice, use vegetable broth. This adds flavor. Bring it to a gentle boil before adding the rice. Stir once, then cover and reduce heat. Let it simmer for about 15 minutes. After that, let it sit for 5 more minutes. This resting time is key for fluffiness.
For the mushrooms, choose fresh ones. I like cremini and button mushrooms for their taste. Sauté them until they are golden brown. This usually takes 5 to 7 minutes. Make sure to cook them in olive oil and butter. This combo gives them great flavor. When you add garlic and thyme, cook for just one more minute. This brings out their aromas.
Serving Suggestions
Serve garlic butter mushroom rice with grilled chicken or fish. The flavors complement each other well. You can also pair it with steak or vegetable stir-fry. It works as a side dish or a main meal. The rice adds a nice texture to your plate.
Presentation Ideas
Presentation matters! Garnish your dish with fresh parsley for color. It makes the dish look appealing. Use a large bowl for family-style serving. This helps everyone to help themselves easily. For extra flair, add some whole sautéed mushrooms on top. It makes your dish look even more special. The bright colors will catch everyone’s eye.

Variations
Add Protein
You can boost your garlic butter mushroom rice by adding protein. Cooked chicken, shrimp, or tofu work great. For a meaty option, grilled chicken adds flavor and texture. Shrimp brings a nice seafood twist, while tofu is perfect for a vegetarian or vegan meal. For a vegan dish, use firm tofu and sauté it until golden. It absorbs flavors well. This keeps your meal hearty without losing the rice’s charm.
Seasonal Variations
Change up your vegetable game with seasonal swaps. In spring, add fresh peas for a pop of color. In summer, sweet corn brings sweetness and crunch. You can also experiment with herbs. Try fresh basil in summer or rosemary in winter for a new twist. These small changes make the dish exciting and fresh.
Cultural Influences
Take your rice on a global journey! For Asian flavors, add ginger or sesame oil. This gives the dish warmth and richness. If you prefer an Italian flair, sprinkle in extra herbs like oregano or thyme. A bit of Parmesan cheese can also elevate the dish. Mixing cultures opens up a world of taste and creativity.
Feel free to explore these variations to fit your taste. Each option brings its own twist to the dish while keeping it simple and flavorful.
Storage Info
Refrigeration Guidelines
To store leftover garlic butter mushroom rice, let it cool first. Place it in an airtight container. This helps keep the rice fresh. Store it in the fridge for up to four days. When reheating, add a splash of broth or water. This keeps the rice moist and flavorful. Heat it in a skillet over medium heat or in the microwave.
Freezing Instructions
Garlic butter mushroom rice is great for freezing! Let the rice cool completely before packing it. Use freezer-safe bags or containers. Remove as much air as possible to prevent freezer burn. It can last up to three months in the freezer. To thaw, place it in the fridge overnight. You can reheat it straight from frozen, but add a bit of liquid.
Shelf Life
In the fridge, your garlic butter mushroom rice lasts about four days. In the freezer, it can stay fresh for up to three months. Check for signs of spoilage before using. If it smells sour or has a change in color, it’s best to toss it. Keeping track of how long it’s stored helps reduce waste. Enjoy your delicious dish without worry!
FAQs
Can I make Garlic Butter Mushroom Rice ahead of time?
Yes, you can make this dish ahead of time. Cook the rice and mushroom mixture separately. Let them cool, then store in the fridge. When ready to serve, reheat them together in a skillet. This keeps the rice fluffy and the mushrooms fresh.
What if I don’t have vegetable broth?
No broth? No problem! You can use water instead. For added flavor, add a splash of soy sauce or a few herbs. You can also make a quick homemade broth. Boil water with onion, garlic, and herbs for about 20 minutes. Strain and use it in the recipe.
How can I make this recipe gluten-free?
To make this dish gluten-free, use gluten-free vegetable broth. Always check labels on broth and seasonings. You can also add gluten-free soy sauce or tamari for that extra flavor.
Is it possible to make Garlic Butter Mushroom Rice in a rice cooker?
Absolutely! Rinse the rice and add it to the rice cooker with broth. Follow your rice cooker’s instructions. While the rice cooks, sauté the mushrooms and garlic in a skillet on the stove. Once the rice is done, mix it with the mushroom mixture for a delicious meal.
In this post, we explored a simple recipe for Garlic Butter Mushroom Rice. You learned about the ingredients, step-by-step cooking instructions, and various tips to make it better. I shared ways to adjust the recipe, add protein, and make it seasonal. Remember, you can store leftovers well and enjoy them later. This dish is tasty and easy to customize. With a few changes, it can fit any meal. Cooking at home can be fun and rewarding, so give it a try!
![To make garlic butter mushroom rice, you will need: - 1 cup jasmine rice - 2 cups vegetable broth - 2 tablespoons unsalted butter - 1 tablespoon olive oil - 3 cups mushrooms, sliced - 4 cloves garlic, minced - 1 small onion, diced - 1 teaspoon dried thyme - Salt and pepper to taste - Fresh parsley, chopped These ingredients work together to create a rich and tasty dish. Jasmine rice gives a lovely aroma and texture. The mushrooms add depth, while garlic brings a bold flavor. You can switch some ingredients if you want: - Use brown rice, basmati, or quinoa instead of jasmine rice. - Try different mushrooms like shiitake or portobello for a new taste. - Use vegan butter if you prefer a dairy-free option. These swaps let you enjoy the dish your way! Want to take your dish up a notch? Consider these ideas: - Add grated Parmesan cheese for a creamy finish. - A splash of soy sauce or Worcestershire sauce adds umami. - Crushed red pepper flakes give a nice kick of heat. These enhancements let you customize the flavor to suit your taste. For the full recipe, check out the details above! - Rinse jasmine rice until water runs clear. This step helps make the rice fluffy. - In a medium pot, bring vegetable broth to a gentle boil. Add the rinsed rice. Stir once, lower the heat, and cover. Let it simmer for about 15 minutes. The rice will absorb the broth. After that, let it sit for 5 more minutes with the lid on. - While the rice cooks, heat olive oil and 1 tablespoon of butter in a large skillet over medium heat. - Add diced onion and sauté until it turns translucent, about 3-4 minutes. This brings out the sweet flavor of the onion. - Then, stir in sliced mushrooms. Cook for about 5-7 minutes until they turn golden brown. This step enhances the mushrooms' taste and texture. - Next, add minced garlic and dried thyme to the skillet and cook for about 1 minute. You want the garlic to become fragrant but not burn. - Once the rice is done, fluff it with a fork. Then, add it to the skillet with the mushroom mixture. Stir everything together. - Add the remaining tablespoon of butter and mix well. Season with salt and pepper to taste. Make sure the butter melts and coats the rice evenly. - Now, you can serve this dish hot. For extra flair, garnish with freshly chopped parsley. For the full recipe, check out the instructions above! To make your rice fluffy, rinse it first. Rinse jasmine rice under cold water until the water runs clear. This step removes excess starch. It helps keep the rice from being sticky. When you cook the rice, use vegetable broth. This adds flavor. Bring it to a gentle boil before adding the rice. Stir once, then cover and reduce heat. Let it simmer for about 15 minutes. After that, let it sit for 5 more minutes. This resting time is key for fluffiness. For the mushrooms, choose fresh ones. I like cremini and button mushrooms for their taste. Sauté them until they are golden brown. This usually takes 5 to 7 minutes. Make sure to cook them in olive oil and butter. This combo gives them great flavor. When you add garlic and thyme, cook for just one more minute. This brings out their aromas. Serve garlic butter mushroom rice with grilled chicken or fish. The flavors complement each other well. You can also pair it with steak or vegetable stir-fry. It works as a side dish or a main meal. The rice adds a nice texture to your plate. Presentation matters! Garnish your dish with fresh parsley for color. It makes the dish look appealing. Use a large bowl for family-style serving. This helps everyone to help themselves easily. For extra flair, add some whole sautéed mushrooms on top. It makes your dish look even more special. The bright colors will catch everyone’s eye. For the full recipe, check out the details above. {{image_2}} You can boost your garlic butter mushroom rice by adding protein. Cooked chicken, shrimp, or tofu work great. For a meaty option, grilled chicken adds flavor and texture. Shrimp brings a nice seafood twist, while tofu is perfect for a vegetarian or vegan meal. For a vegan dish, use firm tofu and sauté it until golden. It absorbs flavors well. This keeps your meal hearty without losing the rice's charm. Change up your vegetable game with seasonal swaps. In spring, add fresh peas for a pop of color. In summer, sweet corn brings sweetness and crunch. You can also experiment with herbs. Try fresh basil in summer or rosemary in winter for a new twist. These small changes make the dish exciting and fresh. Take your rice on a global journey! For Asian flavors, add ginger or sesame oil. This gives the dish warmth and richness. If you prefer an Italian flair, sprinkle in extra herbs like oregano or thyme. A bit of Parmesan cheese can also elevate the dish. Mixing cultures opens up a world of taste and creativity. Feel free to explore these variations to fit your taste. Each option brings its own twist to the dish while keeping it simple and flavorful. For the full recipe, check out the [Full Recipe]. To store leftover garlic butter mushroom rice, let it cool first. Place it in an airtight container. This helps keep the rice fresh. Store it in the fridge for up to four days. When reheating, add a splash of broth or water. This keeps the rice moist and flavorful. Heat it in a skillet over medium heat or in the microwave. Garlic butter mushroom rice is great for freezing! Let the rice cool completely before packing it. Use freezer-safe bags or containers. Remove as much air as possible to prevent freezer burn. It can last up to three months in the freezer. To thaw, place it in the fridge overnight. You can reheat it straight from frozen, but add a bit of liquid. In the fridge, your garlic butter mushroom rice lasts about four days. In the freezer, it can stay fresh for up to three months. Check for signs of spoilage before using. If it smells sour or has a change in color, it’s best to toss it. Keeping track of how long it’s stored helps reduce waste. Enjoy your delicious dish without worry! Yes, you can make this dish ahead of time. Cook the rice and mushroom mixture separately. Let them cool, then store in the fridge. When ready to serve, reheat them together in a skillet. This keeps the rice fluffy and the mushrooms fresh. No broth? No problem! You can use water instead. For added flavor, add a splash of soy sauce or a few herbs. You can also make a quick homemade broth. Boil water with onion, garlic, and herbs for about 20 minutes. Strain and use it in the recipe. To make this dish gluten-free, use gluten-free vegetable broth. Always check labels on broth and seasonings. You can also add gluten-free soy sauce or tamari for that extra flavor. Absolutely! Rinse the rice and add it to the rice cooker with broth. Follow your rice cooker's instructions. While the rice cooks, sauté the mushrooms and garlic in a skillet on the stove. Once the rice is done, mix it with the mushroom mixture for a delicious meal. In this post, we explored a simple recipe for Garlic Butter Mushroom Rice. You learned about the ingredients, step-by-step cooking instructions, and various tips to make it better. I shared ways to adjust the recipe, add protein, and make it seasonal. Remember, you can store leftovers well and enjoy them later. This dish is tasty and easy to customize. With a few changes, it can fit any meal. Cooking at home can be fun and rewarding, so give it a try!](https://dailydishly.com/wp-content/uploads/2025/07/29514873-f8b8-4454-af35-97a6bac317ac-300x300.webp)

![For my roasted veggie tacos, I love using a mix of colorful veggies. Here’s what I suggest: - 1 zucchini, diced - 1 red bell pepper, diced - 1 yellow bell pepper, diced - 1 red onion, diced - 1 cup cherry tomatoes, halved These veggies not only taste great, but they also look vibrant. You can easily swap in your favorites. To make these tacos truly flavorful, I use some simple seasonings: - 2 tablespoons olive oil - 1 teaspoon ground cumin - 1 teaspoon smoked paprika - Salt and pepper to taste These spices bring out the best flavors in the veggies. The olive oil helps them roast perfectly. Once your tacos are ready, it's time for the fun part: the toppings! I recommend: - 8 small corn tortillas - 1 avocado, sliced - Fresh cilantro, for garnish - Lime wedges, for serving The creamy avocado and fresh cilantro add a nice touch. Squeezing lime over the tacos gives them a bright finish. For the full recipe, check out the detailed cooking steps! Start by preheating your oven to 425°F (220°C). This high heat helps the veggies roast well. You want them to be soft and slightly charred. Next, gather your vegetables. You will need: - 1 zucchini, diced - 1 red bell pepper, diced - 1 yellow bell pepper, diced - 1 red onion, diced - 1 cup cherry tomatoes, halved In a large bowl, toss all the diced veggies together. This ensures they mix well. Drizzle 2 tablespoons of olive oil over the vegetables. Then, add: - 1 teaspoon ground cumin - 1 teaspoon smoked paprika - Salt and pepper to taste Mix everything together until the veggies are well coated. Spread them out on a baking sheet in a single layer. Roast for 20 to 25 minutes. Stir halfway through to make sure they cook evenly. While the veggies roast, heat 8 small corn tortillas in a dry skillet. Warm them for about 30 seconds on each side. This makes them soft and easy to fold. Once the veggies are ready, take them out of the oven. To make your tacos, place a generous spoonful of roasted veggies on each tortilla. Top with slices of avocado and sprinkle fresh cilantro on top. Serve with lime wedges on the side for that extra zing. For the full recipe, check [Full Recipe]. For great roasted veggie tacos, pick vegetables that roast well. I love using: - Zucchini - Bell peppers - Red onion - Cherry tomatoes These veggies bring color and flavor. You can also try mushrooms or eggplant. The key is to cut them into similar sizes. This ensures even cooking. Spices can change the whole taco game. I often use: - Ground cumin - Smoked paprika - Salt and pepper These add a nice warmth. For a kick, try chili powder or cayenne pepper. You can also mix in garlic powder or onion powder for depth. Feel free to experiment based on your taste! Tortillas are the base of your tacos. Small corn tortillas work best. They are soft and tasty. You can also use flour tortillas if you prefer. For a fun twist, try lettuce wraps for a low-carb option. Just make sure your tortillas are warm. This makes them easier to fold and eat. For the complete dish, check out the Full Recipe. {{image_2}} You can add proteins to your roasted veggie tacos for more flavor. Chicken, beef, or shrimp work well. If you want a plant-based option, try black beans or chickpeas. Just cook them separately, then mix them with the roasted veggies in your taco. This adds texture and makes the meal more filling. These tacos are easy to make vegan and gluten-free. Use corn tortillas, which are naturally gluten-free. For a vegan twist, skip any dairy toppings. You can use plant-based sour cream or cashew cream instead. This way, everyone can enjoy these tasty tacos without worry. Toppings can change the whole taco experience. You can use fresh salsa or a spicy sauce for a kick. Try pickled onions for tangy flavor. If you like crunch, add shredded cabbage. For creaminess, avocado is a perfect choice. Experiment with different toppings to find your favorite combination. For the full recipe, check out the Roasted Veggie Tacos instructions above. To keep your leftover tacos fresh, place them in an airtight container. This helps prevent sogginess. Store them in the fridge for up to three days. If you have extra roasted veggies, keep them separate. You can use them in salads or wraps later. When you want to eat your tacos again, reheating is easy. You can use a skillet or the microwave. If you use a skillet, heat it over medium heat. Place the tacos in the skillet for about two minutes on each side. For the microwave, warm them for about 30 seconds. Make sure they are hot all the way through. You can freeze the roasted veggies for later use. Store them in a freezer-safe bag. Press out as much air as possible before sealing. They will last for about three months in the freezer. To use them, thaw overnight in the fridge and then reheat. Enjoy your tasty roasted veggie tacos again with minimal work! For the complete recipe, check out the Full Recipe above. I love using a mix of colorful veggies. Zucchini, bell peppers, red onions, and cherry tomatoes work best. These vegetables roast well and bring great flavors. You can also try corn, mushrooms, or sweet potatoes for variety. Each veggie adds its own taste and texture. Roasted veggie tacos stay fresh for about three to four days in the fridge. Make sure to store them in an airtight container. The veggies may lose some crunch, but they will still taste good. Just reheat them before eating for the best flavor. Yes, you can prepare the veggies a day ahead. Chop them and store them in the fridge. This saves time on taco night. You can also roast them in advance and keep them in the fridge. Just warm them up before serving. Roasted veggie tacos pair well with many sides. I recommend serving them with fresh guacamole, salsa, or a zesty salad. You can also add rice or beans for a hearty meal. A side of tortilla chips adds a nice crunch too. For the full recipe, check out the Roasted Veggie Tacos section! Roasted veggie tacos are a great way to enjoy healthy, tasty meals. We covered the best ingredients, from fresh vegetables to tasty seasonings. You now have step-by-step instructions for making these delicious tacos at home. Plus, you learned useful tips for storage and variations to suit your needs. Remember, cooking should be fun and easy. Try different vegetables and toppings to make it your own. Enjoy your taco journey!](https://dailydishly.com/wp-content/uploads/2025/07/2cc26e34-4f45-47fb-a3bd-ef05b980d92e-768x768.webp)


![- Chicken and rice requirements - 4 boneless, skinless chicken thighs - 2 cups long-grain rice - Seasoning and flavor enhancers - 4 tablespoons unsalted butter - 5 cloves garlic, minced - 1 onion, finely chopped - 3 cups chicken broth - 1 teaspoon dried oregano - 1 teaspoon paprika - Salt and pepper to taste - Optional garnishes and additions - 1 cup frozen peas - Fresh parsley, chopped (for garnish) Gathering these ingredients sets the stage for a dish that bursts with flavor. Each item plays a key role. The chicken thighs offer rich taste and tenderness. The long-grain rice absorbs all the savory broth. Butter and garlic create a lovely aroma and depth. Onions bring sweetness, while seasonings elevate the whole dish. Feel free to add peas for a pop of color and nutrition. Fresh parsley adds a lovely touch on top. This simple yet flavorful dish uses ingredients you can find easily. Check out the Full Recipe to see how everything comes together! 1. Sautéing onion and garlic Start by melting 2 tablespoons of butter in a large skillet over medium heat. Add the finely chopped onion. Sauté for about 5 minutes until it turns translucent. Next, toss in 5 cloves of minced garlic. Cook for another minute until it smells amazing. 2. Cooking chicken thighs Season 4 boneless, skinless chicken thighs with 1 teaspoon of dried oregano, 1 teaspoon of paprika, salt, and pepper. Move the onion and garlic to the side of the skillet. Place the chicken thighs in the center. Cook for 6-7 minutes on each side until they are browned and cooked through. Once done, remove the chicken and set it aside. 3. Toasting rice and adding broth In the same skillet, add the other 2 tablespoons of butter. Stir in 2 cups of long-grain rice. Let it toast for about 2-3 minutes. Then, pour in 3 cups of chicken broth. Stir to combine and bring the mixture to a boil. 1. Combining chicken and rice Once the broth boils, reduce the heat to low. Carefully place the cooked chicken thighs on top of the rice. Cover the skillet and let it simmer for 15-20 minutes. You want the rice to be tender and soak up most of the broth. 2. Simmering for perfect texture In the last 5 minutes of cooking, add 1 cup of frozen peas on top of the rice. Do not stir. Let the peas steam with the rice for added color and flavor. 3. Final touches before serving After cooking, turn off the heat. Let the dish sit covered for another 5 minutes. Fluff the rice with a fork and gently mix in the peas. Serve warm and garnish with fresh chopped parsley for a beautiful finish. For the full recipe, check out the complete instructions and tips! To get the best flavor from your chicken, use the right seasonings. I like to mix oregano, paprika, salt, and pepper. This blend gives the chicken a tasty kick. Let the chicken sit for a few minutes after seasoning. This helps the spices soak in. When cooking, aim for a golden brown on each side. Cook the chicken for about 6-7 minutes per side. This timing ensures juicy chicken. Use a meat thermometer to check the inside. It should reach 165°F. To avoid mushy rice, rinse it before cooking. This removes excess starch. Use a 1:1.5 ratio of rice to liquid. For this recipe, use 3 cups of chicken broth for 2 cups of rice. Bring the broth to a boil before adding rice. Once boiling, reduce the heat and cover the skillet. Let the rice simmer for 15-20 minutes. This technique gives you fluffy rice that absorbs all the flavors. Garnishing adds a nice touch. Fresh herbs like parsley brighten the dish. Chop the parsley finely and sprinkle it on before serving. For a great look, serve the chicken on top of the rice. This way, the colors mix well. You can also add a lemon wedge on the side for a pop of freshness. Enjoy your meal! For the full recipe, check [Full Recipe]. {{image_2}} You can switch out the chicken for other meats. Try boneless pork chops or even tofu. Each option brings a new taste. If you want a different grain, choose quinoa or farro. These grains add unique textures and flavors to the dish. Adding vegetables is a great way to boost flavor and nutrition. Consider bell peppers, carrots, or spinach. These veggies cook well and add color. You can also use different herbs and spices. Basil, thyme, or even a kick of chili flakes can change the whole dish. To make this dish gluten-free, use rice and check your broth. Many brands offer gluten-free options. For low-carb choices, replace rice with cauliflower rice. It’s a great substitute and keeps the meal light. You don’t lose flavor, and it stays filling. Explore the [Full Recipe] for more tips and ideas! To keep your Garlic Butter Chicken and Rice fresh, refrigerate it within two hours. Use an airtight container for best results. Store it in the fridge for up to three days. For longer storage, freezing is a great option. Place the dish in a freezer-safe container. It can last up to three months in the freezer. Just remember to label it with the date. When it's time to enjoy leftovers, reheating is key. For rice, add a splash of water before reheating. This helps keep the rice fluffy. You can use a microwave or a stovetop for this. For chicken, use a low heat setting. This keeps the chicken juicy and flavorful. Make sure to cover it while reheating to trap moisture. Enjoy your delicious meal again! For the full recipe, check out the section above. What can I serve with Garlic Butter Chicken and Rice? You can serve this dish with a side of steamed veggies. Broccoli or green beans work well. A fresh salad adds crunch. Garlic bread can also enhance the meal. Can I make this dish ahead of time? Yes, you can prepare Garlic Butter Chicken and Rice in advance. Cook it, then cool it down. Store in an airtight container in the fridge. Reheat before serving, and it will taste great. How do I ensure my chicken is tender? To keep chicken tender, do not overcook it. Use a meat thermometer to check for doneness. Aim for 165°F. Marinating the chicken can also help it stay juicy. Why is my rice still hard? If your rice is hard, it may need more liquid. Add a bit of broth or water and simmer longer. Cover the pot to trap steam, which helps cook the rice. What if I don't have chicken broth? If you lack chicken broth, you can use water. Add extra seasonings to boost flavor. You can also use vegetable broth as a substitute. Can I use brown rice instead? Yes, you can use brown rice instead of white rice. Just know that brown rice takes longer to cook. Increase the simmer time to about 30-40 minutes. Adjust the liquid as needed. This blog post covered a complete guide to making Garlic Butter Chicken and Rice. You learned about the key ingredients and step-by-step instructions. I shared tips to ensure flavorful chicken and perfect rice. You also discovered variations and storage info. In closing, this dish is simple and flexible. Adjust it to your taste and dietary needs. Enjoy your cooking journey and share this recipe with others!](https://dailydishly.com/wp-content/uploads/2025/05/2b69aced-7351-4258-8c9e-dc4a3c9f0304-768x768.webp)
![To make spicy black bean burgers, you need a few key ingredients: - 1 can (15 oz) black beans, drained and rinsed - 1/2 cup cooked quinoa - 1/2 cup breadcrumbs (gluten-free if needed) These ingredients form the base of the burger. The black beans provide protein and taste. Quinoa adds texture and nutrition. Breadcrumbs help bind the mix together. You can make these burgers your own with some fun additions: - Toppings Suggestions: avocado slices, lettuce, tomato, salsa, or spicy mayo - Spice Enhancements: jalapeño and garlic for extra kick Feel free to swap ingredients based on your taste. Want more heat? Add more jalapeño. Prefer a fresh crunch? Load up on lettuce and tomato. These spicy black bean burgers are not only tasty but also healthy: - Calories per serving: About 180 - Protein: 10g - Fats: 5g - Carbs: 28g This burger packs a punch of flavor while keeping a balanced profile. It is a great option for lunch or dinner. For the full recipe, check out the details above. To make the base, start by mashing the black beans. Use a fork or a potato masher. You want them mostly smooth, but keep some chunks for texture. This adds a nice bite to your burger. Next, add the additional ingredients to the bowl. Combine cooked quinoa, breadcrumbs, chopped red onion, minced jalapeño, minced garlic, cumin, smoked paprika, soy sauce, lime juice, salt, and pepper. Mix well until all ingredients are combined. If the mixture feels too wet, add a bit more breadcrumbs. This step helps hold the patties together. Now, it’s time to shape your burgers. Divide the mixture into equal portions, about four patties. Form each portion into a round shape. If you want them to hold together better, chill the patties in the fridge for 30 minutes. This makes them firmer. For cooking, heat a non-stick skillet or grill over medium heat. Drizzle a bit of olive oil to prevent sticking. Cook the patties for about 4 to 5 minutes on each side. You want them crispy and heated through. The smell will be amazing! When it’s time to serve, choose your toppings wisely. Avocado slices add creaminess, while lettuce and tomato add freshness. Salsa or spicy mayo can enhance the flavor even more. Pair your spicy black bean burgers with a side salad or some crispy fries. This makes for a delicious meal that’s both filling and healthy. You can find the full recipe above for more details on how to make these tasty burgers! To make your spicy black bean burgers great, focus on texture. Start by mashing the black beans well, but leave some chunks. This gives your burgers a nice bite. Chilling the patties is key. After you shape them, put them in the fridge for about 30 minutes. This helps them hold together better during cooking. Baking is a great alternative to frying. Preheat your oven to 375°F (190°C) and place the patties on a baking sheet. Bake for 20-25 minutes, flipping halfway. This method makes them crispy without extra oil. You can also adjust the flavors. Want more heat? Add more jalapeño or a dash of hot sauce. Feel free to mix in fresh herbs like cilantro for a fresh twist. Binding agents are crucial. If your mixture feels too wet, add more breadcrumbs. You can also use flaxseed meal or chia seeds mixed with water for a nice binder. Watch the moisture content closely. If you use canned beans, make sure to drain them well. Excess liquid can turn your patties into a mushy mess. For the full recipe of these tasty spicy black bean burgers, check out the recipe provided above. {{image_2}} You can change the taste of your spicy black bean burgers in fun ways. One option is the Southwest spicy black bean burger. For this, add corn, diced red pepper, and taco seasoning. This gives a bold, zesty flavor. Another tasty choice is the chipotle black bean burger. Mix in chipotle peppers in adobo sauce. This adds a smoky heat that spice lovers will enjoy. If you want a low-carb meal, try lettuce wraps. Instead of buns, use large lettuce leaves. They keep the burger juicy and fresh. You can also make black bean burger bowls. Simply place the patty on a bed of rice or quinoa. Top it with your favorite veggies and salsa for a hearty meal. Making these burgers fit your diet is easy. For gluten-free versions, use gluten-free breadcrumbs. This keeps the burger tasty without the gluten. If you’re vegan, skip the eggs and use mashed flax seeds instead. This keeps the burgers bound together while being plant-based. Whether you’re vegan or vegetarian, these burgers can fit your needs. You can enjoy them without missing out on flavor. For the full recipe, check here: [Full Recipe]. To keep uncooked patties fresh, place them in the fridge. Use an airtight container. They stay good in the fridge for about 2-3 days. If you want to keep them longer, freezing is a great option. Wrap each patty in plastic wrap or parchment paper. Then, put them in a freezer bag. They can last up to 3 months in the freezer. After cooking, let the black bean burgers cool down. Store them in an airtight container. This keeps them moist and flavorful. They can last in the fridge for about 4-5 days. When you want to eat them, simply reheat in a skillet or microwave. For the skillet, heat for about 3-4 minutes on medium. If using the microwave, heat for about 1-2 minutes, checking to avoid overheating. In the fridge, uncooked patties last for 2-3 days. Cooked black bean burgers stay fresh for 4-5 days. Always check for signs of spoilage. If you see mold or an off smell, it’s best to throw them away. Enjoy your spicy black bean burgers while they’re fresh! For the full recipe, check out [Full Recipe]. To make your spicy black bean burgers less mushy, focus on two main areas: ingredient adjustments and binding tips. - Ingredient adjustments: Use less black beans and add more breadcrumbs or quinoa. This helps absorb moisture and creates a firmer texture. - Tips for better binding: Chilling the patties for about 30 minutes in the fridge helps them hold their shape. You can also add a bit of ground flaxseed mixed with water as a natural binder. Yes, you can make these burgers ahead of time! Here are some best practices for meal prep: - Prep the patties: Form the patties and place them on a baking sheet lined with parchment paper. You can freeze them for later use. - Store in the fridge: If you plan to cook them within a day or two, simply cover the patties with plastic wrap and keep them in the fridge. If you want to substitute black beans, here are some great alternatives: - Alternative legumes: Use kidney beans, pinto beans, or chickpeas. Each will give a different taste and texture. - Other ingredients: You can also use lentils or cooked mushrooms for a unique flavor profile. These options provide good nutrition and maintain the burger's heartiness. For a full recipe, check out the Spicy Black Bean Burgers section above! You can create delicious spicy black bean burgers using simple, healthy ingredients. Start with black beans and quinoa, then customize them with tasty toppings. Follow clear steps to make perfect patties, and try different cooking methods. Remember the tips for texture and binding to avoid mushiness. Store uncooked or cooked burgers properly for later meals. In summary, these burgers are easy, versatile, and packed with flavor. Enjoy experimenting with your own twists!](https://dailydishly.com/wp-content/uploads/2025/06/fb468978-fb40-4fbf-9ebe-b248e91fb409-768x768.webp)