
Looking for a quick and yummy dinner idea? You’ve hit the jackpot with Garlic Herb Butter Chicken Thighs! This dish is juicy, rich, and full of flavor. In this post, I’ll walk you through easy steps to make the perfect meal, plus some handy tips to impress your family. So grab your apron, and let’s get cooking a savory delight that your taste buds will thank you for!
Why I Love This Recipe
- Flavorful Herb Butter: The combination of garlic, rosemary, and thyme creates a mouthwatering flavor that penetrates the chicken, making each bite succulent and aromatic.
- Crispy Skin: By spreading the herb butter under the skin, you ensure a deliciously crispy exterior that locks in moisture and flavor.
- Easy Preparation: This recipe requires minimal prep time and effort, making it perfect for busy weeknights or special occasions.
- Versatile Dish: Serve it with a variety of sides like roasted vegetables, rice, or a fresh salad for a well-rounded meal that suits any palate.
Ingredients
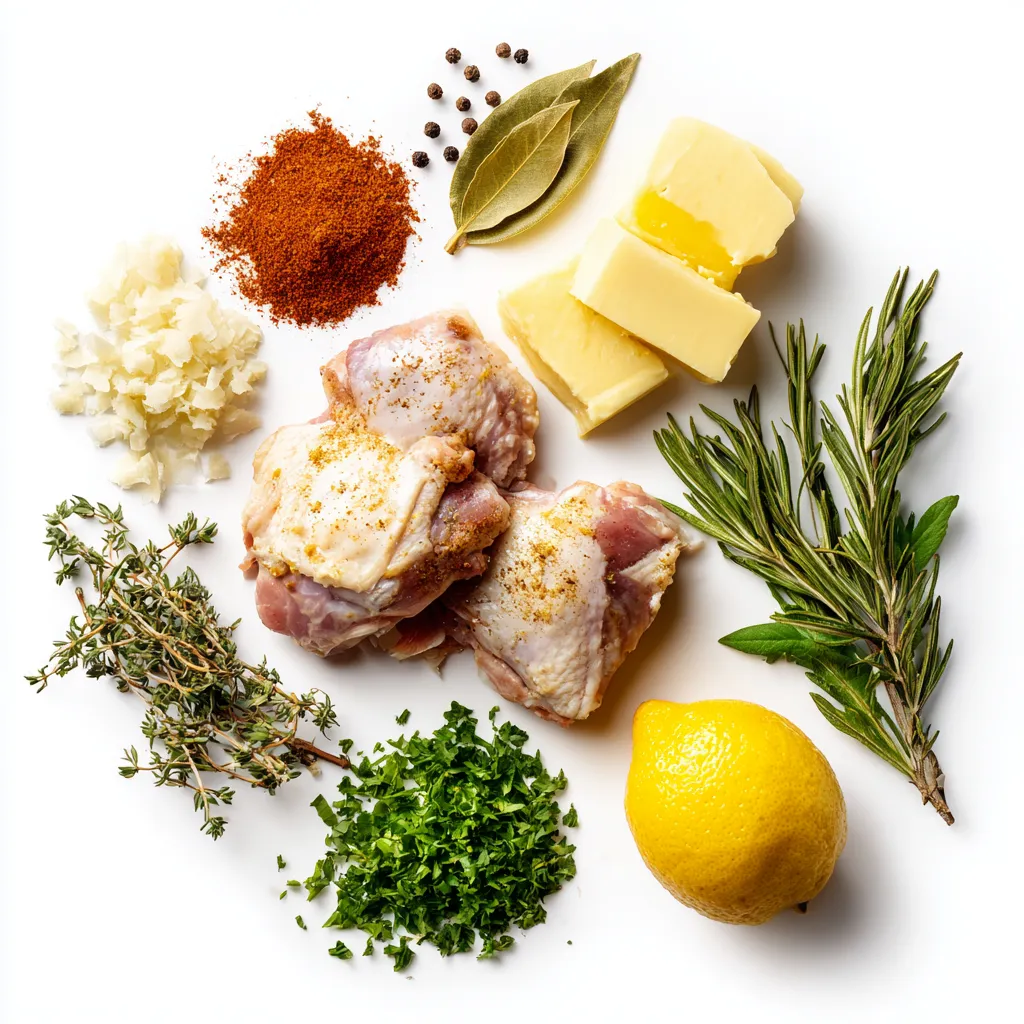
List of Ingredients
– 4 bone-in, skin-on chicken thighs
– 4 tablespoons unsalted butter, softened
– 5 cloves garlic, minced
– 2 teaspoons fresh rosemary, chopped
– 2 teaspoons fresh thyme, chopped
– 1 teaspoon smoked paprika
– Salt and pepper, to taste
– 1 lemon, zested and juiced
– Fresh parsley, chopped (for garnish)
Gathering the right ingredients makes all the difference. For this dish, you need juicy chicken thighs. I love using bone-in, skin-on thighs. They stay moist and get crispy skin.
Next, we have our garlic and herbs. Fresh rosemary and thyme add a wonderful flavor. You will also need minced garlic because it brings out the best taste.
Seasonings play an important role too. Smoked paprika adds a hint of smokiness, while salt and pepper enhance the dish.
Don’t forget the lemon! It brightens the flavors and gives a fresh taste. Lastly, fresh parsley serves as a beautiful garnish and adds color.
With these ingredients, you are ready to create a savory dinner delight.
Step-by-Step Instructions
Preparation Steps
1. Preheat the oven: Set your oven to 400°F (200°C). This makes sure it’s hot enough for crispy skin.
2. Prepare the garlic herb butter mixture: In a small bowl, mix these ingredients:
– 4 tablespoons unsalted butter, softened
– 5 cloves garlic, minced
– 2 teaspoons fresh rosemary, chopped
– 2 teaspoons fresh thyme, chopped
– 1 teaspoon smoked paprika
– Salt and pepper to taste
Stir well to blend the flavors. This butter adds a tasty kick to the chicken.
Cooking Instructions
1. Seasoning the chicken thighs: Pat 4 bone-in, skin-on chicken thighs dry with paper towels. This helps the skin get crispy. Season both sides with salt and pepper. Be generous; it makes a big difference.
2. Applying the butter under the skin: Carefully lift the skin of each chicken thigh. Use your fingers or a small spatula to spread some garlic herb butter under the skin. Don’t tear the skin! Then, spread any leftover butter on top of the chicken.
3. Baking the chicken thighs: Place the seasoned chicken thighs in a baking dish. Drizzle lemon juice over them and sprinkle with lemon zest. Bake for 35-40 minutes. Check that the internal temperature hits 165°F (75°C) and the skin is golden brown.
Finishing Touches
1. Resting the chicken before serving: Once baked, take the chicken out of the oven. Let it rest for 5-10 minutes. This helps the juices stay in the meat, making it juicy and tender.
2. Garnishing tips: Right before serving, sprinkle freshly chopped parsley on top. This adds color and freshness to your dish. You can also serve the thighs on a rustic wooden board with lemon wedges. It looks great and tastes even better!
Tips & Tricks
Cooking Tips
– Ensuring crispy skin: Start by patting the chicken thighs dry. Removing moisture helps the skin crisp up nicely. Season both sides well with salt and pepper. The salt draws out more moisture, which gives you that perfect crispy texture.
– Checking for doneness: Use a meat thermometer to check the chicken. The safe internal temperature is 165°F (75°C). Insert the thermometer into the thickest part of the thigh for an accurate reading. The skin should also be golden brown and crackly when done.
Serving Suggestions
– Recommended side dishes: Garlic herb butter chicken pairs well with simple sides. Try roasted vegetables or creamy mashed potatoes. A fresh salad with bright greens adds a nice contrast. You can also serve it with rice or quinoa for a hearty meal.
– Visual presentation tips: Presentation matters! Serve the chicken on a rustic wooden board. Add lemon wedges on the side for a pop of color. Sprinkle extra fresh herbs on top for a vibrant look. This makes your dish not just tasty but also visually appealing.
Pro Tips
- Butter Temperature: Ensure the butter is softened to room temperature for easy mixing with the herbs and garlic.
- Crispy Skin: Patting the chicken thighs dry before seasoning helps achieve a beautifully crispy skin when baked.
- Herb Variations: Feel free to experiment with different herbs like sage or oregano for a unique flavor profile.
- Lemon Zest Boost: Zesting the lemon before juicing maximizes the citrus flavor and adds a fragrant aroma to the dish.
Variations
Herb Substitutions
You can switch up the herbs to change the flavor. Here are some ideas:
– Oregano: This gives a warm, earthy taste.
– Basil: It adds a fresh and sweet note.
– Dill: It brings a bright, tangy flavor.
Using fresh herbs adds more taste. Dried herbs work too but they are less strong. If you use dried herbs, use less than fresh. A good rule is to use one-third the amount of dried herbs compared to fresh.
Cooking Method Alternatives
If you want to try different cooking methods, here are two great options:
– Grilling Option: Marinate the chicken with the herb butter. Preheat the grill to medium-high. Cook the thighs for about 6-8 minutes per side. This gives a nice smoky flavor and crispy skin.
– Slow Cooker Method: Place the seasoned thighs in the slow cooker. Add a bit of broth for moisture. Cook on low for 6-8 hours. This makes the chicken very tender and juicy.
Feel free to experiment with these methods to find your favorite!
Storage Info
Leftover Storage
After enjoying your garlic herb butter chicken thighs, store any leftovers properly. In the refrigerator, place the chicken in an airtight container. It will stay fresh for up to three days. To keep it tasty, try to cool the chicken first before sealing it.
Freezing tips are also useful. Wrap each thigh tightly in plastic wrap. Then, place them in a freezer-safe bag. This method helps prevent freezer burn. You can freeze the chicken for up to three months. Remember to label the bag with the date.
Reheating Guidelines
For the best reheating methods, use your oven. Preheat it to 350°F (175°C). Place the chicken in a baking dish and cover it with foil. This helps keep it moist. Heat for about 20 minutes or until warmed through.
To maintain texture and flavor, avoid using a microwave. Microwaving can make the chicken rubbery. If you have to use a microwave, do so on a low setting. Add a few drops of water to keep it from drying out. Enjoy your delicious chicken just as much as the first time!
FAQs
Common Cooking Questions
Can I use boneless chicken thighs?
Yes, you can use boneless chicken thighs. They cook faster and stay juicy. Just reduce the baking time to about 25-30 minutes. Check the internal temperature to ensure it reaches 165°F (75°C).
How to avoid dry chicken thighs?
To avoid dry chicken thighs, keep the skin on. The skin keeps moisture in while it cooks. Also, don’t overcook them. Always use a meat thermometer for accuracy. Resting the chicken after cooking helps it stay juicy.
What to serve with garlic herb butter chicken thighs?
You can serve garlic herb butter chicken thighs with many sides. Roasted vegetables or a fresh salad work well. Creamy mashed potatoes or fluffy rice also pair nicely. Lemon wedges add a bright touch and enhance the flavor.
This post covered all you need to make garlic herb butter chicken thighs. We discussed the key ingredients and shared easy steps for cooking. I provided tips for crispy skin and great serving ideas. Also, you learned variations and storage options for leftovers.
Try this recipe to impress your friends and family. Enjoy cooking, and remember, practice makes perfec


