Ginger Lime Chicken Lettuce Wraps Flavorful Recipe

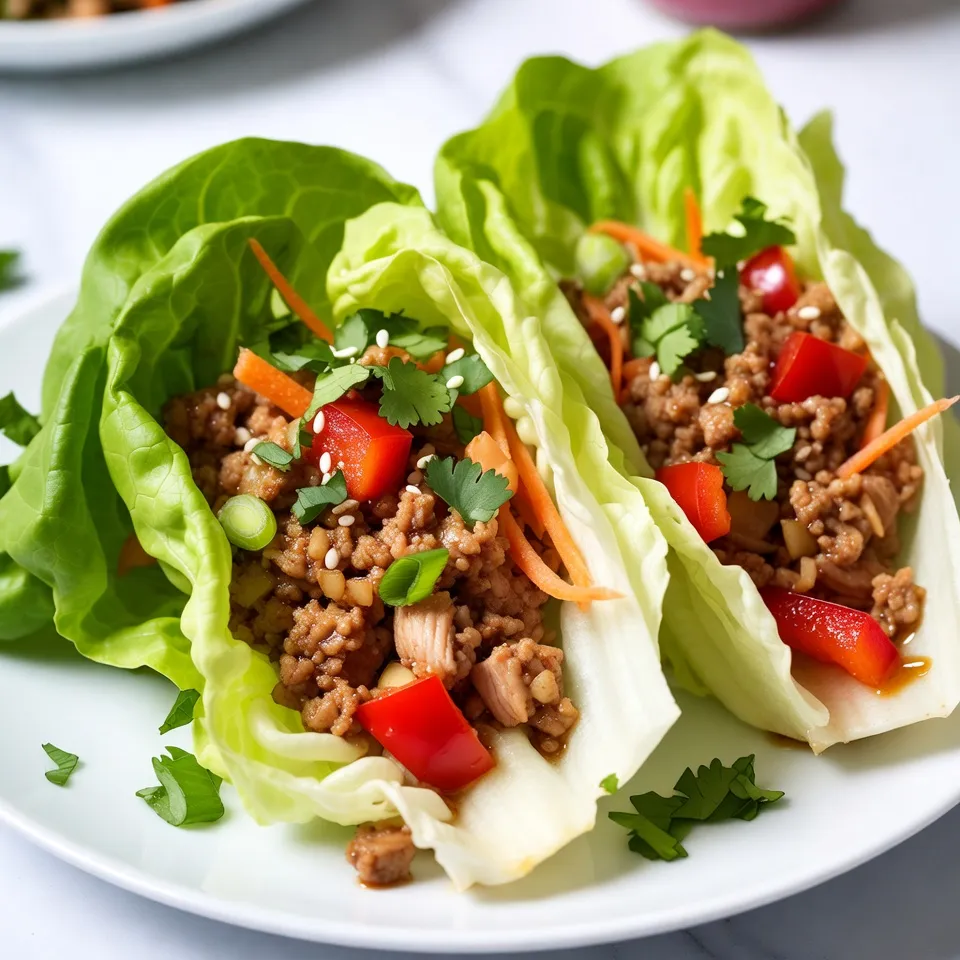
Looking for a fresh and tasty meal? Try my Ginger Lime Chicken Lettuce Wraps! This recipe bursts with flavor, thanks to fresh ginger, lime, and colorful veggies. You’ll love the crunch of lettuce paired with savory ground chicken. Whether you’re cooking for family or friends, this dish is simple and fun to make. Ready to embrace a delicious twist on dinner? Let’s dive into the ingredients and get started!
Why I Love This Recipe
- Fresh Flavors: The combination of ginger and lime brings a bright, zesty flavor that elevates the ground chicken.
- Healthy Ingredients: Using lettuce wraps instead of tortillas makes this dish a low-carb option that’s packed with nutrients.
- Quick and Easy: This recipe comes together in just 25 minutes, making it perfect for a busy weeknight dinner.
- Customizable: Feel free to add your favorite toppings or substitute vegetables to suit your taste preferences.
Ingredients
Main Ingredients
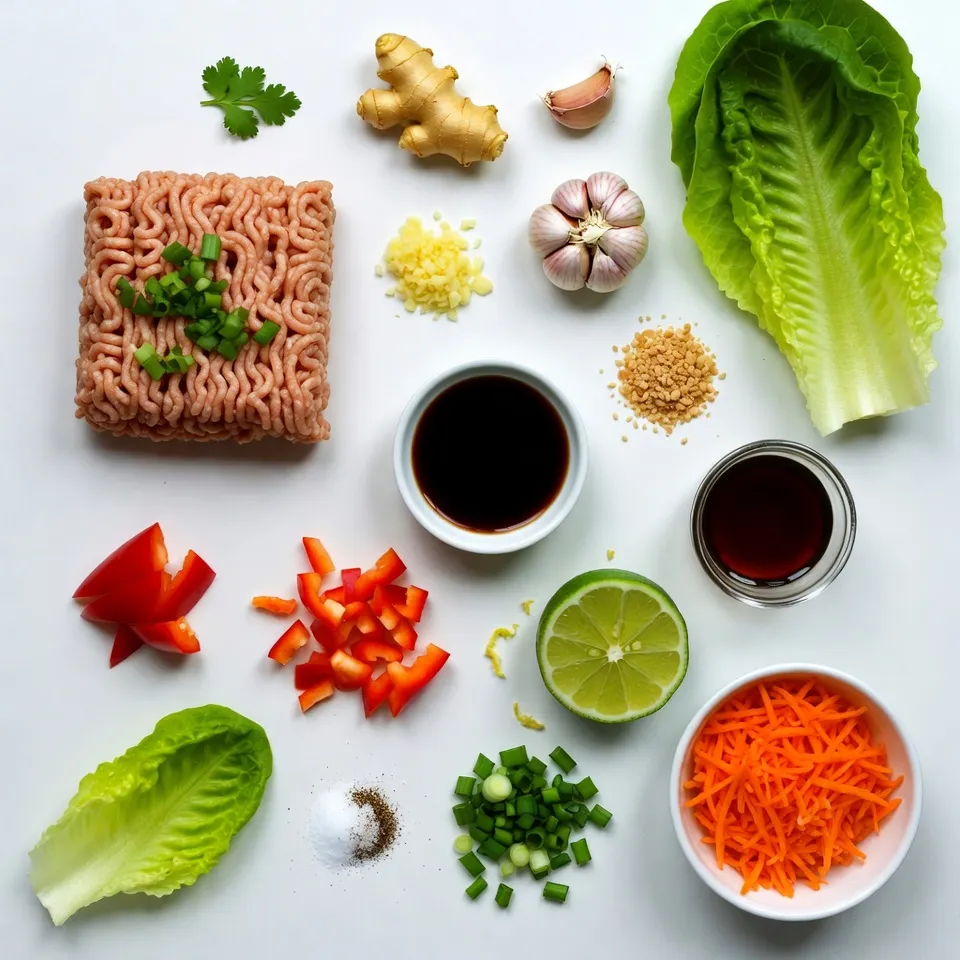
– 1 lb ground chicken
– 2 tablespoons fresh ginger, minced
– 2 cloves garlic, minced
– 2 tablespoons soy sauce
– 1 tablespoon fish sauce
– 1 tablespoon honey
– Juice and zest of 1 lime
– 1 red bell pepper, diced
– 1 cup carrots, shredded
– 1 green onion, chopped
– 1 head of butter or iceberg lettuce
These main ingredients create a burst of flavor. The ground chicken is the heart of this dish. Fresh ginger adds a warm spice, while garlic gives depth. Soy sauce and fish sauce bring a savory umami taste. Honey balances the flavors with a touch of sweetness. Lime juice and zest brighten everything up. The red bell pepper and carrots add crunch and color. Finally, green onion adds freshness to each bite.
Optional Toppings
– Chopped cilantro
– Crushed peanuts
– Sesame seeds
These toppings can take your wraps to the next level. Chopped cilantro brings a fresh herb taste. Crushed peanuts add a nice crunch and nutty flavor. Sesame seeds sprinkle in a bit of nutty richness, too. You can mix and match these toppings to make your wraps unique.

Step-by-Step Instructions
Cooking the Chicken
Start by heating a large skillet over medium heat. Add 1 pound of ground chicken. Cook it for about 5 to 7 minutes. You want it to brown nicely. Make sure to break it apart using a spatula as it cooks. This helps it cook evenly. Once the chicken is browned, add 2 tablespoons of minced ginger and 2 cloves of minced garlic. Stir it well and cook for another 2 minutes. You’ll smell the great aroma of ginger and garlic filling your kitchen!
Combining Flavors
Next, pour in the sauce ingredients. Use 2 tablespoons of soy sauce, 1 tablespoon of fish sauce, 1 tablespoon of honey, and the juice and zest of 1 lime. Stir everything well to coat the chicken evenly. Then, add 1 diced red bell pepper and 1 cup of shredded carrots. Cook for another 3 to 4 minutes until the veggies are tender. Season with salt and pepper to taste. This mix of flavors makes the chicken truly special.
Assembling the Wraps
Now, it’s time to assemble your wraps. Take a leaf of butter or iceberg lettuce. Spoon a portion of the chicken mixture into the center of the leaf. Top it with chopped green onions and any extra toppings you like, such as chopped cilantro, crushed peanuts, or sesame seeds. Fold the lettuce leaf around the filling. Now you have a healthy and tasty wrap ready to enjoy!
Tips & Tricks
Cooking Tips
– Ensure chicken is fully cooked. Use a meat thermometer to check. The chicken should reach 165°F (75°C). This keeps it safe to eat.
– Adjust seasonings to taste. Start with the base recipe. Then tweak the soy sauce, lime, or honey as you like. Flavor is personal, so have fun with it.
Presentation Tips
– How to arrange wraps for serving. Place the filled wraps on a large platter. Arrange them in a circle or line for a nice look.
– Best serving dishes. Use a shallow bowl or a wide plate. This gives guests easy access to the wraps.
Making it Healthier
– Suggestions for low-sodium options. Choose low-sodium soy sauce and fish sauce. This helps cut back on salt without losing flavor.
– Substitutions for dietary restrictions. Swap ground chicken for turkey or tofu. Use gluten-free soy sauce for a gluten-free option. This way, everyone can enjoy your wraps!
Pro Tips
- Fresh Ingredients: Always use fresh ginger and garlic for the best flavor. They add a vibrant kick that enhances the dish.
- Customize Your Wraps: Feel free to add other vegetables like cucumbers or avocados for extra crunch and nutrition.
- Perfect Lettuce Leaves: Choose the largest and most intact leaves for wrapping. This will make it easier to hold the filling without tearing.
- Make Ahead: Prepare the chicken mixture in advance and store it in the refrigerator. Assemble the wraps just before serving for a fresh experience.

Variations
Ingredient Swaps
You can swap proteins to mix things up. Use ground turkey for a leaner option. Tofu works well for a plant-based twist. Both options are tasty and easy to prepare.
For veggies, be creative! Try cucumbers for crunch or add bok choy for a unique flavor. You can even use shredded cabbage for a different texture. The key is to keep it fresh and colorful.
Flavor Enhancements
If you like heat, add chili flakes or fresh diced chilies. This will spice up your wraps and give them a nice kick. You can also use Sriracha or chili paste for more flavor.
For a touch of sweetness, try different sauces. Teriyaki sauce adds a nice glaze. You can also use sweet chili sauce for a fun twist. Experiment and find your favorite flavor combination.
Serving Suggestions
These wraps pair well with simple side dishes. Try serving them with a fresh fruit salad or a light cucumber salad. Both options add freshness to your meal.
For a fun gathering, create a wrap platter. Arrange the wraps on a large plate with bowls of toppings. Guests can build their own wraps, making it a fun and interactive meal.
Storage Info
Storing Leftovers
To keep your Ginger Lime Chicken Lettuce Wraps fresh, store them in the fridge. Use an airtight container to prevent moisture loss. This helps keep the flavors bright and tasty. You can refrigerate the wraps for up to three days. After that, they may lose their crunch and flavor.
Freezing Instructions
If you want to save some wraps for later, freezing is a good option. First, separate the chicken filling from the lettuce. Wrap the chicken tightly in plastic wrap. Then, place it in a freezer bag. This helps prevent freezer burn. You can freeze the filling for up to three months.
To reheat frozen chicken filling, take it out and thaw it overnight in the fridge. When ready, heat it in a skillet over medium heat. Stir it until it is warmed through. Serve it with fresh lettuce leaves for a quick meal. Enjoy the same great taste!
FAQs
What can I use instead of lettuce as a wrap?
You can use many other options instead of lettuce. Try collard greens, rice paper, or cabbage leaves. Each choice gives a unique flavor and texture. Collard greens are sturdy and hold fillings well. Rice paper adds a fun chew. Cabbage leaves add a crunch. Pick what you enjoy!
Can I make Ginger Lime Chicken Lettuce Wraps ahead of time?
Yes, you can prepare Ginger Lime Chicken Lettuce Wraps ahead. Cook the chicken mixture and store it in the fridge. It stays fresh for about three days. When ready to eat, simply warm it up and fill your lettuce wraps. This makes for a quick meal!
How do I make the dish spicier?
To add heat, include chopped fresh chili or red pepper flakes. Mix them in with the ginger and garlic for a spicy kick. You can also use sriracha or chili sauce in the sauce mix. Adjust to your spice level for the best flavor!
In this post, you learned about the key ingredients for Ginger Lime Chicken Lettuce Wraps, like ground chicken, fresh ginger, and lime. We covered step-by-step cooking and how to assemble the wraps. Tips for enhancing the dish, storage, and variations make it even more fun to try.
Now, you can create tasty wraps that suit your taste. Enjoy experimenting with flavors and toppings. Happy cookin

Ginger Lime Chicken Lettuce Wraps
Ingredients
- 1 lb ground chicken
- 2 tablespoons fresh ginger, minced
- 2 cloves garlic, minced
- 2 tablespoons soy sauce
- 1 tablespoon fish sauce
- 1 tablespoon honey
- 1 lime juice and zest
- 1 medium red bell pepper, diced
- 1 cup carrots, shredded
- 1 medium green onion, chopped
- to taste salt and pepper
- 1 head butter lettuce or iceberg lettuce, leaves separated
- optional chopped cilantro
- optional crushed peanuts
- optional sesame seeds
Instructions
- In a large skillet over medium heat, add the ground chicken and cook until browned, breaking it apart with a spatula as it cooks (about 5-7 minutes).
- Add the minced ginger and garlic to the skillet, stirring to combine, and cook for an additional 2 minutes until fragrant.
- Pour in the soy sauce, fish sauce, honey, lime juice, and lime zest; stir well to coat the chicken evenly.
- Add the diced red bell pepper and shredded carrots to the skillet, cooking for another 3-4 minutes until the vegetables are tender.
- Season with salt and pepper to taste, and then remove from heat.
- To assemble the lettuce wraps, take a leaf of lettuce and spoon a portion of the chicken mixture into the center.
- Top with chopped green onions and any additional toppings of your choice like cilantro, crushed peanuts, or sesame seeds.
- Fold the lettuce leaf around the filling and enjoy as a healthy and vibrant wrap!


![- 1 medium head of cauliflower, cut into florets - 1 cup all-purpose flour - 1 cup water - 1 cup panko breadcrumbs - 1 teaspoon garlic powder - 1 teaspoon onion powder - 1 teaspoon smoked paprika - 1 teaspoon cayenne pepper (adjust for spice preference) - 1 cup buffalo sauce (store-bought or homemade) - 8 small corn or flour tortillas The heart of these tacos is the cauliflower. This veggie gives the dish a great texture and absorbs the buffalo sauce well. You need flour and water to make the batter. Panko breadcrumbs add a nice crunch. Spices like garlic powder, onion powder, smoked paprika, and cayenne pepper give the cauliflower its bold flavor. - 1 ripe avocado, sliced - 1 cup shredded lettuce - ½ cup crumbled blue cheese or feta cheese (optional) - Fresh cilantro, for garnish - Lime wedges, for serving Toppings change the game. Sliced avocado adds creaminess, while shredded lettuce gives a fresh crunch. Blue cheese or feta adds tang. Fresh cilantro brightens the dish. Lime wedges are perfect for squeezing over the tacos. - Vegan, gluten-free options, allergen information These tacos can fit many diets. For a vegan option, skip the cheese. Use gluten-free flour and corn tortillas for a gluten-free meal. Always check for allergies, especially with buffalo sauce and toppings. For the full recipe, check [Full Recipe]. 1. First, preheat your oven to 425°F (220°C). This step is key. 2. Line a baking sheet with parchment paper. It helps with easy cleanup. 3. In a medium bowl, whisk together: - 1 cup all-purpose flour - 1 cup water - 1 teaspoon garlic powder - 1 teaspoon onion powder - 1 teaspoon smoked paprika - 1 teaspoon cayenne pepper (adjust for spice preference) Mix until the batter is smooth. 4. In another bowl, pour in 1 cup of panko breadcrumbs. This will give your cauliflower that crunchy texture. 5. Take each cauliflower floret and dip it into the batter. Let the extra batter drip off. 6. Then coat the floret with panko breadcrumbs. Place the coated florets on the baking sheet. 7. Bake in the oven for 25-30 minutes. Flip halfway through to ensure even cooking. The cauliflower should turn golden brown and crispy. 8. In a large bowl, toss the baked cauliflower with 1 cup of buffalo sauce. Make sure every piece is well-coated. 9. Warm your tortillas on a skillet or in the microwave. This makes them soft and pliable. 10. On each tortilla, layer the buffalo cauliflower, shredded lettuce, and avocado slices. 11. If you like, add crumbled blue cheese or feta on top. 12. Garnish with fresh cilantro and serve with lime wedges. Squeeze lime juice over the tacos for added flavor. For the full recipe, refer to the earlier section. Enjoy your delicious Buffalo Cauliflower Tacos! To get crispy cauliflower, start by removing moisture. After cutting the cauliflower into florets, pat them dry with a paper towel. This helps the batter stick and ensures crispiness. When baking, use a hot oven set to 425°F (220°C). Spread the florets on a lined baking sheet in a single layer. Avoid crowding them, as this traps steam and makes them soggy. Flip the cauliflower halfway through baking for even crispiness. For extra flavor, play with spices. If you like it hot, add more cayenne pepper to the batter. You can also try using garlic or onion powder in larger amounts for a stronger taste. Pair your tacos with delicious dipping sauces like ranch or a creamy avocado dip. A side of crunchy slaw can add freshness and texture. To serve a larger group, simply double the ingredients. For smaller gatherings, halve the recipe. Adjust the number of tortillas and toppings to match your needs. This way, everyone gets their fill of these tasty tacos while minimizing waste. For the complete recipe, check out the Full Recipe. {{image_2}} You can switch up the flavor with different hot sauces. Try a garlic or honey hot sauce for a sweet twist. Sriracha or chipotle sauce can add a smoky kick. Adjust the spice level by adding more or less cayenne pepper. You can also mix in other spices like cumin or chili powder for a unique taste. For a creamy touch, use dairy-free cheese options. Cashew cheese or vegan feta works well. You can also add more veggies like diced tomatoes, corn, or even a crunchy slaw. This adds color and texture to your tacos, making each bite exciting. Want a lighter meal? Turn your tacos into a salad! Start with a bed of greens instead of tortillas. Top with the buffalo cauliflower, avocado, and your favorite toppings. Drizzle with extra buffalo sauce or a zesty dressing. This way, you enjoy the same great flavors in a fresh and healthy way. For the full recipe, check out the detailed instructions above. To keep your tacos fresh, store them in airtight containers. Place the assembled tacos in the fridge. They stay good for up to two days. If you don't want soggy tacos, store the ingredients separately. This way, the tortillas won't get wet. Keep the buffalo cauliflower in one container and the toppings in another. Reheating crispy cauliflower can be tricky. Use an oven for the best results. Preheat it to 350°F (175°C). Spread the cauliflower on a baking sheet and heat for about 10 minutes. This helps maintain its crispiness. If you need to use a microwave, do it quickly. Heat in short bursts to avoid sogginess. You can freeze cooked cauliflower. Just let it cool completely first. Place it in a freezer-safe bag. Try to squeeze out as much air as possible. It can last up to three months in the freezer. When you're ready to eat, thaw it in the fridge overnight and reheat. For the best taste, use the Full Recipe to make fresh tacos when you’re ready to enjoy! Yes, you can prepare these tacos ahead of time. For the best texture, follow these meal prep tips: - Bake the cauliflower: Cook the cauliflower and toss it in buffalo sauce. Let it cool. Store it in an airtight container. - Prep the tortillas: Warm the tortillas just before serving. This keeps them soft. - Keep toppings separate: Store ingredients like avocado and lettuce in separate containers. This keeps them fresh. When ready to serve, just reheat the cauliflower in the oven. If you want a gluten-free version, here are some options: - Flour: Use gluten-free all-purpose flour or almond flour instead of regular flour. - Tortillas: Choose corn tortillas or gluten-free flour tortillas. Both work great for these tacos. These swaps keep the flavor intact while making it gluten-free. You can manage the heat level easily. Here are some tips: - Cayenne pepper: Start with less cayenne pepper. You can always add more later. - Buffalo sauce: Choose a milder buffalo sauce. Some brands offer a range of heat levels. - Add toppings: Use toppings like avocado or sour cream to balance the spice. These adjustments help you find your perfect heat level while still enjoying the flavor of the tacos. Buffalo cauliflower tacos are a tasty treat that anyone can enjoy. We covered the main ingredients, from cauliflower to tortillas, and discussed optional toppings. You learned how to prepare, cook, and assemble these tacos, plus tips for crispy perfection. Exploring variations lets you customize to your taste, and knowing how to store leftovers keeps your meal fresh. With the right adjustments, you can make this dish fit your diet. Enjoy creating your own buffalo cauliflower tacos, and share them with family and friends for a fun meal!](https://dailydishly.com/wp-content/uploads/2025/07/222f8f62-8bb8-4cb7-89ef-1e5b6133e329-768x768.webp)


