Gingerbread Ice Cream Sandwiches Festive and Delicious

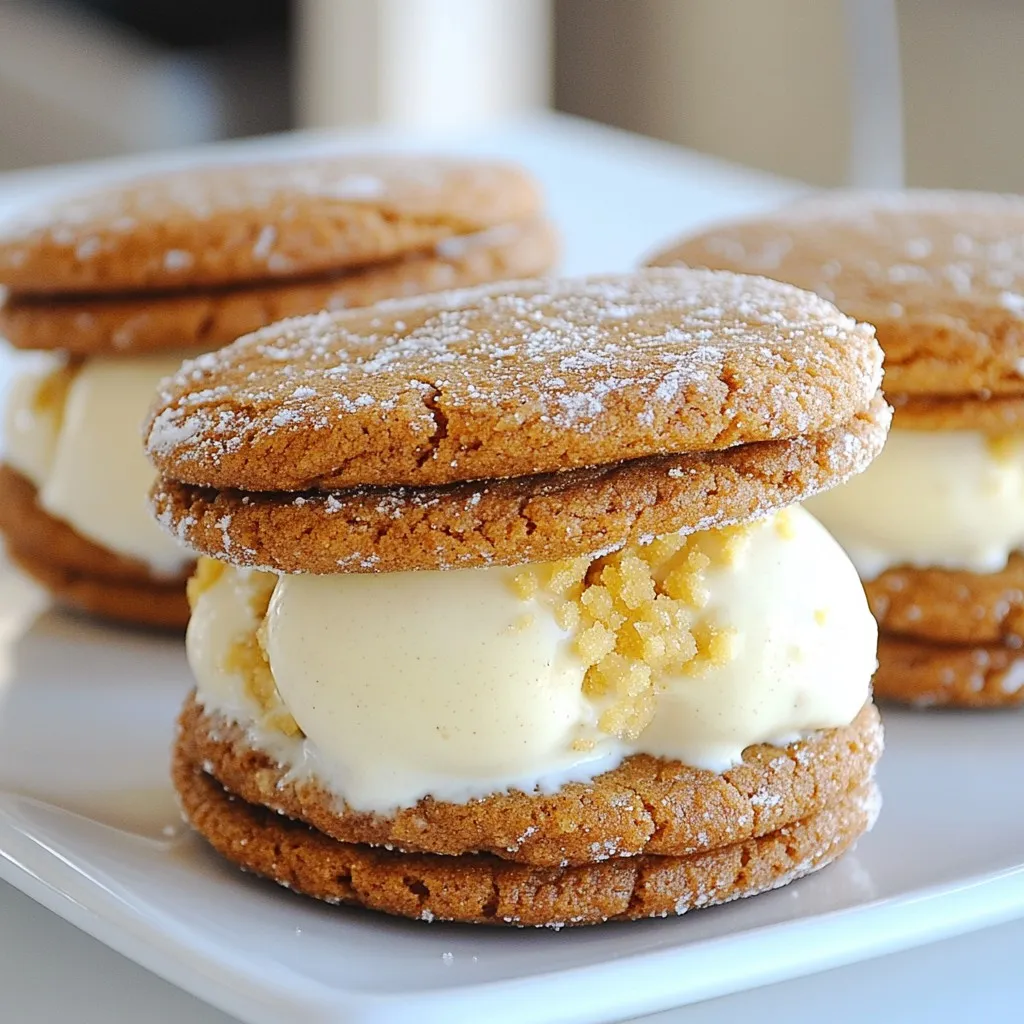
Looking for a festive treat that will wow your guests? These Gingerbread Ice Cream Sandwiches combine the warm spice of gingerbread cookies with the sweet creaminess of ice cream. Perfect for holiday gatherings or cozy nights at home, they are simple to make and fun to enjoy. Discover how to whip these delightful sandwiches up in your kitchen, and watch them disappear faster than you can say “yum!”
Why I Love This Recipe
- Festive Flavor: The combination of ginger, cinnamon, and cloves creates a warm, spicy flavor that embodies the holiday spirit.
- Fun to Assemble: Building these ice cream sandwiches is a fun activity for all ages, making them perfect for family gatherings.
- Customizable: You can easily switch up the ice cream flavor or add different toppings, making each sandwich unique.
- Make Ahead: These sandwiches can be made in advance and stored in the freezer, making them a convenient treat for unexpected guests.
Ingredients
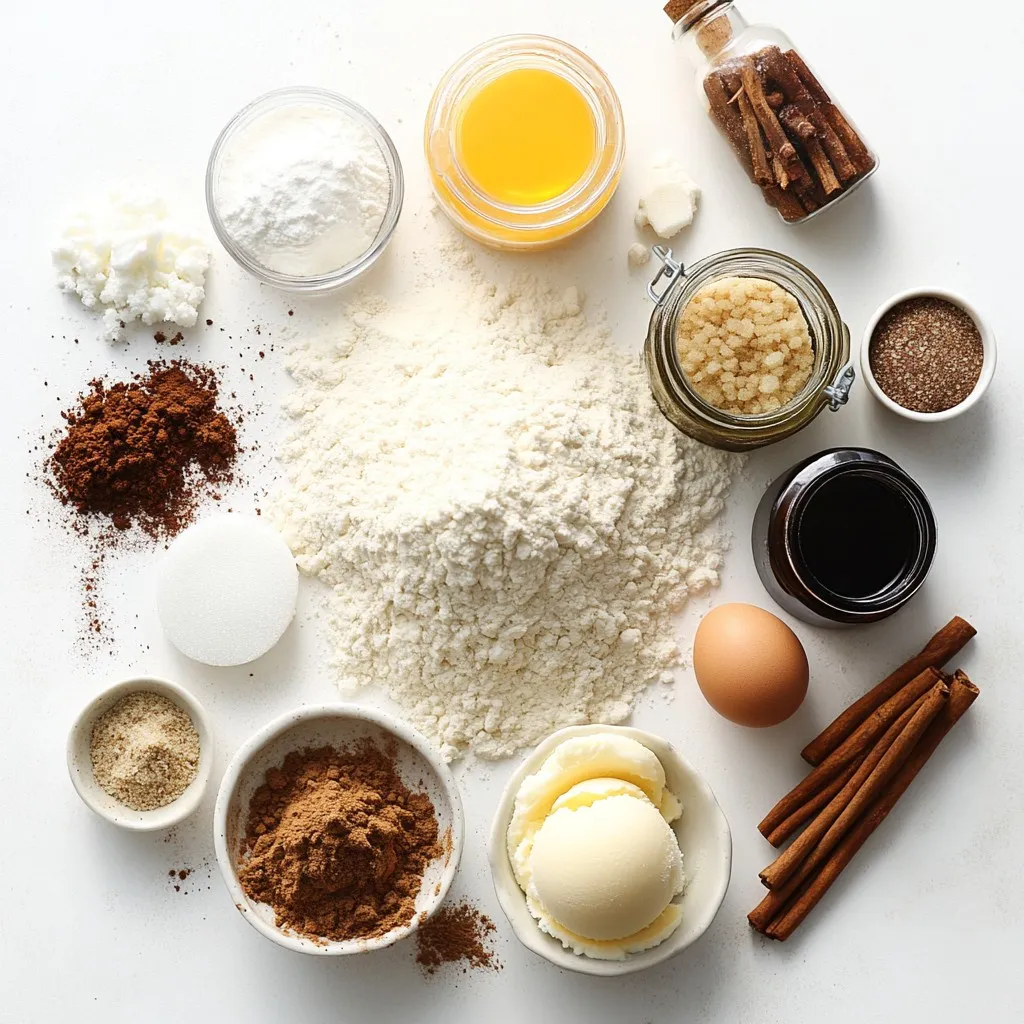
Essential Ingredients for Gingerbread Ice Cream Sandwiches
– 2 cups all-purpose flour
– 1 teaspoon baking soda
– 1 tablespoon ground ginger
– 1 tablespoon ground cinnamon
– 1/2 teaspoon ground cloves
– 1/2 teaspoon salt
– 1/2 cup unsalted butter, softened
– 1/2 cup brown sugar, packed
– 1/4 cup granulated sugar
– 1 large egg
– 1/4 cup molasses
– 1 teaspoon vanilla extract
– 2 cups vanilla ice cream (or flavor of your choice)
– Optional toppings: crushed gingerbread cookies, sprinkles
The first thing you need is good ingredients. These will make your gingerbread ice cream sandwiches tasty and fun. The all-purpose flour gives the cookies structure. Baking soda helps them rise and stay soft. Ground ginger, cinnamon, and cloves add warm spices. Salt balances the flavors.
You’ll also need butter. It makes the cookies rich and creamy. Brown sugar gives them a nice color and taste. Granulated sugar adds sweetness. The egg binds everything together. Molasses adds moisture and a deep flavor. Finally, vanilla extract gives a lovely aroma.
For the ice cream, you can use vanilla or any flavor you love. The optional toppings, like crushed cookies or sprinkles, add a fun touch. You can get creative with them!

Step-by-Step Instructions
Preparing the Gingerbread Dough
– Whisk together these dry ingredients:
– 2 cups all-purpose flour
– 1 teaspoon baking soda
– 1 tablespoon ground ginger
– 1 tablespoon ground cinnamon
– 1/2 teaspoon ground cloves
– 1/2 teaspoon salt
In a big bowl, cream together:
– 1/2 cup unsalted butter, softened
– 1/2 cup brown sugar, packed
– 1/4 cup granulated sugar
Beat in:
– 1 large egg
– 1/4 cup molasses
– 1 teaspoon vanilla extract
Then, mix the dry flour mix into the wet mix until a smooth dough forms. You might need to use your hands for the last bit of flour.
Chilling and Baking
Wrap the dough in plastic wrap. Chill in the fridge for at least 1 hour. This helps the dough firm up.
Preheat your oven to 350°F (175°C). Line a baking sheet with parchment paper.
On a floured surface, roll out the dough to about 1/4 inch thick. Use cookie cutters to cut out fun shapes. Gingerbread men or round cookies are great options!
Place the cookies on the prepared baking sheet. Bake for 8-10 minutes until the edges are slightly firm. Let them cool on a wire rack.
Assembling the Sandwiches
Once your cookies are cool, take one cookie. Place a generous scoop of ice cream on the bottom. Then, top it with another cookie to form a sandwich.
For added fun, roll the edges of the ice cream in optional toppings like crushed gingerbread cookies or colorful sprinkles.
Finally, place the assembled sandwiches back in the freezer for about 30 minutes. This sets them firmly and makes them easier to enjoy!
Tips & Tricks
Achieving the Perfect Gingerbread Flavor
To get the best gingerbread flavor, use fresh spices. Fresh spices have a stronger scent and taste. Check your spice jars; if they are old, buy new ones. Also, be precise with your measurements. This will help you get the flavor just right every time.
Cookie Texture Tips
Chilling the dough is key to great cookies. After making your dough, wrap it in plastic wrap and chill it for at least one hour. This helps the cookies hold their shape. The thickness of your cookies matters too. If you’re making thicker cookies, bake them a bit longer. Keep an eye on them to avoid overbaking.
Serving Suggestions
Get creative with how you serve your gingerbread ice cream sandwiches. Use a festive platter to showcase them. You can drizzle caramel or chocolate sauce on top for a fun touch. For drinks, pair them with hot cocoa or spiced tea. These drinks will enhance the holiday vibe and make your treats even more special.
Pro Tips
- Chill the Dough: Be sure to chill the dough for at least one hour. This helps the cookies maintain their shape while baking and makes rolling out easier.
- Use Parchment Paper: Line your baking sheets with parchment paper to prevent sticking and ensure even baking.
- Customize Your Ice Cream: Feel free to experiment with different ice cream flavors or even add mix-ins like chocolate chips or nuts for a unique twist!
- Presentation Matters: Serve your gingerbread ice cream sandwiches on a festive platter and consider drizzling with caramel or chocolate sauce for an eye-catching dessert.

Variations
Vegan Gingerbread Ice Cream Sandwiches
To make these treats vegan, you can swap some ingredients. Use plant-based butter instead of unsalted butter. Replace the egg with a flax egg, made by mixing one tablespoon of flaxseed meal with two and a half tablespoons of water. Let it sit for five minutes to thicken. For the ice cream, choose a dairy-free option that you like. Almond, coconut, or cashew ice creams work well. This way, you can enjoy the festive flavor without eggs or dairy.
Gluten-Free Options
For a gluten-free version, use a good gluten-free flour blend. Look for mixes that contain brown rice flour, tapioca starch, and potato starch. These blends mimic the texture of all-purpose flour. You can also add a bit of xanthan gum to help the cookies hold together. Follow the rest of the recipe as usual, and you’ll have delicious gluten-free gingerbread ice cream sandwiches.
Flavor Variations
Get creative with your ice cream flavors! While vanilla is a classic choice, try chocolate, peppermint, or even pumpkin spice for a fun twist. You can also add spices like nutmeg or cardamom to the dough for extra warmth. For crunch, mix in chopped nuts like pecans or walnuts. This way, you can customize your sandwiches to suit your taste. The options are endless!
Storage Info
How to Store Gingerbread Ice Cream Sandwiches
To keep your gingerbread ice cream sandwiches fresh, store them in an airtight container. This helps to lock in moisture and flavor. Place parchment paper between layers to avoid sticking. If you have leftovers, try to eat them in a few days for the best taste.
Freezer Storage Tips
These treats can last up to two months in the freezer. Wrap each sandwich in plastic wrap to keep them from getting freezer burn. For added protection, place the wrapped sandwiches in a freezer-safe bag. This method helps maintain a nice texture, so they stay soft and tasty.
Reheating Instructions
If your cookies become too hard, re-soften them by placing them in a warm oven for a few minutes. Keep the temperature low, around 200°F (93°C). Check them often to avoid overdoing it. This is a great way to bring back that fresh-baked feel!
FAQs
Can I make the dough ahead of time?
Yes, you can make the dough ahead of time. Just wrap it tightly in plastic wrap and store it in the fridge. It will stay fresh for up to three days. When you’re ready, roll it out and bake!
What type of ice cream pairs best with gingerbread?
Vanilla ice cream is a classic choice. It balances the spices in gingerbread well. For a twist, try flavors like caramel, cinnamon, or even pumpkin. Each adds a unique touch to your sandwich.
Can I freeze the cookie dough?
Absolutely! You can freeze the cookie dough. Shape it into a disk, wrap it well, and store it in the freezer. It will keep for about three months. When ready to use, thaw it overnight in the fridge before baking.
How do I prevent the ice cream from melting when assembling?
To keep the ice cream firm, scoop it right from the freezer. Work quickly when making the sandwiches. After you assemble them, freeze the sandwiches for about 30 minutes before serving. This helps them hold their shape.
Gingerbread ice cream sandwiches are a fun treat you can make at home. We covered essential ingredients, step-by-step instructions, and tips for success. Variations for vegan and gluten-free options let you explore different flavors. Proper storage keeps them fresh and yummy.
Enjoy making these sandwiches your way. They will surely impress family and friends. Get creative and have fun with this easy recip


![- 1 cup rolled oats - 1 cup almond butter - 1/2 cup shredded unsweetened coconut These main ingredients are the heart of your Almond Joy Energy Bites. Rolled oats provide fiber, giving you energy and keeping you full. Almond butter adds healthy fats and protein, making these bites more satisfying. Shredded coconut brings a delicious tropical flavor and a nice texture. - 1/4 cup honey or maple syrup - 1 teaspoon vanilla extract - 1/2 teaspoon sea salt For sweetness, you can use honey or maple syrup. Both options add a rich flavor. Vanilla extract enhances the overall taste, making it more delightful. Sea salt balances the sweetness and adds depth to every bite. - 1/4 cup mini dark chocolate chips - 1/4 cup chopped almonds Mini dark chocolate chips make these bites even more fun. They add a sweet, chocolatey burst in every mouthful. Chopped almonds give a crunch that contrasts with the softness of the other ingredients. This mix of textures makes them exciting to eat. You can find the complete recipe [Full Recipe]. - Step 1: Combine ingredients in a large mixing bowl. Start with rolled oats, almond butter, shredded coconut, honey, and vanilla extract. Mix these until you see a smooth blend. - Step 2: Ensure all ingredients are thoroughly mixed. You want a thick, sticky mixture that holds well together. - Step 3: Scoop and roll the mixture into bite-sized balls. Aim for about one inch in diameter. This size is easy to eat and perfect for snacking. - Step 4: Place on a parchment-lined baking sheet. This helps prevent sticking and makes cleanup easier. - Step 5: Refrigerate for at least 30 minutes. This step helps the bites firm up nicely. - Step 6: Transfer to an airtight container. Store them in the fridge where they can last up to a week. Enjoy them whenever you need a tasty pick-me-up! For the full recipe, check out the complete instructions above. To get the best Almond Joy Energy Bites, use room temperature almond butter. This makes mixing much easier. You can also change the size of the bites. Make them big or small based on what you like. When you serve these bites, arrange them nicely on a plate. You can use a clear glass jar for a fun look. For extra charm, sprinkle some shredded coconut or chopped almonds on top. This makes the bites more eye-catching. These energy bites taste great with a glass of milk or nut milk. They also work well as a post-workout snack or a treat during lunch. Feel free to enjoy them any time you need a boost. If you want to make them even better, check out the Full Recipe for more tips! {{image_2}} You can easily change the taste of your Almond Joy Energy Bites. Try swapping almond butter for another nut butter, like peanut or cashew. This simple switch gives a new flavor twist. You can also add different mix-ins. Consider using dried fruits like cranberries or raisins. Seeds, like chia or pumpkin, add crunch and nutrition. The texture of these bites can be fun to play with too. Experiment with different types of chocolate. Use dark, milk, or even white chocolate for a sweet touch. If you want to boost the nutrition, add protein powder. This makes your bites more filling and adds a protein punch. You can make these bites fit various diets. To make them vegan, just use maple syrup instead of honey. This keeps them sweet and plant-based. If you need them gluten-free, check that your oats are not cross-contaminated with gluten. This way, everyone can enjoy these tasty snacks. For the full recipe, check out the complete guide to making these delicious bites. To keep your Almond Joy Energy Bites fresh, store them in an airtight container in the refrigerator. This helps maintain their texture and flavor. Always keep them away from direct sunlight and heat. This prevents them from getting too warm and losing their yummy taste. These energy bites are good for up to a week in the fridge. If you want to store them for longer, you can freeze them. They can last in the freezer for up to three months. Just make sure to keep them in an airtight container to avoid freezer burn. When you’re ready to enjoy your frozen energy bites, leave them at room temperature for a few minutes. This makes them easy to eat. For the best results, refrigerate them overnight if they are frozen. This way, they will taste fresh and delightful when you’re ready to snack. Yes, adjust honey or maple syrup to taste. If you want less sweetness, start with half. You can always add more later if you need it sweeter. This way, you control the flavor to match your liking. They are a nutritious snack that kids generally enjoy. The mix of oats, chocolate, and nuts makes them tasty. Plus, they are fun to eat! Kids love the chewy texture and the sweet bits of chocolate. Yes, they can be prepared in advance and stored for later use. Make a batch over the weekend and enjoy them all week. This saves time and gives you quick snacks ready to go. They should be firm after chilling for at least 30 minutes. Check them by pressing gently. If they hold their shape, they are ready to eat. Enjoy your Almond Joy Energy Bites as a quick treat or snack! You learned how to make Almond Joy Energy Bites with simple ingredients. Combine oats, almond butter, and coconut for a tasty mix. Sweeten with honey or maple syrup, and add chocolate chips for fun. Follow the steps to roll and chill the bites. These treats are easy to customize and store well. Enjoy them as snacks or post-workout fuel. With endless variations, you can always explore new flavors. Get ready to share these tasty bites with friends and family!](https://dailydishly.com/wp-content/uploads/2025/07/b2b32087-befa-4ffb-92e8-3f970098e72d-768x768.webp)

![To make a tasty no-bake strawberry cheesecake, you need a few key ingredients: - 200g digestive biscuits, crushed - 100g unsalted butter, melted - 400g cream cheese, softened - 100g powdered sugar - 1 teaspoon vanilla extract - 250ml heavy cream - 300g fresh strawberries, hulled and sliced - 100g strawberry jam These ingredients work together to create a rich and creamy dessert. The digestive biscuits form a crunchy base, while the cream cheese and heavy cream give it a smooth texture. You can customize your cheesecake with a few optional ingredients: - Fresh mint leaves for garnish - Additional fruit toppings like blueberries or raspberries - A splash of lemon juice for a tangy flavor - Chocolate shavings for a sweet touch These extras allow you to add your personal flair to the cheesecake. If you need substitutions, here are some ideas: - Use graham crackers instead of digestive biscuits for the base. - Swap cream cheese with Greek yogurt for a lighter option. - Try coconut cream instead of heavy cream for a dairy-free version. - Use honey instead of powdered sugar for a natural sweetener. These alternatives can make the recipe fit your needs while still tasting great. For the full recipe, check the detailed steps to create this delightful dessert. To start, gather your ingredients. You need crushed digestive biscuits and melted butter. In a mixing bowl, combine these two. Mix until you see a texture that looks like wet sand. Next, take a 9-inch springform pan. Press the biscuit mixture firmly into the bottom. Make sure it is even. This will be the base of your cheesecake. After that, refrigerate the pan for about 10 minutes. This helps the base to set nicely. Now, let’s make that creamy filling. In a new bowl, add softened cream cheese, powdered sugar, and vanilla extract. Beat these together until they become smooth and creamy. In another bowl, whip the heavy cream. Keep whipping until stiff peaks form. This means it will hold its shape well. Now, gently fold the whipped cream into the cream cheese mixture. Do this carefully so the filling stays light and airy. Once your filling is ready, pour it over the chilled biscuit base. Spread it evenly with a spatula. Now, let’s add some color. Arrange the sliced strawberries on top of the cheesecake. You can be creative with this step! In a small saucepan, melt the strawberry jam over low heat. Once it is runny, let it cool a little. Drizzle the jam over the strawberries for a shiny finish. Finally, cover your cheesecake with plastic wrap. Refrigerate it for at least 4 hours, or even overnight. This waiting time helps it set perfectly. For the full recipe, check the earlier section. When making a no-bake strawberry cheesecake, a few common mistakes can spoil your treat. First, don’t skip chilling the biscuit base. It needs to set before adding the filling. Second, make sure your cream cheese is fully softened. Cold cream cheese can create lumps in your mixture. Lastly, don’t rush the whipping of the heavy cream. Whip it until stiff peaks form for the best texture. To get a creamy and smooth texture, follow these steps. Mix the cream cheese, powdered sugar, and vanilla extract until it’s really smooth. Then, whip the heavy cream separately until it’s nice and fluffy. When you fold the whipped cream into the cream cheese mix, do it gently. This keeps air in the mixture, making it light and fluffy. Serving your cheesecake can be fun and creative. Cut slices and place them on pretty dessert plates. You can add fresh mint leaves on top for a pop of color. For extra sweetness, drizzle more strawberry jam over the slices. You can also serve it with a side of fresh strawberries. This adds a nice touch and makes the dessert look even better. For the full recipe, refer to the earlier sections. {{image_2}} You can change up the fruity flavor of your cheesecake. Swap strawberries for other berries like blueberries or raspberries. You can also use peaches, mangoes, or even kiwi. Just chop the fruit and layer it on top or mix it into the filling. This makes your dessert colorful and fun. Want a richer taste? Try adding chocolate or caramel. For chocolate, mix in cocoa powder or melted chocolate into the cream cheese. Drizzle caramel sauce on top for a sweet touch. Both options give your cheesecake a new twist that chocolate lovers will adore. If you need a gluten-free option, use gluten-free cookies for the base. Many brands offer tasty gluten-free biscuits. Check the label to be sure. This way, everyone can enjoy this delicious treat without worry. Make sure to use gluten-free cream cheese and whipped cream too. For the full recipe, check out the [Full Recipe]. To keep your No-Bake Strawberry Cheesecake fresh, store it in the fridge. Use an airtight container to prevent any odors from mixing in. If you don’t have one, cover the cheesecake tightly with plastic wrap. This keeps it safe and tasty. Your cheesecake stays fresh in the fridge for about 3 to 5 days. After that, the texture may change, and the flavor might fade. Keep an eye on any signs of spoilage, like a sour smell or discoloration. Yes, you can freeze No-Bake Strawberry Cheesecake. Wrap it well in plastic wrap and then foil. This keeps out air and prevents freezer burn. It can last up to 3 months in the freezer. When ready to eat, thaw it in the fridge for a few hours. Enjoy the creamy goodness! For the full recipe, check out the details above. Baked cheesecakes use heat to set the filling. This process gives a dense, rich texture. No-bake cheesecakes rely on cold temperatures to firm up. They often taste lighter and creamier. Baked cheesecakes need time in the oven, while no-bake ones chill in the fridge. This makes no-bake cheesecakes quicker to prepare. To make your cheesecake firmer, try these tips: - Use full-fat cream cheese. This adds richness and firmness. - Add gelatin to the filling. Dissolve it in water and mix it in. - Chill the cheesecake longer. Let it set overnight for the best results. - Avoid overmixing the cream cheese. This keeps air out and helps it firm up. Yes, you can use frozen strawberries. Just thaw them first and drain excess liquid. The flavor will still be great, but the texture may change slightly. Fresh strawberries give a firmer bite and vibrant look. For best results, try to use fresh strawberries in the recipe. For the full recipe, check the main article. No-bake strawberry cheesecake is easy and fun to make. We explored key ingredients, like strawberries and cream cheese, and even how to customize them. I shared step-by-step instructions to help you prepare the base, filling, and assembly. Tips on avoiding common mistakes will guide you to the perfect texture. With various topping options, you can get creative. Finally, proper storage keeps your cheesecake fresh longer. Remember, this dessert is versatile, so don't hesitate to experiment. Enjoy every bite of your delicious creation!](https://dailydishly.com/wp-content/uploads/2025/06/5274bd3f-8d96-4968-97f1-1841490db53b-768x768.webp)


