If you’re looking for a simple and tasty way to enjoy veggies, you’re in the right place! Grilled veggie kabobs are colorful, flavorful, and easy to make. In this guide, I will share the best ingredients, step-by-step instructions, and tips to grill the perfect kabobs. You’ll impress your family and friends while serving up healthy meals. Get ready to fire up the grill and taste the goodness of fresh veggies on a stick!
Ingredients
Essential Vegetables for Grilled Veggie Kabobs
To make the best grilled veggie kabobs, choose vibrant and fresh vegetables. Here’s a list of my top picks:
– 1 bell pepper (any color), cut into 1-inch pieces
– 1 zucchini, sliced into rounds
– 1 yellow squash, sliced into rounds
– 1 red onion, cut into wedges
– 8 cherry tomatoes
– 1 cup mushrooms, cleaned and stems removed
These vegetables not only taste great but also add color to your dish. You can mix and match based on what you love or what’s in season.
Recommended Marinade Ingredients
A good marinade brings your kabobs to life. Here’s what I use:
– 3 tablespoons olive oil
– 2 cloves garlic, minced
– 1 teaspoon smoked paprika
– 1 teaspoon dried oregano
– Salt and pepper to taste
This marinade enhances the flavors of the veggies. The olive oil helps them grill nicely, while the spices add a lovely kick.
Skewer Options: Wooden vs. Metal
When it comes to skewers, you can choose between wooden and metal. Here are the pros of each:
– Wooden Skewers: Soak them in water for 30 minutes. This prevents burning. They are great for a rustic look.
– Metal Skewers: No soaking needed. They are durable and reusable. They also help cook the veggies evenly.
Pick the type that works best for you. Both will hold your tasty veggies just fine!
Step-by-Step Instructions
Preparation of Vegetables
Start by washing all your vegetables. Cut the bell pepper into 1-inch pieces. Slice the zucchini and yellow squash into rounds. Then, cut the red onion into wedges. Keep the cherry tomatoes whole and clean the mushrooms by removing the stems. Arrange all your cut veggies on a large plate. This makes it easier to grab them as you assemble the kabobs.
Marinating Process for Flavorful Kabobs
Next, grab a large bowl. Pour in 3 tablespoons of olive oil. Add 2 minced garlic cloves, 1 teaspoon of smoked paprika, and 1 teaspoon of dried oregano. Sprinkle in some salt and pepper. Whisk everything together until it’s mixed well. Now, add your prepared vegetables to the bowl. Toss them gently so every piece gets coated in that tasty marinade. Let the veggies sit for 15 minutes. This helps them soak up the flavors.
Grilling Techniques for Perfectly Cooked Veggies
Before grilling, if you’re using wooden skewers, soak them in water for at least 30 minutes. This keeps them from burning. Preheat your grill to medium-high heat. Now, take the marinated veggies and thread them onto the skewers. Mix the colors for a nice look. Place the skewers on the grill. Cook them for about 10-15 minutes. Make sure to turn them occasionally. Look for tender veggies with nice grill marks. When done, let them rest for a couple of minutes before serving. Enjoy your grilled veggie kabobs with your choice of dip!
Tips & Tricks
How to Soak Wooden Skewers Properly
Soaking wooden skewers helps prevent them from burning on the grill. Place your skewers in a bowl of water. Let them soak for at least 30 minutes. This simple step makes a big difference when grilling. It keeps your kabobs intact and adds no flavor.
Optimal Grill Temperature and Cooking Time
For the best grilled veggie kabobs, set your grill to medium-high heat. This temperature helps the veggies cook evenly. Preheat the grill for about 10 minutes before adding the kabobs. Grill the skewers for 10-15 minutes. Turn them occasionally for even cooking. Look for tender veggies with nice grill marks.
Techniques for Even Cooking
To ensure even cooking, cut your veggies into similar sizes. This helps them cook at the same rate. When threading the veggies onto the skewers, alternate between different types. This not only looks pretty but also helps flavors mix well. If you have thicker pieces, place them on the edges where they get more heat.
Variations
Different Vegetable Combinations
You can mix and match your veggies for grilled kabobs. Try adding eggplant or asparagus for a new taste. Sweet corn cut into chunks adds a fun crunch. Carrots, sliced thin, give a nice color too. Use your favorite seasonal veggies for the best flavor. Remember, the more colors, the better your kabobs look!
Adding Protein: Tofu or Chicken Options
To make these kabobs heartier, add protein. Tofu works well and absorbs flavors nicely. Cut firm tofu into cubes and marinate it like the veggies. If you prefer chicken, use boneless, skinless pieces cut into cubes. Marinate the chicken with the same mix for a tasty twist. Both options make these kabobs more filling and satisfying.
Flavor Twist: Try Different Marinades
Switching up the marinade can change everything. You can use soy sauce for an Asian flair. A citrus-based marinade adds bright notes. Try balsamic vinegar for a sweet and tangy taste. Experiment with herbs like rosemary or thyme for a fresh kick. Each marinade will give your kabobs a unique flavor.
Storage Info
Best Practices for Storing Leftover Kabobs
After enjoying your grilled veggie kabobs, store any leftovers properly. First, let them cool to room temperature. Then, place them in an airtight container. This keeps them fresh and tasty. You can store the kabobs in the fridge for up to three days. If you want to enjoy them later, freezing is a great option.
Reheating Tips for Grilled Veggie Kabobs
To reheat your kabobs, use the oven or skillet. Preheat the oven to 350°F (175°C). Place the kabobs on a baking sheet and cover them with foil. Heat for about 10-15 minutes. If using a skillet, add a splash of water to prevent sticking. Heat over medium until warm. This will keep the veggies tender and flavorful.
Freezing Suggestions for Meal Prep
Freezing kabobs is easy and great for meal prep. First, make sure the kabobs are fully cooled. Then, wrap each kabob in plastic wrap. Place them in a freezer-safe bag or container. They can last up to three months in the freezer. When you’re ready to eat, thaw them overnight in the fridge before reheating. Enjoy your delicious grilled veggie kabobs anytime!
FAQs
What type of grill is best for cooking veggie kabobs?
A gas grill or charcoal grill works best for veggie kabobs. Gas grills heat evenly and are easy to control. Charcoal grills give a nice smoky flavor. If you are using a grill pan, make sure it gets hot enough. This helps to sear the veggies well.
Can I prepare the kabobs ahead of time?
Yes, you can prepare kabobs ahead of time. You can cut the veggies and marinate them a few hours before cooking. Just keep them in the fridge. This helps the flavors mix well. If you want, you can also thread them onto skewers in advance. Just make sure to store them in a cool place until ready to grill.
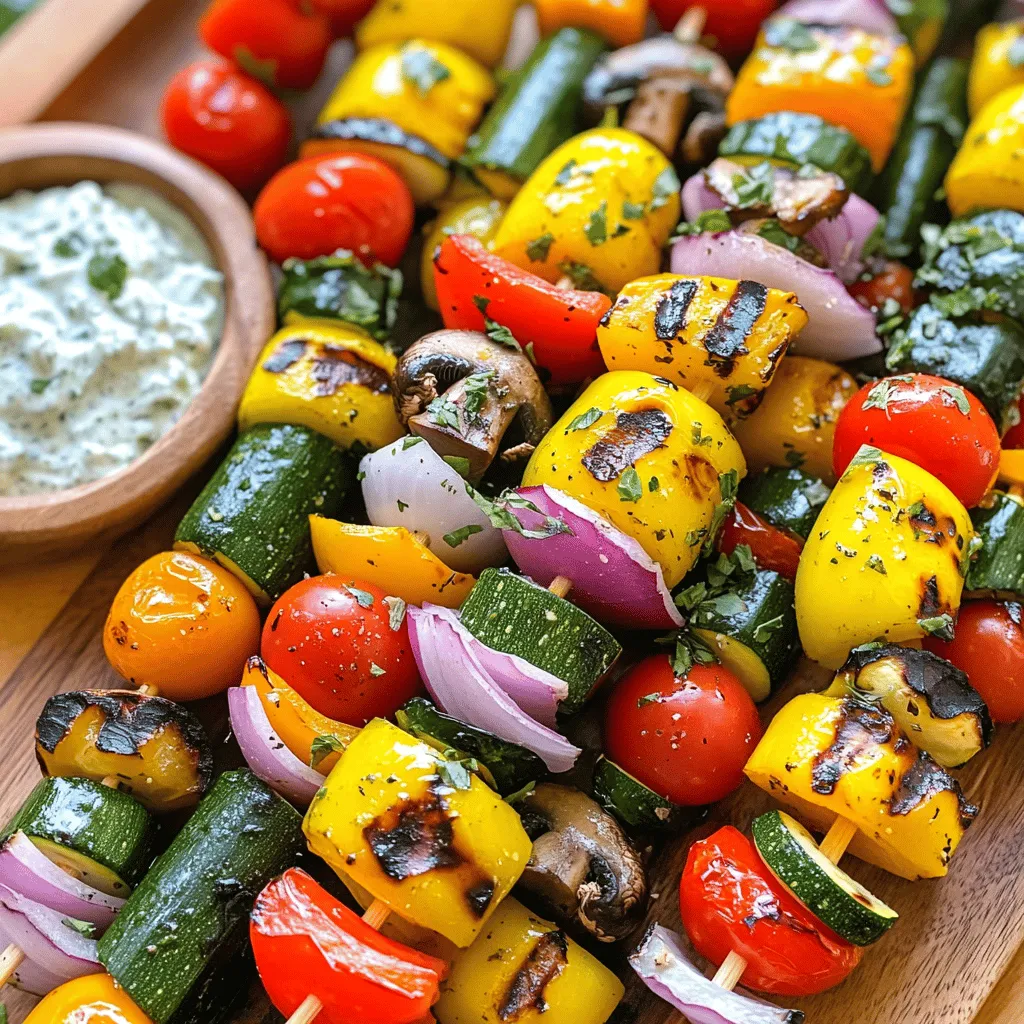
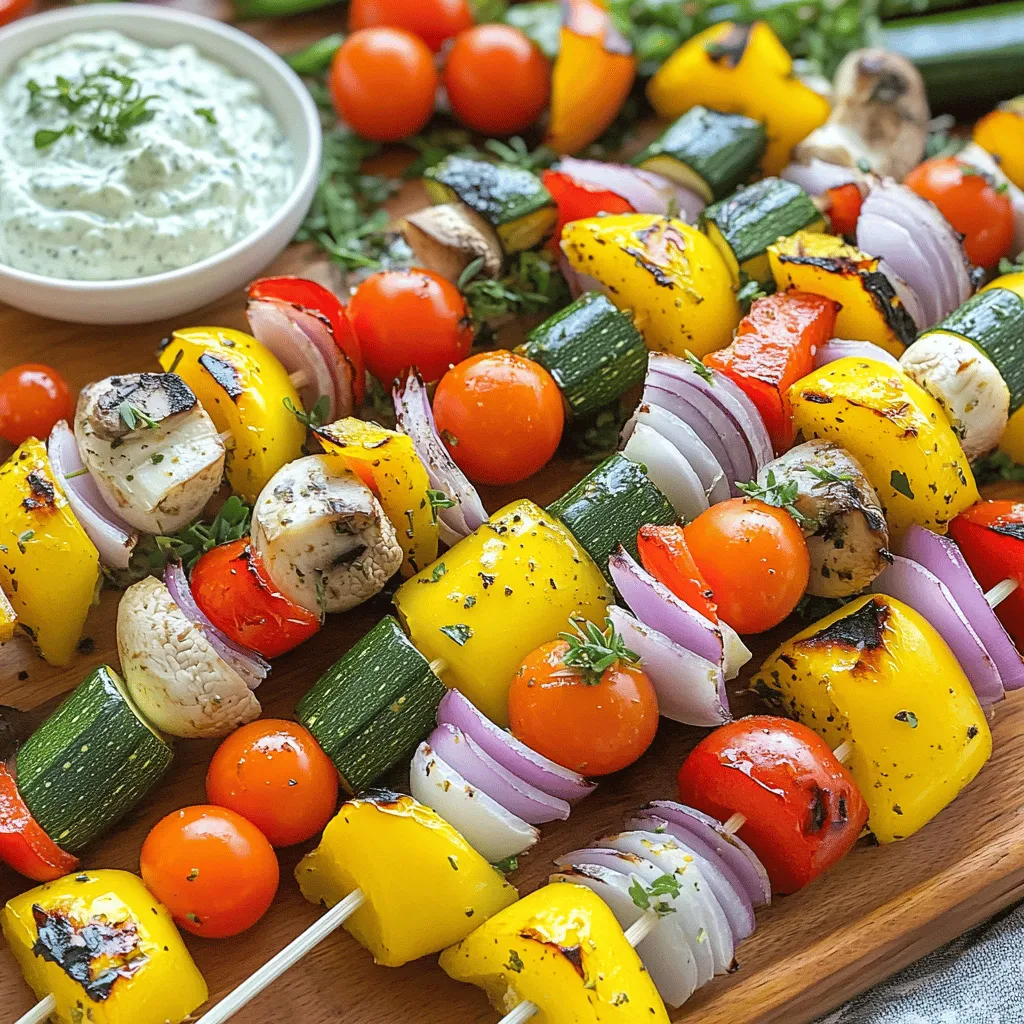
What dips pair well with grilled veggie kabobs?
Grilled veggie kabobs taste great with many dips. Here are some good options:
– Tzatziki: A yogurt dip with cucumber and garlic.
– Hummus: A creamy dip made from chickpeas.
– Baba ghanoush: A dip made from roasted eggplant.
– Green goddess: A fresh herb dip.
These dips add creaminess and flavor to the meal.
Are grilled veggie kabobs suitable for vegetarian diets?
Yes, grilled veggie kabobs are perfect for vegetarians. They are made from fresh vegetables and can include tofu or mushrooms for extra texture. This dish is colorful and full of nutrients. It’s a great way to enjoy a healthy meal.
How do I know when the vegetables are done grilling?
You can tell the veggies are done when they are tender and have grill marks. The cooking time is usually about 10 to 15 minutes. You should turn the skewers occasionally to cook them evenly. If you poke a vegetable and it feels soft, it is ready to eat.Soak wooden skewers in water for at least 30 minutes. This helps prevent burning on the grill.
2. In a large bowl, mix olive oil, minced garlic, smoked paprika, oregano, salt, and pepper. Whisk until well combined.
3. Add the veggies to the bowl: bell pepper, zucchini, yellow squash, red onion, cherry tomatoes, and mushrooms. Toss gently to coat them with the marinade. Let them sit for at least 15 minutes.
4. Preheat your grill to medium-high heat.
5. Thread the marinated veggies onto the skewers. Alternate between the different veggies for a colorful look.
6. Place the skewers on the grill. Cook for about 10-15 minutes, turning them so they cook evenly. Look for nice grill marks and tender veggies.
7. Remove the kabobs from the grill. Let them rest for a couple of minutes before you serve.
Serving Suggestions
Serve your grilled veggie kabobs on a platter. Sprinkle fresh herbs like parsley or basil on top. For a fresh touch, offer tzatziki or yogurt dip on the side. These kabobs pair well with a light salad or warm pita bread. Enjoy the vibrant flavors!
In this post, we covered how to make grilled veggie kabobs. We discussed essential vegetables, marinades, and skewer options. I shared steps for prepping, marinating, and grilling for great taste. Helpful tips like soaking wooden skewers and cooking times were also included. You can create tasty variations by adding proteins or different veggie combos. Lastly, we shared storage and reheating tips to keep leftovers fresh. Now, you’re set to impress with delicious grilled kabobs! Enjoy your cooking adventures!


