Harvest Quinoa Salad with Roasted Squash Delight

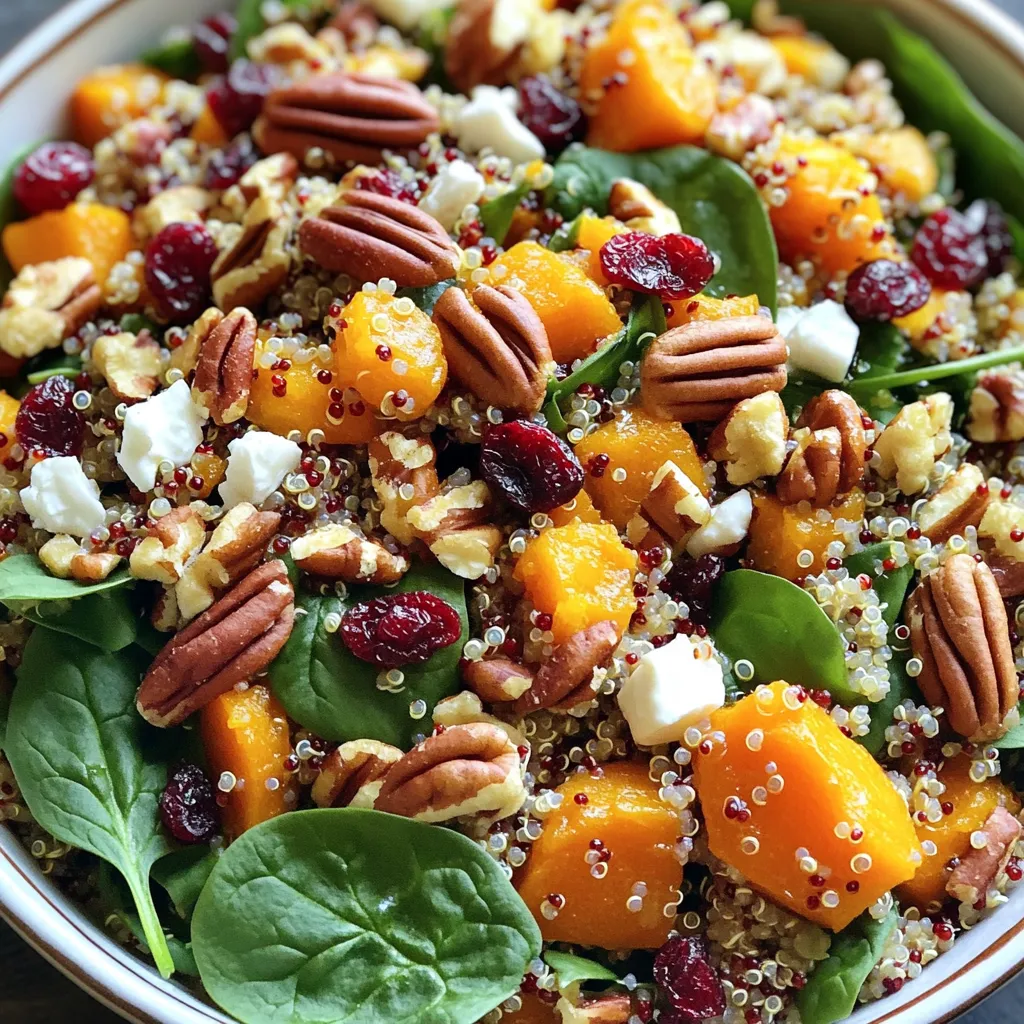
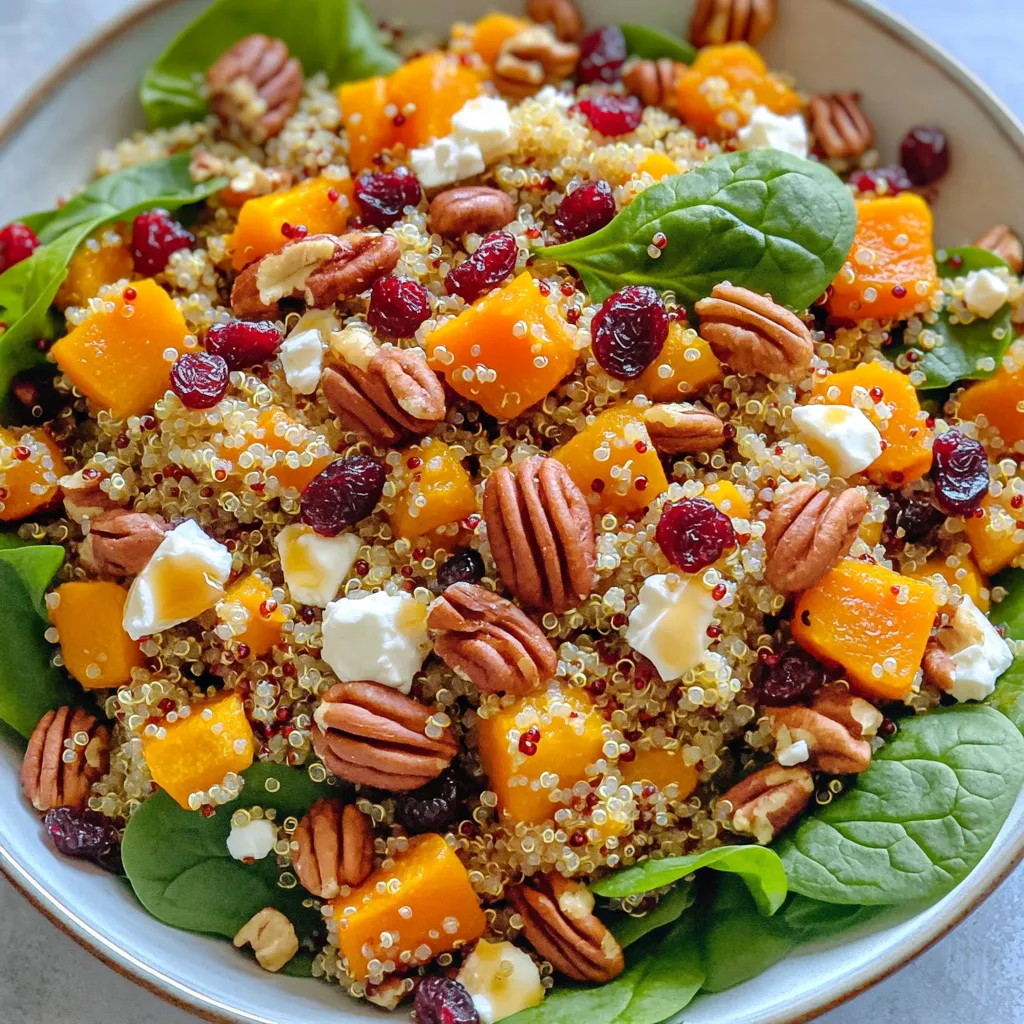
Get ready to enjoy the flavors of fall with my Harvest Quinoa Salad with Roasted Squash Delight! This dish combines healthy quinoa, sweet butternut squash, and tangy feta for a burst of taste. It’s packed with nutrients and is easy to make. Whether you’re preparing a cozy dinner or a festive gathering, this salad will impress your guests and satisfy your cravings. Let’s dive into making this tasty dish with step-by-step instructions!
Ingredients
List of Ingredients
– 1 cup quinoa, rinsed
– 2 cups vegetable broth
– 1 small butternut squash, peeled and cubed
– 2 tablespoons olive oil
– Salt and pepper to taste
– 1 teaspoon ground cinnamon
– 1/2 cup dried cranberries
– 1/2 cup feta cheese, crumbled
– 1/4 cup chopped pecans, toasted
– 1/4 cup red onion, finely chopped
– 2 cups baby spinach
– 2 tablespoons apple cider vinegar
– 1 tablespoon maple syrup
Nutritional Information
This hearty salad packs a nutritious punch. Each serving has about 350 calories. It has around 15 grams of fat, 10 grams of protein, and 50 grams of carbohydrates. The healthy fats come from olive oil and pecans, while quinoa boosts protein content. Add dried cranberries for a sweet touch and fiber.
Eating this salad gives you a great mix of nutrients. Quinoa is a complete protein, meaning it has all nine essential amino acids. The butternut squash adds vitamins A and C. The spinach provides iron and calcium. This dish is perfect for a light lunch or dinner.
Step-by-Step Instructions
Preparation Steps for Quinoa
1. First, boil 2 cups of vegetable broth in a medium pot.
2. Once boiling, add 1 cup of rinsed quinoa.
3. Reduce the heat to low and cover the pot.
4. Let it simmer for about 15 minutes until all the liquid absorbs.
5. Fluff the quinoa with a fork and set it aside to cool.
Roasting Butternut Squash
1. Preheat your oven to 400°F (200°C).
2. Line a baking sheet with parchment paper.
3. Toss the cubed butternut squash with 1 tablespoon of olive oil, salt, pepper, and 1 teaspoon of ground cinnamon.
4. Spread the seasoned squash on the baking sheet in a single layer.
5. Roast the squash for 25 to 30 minutes. Toss it halfway for even cooking.
Combining Ingredients
1. In a large bowl, mix the cooked quinoa with the roasted squash.
2. Add in 1/2 cup of dried cranberries, 1/2 cup of crumbled feta cheese, and 1/4 cup of chopped pecans.
3. Mix in 1/4 cup of finely chopped red onion and 2 cups of baby spinach.
Making the Dressing
1. In a small bowl, whisk together the remaining tablespoon of olive oil, 2 tablespoons of apple cider vinegar, and 1 tablespoon of maple syrup.
2. Pour the dressing over the quinoa salad.
3. Gently toss everything until well mixed. Adjust seasoning if needed.
Tips & Tricks
Perfecting the Quinoa
To make great quinoa, start by rinsing it well. Place the quinoa in a fine mesh strainer. Rinse it under cold water for about 1-2 minutes. This removes the bitter coating called saponin. After rinsing, it’s time to cook.
Once the quinoa is cooked, fluff it for the best texture. Use a fork to gently stir the quinoa. This helps separate the grains, making them light and fluffy.
Roasting Techniques
Roasting the butternut squash brings out its natural sweetness. To achieve caramelization, cut the squash into even cubes. Toss the cubes with olive oil, salt, and cinnamon. Spread them in a single layer on the baking sheet. This allows them to roast evenly.
For even roasting, toss the squash halfway through cooking. This ensures all sides get that perfect golden color. Keep an eye on them. You want them tender and slightly browned.
Serving Suggestions
Garnishing your salad makes it pop! Add extra pecans and a sprinkle of feta on top. This not only looks nice but adds more flavor. You can also add fresh spinach leaves for a splash of color.
When serving, use a large, shallow bowl. This allows everyone to see the beautiful layers of the salad. Enjoy your Harvest Quinoa Salad fresh or after chilling for 30 minutes. This helps the flavors blend nicely.

Variations
Ingredient Swaps
You can easily swap ingredients in this harvest quinoa salad. Here are some fun ideas:
– Substitute with other grains: Instead of quinoa, try farro, bulgur, or brown rice. Each grain adds a unique texture.
– Cheese alternatives: If you want to skip feta, use goat cheese, or leave it out for a vegan option.
Additional Flavor Enhancements
Boost the flavor of your salad with these simple changes:
– Spices and herbs to try: Add a dash of nutmeg or thyme for extra warmth. Fresh herbs like parsley or cilantro can also brighten the dish.
– Switch up the dressing: Instead of apple cider vinegar, use balsamic vinegar for a sweet twist. You can also add a squeeze of lemon juice for freshness.
Storage Info
Storing Leftovers
To keep your Harvest Quinoa Salad fresh, refrigerate it right away. Place it in an airtight container. This helps lock in moisture and flavor. Make sure the salad cools before sealing the container. Glass or BPA-free plastic containers work best for storage.
Shelf Life
You can keep the salad in the fridge for up to three days. After that, the ingredients may lose freshness. Check for any signs of spoilage before eating. If it looks or smells off, throw it away.
Freezing Options
Freezing this salad is a bit tricky. Quinoa can freeze well, but the veggies may not. If you want to freeze it, separate the dressing and salad. Place the salad in a freezer-safe bag or container. Press out as much air as possible. To thaw, move it to the fridge overnight. When ready, mix in the fresh dressing for best taste.
FAQs
Can I make this salad ahead of time?
Yes, you can prepare this salad ahead of time. You can cook the quinoa and roast the butternut squash a day in advance. Store them in the fridge. When ready to serve, just mix everything together. This allows the flavors to meld beautifully.
What can I use instead of butternut squash?
If you do not have butternut squash, you can use sweet potatoes or pumpkin. Both options add a sweet flavor. You can also try roasted carrots for a different twist.
Is this salad gluten-free?
Yes, this salad is gluten-free. Quinoa is a great grain for those avoiding gluten. Just make sure to check your vegetable broth for gluten-free labeling.
Can I serve this salad warm?
Absolutely! You can serve this salad warm or cold. If you prefer it warm, mix the roasted squash and quinoa right after cooking. It makes a cozy meal.
How can I make it vegan?
To make this salad vegan, simply leave out the feta cheese. You can add more nuts or seeds for extra protein. Nutritional yeast can also give a cheesy flavor without dairy.
This blog post covered a tasty quinoa salad with roasted butternut squash. We explored key ingredients, preparation steps, and tips for perfecting the dish. I shared ways to store leftovers and offered fun variations to mix it up.
You can enjoy this salad warm or cold. Each bite is packed with flavor and nutrients. So grab your ingredients and try this recipe today. You won’t regret it!


![To make this dish, you need a few key items. Here is what you’ll need: - 1 pound large shrimp, peeled and deveined - 4 tablespoons unsalted butter - 4 cloves garlic, minced - 1 teaspoon red pepper flakes (adjust to taste) - 1 lemon, zested and juiced - 1/4 cup chicken broth or vegetable broth - 8 ounces linguine or spaghetti - 1/4 cup fresh parsley, chopped - Salt and pepper to taste - Lemon wedges, for serving These ingredients create a rich and tasty sauce that makes the shrimp shine. You will need some tools to help you cook this dish well. Here are the main ones: - Large skillet - Pot for boiling pasta - Colander for draining pasta - Zester or grater for the lemon - Cutting board and knife for garlic and parsley Having these tools makes cooking easier and more fun. If you don't have some ingredients, don't worry! Here are a few swaps you can try: - Shrimp: Use scallops or chicken if you prefer. - Butter: Olive oil can replace butter for a lighter option. - Pasta: Any pasta works, like penne or fettuccine. - Broth: Water can work, but broth adds more flavor. These substitutions help you customize the dish to your taste while keeping it delicious. First, fill a large pot with water. Add salt to the water to season it. Bring the water to a boil over high heat. Add 8 ounces of linguine or spaghetti. Cook according to the package instructions until it is al dente. This usually takes about 8-10 minutes. Once cooked, drain the pasta and set it aside. Make sure to save a little pasta water for later. In a large skillet, melt 2 tablespoons of unsalted butter over medium heat. Wait until it is completely melted. Then, add 4 cloves of minced garlic and 1 teaspoon of red pepper flakes to the skillet. Stir the mixture and sauté for 1-2 minutes. Watch the garlic closely to prevent it from burning. When it smells fragrant, it’s ready for the shrimp. Add 1 pound of peeled and deveined large shrimp to the skillet. Sprinkle salt and pepper over the shrimp to season it. Cook the shrimp for about 3-4 minutes on each side. They should turn pink and opaque when done. After cooking, pour in 1/4 cup of chicken broth and the juice and zest of 1 lemon. Stir everything together and let it simmer for 2-3 minutes. This step helps the flavors meld perfectly. Finally, reduce the heat to low, add the remaining 2 tablespoons of butter, and stir until it melts and makes a glossy sauce. Toss in the cooked pasta and mix well, adding a splash of reserved pasta water if the sauce seems too thick. Stir in 1/4 cup of chopped parsley for a fresh touch. Serve hot with lemon wedges on the side. This dish comes together quickly, making it a great option for busy nights. For the complete recipe, refer to the [Full Recipe]. To cook shrimp well, start with fresh or thawed shrimp. Pat them dry to avoid too much water in the pan. Heat your skillet over medium heat and add butter. Once the butter melts, add the shrimp. Cook for 3-4 minutes on each side. Look for a pink color and opaque texture. This tells you the shrimp are done. Overcooked shrimp become rubbery, so watch closely. If you like spice, add more red pepper flakes. Start with one teaspoon, then taste. You can always add more. For less heat, skip the flakes or use just a pinch. A squeeze of lemon juice can balance the spice. It adds zest without heat. Adjusting spice makes the dish yours. Fresh garlic is key to great flavor. Use a sharp knife to chop or mince garlic cloves. For a stronger taste, mince them finely. You can also use a garlic press for ease. Heat the garlic in butter until fragrant, but don’t let it burn. Burned garlic tastes bitter and ruins the dish. For the full recipe, check out the Garlic Butter Shrimp Scampi section. {{image_2}} You can switch shrimp for many other proteins. Chicken is a great choice. Use boneless chicken thighs or breasts for a hearty dish. Just adjust the cooking time. Another option is scallops. They cook fast and add a sweet flavor. You can also try fish like tilapia or cod. Just remember, cooking times will vary based on the protein you choose. Adding veggies boosts flavor and nutrition. Try spinach for a fresh taste. It wilts nicely and blends well with the sauce. Cherry tomatoes add a pop of color and sweetness. You can also use asparagus or bell peppers. Sauté them with garlic for extra taste. Feel free to mix and match based on your favorites. While linguine is classic, you can use any pasta you like. Spaghetti works well too. For a twist, try penne or fettuccine. You can even use whole wheat or gluten-free pasta. Each type gives a unique texture and flavor. Just cook according to package directions for the best results. For a full recipe, check out the Garlic Butter Shrimp Scampi 🧄! Store any leftover garlic butter shrimp scampi in an airtight container. Make sure to let it cool first. Place it in the fridge. This dish can stay fresh for up to three days. To reheat, use a skillet over low heat. Add a splash of broth or water to prevent drying. Stir often until heated through. You can also use a microwave. Heat it in short bursts, stirring in between. You can freeze garlic butter shrimp scampi, but shrimp is best fresh. If you decide to freeze it, use a freezer-safe bag. Remove as much air as possible. Label it with the date. It will last for about two months. Thaw in the fridge overnight before reheating. Enjoy the Full Recipe for the perfect shrimp scampi! Garlic butter shrimp scampi lasts about 2-3 days in the fridge. Store it in an airtight container. When you reheat it, do so gently. This will keep the shrimp tender and the flavors intact. Yes, you can use frozen shrimp for this dish. Just thaw them first. Place the frozen shrimp in cold water for about 15-20 minutes. After thawing, they will cook just as well as fresh shrimp. You can serve garlic butter shrimp scampi with various sides. Here are some great options: - Crusty bread to soak up the sauce - A fresh green salad for crunch - Garlic bread for extra flavor - Steamed vegetables for a healthy touch These pairings enhance the meal and make it more satisfying. For the full recipe, check out the complete guide! Garlic butter shrimp scampi is a tasty dish you can cook at home. We covered key ingredients, tools, and steps to make this meal. I shared tips for cooking shrimp and ways to change the recipe. Proper storage and reheating tips help keep your leftovers fresh. Enjoy experimenting with variations and flavors. This dish is simple and fun to make. With practice, you’ll impress everyone at your table. Happy cooking!](https://dailydishly.com/wp-content/uploads/2025/06/9dcab216-770d-481a-a268-3e480fcb1d58-768x768.webp)
![To make a delicious Margherita pizza, you need the following items: - 2 cups all-purpose flour - 1 teaspoon active dry yeast - ¾ cup warm water (about 110°F) - 1 teaspoon sugar - 1 teaspoon salt - 1 tablespoon olive oil These ingredients create a perfect dough. The flour gives it structure, while the yeast helps it rise. The sugar feeds the yeast, and the salt adds flavor. For the toppings, gather these simple ingredients: - 1 cup canned San Marzano tomatoes, crushed - 1 cup fresh mozzarella cheese, sliced - Fresh basil leaves (about 8-10 leaves) - Salt and pepper to taste - Extra olive oil for drizzling San Marzano tomatoes are sweeter and richer in taste. Fresh mozzarella melts beautifully, and basil adds a fragrant touch. The salt and pepper boost the flavors, while olive oil gives a nice finish. This combination makes the pizza flavorful and fresh, just like you would find in Italy. For the full recipe, check out the details above. - Combine warm water, sugar, and yeast. Let it foam for about 5-10 minutes. - Mix flour and salt in a bowl. Create a well in the center, then add the yeast mixture. - Knead the dough on a floured surface until it's smooth and elastic, about 8-10 minutes. - Shape the dough into a ball. Place it in an oiled bowl and cover it with a damp cloth. - Preheat your oven to its highest setting, usually between 475°F and 500°F. - Prepare the sauce using crushed San Marzano tomatoes. Season it with salt and pepper. - After the dough rises, punch it down. Shape it into a 12-inch round. - Transfer the dough to a pizza peel or baking sheet. Spread the sauce thinly over the dough. - Evenly place slices of fresh mozzarella on top of the sauce. Tear fresh basil leaves and sprinkle them over the cheese. - Bake the pizza in the oven for about 10-12 minutes. Look for a golden crust and bubbling cheese. Use the Full Recipe for detailed steps and measurements to create this classic dish! To make great dough, you want it elastic but not sticky. When you knead, aim for about eight to ten minutes. This builds the right texture. If the dough feels too wet, add a bit more flour. If it’s too dry, a splash of water helps. The goal is a smooth and stretchy dough. For the sauce, use high-quality San Marzano tomatoes. They make a big difference in taste. Crush them gently, and add salt and pepper to enhance the flavor. Be careful not to overload your pizza with toppings. Less is more for a perfect bake. This lets the dough rise and crisp up nicely. A pizza stone is a fantastic tool for a crispier crust. Preheat it in the oven to get it really hot. If you don’t have one, a baking sheet works too. Just keep an eye on your pizza while it bakes. You might need to adjust the baking time based on your oven and your taste. Aim for a golden crust and bubbling cheese for the best results. Using these tips will help you craft a classic Margherita pizza that impresses. For the full recipe, check out our detailed instructions and ingredient list. {{image_2}} You can make your Margherita pizza even better by trying different cheeses. Burrata adds a creamy texture that melts beautifully. Smoked mozzarella brings a rich, savory flavor. Both options will change the taste while keeping it classic. Don’t be afraid to get creative with toppings. Arugula adds a peppery bite that pairs well with the cheese. Prosciutto gives a salty, savory kick. A drizzle of truffle oil can elevate the dish with its earthy aroma. These changes can delight your taste buds while keeping the pizza true to its roots. If you want to mix things up, consider using different sauces. Pesto offers a fresh, herbal twist that complements the cheese. White sauce can add a creamy richness that contrasts nicely with the crust. These variations keep the spirit of Margherita while letting you explore new flavors. For the full recipe, check out the [Full Recipe] section! Store your leftover pizza in the refrigerator. Use an airtight container to keep it fresh. It will stay good for up to 3 days. This way, you can enjoy your pizza a bit longer. Want to save pizza for later? You can freeze unbaked pizza for easy meals. Wrap it tightly in plastic wrap and then in foil. This keeps the flavors intact for future enjoyment. To reheat your pizza, the oven is the best choice. Set it to 375°F and bake for about 10 minutes. This method keeps the crust crispy and the cheese melty. If you're in a hurry, use a skillet. Heat it on medium-low for quicker results. Just cover it with a lid to warm the toppings evenly. Margherita pizza comes from Naples, Italy. It was created in 1889 for Queen Margherita of Savoy. The colors of the pizza match the Italian flag: red tomatoes, white mozzarella, and green basil. This dish is simple but full of flavor. It shows how good food can be made from just a few fresh ingredients. To make gluten-free Margherita pizza, use gluten-free flour. You can mix it with xanthan gum for better texture. Here’s a simple list of gluten-free ingredients: - 2 cups gluten-free flour - 1 teaspoon active dry yeast - ¾ cup warm water - 1 teaspoon sugar - 1 teaspoon salt - 1 tablespoon olive oil Follow the same steps as the regular recipe, and you’ll have a tasty gluten-free pizza. Yes, you can make Margherita pizza without a pizza stone. You can use a baking sheet instead. Just preheat the baking sheet in the oven. It helps to create a nice crust. Place the assembled pizza on the hot sheet and bake as directed. You may also use a cast-iron skillet for a crispy base. An authentic Margherita pizza has key elements. It uses San Marzano tomatoes, fresh mozzarella, and basil. The dough must be hand-stretched and thin. The pizza should be baked at a high temperature for a short time. This method creates a soft inside and crisp outside. This recipe yields 2 to 4 servings. It depends on how big you slice the pizza. If you want more, just double the ingredients. You can also make smaller pizzas for a fun meal with friends or family. The number 19 is special because it refers to the recipe's order in this article. Each recipe is numbered for easy reference. In this case, Margherita pizza is recipe number 19. It highlights the importance of classic dishes in my collection. Classic Margherita pizza combines simple ingredients for a delightful dish. You learned the essential components, from fresh basil to San Marzano tomatoes. Following clear steps, you can create perfect dough and rich toppings. Remember to use quality ingredients for the best taste. Feel free to experiment with variations and storage tips. Making this pizza at home is rewarding and fun. Enjoy the process, and savor the delicious results every time.](https://dailydishly.com/wp-content/uploads/2025/06/379b831d-c22e-427f-bef4-29b7c3a1d548-768x768.webp)

![- 1 lb sea scallops, patted dry - 4 tablespoons unsalted butter, divided - 4 cloves garlic, minced - Zest of 1 lemon - 2 tablespoons fresh lemon juice - 2 tablespoons fresh parsley, chopped - Salt and pepper, to taste - Lemon wedges, for garnish Using fresh ingredients makes a big difference in your dish. The sea scallops should be the star. Buy them from a trusted source. Look for ones that are firm and smell fresh. Butter adds richness. Use unsalted butter to control the salt. Garlic gives a fragrant punch. Mince it well, so it spreads evenly. Lemon zest gives bright flavor. It enhances the scallops. Fresh lemon juice adds tang. Fresh parsley brings color and flavor. Use it for garnish, but also mix it in for freshness. Don’t forget salt and pepper for seasoning. Adjust these to your taste. Lastly, lemon wedges are perfect for serving. They provide an extra squeeze of flavor. For the full recipe and instructions, check out the complete guide. First, you need to pat dry the scallops. Use a paper towel to soak up moisture. This step is key for a good sear. Season both sides with salt and pepper. Just a pinch is enough. This adds flavor without overpowering the scallops. Next, choose a large skillet. A non-stick skillet works well. Heat 2 tablespoons of butter over medium-high heat. Wait until it melts and starts to bubble. This shows the pan is hot enough for cooking. Now, place the scallops in the skillet. Make sure they are in a single layer. Avoid overcrowding the pan; this helps them sear better. Cook them for about 2-3 minutes. Look for a golden-brown crust on one side. Gently flip each scallop using tongs. Now, add the minced garlic to the pan. Cook for another 2-3 minutes. Baste the scallops with the melted butter. This keeps them moist and adds flavor. Once the scallops are opaque and firm, it’s time for lemon. Add the zest and juice from the lemon. Then, add the remaining 2 tablespoons of butter. Toss everything gently for one more minute. This combines the flavors well. Finally, remove the skillet from heat. Stir in freshly chopped parsley for a pop of color. This adds freshness to your dish. Transfer the scallops to a serving plate. Drizzle with the garlic lemon butter sauce. Garnish with lemon wedges for a bright touch. For a full guide, check the [Full Recipe]. To get that perfect sear on your scallops, aim for a high heat. The skillet should be hot, but not smoking. A good range is between medium-high and high heat. This helps to form a nice crust. Avoid moving the scallops too soon. Let them cook for 2-3 minutes on one side. If you flip them too early, they might stick. Keep the scallops in a single layer. Overcrowding the pan can cause steaming instead of searing. When choosing scallops, fresh is best. Fresh scallops should smell like the ocean, not fishy. They should look plump and slightly moist. If you must use frozen scallops, make sure they are dry-packed. This means they are frozen without extra water, which helps with flavor. Sourcing scallops may vary by location. Local fish markets often have fresher options. If you can, ask for the catch of the day. This ensures you get the best flavor. To kick up the flavor, consider adding spices. A pinch of cayenne can add heat. Alternatively, try using smoked paprika for a unique twist. Herbs can also enhance the dish. Fresh thyme, tarragon, or basil can pair well. You can mix and match herbs for more depth. A little creativity can make your dish shine. For a full guide, check the Full Recipe of garlic lemon butter scallops. {{image_2}} You can use different herbs to change the flavor of your garlic lemon butter scallops. Consider thyme, tarragon, or basil. Each herb brings a unique taste. Mixing herbs can create even more complex flavors. For instance, thyme and lemon work well together. Tarragon adds a hint of sweetness. Basil offers a fresh and aromatic twist. Experiment to find your favorite blend! You can add vegetables to your dish for extra color and nutrition. Asparagus or spinach pairs nicely with scallops. Simply sauté them in the pan before adding the scallops. This adds a lovely crunch and flavor. If you like a bit of heat, sprinkle in some red pepper flakes. They bring a nice kick without overpowering the dish. Adjust the amount to suit your taste! Pair your scallops with delicious side dishes. A light salad or creamy risotto complements the flavors well. Garlic bread is another great option for scooping up that tasty sauce. For a drink, try a crisp white wine like Sauvignon Blanc. It matches the citrus notes of the dish. You can also go for a light sparkling water with lemon. It refreshes the palate beautifully. To keep your garlic lemon butter scallops fresh, follow these steps: - Refrigeration: Place scallops in an airtight container. This keeps them moist and prevents odors. Store in the fridge for up to two days. - Freezing: For longer storage, freeze scallops. Use a freezer-safe bag or container. Remove as much air as possible to prevent freezer burn. They can last about three months in the freezer. When it’s time to enjoy your leftovers, reheating carefully is key: - Best Methods: Reheat scallops in a skillet over low heat. Add a splash of water or broth to keep them moist. - Avoiding Texture Changes: Do not microwave them. This can make scallops rubbery. Always heat gently to maintain their tender texture. Knowing how long your cooked scallops last is important: - Fridge Duration: Cooked scallops last in the fridge for about two days. Make sure they are stored properly. - Signs of Spoilage: Check for an off smell, slimy texture, or discoloration. If you notice any of these signs, it's best to discard them. You can tell when scallops are cooked by looking for a few signs. They should turn opaque and firm. The outside should have a nice golden-brown crust. The ideal internal temperature for cooked scallops is 125°F (52°C). Use a meat thermometer for accuracy if you have one. Yes, you can use frozen scallops. Thaw them in the fridge overnight for the best results. If you are short on time, you can also place them in cold water for about an hour. When cooking, remember that frozen scallops may need a minute or two longer than fresh ones. Garlic lemon butter scallops pair well with many sides. Try serving them over a bed of creamy risotto or alongside steamed asparagus. You can also add a simple salad for a fresh touch. To elevate the dish, garnish with fresh herbs or a squeeze of lemon juice. To make this recipe dairy-free, swap the butter for a dairy-free alternative, like olive oil or vegan butter. You can still achieve great flavor. For cooking methods, you can sauté the scallops in oil instead of butter. Just make sure to heat the oil until it’s hot enough for a good sear. This article guides you through making delicious garlic lemon butter scallops. You learned about key ingredients, step-by-step cooking techniques, and essential tips for the perfect result. Scallops can be tricky, but with careful attention to detail, you can create a flavorful dish. Remember to choose fresh scallops and experiment with variations. Serving simple sides and wine will enhance your meal. Enjoy your cooking adventure and savor every bite of your creation!](https://dailydishly.com/wp-content/uploads/2025/07/07c4918e-d054-436d-9eed-7a883b9d5641-768x768.webp)

