Honey Garlic Chicken Thighs Flavorful and Easy Recipe

Are you ready to savor a quick and tasty meal? Honey Garlic Chicken Thighs are a must-try! This recipe is simple, flavorful, and sure to impress. With just a few ingredients, you can create a dish that bursts with sweet and savory goodness. Whether you’re cooking for family or friends, these thighs will be the star of the show. Let’s dive into the easy steps and enjoy this delightful meal together!
Why I Love This Recipe
- Sweet and Savory Balance: This recipe perfectly combines the sweetness of honey with the savory depth of soy sauce, creating a delightful flavor profile that pleases the palate.
- Easy to Prepare:
- Crispy Skin: Cooking the chicken thighs in the oven ensures a crispy skin while keeping the meat juicy and tender, making every bite enjoyable.
- Great for Meal Prep: This recipe can be made in advance and stored, making it a convenient option for lunches or quick dinners throughout the week.
Ingredients
To make honey garlic chicken thighs, you need a few simple ingredients. These items will help create the sweet and sticky flavor that makes this dish special.
List of Ingredients
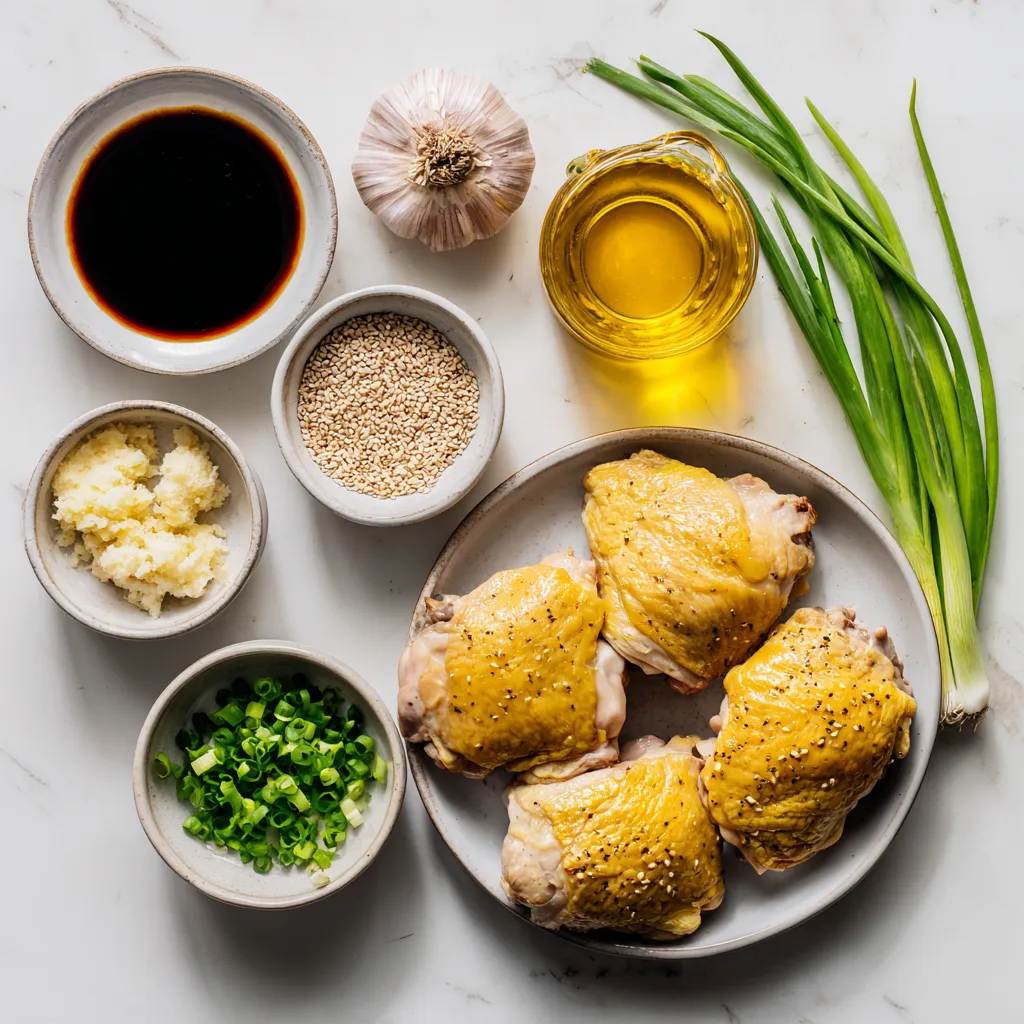
– 6 bone-in, skin-on chicken thighs
– 1/3 cup honey
– 1/4 cup soy sauce (low-sodium preferred)
– 4 cloves garlic, minced
– 1 tablespoon fresh ginger, grated
– 1 tablespoon rice vinegar
– 1 teaspoon sesame oil
– 1/2 teaspoon black pepper
– 2 tablespoons green onions, chopped (for garnish)
– Sesame seeds (for garnish)
I love using bone-in, skin-on chicken thighs for this recipe. The skin helps keep the meat juicy, while the bones add flavor. Honey gives a nice sweetness, and soy sauce adds a bit of salt. Garlic and ginger bring a warm taste that I can’t resist. Rice vinegar adds a nice zing, and sesame oil brings a nutty note. The black pepper gives just a hint of spice.
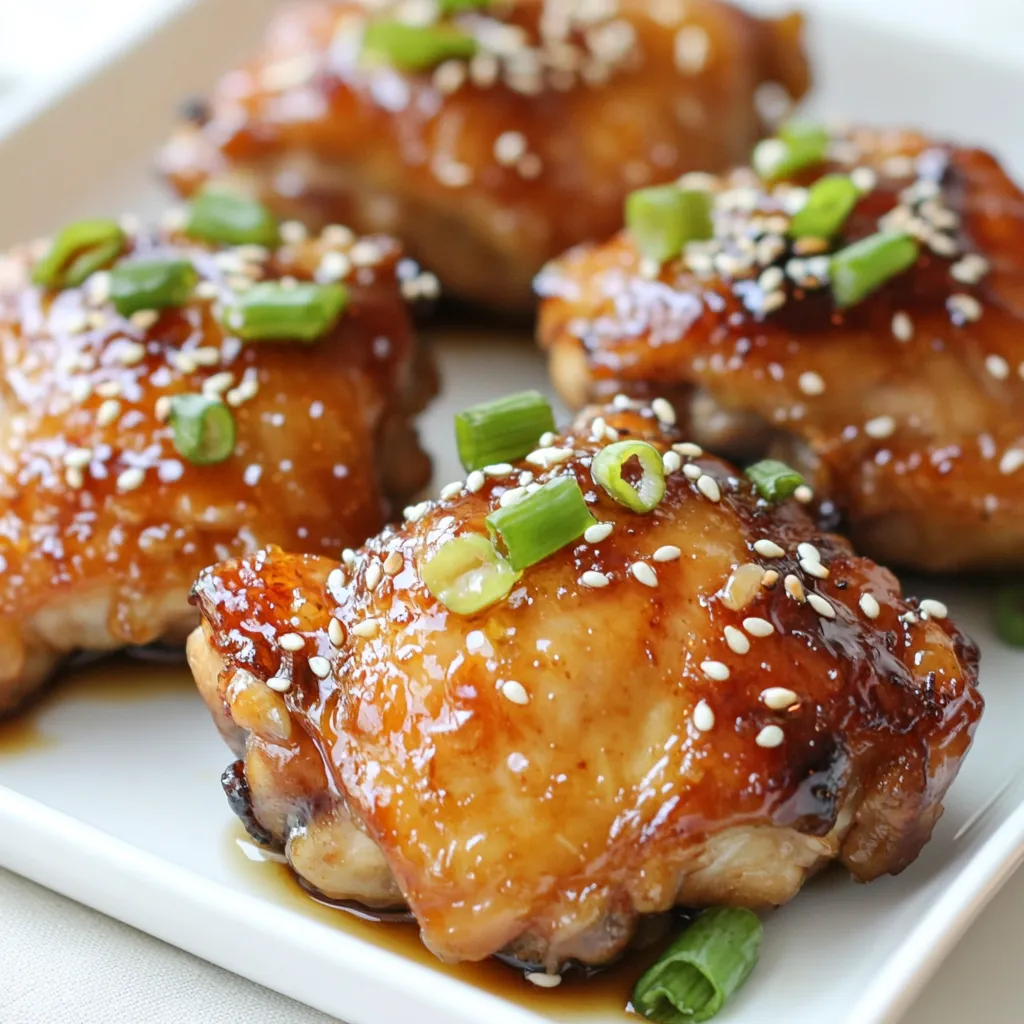
For garnishes, I use green onions and sesame seeds. They add color and texture to the dish, making it look fancy. Keep these ingredients handy, and you will be ready to cook a flavorful meal!

Step-by-Step Instructions
Preparing the Marinade
To start, gather your marinade ingredients. You will need honey, soy sauce, minced garlic, grated ginger, rice vinegar, sesame oil, and black pepper. In a mixing bowl, whisk these together. Make sure they blend well. The honey gives this dish its sweet flavor, while the soy sauce adds depth. Garlic and ginger bring a nice kick. This marinade will make your chicken flavorful and juicy.
Marinating the Chicken
Next, take your chicken thighs. You want to use bone-in, skin-on thighs for the best taste. Place them in a large resealable bag or a shallow dish. Pour the marinade over the chicken. Make sure every piece gets coated well. Seal the bag or cover the dish tightly. Let it sit in the fridge for at least 30 minutes. For a stronger flavor, you can marinate for up to 4 hours. This step is key to making the chicken tender and delicious.
Baking the Chicken
Now, preheat your oven to 400°F (200°C). This temperature is perfect for getting that crispy skin. Take the chicken out of the marinade. Shake off any extra liquid. Place the chicken thighs in a baking dish, skin-side up. Bake them for about 35-40 minutes. You want the internal temperature to reach 165°F (74°C). The skin should look golden and crispy. While the chicken bakes, heat the leftover marinade in a saucepan. Bring it to a boil, then let it simmer for about 5-7 minutes. This will thicken it up. Once the chicken is done, brush it with the glaze. Let it rest for 5 minutes, then garnish with green onions and sesame seeds. Enjoy your tasty honey garlic chicken thighs!
Tips & Tricks
Achieving Perfect Flavor
To get the best flavor, marinate the chicken for at least 30 minutes. If you have more time, go for 4 hours. The longer the chicken sits in the marinade, the better it tastes. The mix of honey, soy sauce, and garlic adds a sweet and savory kick. You can also add a bit of chili for heat if you like spice.
Ensuring Crispy Skin
Crispy skin makes all the difference. Start with bone-in, skin-on chicken thighs. Dry the skin well before cooking. This helps it crisp up nicely. Bake the chicken at 400°F. This high temperature helps render the fat and gives you that crunch. Midway through baking, brush on the thickened glaze. This adds flavor and helps the skin get even crispier.
Adjusting Cooking Times
Cooking times may vary based on your oven. Always check the internal temperature. It should reach 165°F to be safe to eat. If your chicken is larger, it may need a few extra minutes. If you have smaller thighs, check them a bit earlier. Using a meat thermometer can help you avoid overcooking. This way, you keep the chicken juicy and tasty.
Pro Tips
- Marinate Longer for Flavor: For a richer flavor, marinate the chicken thighs for up to 4 hours. This allows the flavors to penetrate deeper into the meat.
- Use a Meat Thermometer: To ensure the chicken is perfectly cooked, use a meat thermometer. The internal temperature should reach 165°F (74°C).
- Broil for Extra Crispiness: If you want even crispier skin, broil the chicken for the last 2-3 minutes of cooking, but watch it closely to prevent burning.
- Save the Marinade: Don’t discard the marinade! Simmer it down to create a delicious glaze to brush on the chicken for added flavor.

Variations
Substitutions for Healthier Options
You can swap some ingredients to make this dish healthier. Use skinless chicken thighs if you want less fat. You can also use honey alternatives like agave syrup or maple syrup. For a lower sodium option, use coconut aminos instead of soy sauce. This change keeps the flavor while cutting down on salt. Fresh herbs can also replace ginger or garlic for a different taste.
Different Cooking Methods (Grilling, Air Frying)
You have many ways to cook honey garlic chicken thighs. Grilling gives them a smoky flavor. Preheat your grill to medium-high heat. Cook the chicken thighs for about 6-8 minutes on each side. Make sure the internal temperature reaches 165°F (74°C). Air frying is quick and easy. Set your air fryer to 375°F (190°C) and cook for 25-30 minutes. Both methods keep the chicken juicy and flavorful.
Flavor Additions and Enhancements
You can boost the taste of your chicken in many fun ways. Try adding red pepper flakes for heat. A squeeze of lime juice adds brightness. You can toss in some veggies like bell peppers or broccoli to roast with the chicken. This adds color and nutrition. Finally, fresh herbs like cilantro or parsley make great garnishes for extra flavor and style.
Storage Info
Refrigerating Leftovers
After cooking, let the chicken cool to room temperature. Place the chicken thighs in an airtight container. You can refrigerate them for up to four days. This helps keep the chicken juicy and tasty. If you have leftover glaze, store it in a separate container.
Freezing Instructions
To freeze, first cool the chicken completely. Wrap each thigh in plastic wrap. Then, place them in a freezer bag. Make sure to remove as much air as possible. This way, the chicken stays fresh for about three months. When you are ready to eat them, thaw in the fridge overnight.
Reheating Tips
For reheating, I suggest using the oven to keep the skin crispy. Preheat your oven to 350°F (175°C). Place the chicken on a baking sheet. Cover with foil to keep moisture in. Heat for about 15-20 minutes. You can also reheat in a microwave, but the skin won’t be as crispy. Just heat on medium power for 2-3 minutes.
FAQs
What is the ideal marinating time for chicken thighs?
The best marinating time is at least 30 minutes. This allows the flavors to soak in. For a richer taste, try marinating for up to 4 hours. Just remember, don’t go overboard. Too long can make the chicken mushy.
Can I use boneless chicken thighs for this recipe?
Yes, you can use boneless chicken thighs. They will cook faster than bone-in thighs. Adjust the baking time to about 25-30 minutes. Always check if the internal temperature hits 165°F (74°C) to ensure safety.
What side dishes pair well with honey garlic chicken thighs?
Honey garlic chicken thighs go well with many sides. Here are some great options:
– Steamed rice
– Garlic mashed potatoes
– Roasted vegetables
– Asian-style coleslaw
– Simple green salad
These sides balance the sweet and savory flavors of the chicken. Enjoy your meal!
In this blog post, we explored how to prepare delicious honey garlic chicken thighs. We covered the key ingredients, including chicken and marinade components. I provided step-by-step instructions for marinating and baking. You learned tips for perfect flavor and crispy skin. We also discussed variations, like healthier options and cooking methods. Finally, I shared storage tips for leftovers. Remember, cooking should be fun and creative! Enjoy making this dish your own, and don’t hesitate to experiment with flavors. Happy cookin

Sweet & Sticky Honey Garlic Chicken Thighs
Ingredients
- 6 pieces bone-in, skin-on chicken thighs
- 1.33 cup honey
- 0.25 cup soy sauce (low-sodium preferred)
- 4 cloves garlic, minced
- 1 tablespoon fresh ginger, grated
- 1 tablespoon rice vinegar
- 1 teaspoon sesame oil
- 0.5 teaspoon black pepper
- 2 tablespoons green onions, chopped (for garnish)
- 1 tablespoon sesame seeds (for garnish)
Instructions
- Prepare the Marinade: In a mixing bowl, whisk together honey, soy sauce, minced garlic, grated ginger, rice vinegar, sesame oil, and black pepper until well combined.
- Marinate the Chicken: Place the chicken thighs in a large resealable plastic bag or a shallow dish. Pour the marinade over the chicken, ensuring each piece is well coated. Seal the bag or cover the dish and marinate in the refrigerator for at least 30 minutes (or up to 4 hours for deeper flavor).
- Preheat the Oven: Preheat your oven to 400°F (200°C).
- Arrange the Chicken: Remove the chicken from the marinade, shaking off excess liquid. Place the chicken thighs skin-side up in a baking dish.
- Bake: Bake in the preheated oven for about 35-40 minutes, or until the internal temperature reaches 165°F (74°C) and the skin is crispy.
- Glaze: While chicken is baking, pour the remaining marinade into a small saucepan. Bring to a boil, then reduce heat and simmer for about 5-7 minutes, until it thickens slightly.
- Serve: Once the chicken is cooked, remove from the oven and brush with the thickened glaze. Let rest for 5 minutes.
- Garnish: Sprinkle with chopped green onions and sesame seeds before serving.


![To make Chicken and Cheese Enchiladas Casserole, you need the right ingredients. Here they are: - 2 cups cooked chicken, shredded - 1 can (15 oz) black beans, rinsed and drained - 1 cup frozen corn - 1 can (10 oz) enchilada sauce (red or green) - 2 cups shredded cheese (cheddar and Monterey Jack mix) - 8 corn tortillas - 1 small red onion, diced - 1 teaspoon ground cumin - 1 teaspoon chili powder - Salt and pepper to taste - Fresh cilantro, for garnish - Sliced jalapeños, for garnish (optional) Each ingredient serves a purpose. The chicken adds protein, while the beans and corn provide fiber. The enchilada sauce gives a rich flavor. The cheese melts beautifully, creating a creamy texture. Tortillas hold it all together. Don't forget the spices! They bring warmth and depth to the dish. Using fresh ingredients makes a big difference. Fresh cilantro adds color and bright flavor. If you want a kick, sliced jalapeños can spice things up. For a full guide on making this dish, check the Full Recipe. - Preheat the oven to 350°F (175°C). - In a large bowl, mix the cooked chicken, black beans, corn, half the enchilada sauce, cumin, chili powder, diced onion, salt, and pepper. Stir it well. This mix gives your casserole a great flavor. - Take a 9x13 inch baking dish and spread a thin layer of the remaining enchilada sauce on the bottom. - Place 4 corn tortillas over the sauce. Overlap them slightly. This helps keep everything together. - Spoon half of your chicken and bean mix over the tortillas. Then sprinkle half of the cheese on top. - Repeat this with another layer of tortillas, the rest of the chicken mixture, and the remaining cheese. - End with a final layer of tortillas and drizzle any remaining enchilada sauce on top. This keeps the dish moist. - Cover the baking dish with aluminum foil. Bake in the preheated oven for 20 minutes. - After 20 minutes, remove the foil. Bake for an extra 10-15 minutes. This lets the cheese get bubbly and golden brown. - Once done, take it out and let it sit for about 5 minutes before slicing. This helps it hold its shape. - For the full recipe, check the detailed instructions above. To make shredding chicken easy, use two forks. Hold one fork in each hand. Pull the chicken apart in opposite directions. This method works great and saves time. You can also use a stand mixer with a paddle attachment. Just place the cooked chicken in the bowl and mix on low speed. To prevent soggy tortillas, lightly fry them in oil first. This step makes them crisp and adds flavor. You can also warm them in the oven for a few minutes. This keeps them from getting too soft when layered in the casserole. For a great side dish, serve Mexican rice or refried beans. These pair nicely with the creamy casserole. You can also add a fresh green salad on the side. A simple salad with lettuce, tomatoes, and avocado adds freshness. To enhance your casserole's look, garnish with fresh cilantro and jalapeño slices. These colorful toppings add a nice touch. A drizzle of extra enchilada sauce can also make it pop. You can serve the casserole on individual plates for a nice presentation. For the full recipe, check out the Chicken and Cheese Enchiladas Casserole section above. {{image_2}} If you have leftover ingredients, use them! You can swap cooked chicken for shredded beef or even pork. If you have extra veggies, toss in bell peppers or zucchini for added color and nutrients. You can also switch the black beans for pinto beans or kidney beans. They add a nice texture and flavor. For a twist, try chickpeas for a protein boost. Adjust the spice levels to fit your taste. Use mild chili powder for a gentle heat or add cayenne pepper for a kick. You can also mix in diced green chiles for extra flavor without too much heat. If you want a meatless version, skip the chicken and add more beans. You can use lentils or quinoa for protein. Toss in spinach or kale for a healthy touch. Enjoy the variety! For the full recipe, check out the [Full Recipe]. To keep your Chicken and Cheese Enchiladas Casserole fresh, store it in an airtight container in the fridge. It will last for about 3 to 4 days. If you want to keep it longer, freeze it. Wrap it well in plastic wrap and aluminum foil. It can last in the freezer for up to 3 months. Just remember to label it with the date. When you're ready to enjoy leftovers, preheat your oven to 350°F (175°C). Place the casserole in an oven-safe dish. Cover it with aluminum foil to keep it moist. Bake for about 20 minutes. If you prefer to use a microwave, slice a portion and place it on a microwave-safe plate. Heat it for 1-2 minutes, checking often. Make sure it is hot throughout. Avoid overheating, as it can make the dish dry. For the best taste, use the oven when possible. How can I make Chicken and Cheese Enchiladas Casserole gluten-free? To make this casserole gluten-free, use corn tortillas. Check that your enchilada sauce is gluten-free too. Many brands offer gluten-free options. Can I prepare this casserole in advance? Yes, you can prepare it a day ahead. Assemble the casserole, then cover and refrigerate. Bake it just before serving. What are the best sides to serve with Chicken and Cheese Enchiladas Casserole? Some great sides include refried beans, Mexican rice, or a fresh salad. These add color and flavor to your meal. Is it possible to add more vegetables to the recipe? Absolutely! You can add bell peppers, zucchini, or spinach. Just chop them small and mix them in with the chicken. Can I use other types of cheese besides cheddar and Monterey Jack? Yes, feel free to experiment! You can use pepper jack for spice or even queso fresco for a creamy touch. This post covered the tasty Chicken and Cheese Enchiladas Casserole. We looked at the main ingredients, steps to create it, tips to perfect it, and storage methods. You can customize this dish easily with varied ingredients or toppings. Remember, cooking should be fun and creative. I hope you enjoy making this hearty casserole as much as I do. Happy cooking!](https://dailydishly.com/wp-content/uploads/2025/06/88aadb9b-53ae-4392-a371-8958c664e0d2-768x768.webp)
![- 1 medium head of cauliflower, cut into florets - 1 cup all-purpose flour - 1 cup water - 1 cup panko breadcrumbs - 1 teaspoon garlic powder - 1 teaspoon onion powder - 1 teaspoon smoked paprika - 1 teaspoon cayenne pepper (adjust for spice preference) - 1 cup buffalo sauce (store-bought or homemade) - 8 small corn or flour tortillas The heart of these tacos is the cauliflower. This veggie gives the dish a great texture and absorbs the buffalo sauce well. You need flour and water to make the batter. Panko breadcrumbs add a nice crunch. Spices like garlic powder, onion powder, smoked paprika, and cayenne pepper give the cauliflower its bold flavor. - 1 ripe avocado, sliced - 1 cup shredded lettuce - ½ cup crumbled blue cheese or feta cheese (optional) - Fresh cilantro, for garnish - Lime wedges, for serving Toppings change the game. Sliced avocado adds creaminess, while shredded lettuce gives a fresh crunch. Blue cheese or feta adds tang. Fresh cilantro brightens the dish. Lime wedges are perfect for squeezing over the tacos. - Vegan, gluten-free options, allergen information These tacos can fit many diets. For a vegan option, skip the cheese. Use gluten-free flour and corn tortillas for a gluten-free meal. Always check for allergies, especially with buffalo sauce and toppings. For the full recipe, check [Full Recipe]. 1. First, preheat your oven to 425°F (220°C). This step is key. 2. Line a baking sheet with parchment paper. It helps with easy cleanup. 3. In a medium bowl, whisk together: - 1 cup all-purpose flour - 1 cup water - 1 teaspoon garlic powder - 1 teaspoon onion powder - 1 teaspoon smoked paprika - 1 teaspoon cayenne pepper (adjust for spice preference) Mix until the batter is smooth. 4. In another bowl, pour in 1 cup of panko breadcrumbs. This will give your cauliflower that crunchy texture. 5. Take each cauliflower floret and dip it into the batter. Let the extra batter drip off. 6. Then coat the floret with panko breadcrumbs. Place the coated florets on the baking sheet. 7. Bake in the oven for 25-30 minutes. Flip halfway through to ensure even cooking. The cauliflower should turn golden brown and crispy. 8. In a large bowl, toss the baked cauliflower with 1 cup of buffalo sauce. Make sure every piece is well-coated. 9. Warm your tortillas on a skillet or in the microwave. This makes them soft and pliable. 10. On each tortilla, layer the buffalo cauliflower, shredded lettuce, and avocado slices. 11. If you like, add crumbled blue cheese or feta on top. 12. Garnish with fresh cilantro and serve with lime wedges. Squeeze lime juice over the tacos for added flavor. For the full recipe, refer to the earlier section. Enjoy your delicious Buffalo Cauliflower Tacos! To get crispy cauliflower, start by removing moisture. After cutting the cauliflower into florets, pat them dry with a paper towel. This helps the batter stick and ensures crispiness. When baking, use a hot oven set to 425°F (220°C). Spread the florets on a lined baking sheet in a single layer. Avoid crowding them, as this traps steam and makes them soggy. Flip the cauliflower halfway through baking for even crispiness. For extra flavor, play with spices. If you like it hot, add more cayenne pepper to the batter. You can also try using garlic or onion powder in larger amounts for a stronger taste. Pair your tacos with delicious dipping sauces like ranch or a creamy avocado dip. A side of crunchy slaw can add freshness and texture. To serve a larger group, simply double the ingredients. For smaller gatherings, halve the recipe. Adjust the number of tortillas and toppings to match your needs. This way, everyone gets their fill of these tasty tacos while minimizing waste. For the complete recipe, check out the Full Recipe. {{image_2}} You can switch up the flavor with different hot sauces. Try a garlic or honey hot sauce for a sweet twist. Sriracha or chipotle sauce can add a smoky kick. Adjust the spice level by adding more or less cayenne pepper. You can also mix in other spices like cumin or chili powder for a unique taste. For a creamy touch, use dairy-free cheese options. Cashew cheese or vegan feta works well. You can also add more veggies like diced tomatoes, corn, or even a crunchy slaw. This adds color and texture to your tacos, making each bite exciting. Want a lighter meal? Turn your tacos into a salad! Start with a bed of greens instead of tortillas. Top with the buffalo cauliflower, avocado, and your favorite toppings. Drizzle with extra buffalo sauce or a zesty dressing. This way, you enjoy the same great flavors in a fresh and healthy way. For the full recipe, check out the detailed instructions above. To keep your tacos fresh, store them in airtight containers. Place the assembled tacos in the fridge. They stay good for up to two days. If you don't want soggy tacos, store the ingredients separately. This way, the tortillas won't get wet. Keep the buffalo cauliflower in one container and the toppings in another. Reheating crispy cauliflower can be tricky. Use an oven for the best results. Preheat it to 350°F (175°C). Spread the cauliflower on a baking sheet and heat for about 10 minutes. This helps maintain its crispiness. If you need to use a microwave, do it quickly. Heat in short bursts to avoid sogginess. You can freeze cooked cauliflower. Just let it cool completely first. Place it in a freezer-safe bag. Try to squeeze out as much air as possible. It can last up to three months in the freezer. When you're ready to eat, thaw it in the fridge overnight and reheat. For the best taste, use the Full Recipe to make fresh tacos when you’re ready to enjoy! Yes, you can prepare these tacos ahead of time. For the best texture, follow these meal prep tips: - Bake the cauliflower: Cook the cauliflower and toss it in buffalo sauce. Let it cool. Store it in an airtight container. - Prep the tortillas: Warm the tortillas just before serving. This keeps them soft. - Keep toppings separate: Store ingredients like avocado and lettuce in separate containers. This keeps them fresh. When ready to serve, just reheat the cauliflower in the oven. If you want a gluten-free version, here are some options: - Flour: Use gluten-free all-purpose flour or almond flour instead of regular flour. - Tortillas: Choose corn tortillas or gluten-free flour tortillas. Both work great for these tacos. These swaps keep the flavor intact while making it gluten-free. You can manage the heat level easily. Here are some tips: - Cayenne pepper: Start with less cayenne pepper. You can always add more later. - Buffalo sauce: Choose a milder buffalo sauce. Some brands offer a range of heat levels. - Add toppings: Use toppings like avocado or sour cream to balance the spice. These adjustments help you find your perfect heat level while still enjoying the flavor of the tacos. Buffalo cauliflower tacos are a tasty treat that anyone can enjoy. We covered the main ingredients, from cauliflower to tortillas, and discussed optional toppings. You learned how to prepare, cook, and assemble these tacos, plus tips for crispy perfection. Exploring variations lets you customize to your taste, and knowing how to store leftovers keeps your meal fresh. With the right adjustments, you can make this dish fit your diet. Enjoy creating your own buffalo cauliflower tacos, and share them with family and friends for a fun meal!](https://dailydishly.com/wp-content/uploads/2025/07/222f8f62-8bb8-4cb7-89ef-1e5b6133e329-768x768.webp)

![- 500g chicken breast, thinly sliced - 2 tablespoons olive oil - 1 tablespoon dried oregano - 1 teaspoon garlic powder - 1 teaspoon onion powder - 1 teaspoon paprika - Salt and pepper to taste - 4 pita breads - 1 cup Greek yogurt - 1 tablespoon lemon juice - 1 cucumber, diced - 1 tomato, diced - 1 small red onion, finely sliced - Fresh parsley for garnish - Each serving has about 400 calories. - Macronutrient breakdown: 30g protein, 45g carbs, 10g fats. - This recipe can be gluten-free by using gluten-free pita. Low-carb options exist by using lettuce wraps. Homemade chicken gyros offer a tasty meal that is simple to make. You can find the full recipe above to guide you through the cooking process. Enjoy! To start, combine the chicken, olive oil, oregano, garlic powder, onion powder, paprika, salt, and pepper in a mixing bowl. This blend gives your chicken a rich flavor. Use your hands or a spoon to mix well. Let the chicken marinate for at least 30 minutes. This time helps the chicken soak up all the tasty spices. Next, preheat your grill or skillet over medium-high heat. Cooking the chicken takes about 6-8 minutes. Stir occasionally to ensure even cooking. You want the chicken to turn golden brown and reach an internal temperature of 165°F. This step is key for juicy and flavorful meat. While the chicken cooks, it’s time to make the tzatziki sauce. In a bowl, mix the Greek yogurt, lemon juice, diced cucumber, salt, and pepper. Stir until everything blends well. For extra flavor, add chopped dill or mint if you like. This sauce adds a cool touch to your gyros. Now, warm the pita breads on the grill for about 1-2 minutes on each side. This makes them soft and warm. Next, layer the grilled chicken in the center of each pita. Top it with diced tomatoes, sliced onions, and a generous dollop of tzatziki sauce. This layering helps you enjoy every bite. For a great presentation, wrap the pita around the filling and secure it with a toothpick. Garnish with fresh parsley for color. Serve your gyros with sides like Greek salad or crispy fries. These options complement the flavors nicely. Enjoy your homemade chicken gyros with family or friends. For the complete guide, check the Full Recipe. To make your chicken gyros amazing, the marinade is key. A good marinade adds flavor and keeps the chicken juicy. Here are some best practices: - Use fresh ingredients: Fresh herbs and spices pack more flavor. - Mix well: Combine olive oil, oregano, garlic powder, onion powder, paprika, salt, and pepper in a bowl. Coat the chicken evenly. - Marinate long enough: Let the chicken sit for at least 30 minutes. For deeper flavor, marinate for up to 4 hours. You can cook your chicken gyros in different ways. Each method gives a unique taste. - Grilling: This gives the best flavor and nice grill marks. Preheat your grill to medium-high heat. Cook chicken for 6-8 minutes until brown. - Oven baking: Preheat your oven to 400°F (200°C). Spread chicken on a baking sheet. Bake for about 20 minutes. - Air frying: Place the chicken in an air fryer. Cook at 375°F (190°C) for 10-12 minutes. This method keeps the chicken crispy. How you serve your gyros can make them even better. Here are some creative ideas: - Garnishing: Top with fresh parsley, crumbled feta, or olives for extra flavor. - Side dishes: Pair with Greek salad, tzatziki, or hummus. These sides add color and taste. For the full recipe, check the [Full Recipe]. Enjoy your homemade chicken gyros! {{image_2}} You can switch the chicken for other meats. Beef or lamb gyros taste great too. Just use the same marinade and grill them as you would the chicken. For a vegetarian option, try using halloumi cheese or grilled vegetables. Halloumi gives a nice salty flavor, while grilled vegetables add color and texture. Both options work well in pita. To change the flavors, you can add different spices or marinades. Try cumin, coriander, or even a bit of chili powder for heat. Each spice brings a unique taste to your gyros. You can also customize the tzatziki sauce. Add fresh dill or mint for a fresh twist. You can mix in garlic or even a hint of lemon zest to boost the flavor. You have choices in how to cook your gyros. You can use an oven or a grill. Grilling gives that lovely smoky flavor. If you prefer an easier method, a slow cooker is perfect. It makes the chicken tender and juicy. Just set it, and let it cook while you do other things. This unique preparation method will amaze your family and friends. To keep your chicken gyros fresh, store them in an airtight container. Place the gyros in the fridge within two hours of cooking. They will stay tasty for up to three days. If you want to eat them later, it’s best to store the ingredients separately. Keep the chicken, veggies, and sauces apart. This helps keep everything fresh and crunchy. You can freeze chicken gyros for longer storage. Wrap each gyro tightly in plastic wrap, then place them in a freezer bag. They can stay in the freezer for up to three months. When you are ready to eat, thaw the gyro in the fridge overnight. Reheat it in a skillet over medium heat for about 5-7 minutes. This keeps the chicken juicy and the pita soft. For the marinated chicken, store it in a sealed container in the fridge. It will stay fresh for two days. If you have leftover veggies, keep them in a separate container. Fresh vegetables can last about three days in the fridge. For sauces like tzatziki, store them in a tight container as well. They will be good for about a week. Enjoy your homemade chicken gyros at their best! Yes, you can use frozen chicken. First, you must thaw it. The best way to do this is by placing the chicken in the fridge overnight. If you're short on time, you can also use the microwave. Remember to cook the chicken right after thawing. This keeps it safe to eat. Gyros comes from Greece. The word "gyros" means "turn" in Greek. It refers to the way the meat cooks on a vertical rotisserie. Gyros has a long history in Greek cuisine, dating back to the 1920s. People often enjoy it with pita bread and fresh toppings. To make gyros gluten-free, choose gluten-free pita or flatbread. Many stores sell gluten-free options. You can also use lettuce wraps for a low-carb choice. This way, you can enjoy gyros without gluten. Yes, you can prepare gyros ahead of time. Marinate the chicken a day before. Store it in the fridge until you're ready to cook. You can also make the tzatziki sauce in advance. Just keep it in a sealed container in the fridge. If you want to keep the pita fresh, wrap it tightly in plastic wrap. You now know how to make delicious gyros at home. We covered the main ingredients, marinating the chicken, cooking techniques, and assembling your dish. I shared tips to perfect your gyros, like alternative proteins and storage methods. Making gyros is simple, fun, and full of flavor. Try out this recipe for a tasty meal tonight. Enjoy the process and impress your friends and family with your skills! Cook with joy and keep exploring new flavors!](https://dailydishly.com/wp-content/uploads/2025/06/a33d49ac-ff2d-4809-8657-a37e258bd1fd-768x768.webp)

