Jalapeño Popper Chicken Casserole Flavorful and Easy

If you love bold flavors and easy meals, you’ll adore my Jalapeño Popper Chicken Casserole. This dish packs all the zesty fun of jalapeño poppers into a comforting casserole that’s perfect for any night. I’ll guide you through simple steps, share tasty tips, and offer variations to fit your taste. Whether you need a quick weeknight dinner or a crowd-pleaser, this recipe will save the day. Let’s dive in!
Why I Love This Recipe
- Comforting Flavor: This casserole combines the creamy goodness of cheese with the spicy kick of jalapeños, making every bite deliciously comforting.
- Easy to Make: With just a few simple steps, you can whip up this hearty dish without spending hours in the kitchen.
- Perfect for Gatherings: This recipe is a crowd-pleaser, ideal for potlucks or family dinners, ensuring everyone leaves satisfied.
- Versatile Ingredients: You can easily customize this casserole by adding your favorite vegetables or adjusting the spice level to suit your taste.
Ingredients
List of Ingredients
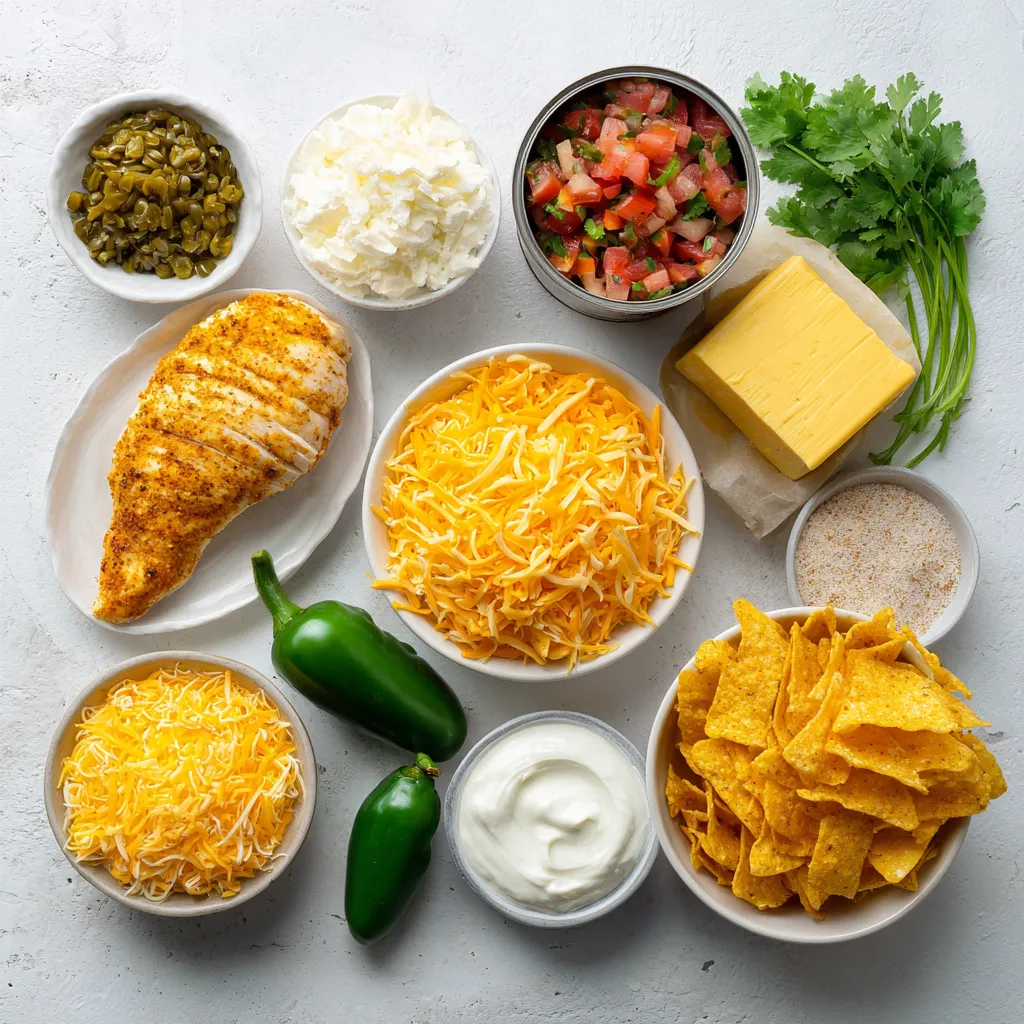
For this tasty dish, you need:
– 2 cups cooked chicken, shredded
– 1 can (10 oz) diced tomatoes with green chilies, drained
– 1 cup cream cheese, softened
– 1 cup shredded cheddar cheese
– 1 cup shredded pepper jack cheese
– 1/2 cup sour cream
– 1/2 cup jalapeños, sliced (adjust to taste)
– 1 tablespoon garlic powder
– 1 teaspoon onion powder
– Salt and pepper to taste
– 1 cup crushed tortilla chips (for topping)
– Fresh cilantro, for garnish (optional)
Ingredient Substitutions
You can swap some items if needed. Use cooked turkey instead of chicken for a tasty twist. If you don’t have cream cheese, try using Greek yogurt. For cheese, mozzarella works well too. You can use fresh tomatoes if you want to skip the canned ones. If jalapeños are too spicy, bell peppers can be a great choice.
Tips for Selecting Fresh Ingredients
When picking chicken, look for bright color and no smell. For tomatoes, choose firm ones with smooth skin. Fresh jalapeños should be bright green with no wrinkles. When buying cheese, go for blocks instead of pre-shredded. They melt better. Always check the date on sour cream to ensure freshness.

Step-by-Step Instructions
Preparing the Casserole Mixture
Start by preheating your oven to 350°F (175°C). In a large bowl, mix the shredded chicken, diced tomatoes with green chilies, cream cheese, and sour cream. Add garlic powder, onion powder, and sliced jalapeños to the mix. You can adjust the jalapeños based on how spicy you want your dish. Stir in half of the cheddar cheese and all the pepper jack cheese. Make sure everything blends well. Season this mixture with salt and pepper to taste.
Baking Instructions
Now, spread the mixture evenly in a greased 9×13 inch baking dish. This helps it cook evenly. Top the casserole with the remaining cheddar cheese and crushed tortilla chips. This adds a nice crunch on top. Place the dish in the oven and bake for 25-30 minutes. Look for bubbly cheese and lightly golden edges. When it’s done, take it out carefully.
Cooling and Serving Tips
Let the casserole cool for a few minutes. This helps it set and makes serving easier. Garnish with fresh cilantro if you like. It adds a fresh touch and looks nice. Now, it’s ready to enjoy! This dish is perfect for family meals or gatherings.
Tips & Tricks
How to Make Creamier Casserole
To make your casserole even creamier, use more cream cheese. You can also mix in a bit of heavy cream. This extra creaminess adds richness to each bite. Another tip is to let your cream cheese soften well. If it’s too cold, it won’t blend smoothly.
Adjusting Spice Levels
You can adjust the spice levels to fit your taste. If you like it mild, use fewer jalapeños. You can even omit them. For extra heat, add more sliced jalapeños or use fresh ones. Mixing in some hot sauce can also give it a nice kick. Always taste your mixture before baking to get it just right.
Meal Prep and Shortcuts
Meal prep can save time on busy days. Cook your chicken ahead of time and store it in the fridge. You can also mix the casserole ingredients a day before. Just cover it and store it in the fridge. When you’re ready, bake it straight from the fridge. This can save you a lot of time!
Pro Tips
- Adjust the Heat: If you prefer a milder dish, reduce the amount of jalapeños or use pickled jalapeños for less heat.
- Make Ahead: Prepare the casserole in advance and store it in the refrigerator. Just add a few extra minutes to the baking time when you’re ready to cook.
- Cheese Variations: Feel free to experiment with different cheese blends, such as Monterey Jack or Gouda, to customize the flavor to your liking.
- Crunchy Topping: For an extra crispy topping, broil the casserole for the last 2-3 minutes of cooking. Just watch it closely to prevent burning!

Variations
Vegetarian Version
You can easily make a vegetarian version of Jalapeño Popper Chicken Casserole. Simply replace the chicken with a mix of beans, like black beans and pinto beans. This gives you protein and great texture. Use the same creamy ingredients, like cream cheese and sour cream. You can also add more veggies, such as corn or bell peppers. These add color and flavor.
Low-Carb Options
For a low-carb variant, swap the crushed tortilla chips for crushed pork rinds or almond flour. This keeps the crunch while cutting carbs. You can also use cauliflower rice instead of regular rice. It blends well into the casserole and adds a nice bite. Make sure to check the ingredients in your canned tomatoes. Some have added sugars.
Other Flavor Add-Ins
Feel free to mix in extra flavors! Try adding cooked bacon for a smoky taste. If you like it spicy, toss in some diced habaneros or chipotles. Fresh herbs like cilantro or green onions can brighten up the dish. You can also change the cheese blend. Use Monterey Jack or gouda for a different twist. Each option gives the casserole a unique flavor.
Storage Info
How to Store Leftovers
To keep your jalapeño popper chicken casserole fresh, let it cool first. Then, transfer the leftovers to an airtight container. Store it in the fridge for up to three days. Make sure to cover the dish tightly to keep moisture in. This helps keep the flavors intact.
Reheating Instructions
When you’re ready to enjoy your leftovers, preheat your oven to 350°F (175°C). Place the casserole in an oven-safe dish. Cover it with foil to prevent it from drying out. Heat for about 20 minutes or until it’s warm all the way through. You can also microwave individual portions for about 2-3 minutes. Just make sure to check the heat.
Freezing the Casserole
To freeze your casserole, let it cool completely. Then, cut it into portions and wrap each piece tightly in plastic wrap. Place the wrapped pieces in a freezer-safe bag. You can freeze it for up to three months. When you’re ready to eat, thaw it in the fridge overnight. Then, reheat it in the oven or microwave. This method keeps the dish tasting fresh and delicious!
FAQs
Can I use raw chicken instead of cooked?
Yes, you can use raw chicken, but it needs more time to cook. If you choose raw chicken, cut it into small pieces. Cook it in the oven for 40-50 minutes at 350°F (175°C). Ensure the chicken reaches a safe internal temperature of 165°F (75°C) before serving. This method gives you juicy chicken in the casserole.
How can I make this dish spicier?
To spice things up, add more jalapeños. You can also use hot sauce. Try mixing in diced serrano peppers or cayenne pepper for extra heat. Another option is to use spicy pepper jack cheese instead of regular cheese. Adjust the spices to your taste for that perfect kick.
What sides pair well with Jalapeño Popper Chicken Casserole?
Serve this casserole with simple sides. A fresh green salad adds crunch and balance. You can also serve it with rice or quinoa for a filling meal. Cornbread or tortilla chips work great too. These sides make your meal more colorful and enjoyable.
Understanding the right ingredients and steps helps you make a great casserole. Follow the tips for fresh picks and shortcuts. Use the variations to match your taste and dietary needs. Storing and reheating properly keeps your leftovers tasty. Remember, cooking can be fun and creative. Enjoy making your casserole just how you like i

Jalapeño Popper Chicken Casserole
Ingredients
- 2 cups cooked chicken, shredded
- 1 can diced tomatoes with green chilies, drained
- 1 cup cream cheese, softened
- 1 cup shredded cheddar cheese
- 1 cup shredded pepper jack cheese
- 1 2 sour cream
- 0.5 cup jalapeños, sliced
- 1 tablespoon garlic powder
- 1 teaspoon onion powder
- to taste salt and pepper
- 1 cup crushed tortilla chips
- optional fresh cilantro, for garnish
Instructions
- Preheat your oven to 350°F (175°C).
- In a large mixing bowl, combine the shredded chicken, diced tomatoes with green chilies, cream cheese, sour cream, garlic powder, onion powder, sliced jalapeños, half of the cheddar cheese, and pepper jack cheese. Mix until all ingredients are well combined.
- Season the mixture with salt and pepper to taste.
- Spread the mixture evenly into a greased 9x13 inch baking dish.
- Top the casserole with the remaining cheddar cheese and crushed tortilla chips, giving it a nice crunch.
- Bake in the preheated oven for 25-30 minutes, or until the cheese is bubbly and the edges are slightly golden.
- Once done, remove from the oven and let it cool for a few minutes before serving.
- Garnish with fresh cilantro if desired, and enjoy!


![To make zucchini noodles with pesto, gather these main ingredients: - 3 medium zucchinis, spiralized into noodles - 1 cup fresh basil leaves - 1/4 cup pine nuts (toasted) - 1/4 cup grated Parmesan cheese (or nutritional yeast for a vegan option) - 2 garlic cloves, minced - 1/3 cup extra-virgin olive oil - Salt and pepper to taste These ingredients create a fresh and bright dish that is full of flavor. The zucchini noodles serve as a light base, while the pesto adds richness. You can enhance the dish with these optional ingredients: - 1/2 cup sun-dried tomatoes, chopped (in oil for extra flavor) - 1/4 teaspoon crushed red pepper flakes (optional) Adding sun-dried tomatoes gives a nice tang and sweetness. The red pepper flakes can add a bit of heat if you like spice. This dish is not just tasty; it also packs a healthy punch. Here’s a quick look at the nutritional benefits: - Zucchini: Low in calories, high in fiber, and rich in vitamins A and C. - Basil: Contains antioxidants and supports heart health. - Pine Nuts: Offer healthy fats and protein. - Parmesan Cheese: Adds calcium and flavor. - Olive Oil: A good source of healthy fats and antioxidants. Each serving is light yet filling, making it a great choice for lunch or dinner. You can find the full recipe [here]. To make fresh pesto, gather your ingredients. You will need basil leaves, toasted pine nuts, Parmesan cheese, minced garlic, and olive oil. Place these in a food processor. First, pulse the basil, pine nuts, cheese, and garlic together. Add a pinch of salt and pepper. While the processor runs, slowly pour in the olive oil. This helps achieve a smooth and creamy texture. After blending, taste your pesto. Adjust the seasoning to your liking. Set it aside for now. Next, grab your zucchinis. Spiralize them into noodle shapes. In a large skillet, heat a tablespoon of olive oil over medium heat. Add the zucchini noodles once the oil is hot. Sauté for about 2-3 minutes. Keep them slightly crunchy, or al dente. This step is key, as overcooking can make them mushy. Once cooked, remove the skillet from heat. Now, it’s time to mix everything together. Add the pesto to the skillet with the zucchini noodles. Stir well to coat the noodles evenly. This is where the magic happens! Next, add chopped sun-dried tomatoes for extra flavor. If you like spice, sprinkle in crushed red pepper flakes. Toss all the ingredients together until well mixed. Serve your dish right away. Presentation matters, so use a large bowl. Create a nest of zucchini noodles and drizzle extra pesto on top. Garnish with toasted pine nuts for a beautiful finish. Enjoy your flavorful and fresh Zucchini Noodles with Pesto! For the full recipe, check [Full Recipe]. When picking zucchini, look for firm ones that are bright in color. Avoid any with soft spots or wrinkles. Smaller zucchinis taste better and are less watery. Aim for ones about six to eight inches long. This ensures a nice, crisp bite in your dish. You can also check the stem; it should be fresh and green. To make your pesto extra creamy, use a good blender or food processor. Start by blending the basil, pine nuts, and garlic first. Then, slowly add the olive oil while blending. This helps to emulsify the oil, making it smooth. You can add a bit more cheese or even a splash of lemon juice. This brightens the flavor and keeps it fresh. One common mistake is cooking zucchini for too long. Zucchini cooks quickly, so aim for just 2-3 minutes. This keeps it al dente and tasty. Also, avoid adding too much salt at the start. Salt pulls out moisture, making your noodles soggy. Instead, season them lightly before adding your pesto. Finally, don’t overcrowd the pan; cook in batches if needed. For the full recipe, check out the [Full Recipe]. {{image_2}} You can easily make this dish vegan. Instead of Parmesan cheese, use nutritional yeast. This swap gives a cheesy flavor without dairy. You still get a creamy pesto. Blend the rest of the ingredients as usual. This keeps the dish rich and tasty. If you have other dietary needs, don't worry. You can switch out ingredients. For gluten-free options, use gluten-free pasta or spiralized veggies. If you need a nut-free recipe, skip the pine nuts. Use sunflower seeds instead. These simple swaps keep the dish enjoyable for everyone. Zucchini is great, but you can change things up. Try adding fresh herbs like parsley or mint. They give a new twist to the flavor. You can also mix in seasonal veggies. In summer, add cherry tomatoes for sweetness. In fall, try roasted butternut squash for warmth. Each season brings fresh options. Enjoy the tasty variety! Store any leftover zucchini noodles with pesto in an airtight container. You want to keep them fresh and tasty. Place the container in the fridge. They will stay good for about two days. Add a few drops of olive oil to prevent sticking. This keeps the noodles from clumping together. If you used sun-dried tomatoes, they can add extra moisture. So, check for sogginess before storing. To reheat your zucchini noodles, use a skillet. Heat it on low to medium heat. Add a little olive oil to the pan, then toss in the noodles. Stir for about two to three minutes. This warms them up without making them mushy. You can also use a microwave. Put the noodles in a bowl and cover it. Heat on medium for about a minute or two. Check and stir halfway through to ensure even heating. Freezing zucchini noodles is not ideal. They can become watery when thawed. However, you can freeze pesto easily. Put it in ice cube trays for easy use later. Once frozen, pop the cubes into a bag. You can use frozen pesto straight from the freezer. Just add it to hot noodles, and it will melt right in. This way, you can enjoy homemade flavor anytime! For the full recipe, check out the details above. Yes, you can use other veggies. Carrots, bell peppers, or squash work well. Spiralize them just like zucchini. They add nice colors and flavors too. Each will give a new twist to your dish. Just remember to cook them until tender, but not mushy. To make nut-free pesto, skip the pine nuts. Use sunflower seeds instead. They blend nicely and add a good texture. You can also use hemp seeds for a different taste. The rest of the pesto stays the same. Use fresh basil and garlic for that classic flavor. Zucchini noodles with pesto pair well with many sides. A fresh salad adds crunch and brightness. Garlic bread is a great choice for dipping. You could also serve grilled chicken or shrimp on top for protein. Enjoy this dish with a light white wine for a special touch. For more ideas, check the Full Recipe for inspiration. Zucchini noodles with pesto offer a tasty and healthy meal. We covered the key ingredients and how to make them. I shared steps for cooking, tips for selecting fresh zucchini, and variations to suit diets. Proper storage and reheating tips will keep leftovers tasty. Remember, experimenting with flavors makes cooking fun. Enjoy your meal, and don’t hesitate to try new things in the kitchen.](https://dailydishly.com/wp-content/uploads/2025/06/e06d07df-0eee-433f-a13f-76c167ac26ec-768x768.webp)


![To make Indian-spiced chickpea stew, you need a few key ingredients: - 2 cups canned chickpeas, drained and rinsed - 1 onion, finely chopped - 2 cloves garlic, minced - 1 tablespoon ginger, grated - 1 can (14 oz) diced tomatoes - 1 can (14 oz) coconut milk - 2 cups vegetable broth - 1 tablespoon curry powder - 1 teaspoon ground cumin - 1 teaspoon turmeric powder - 1/2 teaspoon red chili powder (adjust to taste) - 1 tablespoon olive oil - Salt and pepper to taste These ingredients blend together to create a hearty and flavorful stew. The chickpeas add protein, while the spices give it warmth and depth. For added flavor and color, consider these garnishes: - Fresh cilantro, chopped - A squeeze of lime juice - Sliced green chilies These garnishes not only enhance the stew's look but also add fresh notes to each bite. To prepare this stew, you will need: - A large pot or Dutch oven - A wooden spoon for stirring - A cutting board and knife for chopping Having the right tools makes cooking easier. You can focus on enjoying the process and the final dish. For the complete list of ingredients and detailed instructions, refer to the Full Recipe. Start by heating olive oil in a large pot over medium heat. When the oil is warm, add the chopped onion. Cook the onion for about five minutes until it becomes soft and clear. This step builds the base of flavor. Next, stir in the minced garlic and grated ginger. Cook for one more minute until it smells great. Now, it’s time to add the spices. Toss in the curry powder, ground cumin, turmeric powder, and red chili powder. Stir them into the onions, garlic, and ginger. Cook the spices for two minutes. This helps them release their rich flavors. After that, pour in the diced tomatoes with their juice and the can of coconut milk. Mix it all together, then add the vegetable broth. Add in the rinsed chickpeas next. They will add protein and texture to the stew. Season with salt and pepper to taste. Bring the stew to a gentle simmer. Once it simmers, reduce the heat to low. Cover the pot and let it cook for 20 to 25 minutes. Stir occasionally to blend the flavors. If you want a thicker stew, mash some chickpeas with the back of a spoon. This complete cooking process creates a dish that is flavorful and satisfying. For the full recipe, refer to the section above. Serve the stew hot, topped with fresh cilantro for a nice touch. To boost the taste of your Indian-spiced chickpea stew, try these tips: - Use fresh spices: Always check your spice shelf. Old spices lose flavor. - Add acidity: A splash of lemon juice can brighten the dish. - Experiment with herbs: Fresh cilantro adds a nice touch at the end. - Toast spices: Briefly cook your spices in oil to bring out their flavor. These steps help layers of flavor shine through. You will taste the difference in every bite. Here are some common errors to steer clear of: - Skipping the sauté: Don’t rush the onion and garlic stage. This builds a solid base. - Overcooking chickpeas: If you use dried chickpeas, soak and cook them properly. They should be tender but not mushy. - Ignoring seasoning: Taste as you go. Adjust salt and pepper to your liking. - Not letting it simmer: Allowing the stew to simmer helps meld all the flavors. By avoiding these mistakes, your stew will be more delicious and satisfying. When it's time to serve, consider these ideas: - Serve with rice: White or brown rice pairs well and soaks up the stew. - Add bread: Naan or crusty bread makes a great side. - Top with yogurt: A dollop of plain yogurt can add creaminess and balance spice. - Garnish: Fresh cilantro is a must for color and taste. Feel free to explore and create your own serving style. Enjoy your meal! For the full recipe, check out the details above. {{image_2}} You can easily boost this stew’s protein. Try adding cooked chicken, beef, or tofu. Each option brings a different taste. For chicken, use shredded pieces. For beef, try ground or diced. Tofu works well when cubed and pan-fried. This adds texture and flavor. You can mix and match to your liking. This Indian-spiced chickpea stew is already vegan. It’s packed with plant-based goodness. If you want to switch it up, add more veggies. Spinach, kale, or sweet potatoes work great. These veggies add nutrients and color. You can also serve it over rice or quinoa for a complete meal. You can swap ingredients based on what you have. For instance, use lentils if you don’t have chickpeas. They cook faster and soak up flavors well. If you lack coconut milk, try almond or soy milk. Just remember, this will change the taste slightly. You can also use any vegetable broth you like. The stew remains flexible and tasty no matter the changes. For the full recipe, check out the [Full Recipe]. I love saving leftovers from my Indian-spiced chickpea stew. To store them, let the stew cool first. Use an airtight container for best results. You can keep it in the fridge for up to three days. If you want to save it longer, freezing is a good option. Reheating is simple. Pour the stew into a pot. Heat it over medium heat on the stove. Stir occasionally to avoid burning. You can also use a microwave. Place the stew in a microwave-safe bowl. Heat it for one to two minutes, stirring halfway through. Make sure it’s hot all the way through before you eat. To freeze the stew, use a freezer-safe container. Leave some space at the top for expansion. This stew can last up to three months in the freezer. When you’re ready to eat, thaw it in the fridge overnight. Then, reheat it using the steps above. Enjoy your delicious meal again! For the full recipe, check out the link provided. To make your Indian-Spiced Chickpea Stew spicier, add more red chili powder. Start with an extra 1/2 teaspoon. If you want more heat, add some chopped green chilies. You can also use fresh ginger or a dash of cayenne pepper. Keep tasting as you go. Adjust the spice level to your liking. Remember, you can always add more, but you can't take it out! Yes, you can use dried chickpeas! Just soak them overnight in water. After soaking, cook them until soft before adding to your stew. This may take about 1 to 2 hours. Be sure to adjust the cooking time in the recipe. Dried chickpeas have a great texture and flavor that can enhance your dish. This stew pairs well with many sides. Serve it with rice or warm naan bread. You can also enjoy it with a fresh salad for a light touch. Consider adding yogurt or raita for creaminess. This balance will elevate your meal. For more ideas, check the Full Recipe for suggestions! This article covered how to make Indian-Spiced Chickpea Stew, from main ingredients to cooking steps. We explored tips for enhancing flavors, avoiding common mistakes, and serving suggestions. You learned about variations, storage, and answering common questions. Enjoying this stew is a delightful experience. Remember, feel free to adjust the spices and toppings to make it your own. Cooking should be fun and creative!](https://dailydishly.com/wp-content/uploads/2025/06/561fcdd4-13bb-4dd2-b7b4-b44f6a9d9028-768x768.webp)