Lemon Butter Scallops Delightful and Easy Recipe

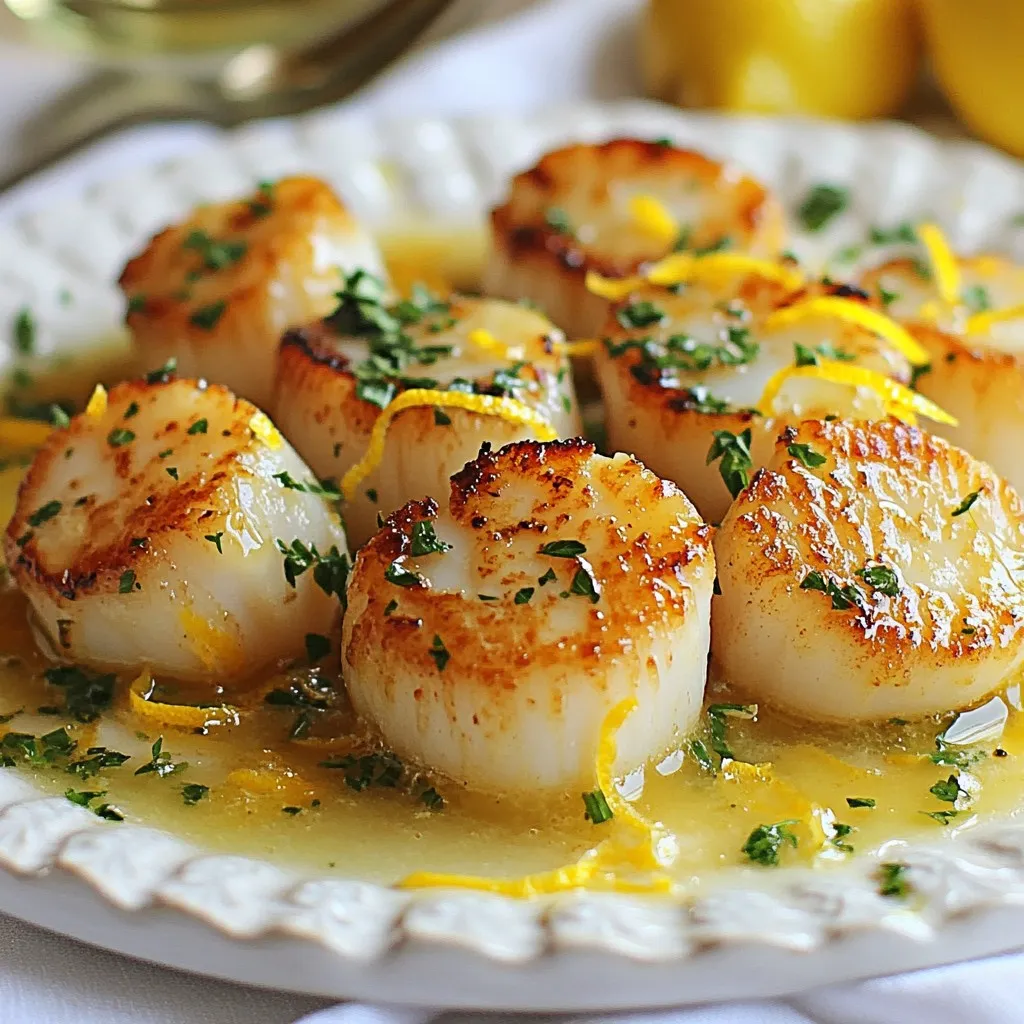
Are you ready to impress your family and friends with a stunning seafood dish? My Lemon Butter Scallops recipe is both delightful and easy to make. Picture tender, juicy scallops seared to perfection in a rich lemon butter sauce. This dish is not just simple; it’s also packed with flavor! Join me as I guide you through each step to create a gourmet meal right at home. Let’s dive into the details and get cooking!
Why I Love This Recipe
- Quick and Easy: This recipe can be prepared in just 15 minutes, making it perfect for a weeknight dinner.
- Deliciously Flavorful: The combination of lemon, garlic, and butter creates a rich and zesty sauce that elevates the scallops.
- Elegant Presentation: Searing the scallops gives them a beautiful golden crust, making them perfect for impressing guests.
- Healthy and Nutritious: Scallops are a great source of lean protein and are low in calories, making this dish both healthy and satisfying.
Ingredients
List of Ingredients
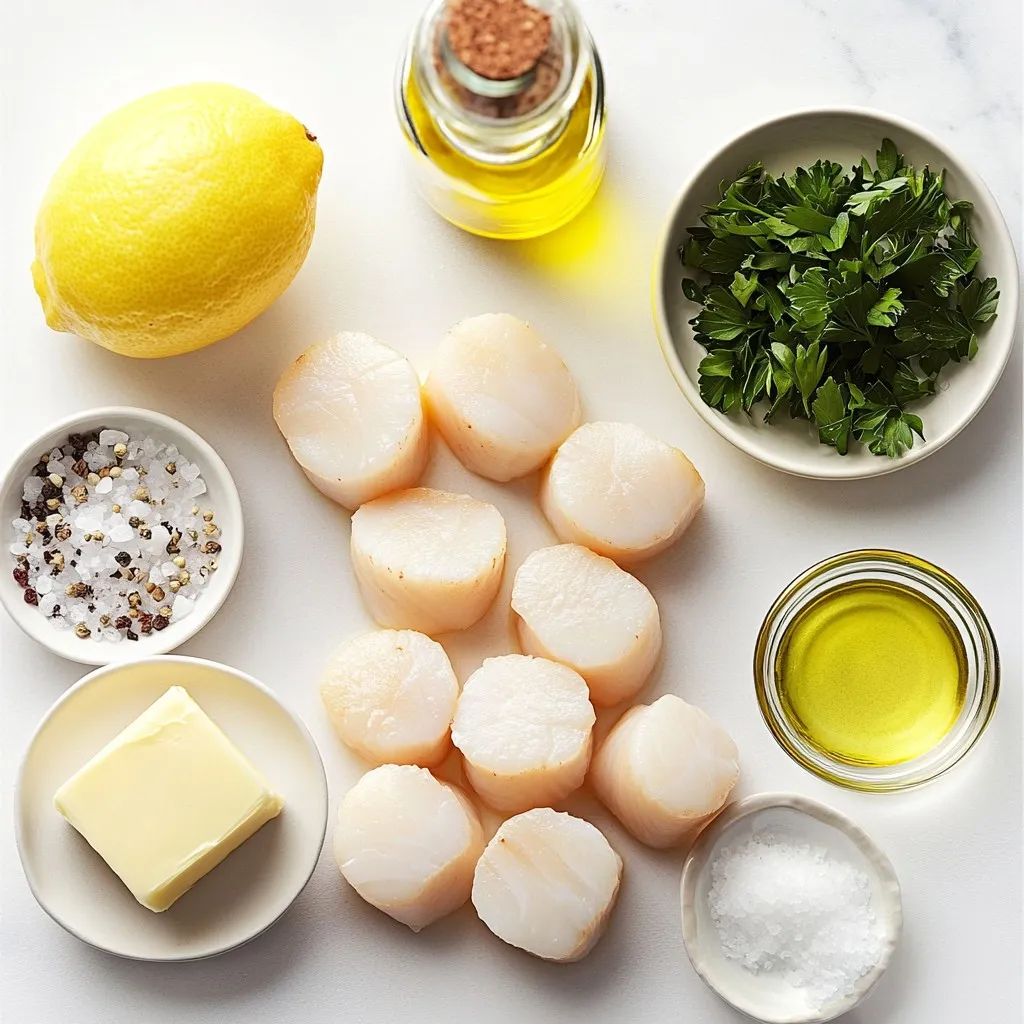
To make lemon butter scallops, gather these ingredients:
– 1 lb sea scallops, cleaned and patted dry
– 4 tablespoons unsalted butter
– 2 tablespoons olive oil
– 2 cloves garlic, minced
– Zest of 1 lemon
– 2 tablespoons fresh lemon juice
– Salt and pepper to taste
– Fresh parsley, chopped for garnish
Tips for Selecting Scallops
When choosing scallops, look for these signs:
– Freshness: They should smell like the sea, not fishy.
– Texture: They should feel firm and springy to touch.
– Color: Choose scallops that are creamy white or slightly beige.
– Size: Larger scallops sear better and have more flavor.
Substitutions for Ingredients
You can make some easy swaps if you need to. Here are a few options:
– Butter: Use ghee or coconut oil for a dairy-free version.
– Olive Oil: Substitute with avocado oil for a different flavor.
– Garlic: Try shallots for a milder taste.
– Parsley: Use chives or basil for a unique twist.

Step-by-Step Instructions
Preparing the Scallops
Start by taking 1 pound of sea scallops. Clean them well and pat them dry using paper towels. Dry scallops help you get a great sear. If they are wet, they will steam instead of sear. This step is key to getting that nice golden color.
Heating the Pan Properly
Grab a large skillet and place it on the stove. Add 2 tablespoons of butter and 2 tablespoons of olive oil. Set the heat to medium-high. Wait until the butter melts and the oil shimmers. This means the pan is hot enough. A hot pan helps to sear the scallops quickly.
Searing and Flipping the Scallops
Once the pan is hot, add the scallops. Make sure not to crowd them. Leave space between each scallop. Sear them for 2 to 3 minutes without moving them. You want a golden crust. After that, gently flip each scallop. Add minced garlic, lemon zest, and the remaining 2 tablespoons of butter. Cook for another 2 to 3 minutes. The scallops should turn opaque and firm. Remove the pan from heat and drizzle lemon juice over the top. This adds a fresh taste to the dish.
Tips & Tricks
Achieving the Perfect Sear
To get a great sear on your scallops, start with dry scallops. Pat them with paper towels. This helps the scallops brown well. Use a hot pan. Heat 2 tablespoons of butter with 2 tablespoons of olive oil. The mix should shimmer but not smoke. Place the scallops in the pan, but don’t crowd them. Give each scallop space. Sear them for 2-3 minutes without moving. This makes a golden crust.
Ensuring Flavor Infusion
For rich flavor, add garlic and lemon zest when you flip the scallops. The garlic should be minced fine. This helps it cook quickly and blend well. Add the rest of the butter at the same time. It melts and makes a sauce. Finally, drizzle fresh lemon juice right before serving. This adds brightness and freshness to the dish.
Common Mistakes to Avoid
One common mistake is overcrowding the pan. Scallops need room to sear. If you crowd them, they steam instead. Another mistake is cooking them too long. Cook just until they are opaque. Overcooking makes them tough. Lastly, don’t skip the lemon juice. It ties the flavors together and lifts the dish.
Pro Tips
- Pat Dry for Perfect Sear: Ensuring your scallops are completely dry before cooking is crucial for achieving a golden crust.
- Don’t Overcrowd the Pan: Give scallops enough space in the skillet to sear properly; overcrowding can cause steaming instead of searing.
- Use Fresh Ingredients: Fresh garlic and lemon will enhance the flavor of your dish significantly, so opt for fresh over dried or bottled.
- Rest Before Serving: Allow scallops to rest for a minute after cooking to help retain their juices and enhance flavor.

Variations
Adding Different Herbs
You can change the flavor of lemon butter scallops by using various herbs. Fresh herbs bring bright tastes. Try using thyme or dill. These herbs add a lovely touch. You can mix them with parsley for more flavor. Just sprinkle herbs right before serving.
Incorporating Additional Ingredients
Feel free to add more ingredients to the dish. For a richer taste, try adding capers or sun-dried tomatoes. They give a nice contrast to the scallops. You can also add a splash of white wine while cooking. This adds depth to the sauce. Another great option is to toss in vegetables like asparagus or spinach. They make the meal more colorful and healthy.
Serving Suggestions and Pairings
Pair your lemon butter scallops with delicious sides. A light salad with mixed greens works perfectly. The freshness of the salad balances the richness of the scallops. You can also serve them over pasta or rice. This makes the meal hearty and filling. Don’t forget a nice crusty bread to soak up the sauce. A crisp white wine, like Sauvignon Blanc, complements the dish well.
Storage Info
Storing Leftovers
After you enjoy your lemon butter scallops, you may have some left. Store them in an airtight container. This keeps them fresh and tasty. Place the container in the fridge. They last for about 1-2 days. If you need more time, consider freezing them.
Reheating Instructions
To reheat your scallops, use a skillet. Heat it on low. Add a bit of butter or oil for flavor. Place the scallops in the pan. Warm them for about 2-3 minutes. Flip them gently to heat evenly. Avoid cooking them too long, or they may become tough.
Best Practices for Freezing Scallops
If you want to freeze scallops, follow these steps. First, cool them completely. Then, wrap each scallop in plastic wrap. Place them in a freezer bag. Remove as much air as possible. This helps prevent freezer burn. Scallops can last in the freezer for up to three months. When you’re ready to cook, thaw them in the fridge overnight.
FAQs
Can I use frozen scallops for this recipe?
Yes, you can use frozen scallops. Just make sure to thaw them first. Place them in the fridge overnight or run them under cold water for quicker thawing. After thawing, pat them dry well. This step helps you get a good sear. If they are too wet, they will not brown nicely.
What can I serve with lemon butter scallops?
Lemon butter scallops pair well with many sides. Here are a few ideas:
– Garlic mashed potatoes: Creamy and buttery, they complement the dish well.
– Steamed asparagus: This adds a nice crunch and color.
– Lemon rice: Fluffy rice with a hint of lemon enhances the flavors.
– Mixed green salad: A fresh salad brightens up your meal.
Feel free to mix and match your sides based on your taste.
How do I know when scallops are done cooking?
Scallops are done when they turn opaque and firm. They should have a golden crust on the outside. Each side usually takes about 2-3 minutes to cook. You can also cut one open to check. If it is slightly translucent in the center, it may need a bit more time. Be careful not to overcook them. Overcooked scallops can become tough and chewy.
This article explored the ingredients needed for delicious scallops, from selection tips to substitutes. We walked through the step-by-step process of preparing, searing, and flipping the scallops to get that perfect bite. I shared helpful tips and tricks for achieving great flavor and avoiding common mistakes. You learned about variations and serving suggestions, plus how to store and reheat leftovers.
Final thoughts: Cooking scallops is simple once you know these key steps. Enjoy your cookin

Lemon Butter Scallops
Ingredients
- 1 lb sea scallops, cleaned and patted dry
- 4 tablespoons unsalted butter
- 2 tablespoons olive oil
- 2 cloves garlic, minced
- 1 zest lemon
- 2 tablespoons fresh lemon juice
- to taste salt and pepper
- for garnish fresh parsley, chopped
Instructions
- Prepare the Scallops: Ensure the scallops are dry by patting them with paper towels. This will help achieve a nice sear.
- Heat the Pan: In a large skillet, heat 2 tablespoons of butter and 2 tablespoons of olive oil over medium-high heat.
- Sear the Scallops: Once hot, place the scallops in the pan, ensuring they are not overcrowded. Sear for about 2-3 minutes on one side without moving them, or until they develop a golden crust.
- Flip and Add Flavors: Gently flip the scallops and add minced garlic, lemon zest, and the remaining 2 tablespoons of butter. Cook for an additional 2-3 minutes until the scallops are opaque and cooked through.
- Finish with Lemon Juice: Remove the skillet from heat and drizzle fresh lemon juice over the scallops while still in the pan.
- Serve: Plate the scallops and spoon some of the buttery garlic sauce from the pan over them. Garnish with freshly chopped parsley.


![- 8 oz rice noodles - 1 cup red bell pepper, julienned - 1 cup yellow bell pepper, julienned - 1 cup cucumber, julienned - 1 cup purple cabbage, shredded - 1 cup carrots, grated - 1 cup edamame (shelled) - 1/4 cup fresh cilantro, chopped - 1/4 cup green onions, sliced For the Peanut Sauce: - 1/2 cup creamy peanut butter - 3 tablespoons soy sauce (or tamari for a gluten-free option) - 2 tablespoons lime juice - 1 tablespoon maple syrup (or honey) - 1 tablespoon sesame oil - 1 garlic clove, minced - 1 teaspoon grated fresh ginger - 1-2 tablespoons water (to thin the sauce, as needed) Each serving has about 250 calories. This salad is packed with nutrients. It offers protein and fiber from the noodles and veggies. The peanut sauce adds healthy fats and flavor. Each bite is both tasty and good for you. If you need gluten-free options, use rice noodles and tamari. For vegan alternatives, swap honey for maple syrup. You can also add tofu for extra protein. This salad can fit many diets while still being delicious. You can find the full recipe for Rainbow Thai Peanut Noodle Salad [Full Recipe]. To start, bring a large pot of water to a boil. Use enough water to let the noodles float freely. Once boiling, add 8 oz of rice noodles. Cook them for about 3 to 5 minutes, or until they are firm but tender. Keep an eye on them! After they are cooked, drain them in a colander. Rinse the noodles with cold water. This stops the cooking and keeps the noodles from sticking together. Set them aside while you prep the veggies. While the noodles cook, wash and cut the vegetables. To make it easy, julienne the red and yellow bell peppers. Use a sharp knife for clean cuts. Slice the cucumber and shred the purple cabbage. Grate the carrots too. Aim for uniform pieces so they mix well. Once cut, place all the veggies in a large mixing bowl. This keeps everything together for the next step. You can also add the edamame for extra protein. Now, let’s make the peanut sauce! In a medium bowl, mix 1/2 cup of creamy peanut butter, 3 tablespoons of soy sauce, and 2 tablespoons of lime juice. Add 1 tablespoon of maple syrup for a touch of sweetness. Next, add 1 tablespoon of sesame oil, 1 minced garlic clove, and 1 teaspoon of grated ginger. Whisk these ingredients together until smooth. If the sauce feels thick, add 1-2 tablespoons of water. This helps thin it out to your liking. Now, pour this yummy sauce over the noodles and veggies. Toss gently to coat everything evenly. The flavors will blend beautifully together. For more details, check the Full Recipe. To cook noodles al dente, bring water to a boil. Add rice noodles and cook for about 4-6 minutes. Stir often to prevent sticking. Once done, drain and rinse under cold water. This stops cooking and keeps noodles firm. For crunchy vegetables, cut them just before serving. This keeps their crispness. Use a sharp knife for even slices. Julienne the peppers and cucumber. Shred the cabbage and grate the carrots. Keep them colorful for a vibrant dish. Boost flavor with spices and condiments. A pinch of red pepper flakes gives heat. Add a splash of fish sauce for depth. If you love citrus, lime zest brightens the dish. Fresh herbs make a big difference. Cilantro adds a fresh taste. You can try mint or basil for a twist. Chop herbs finely and mix them in just before serving. Serving bowls set the stage for a great meal. Use larger bowls for family-style serving. For individual plates, choose clear glass bowls. This shows off the colorful layers. Garnishing techniques can elevate your dish. Sprinkle extra cilantro on top for a pop of green. Add chopped peanuts for crunch. Arrange salad in colorful layers for a beautiful view. A rainbow of colors always catches the eye. {{image_2}} You can make this salad heartier by adding protein. Chicken is a great choice. Just grill or sauté it, then slice it thin. Tofu is another option. It soaks up the peanut sauce well. You can also try shrimp or beans for a different flavor. Each adds a nice touch to the Rainbow Thai Peanut Noodle Salad. Switching up the peanut sauce can give your salad new life. You can try a sesame sauce for a nutty twist. Just blend sesame paste with soy sauce and lime juice. For a sweeter flavor, teriyaki sauce works well too. It brings a rich taste that pairs nicely with the fresh veggies. Using seasonal vegetables can enhance your salad's freshness. In summer, add ripe tomatoes or corn for sweetness. Fall brings squash or roasted peppers for warmth. Winter might call for hearty greens like kale. Each season offers unique flavors. Tailoring your recipe helps keep it exciting all year long. For the full recipe, check out the detailed steps to make this dish shine. To store leftovers of your Rainbow Thai Peanut Noodle Salad, put it in the fridge. Use an airtight container to keep it fresh. Glass containers work great because they don’t hold onto smells. If you use plastic, make sure it’s food-safe and BPA-free. You can freeze the salad, but it is best to freeze only the noodles and sauce. Keep the veggies separate. They don't freeze well and lose their crunch. To thaw, move the noodles and sauce to the fridge overnight. When ready to eat, heat the noodles gently and mix in fresh veggies. This keeps everything bright and tasty. In the fridge, the salad lasts about 3 to 5 days. Check for signs of spoilage before eating. If the veggies look wilted or the sauce smells off, it’s best to toss it. Freshness is key for this vibrant dish! What is the best type of noodles for this salad? The best noodles are rice noodles. They are light and soak up the sauce. You can also use soba or whole grain noodles if you prefer. Just remember to cook them until they are al dente. This keeps them from getting too mushy in the salad. Can I make the salad in advance? Yes, you can make the salad ahead of time. It tastes better after chilling for a bit. Prepare it up to a day in advance and store it in the fridge. Just keep the sauce separate if you want the noodles to stay firm. What to do if the sauce is too thick? If your sauce is too thick, add a tablespoon of water. Mix it well, and check again. You can repeat this until it reaches the right consistency. A smooth sauce coats the salad nicely. How to fix overly soggy noodles? To fix soggy noodles, rinse them in cold water. This stops the cooking process and helps firm them up. If they still seem too soft, use them in soups or stir-fries instead. What can I serve with Rainbow Thai Peanut Noodle Salad? This salad pairs well with grilled chicken or shrimp. You can also serve it with spring rolls for a light meal. Add a side of fresh fruit for a sweet touch. Can this dish be served warm? Yes, you can serve this dish warm. Just toss the salad right after mixing it. However, I recommend chilling it first to enhance the flavors. For the full recipe, check out the details provided above. This blog post covered key ingredients for Rainbow Thai Peanut Noodle Salad, including rice noodles, fresh veggies, and tasty peanut sauce. I shared nutritional info, substitutions for dietary needs, and step-by-step cooking instructions. We also explored tips to enhance texture and flavor, various protein additions, and creative presentation ideas. Overall, this salad is versatile and easy to make, perfect for any occasion. Keep it fresh, store leftovers properly, and don't hesitate to try new variations. Enjoy crafting your delicious, colorful dish!](https://dailydishly.com/wp-content/uploads/2025/07/2e038f5f-8562-408c-ae38-174aa7e62a42-768x768.webp)


