Lemon Dill Salmon Cakes Flavorful and Simple Recipe
![- 2 cups cooked salmon, flaked - 1/2 cup breadcrumbs (preferably panko) - 1/4 cup fresh dill, finely chopped - 1/4 cup green onions, finely chopped - 1/4 cup mayonnaise - 1 tablespoon Dijon mustard - 1 tablespoon lemon juice - 1 teaspoon lemon zest - 1 egg, lightly beaten - 1/2 teaspoon garlic powder - Olive oil for frying - Salt and pepper to taste You can swap out fresh dill for dried dill if needed. Use whole wheat or gluten-free breadcrumbs for a healthier option. If you don't have mayonnaise, Greek yogurt works great. For salmon, you can use canned salmon, which saves time and is still tasty. Each salmon cake has about 200 calories. They provide around 15 grams of protein, which is great for muscle health. The healthy fats from salmon support heart health. You also get vitamins and minerals from the dill and lemon. These cakes offer a good balance of carbs and protein, making them a smart choice for meals or snacks. 1. Start by gathering all your ingredients. You will need cooked salmon, breadcrumbs, dill, and more. 2. In a large mixing bowl, combine the flaked salmon, breadcrumbs, dill, green onions, mayonnaise, Dijon mustard, lemon juice, lemon zest, and garlic powder. 3. Next, add the lightly beaten egg along with salt and pepper to taste. 4. Mix everything until just combined. Be careful not to overmix; this keeps the cakes light. 5. Now, form the mixture into patties. Make them about 2-3 inches wide and 1/2 inch thick. You should get around 8-10 patties. 1. Heat a skillet over medium heat. Pour in a drizzle of olive oil to coat the bottom. 2. Wait for the oil to get hot. This is key for a good crisp. 3. Carefully place the patties in the skillet. Don't overcrowd the pan; cook in batches if needed. 4. Fry each side for about 4-5 minutes. You want them golden brown and cooked through. 5. Once they're done, move the cakes to a paper towel-lined plate. This helps absorb extra oil. 1. Present the salmon cakes on a nice platter. Add some lemon wedges on the side for a pop of color. 2. Garnish with extra fresh dill to make it look appealing. 3. Serve with a side of tartar sauce or a light salad for a complete meal. 4. Enjoy your flavorful Lemon Dill Salmon Cakes! You can find the Full Recipe for more detailed steps. To make the best Lemon Dill Salmon Cakes, focus on a few key points. First, use fresh ingredients. Fresh dill and green onions boost flavor. Second, don’t overmix the batter. This keeps your cakes tender. Form the patties gently to maintain their structure. When frying, make sure the oil is hot. This helps create a golden crust. Flip the cakes carefully to avoid breaking them. Lastly, let them rest on paper towels to absorb extra oil. Serve your salmon cakes with bright sides. A fresh green salad pairs well. You might also want to try a simple tartar sauce or yogurt dip. Lemon wedges add a nice touch. Pick a sauce with a bit of tang to balance the richness of the salmon. This will enhance the flavors and make the meal more enjoyable. For storing leftover salmon cakes, cool them first. Then, place them in an airtight container. They can stay in the fridge for up to three days. If you want to keep them longer, freeze them. Wrap each cake in plastic wrap, then place them in a freezer bag. They last up to three months in the freezer. To reheat, warm them in a skillet or the oven. This keeps them crispy and delicious. For the full recipe and step-by-step guide, check the [Full Recipe]. {{image_2}} You can easily change the flavor of these salmon cakes. Adding spices can make a big difference. Try mixing in: - Old Bay seasoning for a classic seafood taste. - Cajun seasoning for a spicy kick. - Fresh parsley instead of dill for a different herb flavor. - Capers for a briny touch. You can also mix in some cheese, like feta or cheddar. This adds creaminess and richness. Don't be afraid to experiment with your favorite flavors. If you want to make these cakes gluten-free, swap out regular breadcrumbs for gluten-free ones. You can also use crushed rice cakes or almond flour. For a low-carb option, skip the breadcrumbs entirely. Use a bit more egg to help bind the cakes. You can even add mashed cauliflower for extra nutrition and texture. While frying gives a nice crispy texture, you can bake or air fry these salmon cakes. To bake, preheat your oven to 400°F (200°C). Place the formed patties on a baking sheet lined with parchment paper. Brush them lightly with olive oil and bake for 15-20 minutes or until golden. For air frying, set your air fryer to 375°F (190°C) and cook for about 10-12 minutes. This method keeps the cakes crispy with less oil. To keep Lemon Dill Salmon Cakes fresh, store them in an airtight container. Place parchment paper between layers to avoid sticking. Refrigerate them if you plan to eat them within three days. For longer storage, freeze the cakes. Wrap each patty in plastic wrap and place them in a freezer bag. This keeps them safe from freezer burn. In the fridge, Lemon Dill Salmon Cakes last about three days. Make sure they are in a sealed container. If you freeze them, they can last up to three months. Just remember, the longer you freeze, the more the texture can change. Reheat salmon cakes safely to enjoy their full flavor. You can use a skillet for the best results. Heat a bit of olive oil over medium heat. Place the cakes in the skillet and cook for about 3-4 minutes on each side. Alternatively, you can use an oven. Preheat it to 350°F (175°C) and bake for 10-15 minutes. This method keeps them moist and helps restore the crispiness. Lemon Dill Salmon Cakes last about 3 to 4 days in the fridge. Make sure to store them in an airtight container. This keeps them fresh and safe to eat. If you see any changes in color or smell, throw them away. Always trust your senses when it comes to food safety. Yes, you can use canned salmon for this recipe. It makes the cooking process quicker and easier. Canned salmon is already cooked, so you just need to mix it with the other ingredients. However, fresh salmon often has a better taste and texture. If you choose canned salmon, look for wild-caught options for a healthier choice. These salmon cakes pair well with many sides. Here are some ideas: - A fresh green salad with a light vinaigrette - Crispy roasted potatoes or sweet potato fries - Steamed vegetables like broccoli or green beans - A tangy tartar sauce or lemon aioli for dipping - Light, chilled white wine or sparkling water These sides complement the flavors of the salmon cakes and make for a tasty meal. For the full recipe, check out the [Full Recipe]. Lemon Dill Salmon Cakes are a tasty, healthy choice. We covered key ingredients, how to make them, and tips for serving. You can mix up flavors and even swap ingredients based on your needs. Remember to store leftovers properly to enjoy later. Whether you're cooking for yourself or others, these cakes bring joy to the table. Experiment with cooking methods and pairings to find your favorite version. Enjoy creating this delicious dish that’s both satisfying and good for you.](https://dailydishly.com/wp-content/uploads/2025/06/eb5d3737-472f-4456-95e5-2392a9f87439.webp)
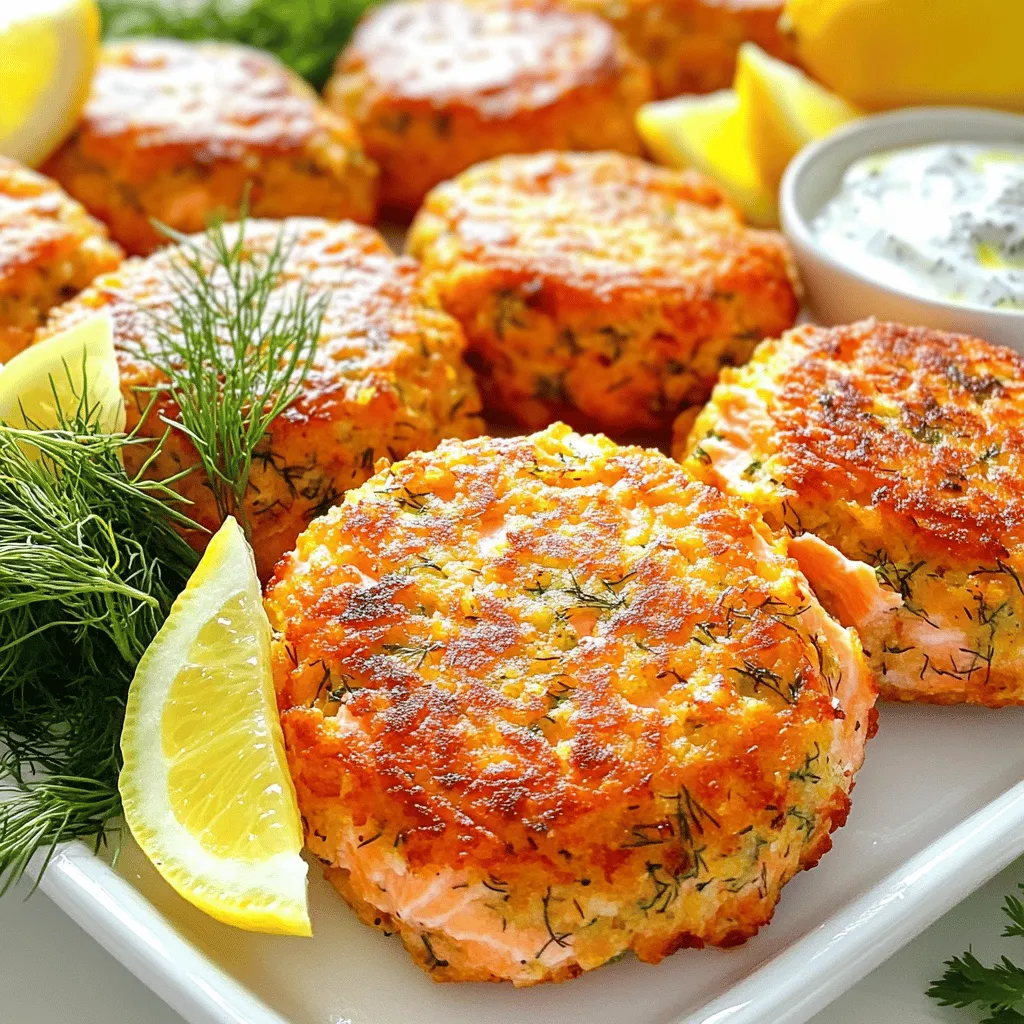
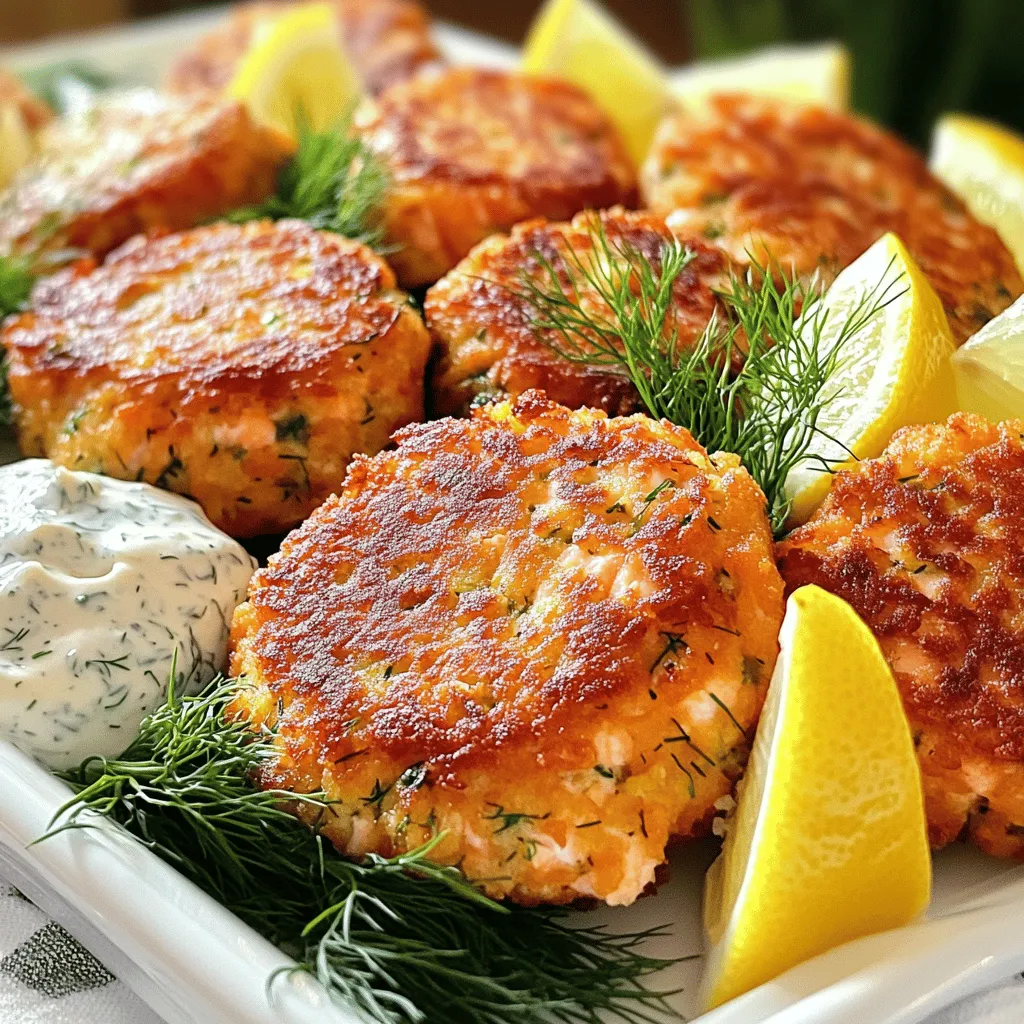
Craving a dish that’s both simple and bursting with flavor? Try my Lemon Dill Salmon Cakes! This recipe combines fresh salmon, zesty lemon, and fragrant dill into a delightful meal that’s quick to make. Whether you’re a busy parent or a cooking novice, you’ll find that these salmon cakes are easy to whip up and perfect for any occasion. Get ready to impress your family and friends with this tasty treat!
Ingredients
List of Ingredients
– 2 cups cooked salmon, flaked
– 1/2 cup breadcrumbs (preferably panko)
– 1/4 cup fresh dill, finely chopped
– 1/4 cup green onions, finely chopped
– 1/4 cup mayonnaise
– 1 tablespoon Dijon mustard
– 1 tablespoon lemon juice
– 1 teaspoon lemon zest
– 1 egg, lightly beaten
– 1/2 teaspoon garlic powder
– Olive oil for frying
– Salt and pepper to taste
Ingredient Substitutions
You can swap out fresh dill for dried dill if needed. Use whole wheat or gluten-free breadcrumbs for a healthier option. If you don’t have mayonnaise, Greek yogurt works great. For salmon, you can use canned salmon, which saves time and is still tasty.
Nutritional Information
Each salmon cake has about 200 calories. They provide around 15 grams of protein, which is great for muscle health. The healthy fats from salmon support heart health. You also get vitamins and minerals from the dill and lemon. These cakes offer a good balance of carbs and protein, making them a smart choice for meals or snacks.
Step-by-Step Instructions
Preparation Steps
1. Start by gathering all your ingredients. You will need cooked salmon, breadcrumbs, dill, and more.
2. In a large mixing bowl, combine the flaked salmon, breadcrumbs, dill, green onions, mayonnaise, Dijon mustard, lemon juice, lemon zest, and garlic powder.
3. Next, add the lightly beaten egg along with salt and pepper to taste.
4. Mix everything until just combined. Be careful not to overmix; this keeps the cakes light.
5. Now, form the mixture into patties. Make them about 2-3 inches wide and 1/2 inch thick. You should get around 8-10 patties.
Cooking Instructions
1. Heat a skillet over medium heat. Pour in a drizzle of olive oil to coat the bottom.
2. Wait for the oil to get hot. This is key for a good crisp.
3. Carefully place the patties in the skillet. Don’t overcrowd the pan; cook in batches if needed.
4. Fry each side for about 4-5 minutes. You want them golden brown and cooked through.
5. Once they’re done, move the cakes to a paper towel-lined plate. This helps absorb extra oil.
Serving Suggestions
1. Present the salmon cakes on a nice platter. Add some lemon wedges on the side for a pop of color.
2. Garnish with extra fresh dill to make it look appealing.
3. Serve with a side of tartar sauce or a light salad for a complete meal.
4. Enjoy your flavorful Lemon Dill Salmon Cakes!
Tips & Tricks
Cooking Tips
To make the best Lemon Dill Salmon Cakes, focus on a few key points. First, use fresh ingredients. Fresh dill and green onions boost flavor. Second, don’t overmix the batter. This keeps your cakes tender. Form the patties gently to maintain their structure. When frying, make sure the oil is hot. This helps create a golden crust. Flip the cakes carefully to avoid breaking them. Lastly, let them rest on paper towels to absorb extra oil.
Serving Tips
Serve your salmon cakes with bright sides. A fresh green salad pairs well. You might also want to try a simple tartar sauce or yogurt dip. Lemon wedges add a nice touch. Pick a sauce with a bit of tang to balance the richness of the salmon. This will enhance the flavors and make the meal more enjoyable.
Storage Tips
For storing leftover salmon cakes, cool them first. Then, place them in an airtight container. They can stay in the fridge for up to three days. If you want to keep them longer, freeze them. Wrap each cake in plastic wrap, then place them in a freezer bag. They last up to three months in the freezer. To reheat, warm them in a skillet or the oven. This keeps them crispy and delicious.

Variations
Flavor Variations
You can easily change the flavor of these salmon cakes. Adding spices can make a big difference. Try mixing in:
– Old Bay seasoning for a classic seafood taste.
– Cajun seasoning for a spicy kick.
– Fresh parsley instead of dill for a different herb flavor.
– Capers for a briny touch.
You can also mix in some cheese, like feta or cheddar. This adds creaminess and richness. Don’t be afraid to experiment with your favorite flavors.
Diet-Friendly Variations
If you want to make these cakes gluten-free, swap out regular breadcrumbs for gluten-free ones. You can also use crushed rice cakes or almond flour. For a low-carb option, skip the breadcrumbs entirely. Use a bit more egg to help bind the cakes. You can even add mashed cauliflower for extra nutrition and texture.
Cooking Method Variations
While frying gives a nice crispy texture, you can bake or air fry these salmon cakes. To bake, preheat your oven to 400°F (200°C). Place the formed patties on a baking sheet lined with parchment paper. Brush them lightly with olive oil and bake for 15-20 minutes or until golden. For air frying, set your air fryer to 375°F (190°C) and cook for about 10-12 minutes. This method keeps the cakes crispy with less oil.
Storage Information
How to Store
To keep Lemon Dill Salmon Cakes fresh, store them in an airtight container. Place parchment paper between layers to avoid sticking. Refrigerate them if you plan to eat them within three days. For longer storage, freeze the cakes. Wrap each patty in plastic wrap and place them in a freezer bag. This keeps them safe from freezer burn.
Shelf Life
In the fridge, Lemon Dill Salmon Cakes last about three days. Make sure they are in a sealed container. If you freeze them, they can last up to three months. Just remember, the longer you freeze, the more the texture can change.
Reheating Instructions
Reheat salmon cakes safely to enjoy their full flavor. You can use a skillet for the best results. Heat a bit of olive oil over medium heat. Place the cakes in the skillet and cook for about 3-4 minutes on each side. Alternatively, you can use an oven. Preheat it to 350°F (175°C) and bake for 10-15 minutes. This method keeps them moist and helps restore the crispiness.
FAQs
How long do Lemon Dill Salmon Cakes last in the fridge?
Lemon Dill Salmon Cakes last about 3 to 4 days in the fridge. Make sure to store them in an airtight container. This keeps them fresh and safe to eat. If you see any changes in color or smell, throw them away. Always trust your senses when it comes to food safety.
Can I use canned salmon for this recipe?
Yes, you can use canned salmon for this recipe. It makes the cooking process quicker and easier. Canned salmon is already cooked, so you just need to mix it with the other ingredients. However, fresh salmon often has a better taste and texture. If you choose canned salmon, look for wild-caught options for a healthier choice.
What can I serve with Lemon Dill Salmon Cakes?
These salmon cakes pair well with many sides. Here are some ideas:
– A fresh green salad with a light vinaigrette
– Crispy roasted potatoes or sweet potato fries
– Steamed vegetables like broccoli or green beans
– A tangy tartar sauce or lemon aioli for dipping
– Light, chilled white wine or sparkling water
These sides complement the flavors of the salmon cakes and make for a tasty meal.
Lemon Dill Salmon Cakes are a tasty, healthy choice. We covered key ingredients, how to make them, and tips for serving. You can mix up flavors and even swap ingredients based on your needs. Remember to store leftovers properly to enjoy later. Whether you’re cooking for yourself or others, these cakes bring joy to the table. Experiment with cooking methods and pairings to find your favorite version. Enjoy creating this delicious dish that’s both satisfying and good for you.
![- 2 cups cooked salmon, flaked - 1/2 cup breadcrumbs (preferably panko) - 1/4 cup fresh dill, finely chopped - 1/4 cup green onions, finely chopped - 1/4 cup mayonnaise - 1 tablespoon Dijon mustard - 1 tablespoon lemon juice - 1 teaspoon lemon zest - 1 egg, lightly beaten - 1/2 teaspoon garlic powder - Olive oil for frying - Salt and pepper to taste You can swap out fresh dill for dried dill if needed. Use whole wheat or gluten-free breadcrumbs for a healthier option. If you don't have mayonnaise, Greek yogurt works great. For salmon, you can use canned salmon, which saves time and is still tasty. Each salmon cake has about 200 calories. They provide around 15 grams of protein, which is great for muscle health. The healthy fats from salmon support heart health. You also get vitamins and minerals from the dill and lemon. These cakes offer a good balance of carbs and protein, making them a smart choice for meals or snacks. 1. Start by gathering all your ingredients. You will need cooked salmon, breadcrumbs, dill, and more. 2. In a large mixing bowl, combine the flaked salmon, breadcrumbs, dill, green onions, mayonnaise, Dijon mustard, lemon juice, lemon zest, and garlic powder. 3. Next, add the lightly beaten egg along with salt and pepper to taste. 4. Mix everything until just combined. Be careful not to overmix; this keeps the cakes light. 5. Now, form the mixture into patties. Make them about 2-3 inches wide and 1/2 inch thick. You should get around 8-10 patties. 1. Heat a skillet over medium heat. Pour in a drizzle of olive oil to coat the bottom. 2. Wait for the oil to get hot. This is key for a good crisp. 3. Carefully place the patties in the skillet. Don't overcrowd the pan; cook in batches if needed. 4. Fry each side for about 4-5 minutes. You want them golden brown and cooked through. 5. Once they're done, move the cakes to a paper towel-lined plate. This helps absorb extra oil. 1. Present the salmon cakes on a nice platter. Add some lemon wedges on the side for a pop of color. 2. Garnish with extra fresh dill to make it look appealing. 3. Serve with a side of tartar sauce or a light salad for a complete meal. 4. Enjoy your flavorful Lemon Dill Salmon Cakes! You can find the Full Recipe for more detailed steps. To make the best Lemon Dill Salmon Cakes, focus on a few key points. First, use fresh ingredients. Fresh dill and green onions boost flavor. Second, don’t overmix the batter. This keeps your cakes tender. Form the patties gently to maintain their structure. When frying, make sure the oil is hot. This helps create a golden crust. Flip the cakes carefully to avoid breaking them. Lastly, let them rest on paper towels to absorb extra oil. Serve your salmon cakes with bright sides. A fresh green salad pairs well. You might also want to try a simple tartar sauce or yogurt dip. Lemon wedges add a nice touch. Pick a sauce with a bit of tang to balance the richness of the salmon. This will enhance the flavors and make the meal more enjoyable. For storing leftover salmon cakes, cool them first. Then, place them in an airtight container. They can stay in the fridge for up to three days. If you want to keep them longer, freeze them. Wrap each cake in plastic wrap, then place them in a freezer bag. They last up to three months in the freezer. To reheat, warm them in a skillet or the oven. This keeps them crispy and delicious. For the full recipe and step-by-step guide, check the [Full Recipe]. {{image_2}} You can easily change the flavor of these salmon cakes. Adding spices can make a big difference. Try mixing in: - Old Bay seasoning for a classic seafood taste. - Cajun seasoning for a spicy kick. - Fresh parsley instead of dill for a different herb flavor. - Capers for a briny touch. You can also mix in some cheese, like feta or cheddar. This adds creaminess and richness. Don't be afraid to experiment with your favorite flavors. If you want to make these cakes gluten-free, swap out regular breadcrumbs for gluten-free ones. You can also use crushed rice cakes or almond flour. For a low-carb option, skip the breadcrumbs entirely. Use a bit more egg to help bind the cakes. You can even add mashed cauliflower for extra nutrition and texture. While frying gives a nice crispy texture, you can bake or air fry these salmon cakes. To bake, preheat your oven to 400°F (200°C). Place the formed patties on a baking sheet lined with parchment paper. Brush them lightly with olive oil and bake for 15-20 minutes or until golden. For air frying, set your air fryer to 375°F (190°C) and cook for about 10-12 minutes. This method keeps the cakes crispy with less oil. To keep Lemon Dill Salmon Cakes fresh, store them in an airtight container. Place parchment paper between layers to avoid sticking. Refrigerate them if you plan to eat them within three days. For longer storage, freeze the cakes. Wrap each patty in plastic wrap and place them in a freezer bag. This keeps them safe from freezer burn. In the fridge, Lemon Dill Salmon Cakes last about three days. Make sure they are in a sealed container. If you freeze them, they can last up to three months. Just remember, the longer you freeze, the more the texture can change. Reheat salmon cakes safely to enjoy their full flavor. You can use a skillet for the best results. Heat a bit of olive oil over medium heat. Place the cakes in the skillet and cook for about 3-4 minutes on each side. Alternatively, you can use an oven. Preheat it to 350°F (175°C) and bake for 10-15 minutes. This method keeps them moist and helps restore the crispiness. Lemon Dill Salmon Cakes last about 3 to 4 days in the fridge. Make sure to store them in an airtight container. This keeps them fresh and safe to eat. If you see any changes in color or smell, throw them away. Always trust your senses when it comes to food safety. Yes, you can use canned salmon for this recipe. It makes the cooking process quicker and easier. Canned salmon is already cooked, so you just need to mix it with the other ingredients. However, fresh salmon often has a better taste and texture. If you choose canned salmon, look for wild-caught options for a healthier choice. These salmon cakes pair well with many sides. Here are some ideas: - A fresh green salad with a light vinaigrette - Crispy roasted potatoes or sweet potato fries - Steamed vegetables like broccoli or green beans - A tangy tartar sauce or lemon aioli for dipping - Light, chilled white wine or sparkling water These sides complement the flavors of the salmon cakes and make for a tasty meal. For the full recipe, check out the [Full Recipe]. Lemon Dill Salmon Cakes are a tasty, healthy choice. We covered key ingredients, how to make them, and tips for serving. You can mix up flavors and even swap ingredients based on your needs. Remember to store leftovers properly to enjoy later. Whether you're cooking for yourself or others, these cakes bring joy to the table. Experiment with cooking methods and pairings to find your favorite version. Enjoy creating this delicious dish that’s both satisfying and good for you.](https://dailydishly.com/wp-content/uploads/2025/06/eb5d3737-472f-4456-95e5-2392a9f87439-300x300.webp)


![For the best garlic butter steak bites, I recommend using sirloin steak. Sirloin is tender and flavorful, making it perfect for this dish. Cut the steak into 1-inch cubes. This size cooks quickly and evenly. Make sure to pat the steak dry with paper towels. This step removes moisture and helps achieve a nice sear. The flavors come alive with fresh herbs. I use 1 teaspoon of fresh rosemary and 1 teaspoon of fresh thyme. You can also use dried herbs if you prefer. Just use half the amount. Don't forget salt and pepper! Season the steak well on all sides to enhance its natural taste. You’ll need 4 tablespoons of unsalted butter and 5 cloves of minced garlic. The butter adds richness, and the garlic brings a wonderful aroma. Finally, garnish with fresh parsley for a pop of color. This simple ingredient list makes the garlic butter steak bites shine. For the full recipe, check out the [Full Recipe]. First, you need to prepare the steak. Take 1 lb of sirloin and cut it into 1-inch cubes. Pat these cubes dry with paper towels. This step helps to make a great sear. Now, season the cubes with salt and pepper on all sides. Use enough seasoning, so the flavor shines through. Next, heat a large skillet over medium-high heat. Add 2 tablespoons of unsalted butter. Wait until the butter is foamy and starts to brown. Then, add half of the steak cubes to the skillet. Sear the steak bites for about 2-3 minutes on each side. Look for a nice brown color. Once done, take them out and set them aside. Repeat for the other half, adding more butter if needed. Now it's time to bring it all together. Lower the heat to medium-low and return all the steak bites to the skillet. Add 5 minced garlic cloves, 1 teaspoon of chopped fresh rosemary, and 1 teaspoon of chopped fresh thyme. Cook for 1-2 minutes while stirring often. You want the garlic to be fragrant but not burnt. Finally, remove the skillet from heat. Stir in the last tablespoon of butter until it melts and mixes well with the steak bites. Adjust the seasoning if needed. Garnish with chopped fresh parsley before you serve. For a complete guide, check the Full Recipe. To get a great sear, start with dry steak cubes. Patting them dry helps. Next, heat your skillet until it’s hot. Add butter when the skillet is ready and foamy. Place the steak cubes in the skillet without crowding them. This allows each piece to brown well. Cook for about 2-3 minutes on each side. Look for a nice brown color. This gives you that tasty crust. To boost the flavor, use fresh herbs like rosemary and thyme. Chop them finely and add them to the skillet with garlic. The garlic adds a lovely aroma. You can also add a splash of Worcestershire sauce for extra depth. Adjust salt and pepper to your taste. Don’t forget to garnish with fresh parsley before serving. This adds a pop of color and freshness. Cooking steak bites to the right temperature is key. For medium-rare, aim for about 130°F. Use a meat thermometer to check. If you prefer medium, go for 140°F. Remember, the steak will keep cooking after you take it off the heat. Let it rest for a few minutes. This helps the juices settle. Enjoy your garlic butter steak bites with the perfect doneness! For the complete recipe, check out the [Full Recipe]. {{image_2}} You can use many cuts of steak for this dish. Sirloin is great, but try ribeye for more flavor. Tenderloin offers a soft bite, while flank steak gives a nice chew. Each cut brings a unique texture and taste. Just remember, adjust the cooking time based on the cut. Thicker cuts need longer cooking, while thinner ones cook faster. The seasonings can change the taste of garlic butter steak bites. Want a spicy kick? Add red pepper flakes or smoked paprika. For a sweeter touch, try a bit of honey or brown sugar. You can swap out rosemary and thyme for herbs like oregano or basil. Each herb adds its own twist, so feel free to experiment. If you want a vegetarian version, use mushrooms instead of steak. Portobello or cremini mushrooms work well. They soak up the garlic butter and give a rich flavor. You can also use tofu or tempeh for plant-based protein. Just make sure to press out any extra water before cooking. This helps them get crispy and tasty. For the full recipe, check out the Garlic Butter Steak Bites section. Store leftover garlic butter steak bites in an airtight container. Make sure they cool first. They will last for 3 to 4 days in the fridge. If you plan to eat them later, try to separate them from the sauce. This keeps the steak from getting too soggy. To reheat, place the steak bites in a skillet over low heat. Add a splash of beef broth or water to keep them moist. Stir often for about 5 minutes until heated through. You can also use a microwave. Heat in short bursts, about 30 seconds each, checking often. You can freeze garlic butter steak bites for up to 3 months. Place them in a freezer-safe container. Make sure to label the container with the date. When you’re ready to eat, thaw them in the fridge overnight. Reheat as mentioned above for the best taste. If you want the full recipe, check the link for more details! It takes about 20 minutes to cook garlic butter steak bites. The prep time is 10 minutes, and cooking takes around 10 minutes. You want to sear the steak for about 2-3 minutes on each side. This gives it a nice brown color. Adjust the time for more doneness if needed. Yes, you can use frozen steak, but it needs to be thawed first. Thaw the steak overnight in the fridge for best results. This keeps the meat juicy and tender. If you hurry, you can use the microwave to defrost it. Just be careful to avoid cooking the edges. Garlic butter steak bites go well with many sides. Try these options: - Sautéed vegetables - Mashed potatoes - Rice pilaf - Crispy roasted potatoes - Fresh salad These sides add flavor and balance to your meal. Feel free to mix and match! For the full recipe, check the earlier section. In this blog post, we covered how to make garlic butter steak bites. We discussed choosing the right meat and using tasty herbs. I shared step-by-step instructions for getting that perfect sear and mixing in garlic butter. We also looked at tips to enhance flavors and suggested variations for different diets. Remember to store leftovers properly and reheat them well. Now you have all the tools to enjoy this simple dish. Cooking is fun, so try it out!](https://dailydishly.com/wp-content/uploads/2025/06/daf37226-e56f-491f-87e9-6665894a306e-768x768.webp)

![For this dish, you need 1 pound of fresh asparagus. Look for bright green color and firm stems. Trim the tough ends before cooking. This helps ensure that each bite is tender and tasty. Garlic and lemon are the stars here. You’ll need 4 cloves of garlic, minced finely. This adds a nice punch of flavor. You also need the zest and juice of 1 lemon. The zest gives a bright taste, while the juice adds a fresh tang. You can enhance the dish with extra ingredients. I suggest adding 1 teaspoon of red pepper flakes for a little heat. Fresh parsley, chopped, makes a nice garnish. It adds color and a fresh taste. A pinch of salt and pepper rounds out the flavors, making the dish pop. For the full recipe, check the details above. Start by gathering all your ingredients. You will need: - 1 pound fresh asparagus, trimmed - 4 cloves garlic, minced - 2 tablespoons olive oil - Zest of 1 lemon - Juice of 1 lemon - 1 teaspoon red pepper flakes (optional) - Salt and pepper to taste - Fresh parsley, chopped (for garnish) Wash the asparagus well and trim the ends. This helps remove any tough parts. Next, mince the garlic finely. Zest the lemon carefully to avoid the bitter white pith. Finally, squeeze the juice from the lemon, making sure to catch any seeds. Preheat your oven to 400°F (200°C). This ensures even cooking. In a large bowl, combine the asparagus, minced garlic, olive oil, lemon zest, and red pepper flakes, if you want some heat. Add the lemon juice and season with salt and pepper. Toss everything together well. You want the asparagus to be nicely coated. Now, spread the asparagus on a baking sheet in a single layer. This helps them cook evenly. Roast them in the oven for 15-20 minutes. Toss halfway through to promote even browning. You’ll know they’re done when they are tender and slightly crispy. Once cooked, remove the asparagus from the oven. Transfer it to a serving platter. For a pop of color and freshness, garnish with chopped parsley. This dish pairs well with many meals, making it a versatile side. If you want, you can check out the Full Recipe for more tips and variations! To get your asparagus just right, start with fresh spears. Look for bright green color and firm texture. Trim the tough ends, about one inch from the bottom. This helps avoid bitterness. Spread the asparagus in a single layer on the baking sheet. This ensures even roasting. Toss halfway through cooking for a nice crisp. Roast until tender, about 15-20 minutes. You can add more flavor to your dish. Try a sprinkle of Parmesan cheese before roasting for a savory kick. Fresh herbs like thyme or dill work well too. Add a splash of balsamic vinegar for a tangy twist. Red pepper flakes add heat, but use them sparingly. Lemon zest gives a bright taste that contrasts nicely with garlic. Need to feed more guests? Simply double the ingredients. You can also cut the recipe in half for smaller meals. Adjust the cooking time if you change the amount. Use a larger baking sheet for more asparagus. This keeps them from steaming and ensures a crispy finish. Always check for doneness by tasting a piece. {{image_2}} You can cook garlic lemon asparagus in many ways. Grilling gives it a smoky flavor. Just toss the asparagus with the garlic lemon mix and grill for 5-7 minutes. Sautéing is quick and easy too. Heat a pan, add olive oil, and toss the asparagus for about 5 minutes. Both methods keep the asparagus crisp and full of taste. Want to change up the flavor? Adding cheese is a great option. Feta or Parmesan adds creaminess. Fresh herbs like thyme or basil also work well. Just mix them in before you roast. If you like heat, try adding more red pepper flakes. Each twist brings a new taste to this dish. Seasonal ingredients can brighten this recipe. In spring, add some fresh peas or radishes. In summer, toss in cherry tomatoes for sweetness. Fall calls for butternut squash cubes. Winter may inspire you to add roasted nuts for crunch. Using what's fresh makes this dish more fun and tasty. After you enjoy your garlic lemon asparagus, store leftovers in an airtight container. This helps keep the flavors fresh. Place the container in the fridge. Leftovers last about three to four days. If you notice any off smells or changes in color, it's best to toss them. To reheat your asparagus, use the oven or a skillet. Preheat the oven to 350°F (175°C). Spread the asparagus on a baking sheet and warm for about 10 minutes. This keeps them crispy. If using a skillet, add a splash of olive oil and heat on medium for five minutes. Stir gently to avoid burning. Yes, you can freeze garlic lemon asparagus, but it may change texture. Blanch the asparagus first. Boil for two minutes, then place in ice water. Drain and dry before placing in freezer bags. They can last up to three months in the freezer. When ready to eat, cook straight from frozen. Enjoy the fresh taste by using the [Full Recipe]. Garlic lemon asparagus lasts about 3 to 5 days in the fridge. To store it, put it in an airtight container. This keeps it fresh and tasty. I recommend eating it within this time for the best flavor and texture. If you notice any changes, like a mushy texture, it’s best to throw it out. You can use frozen asparagus, but it will change the dish’s texture. Frozen asparagus tends to be softer when cooked. To use it, thaw the asparagus first. After that, pat it dry to remove excess moisture. This helps achieve a better roast. You might also need to adjust the cooking time. Garlic lemon asparagus pairs well with many dishes. Here are some great options: - Grilled chicken or fish - Pasta with olive oil and herbs - Quinoa or rice dishes - Steak or pork chops - A fresh green salad These ideas help you create a balanced meal. The bright lemon flavor complements rich proteins nicely. For even more inspiration, check out the Full Recipe for Garlic Lemon Asparagus. This article covered how to make delicious Garlic Lemon Asparagus. We talked about key ingredients like fresh asparagus and garlic. I shared clear steps to prepare, cook, and serve it. You learned tips for roasting it perfectly and some fun variations. Also, I gave storage tips to keep it fresh. When you try this dish, enjoy its bright flavors. Feel free to get creative with your own twists. Happy cooking!](https://dailydishly.com/wp-content/uploads/2025/06/b7aeafc4-6d88-42f1-94a5-d1a2b58bd123-768x768.webp)