Lemon Garlic Roasted Broccoli Savory and Simple Dish

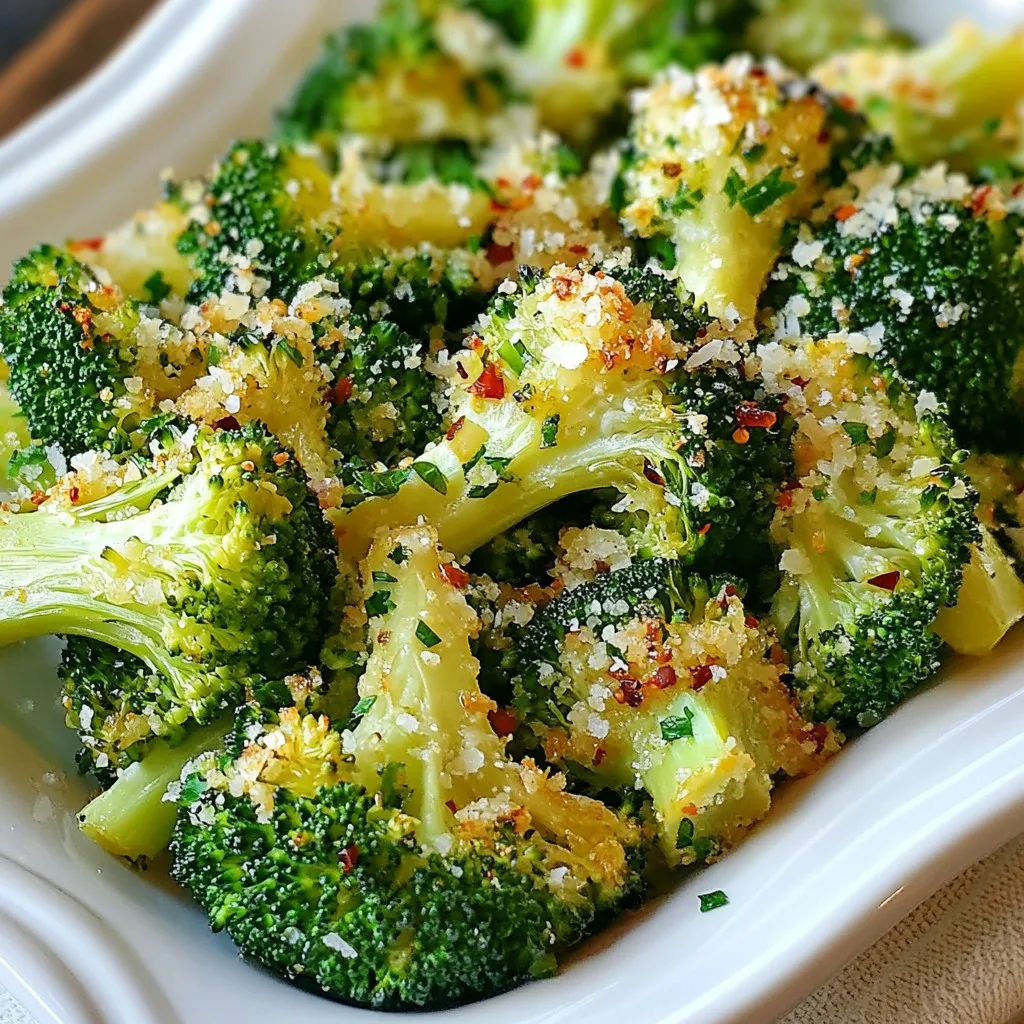
Looking for a quick and tasty vegetable dish? My Lemon Garlic Roasted Broccoli is both savory and simple to make! This easy recipe transforms plain broccoli into a flavorful side that pairs well with any meal. Packed with fresh flavors, it’s perfect for busy weeknights or special gatherings. Dive in, and let’s make your dinner vibrant and delicious!
Why I Love This Recipe
- Simple Preparation: This recipe requires minimal ingredients and is quick to prepare, making it perfect for any weeknight dinner.
- Flavorful Combination: The combination of lemon and garlic elevates the natural flavor of broccoli, creating a delicious side dish.
- Healthy Option: Broccoli is packed with vitamins and minerals, making this dish a nutritious addition to your meals.
- Customizable: You can easily adjust the spice level and add cheese or other toppings to suit your taste preferences.
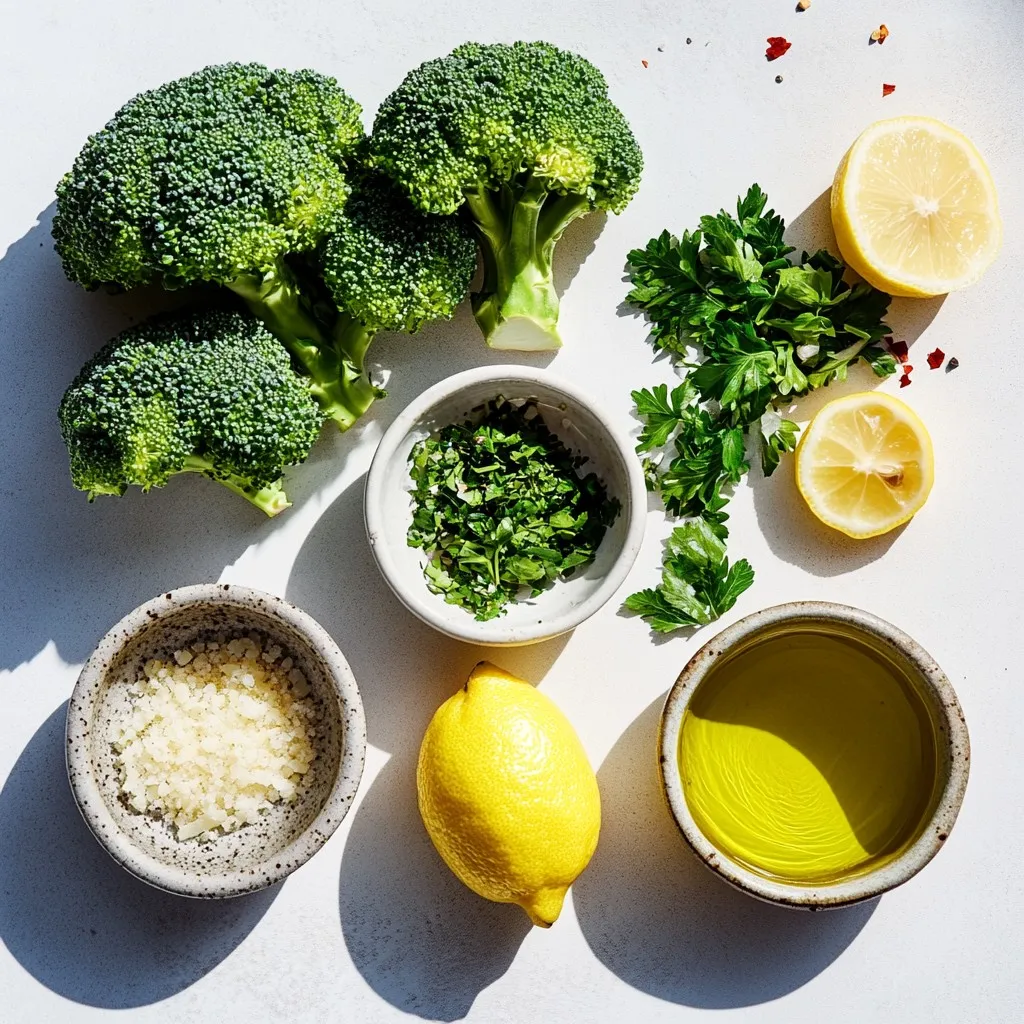
Ingredients
List of Ingredients
– 1 lb broccoli florets
– 4 cloves garlic, minced
– 3 tablespoons olive oil
– Zest of 1 lemon
– 2 tablespoons lemon juice
– 1 teaspoon red pepper flakes (optional)
– Salt and pepper to taste
– ¼ cup grated Parmesan cheese (optional)
– Fresh parsley, chopped for garnish
Quantity and Preparation Details
You need one pound of broccoli florets. Look for bright green, firm pieces. Next, take four cloves of garlic and mince them finely. This adds a strong flavor. Use three tablespoons of olive oil for a rich taste. The zest of one lemon gives a nice aroma. You also need two tablespoons of fresh lemon juice for a tangy kick. If you want some heat, add one teaspoon of red pepper flakes. You can add salt and pepper to taste. For a cheesy touch, include a quarter cup of grated Parmesan cheese. Lastly, chop fresh parsley for a colorful garnish.
Optional Ingredients for Enhanced Flavor
To boost the flavor of this dish, consider adding some lemon zest. It adds brightness. Red pepper flakes bring heat that many enjoy. For a richer taste, the optional Parmesan cheese works well. If you want a different twist, try adding nuts, like almonds or pine nuts. They add crunch and depth.

Step-by-Step Instructions
Preparation Steps
First, preheat your oven to 425°F (220°C). This high heat helps the broccoli get crispy. Next, grab a large mixing bowl. Add 1 pound of broccoli florets. Then, add 4 cloves of minced garlic. Pour in 3 tablespoons of olive oil. The oil keeps the broccoli moist.
Now, zest one lemon. Add the zest to the bowl. Then squeeze in 2 tablespoons of lemon juice. If you like spice, sprinkle in 1 teaspoon of red pepper flakes. Next, season with salt and pepper to taste. Toss everything together. Make sure the broccoli gets coated well with the mixture.
Roasting Process
Spread the broccoli mixture on a baking sheet. Use parchment paper to line the sheet. This keeps it from sticking. Place the sheet in the oven and roast for 20 to 25 minutes. You want the broccoli to be tender and crispy on the edges.
For an extra touch, you can add ¼ cup of grated Parmesan cheese during the last 5 minutes. The cheese will melt and add a rich flavor.
Finishing Touches and Serving Suggestions
Once the broccoli is done, take it out of the oven. Let it cool slightly before serving. To make it look pretty, garnish with chopped fresh parsley. This dish pairs well with grilled chicken or fish. Enjoy your bright and tasty Lemon Garlic Roasted Broccoli!
Tips & Tricks
How to Select Fresh Broccoli
To select fresh broccoli, look for bright green florets. The stems should be firm and not limp. Avoid any yellowing, as this shows age. You want the florets to be tight and not spread apart. If the broccoli smells strong, it may be past its prime. Always choose organic when possible for better flavor and fewer chemicals.
Achieving the Perfect Roast
Roasting broccoli is all about temperature and time. Preheat your oven to 425°F (220°C). This high heat gives you crispy edges. Spread the broccoli in one even layer on the baking sheet. Crowding the pan can lead to steaming, not roasting. Toss the florets halfway through cooking for even browning. Aim for 20-25 minutes to reach that perfect tender-crisp texture.
Ingredient Substitutions for Custom Flavor
You can easily tweak this recipe to your taste. For a nutty flavor, try adding toasted almonds or walnuts. Swap out the Parmesan for nutritional yeast for a vegan option. If you want more spice, use cayenne pepper instead of red pepper flakes. For a citrus twist, lime juice works well too. Each change gives a new flavor, keeping it fresh and fun!
Pro Tips
- Choose Fresh Broccoli: Always select bright green broccoli with firm stems and tight florets for the best flavor and texture.
- Adjust Lemon Flavor: For a stronger lemon flavor, add more lemon zest or juice according to your taste preference.
- Experiment with Cheese: Try different types of cheese like feta or goat cheese for a unique twist on the classic Parmesan topping.
- Serve with Dips: Pair the roasted broccoli with a yogurt-based dip or hummus for added flavor and creaminess.

Variations
Asian-inspired Lemon Garlic Broccoli
You can give this dish an Asian twist. Start with the same base. Add soy sauce and sesame oil to the mix. The umami flavor enriches the broccoli. You might also sprinkle sesame seeds on top for crunch. This adds a nice touch and makes it visually appealing.
Adding Protein for a Main Dish
Want to turn this side into a main? Add some protein! Chicken or shrimp work great. Toss the protein with the broccoli before roasting. This will soak up all the lemon and garlic flavors. You can also use tofu for a plant-based option. It’s a filling and healthy meal that still tastes amazing.
Vegan Alternatives to Parmesan Cheese
If you want a vegan option, skip the Parmesan cheese. Nutritional yeast is a great substitute. It gives a cheesy flavor without dairy. You can also use crushed nuts for a nice texture. Mixing in some ground cashews or almonds can add richness, too. Enjoy your Lemon Garlic Roasted Broccoli in a way that fits your diet!
Storage Info
How to Store Leftovers
After you enjoy your Lemon Garlic Roasted Broccoli, store any leftovers in a tight container. Let the broccoli cool to room temperature first. Then, place it in the fridge. It will stay fresh for about 3 to 4 days. Make sure to keep it covered to avoid drying out.
Reheating Instructions
To reheat, preheat your oven to 350°F (175°C). Spread the broccoli on a baking sheet. Heat for about 10 minutes or until warm. You can also use a microwave. Place the broccoli in a bowl, cover it, and heat for 1-2 minutes. Stir halfway to ensure even heating.
Freezing for Future Use
If you want to save the broccoli for later, freezing is a great option. First, cool the leftovers completely. Then, pack them in a freezer-safe bag or container. Remove as much air as possible. You can freeze it for up to 3 months. To use, thaw it overnight in the fridge before reheating.
FAQs
Can I use frozen broccoli for this recipe?
Yes, you can use frozen broccoli. Just thaw it first. Drain any water. Toss it with garlic, oil, lemon, and spices. The cooking time may be a bit shorter. Watch for tenderness and crispness.
What can I serve with Lemon Garlic Roasted Broccoli?
You can serve this dish with many foods. It pairs well with grilled chicken or fish. Serve it alongside rice or quinoa for a full meal. You can also enjoy it with pasta or as a side for steak.
How do I make this recipe gluten-free?
This recipe is already gluten-free as written. Just use the listed ingredients. Always check labels for any hidden gluten. Parmesan cheese is optional but gluten-free too.
Is there a low-carb version of this dish?
Yes, this dish is low-carb as it stands. Broccoli is a great low-carb veggie. Use it as a side or a main dish. You can skip the cheese if you want to reduce carbs further.
In this post, I shared how to make Lemon Garlic Roasted Broccoli. First, we listed the key ingredients and how to prep them. Then, I guided you through each step of the cooking process, including tips for the best flavor. You also learned variations and ways to store leftovers. This dish is healthy and easy, so you can enjoy it often. Try making it your own by adding your favorite flavors or proteins. More flavors bring more joy to simple meal

Lemon Garlic Roasted Broccoli
Ingredients
- 1 lb broccoli florets
- 4 cloves garlic, minced
- 3 tablespoons olive oil
- 1 zest lemon
- 2 tablespoons lemon juice
- 1 teaspoon red pepper flakes (optional)
- to taste salt and pepper
- 0.25 cup grated Parmesan cheese (optional)
- for garnish fresh parsley, chopped
Instructions
- Preheat your oven to 425°F (220°C).
- In a large mixing bowl, combine the broccoli florets, minced garlic, olive oil, lemon zest, and lemon juice.
- If you like some heat, add the red pepper flakes to the bowl.
- Season the mixture with salt and pepper to taste.
- Toss everything together until the broccoli is evenly coated.
- Spread the garlic broccoli mixture evenly on a baking sheet lined with parchment paper.
- Roast in the preheated oven for 20-25 minutes, or until the broccoli is tender and slightly crispy on the edges.
- If desired, sprinkle the grated Parmesan cheese over the broccoli during the last 5 minutes of roasting.
- Once done, remove the broccoli from the oven and allow it to cool slightly.
- Garnish with chopped fresh parsley before serving.


![To make Roasted Garlic Parmesan Cauliflower, gather the following main ingredients: - 1 medium head of cauliflower, cut into florets - 6 cloves of garlic, minced - 1/4 cup grated Parmesan cheese - 3 tablespoons olive oil - 1 teaspoon garlic powder - 1/2 teaspoon smoked paprika - Salt and pepper to taste - Fresh parsley, chopped (for garnish) These ingredients create a rich and savory flavor in the dish. The garlic gives it a nice punch, while the Parmesan adds creaminess. You can add some optional ingredients to change up the flavor. Here are a few ideas: - Lemon juice for a tangy twist - Red pepper flakes for heat - Thyme or rosemary for an herbaceous note Using these optional ingredients can give you a unique spin on the original dish. To prepare this delicious dish, you’ll need a few basic tools: - A large mixing bowl - A baking sheet - Parchment paper for easy cleanup - A sharp knife for cutting the cauliflower - A spatula for tossing the florets Having the right tools makes cooking easier and more fun. You can find the full recipe in the guide above. First, you need to wash the cauliflower. Remove the leaves and cut the head into small florets. Make sure they are about the same size. This helps them cook evenly. You want each floret to be bite-sized. It makes serving easier and more fun to eat. In a large bowl, add your cauliflower florets. Now, add minced garlic, olive oil, garlic powder, smoked paprika, salt, and pepper. Toss everything well. Ensure each floret gets coated in the tasty mix. This step is key for great flavor. The garlic and spices will really shine through. Preheat your oven to 425°F (220°C). Spread the seasoned florets on a baking sheet lined with parchment paper. Make sure they are in a single layer. This helps them roast well. Bake for about 20-25 minutes. Stir halfway through to ensure even roasting. The cauliflower should turn tender and golden brown. When you take them out, sprinkle the Parmesan cheese on top. Pop them back in the oven for 5 more minutes. This will melt the cheese and make everything delicious. Finally, let the roasted cauliflower cool for a couple of minutes. Garnish with fresh parsley before serving. Enjoy your flavorful dish! For the full recipe, check [Full Recipe]. To get the best flavor, use fresh garlic. Fresh garlic gives a strong, rich taste. Mince the garlic finely for even better flavor. You can also add a pinch of lemon zest. This adds a bright note that balances the richness of the cheese. Roasting cauliflower is all about the heat. Preheat your oven to 425°F (220°C). This high heat gives the cauliflower a nice golden color. Spread the florets out on the baking sheet. If they are too close, they will steam instead of roast. Stir them halfway through cooking. This helps to brown all sides evenly. Roasted garlic parmesan cauliflower shines on its own. Serve it as a side dish with grilled chicken or fish. You can also toss it into salads for extra flavor. For a fun twist, make it a topping for baked potatoes. The creamy cheese and garlic mix perfectly with the fluffy potato. Don’t forget to check the Full Recipe for more tips! {{image_2}} You can switch up the cheese in this dish. Try using cheddar for a sharper taste. Goat cheese adds a creamy touch that melts nicely. Feta gives a tangy bite that pairs well with garlic. If you want a nutty flavor, use Gruyère instead. Each cheese brings its own flair to the roasted cauliflower. You can mix in other veggies for more color and taste. Broccoli works great with cauliflower. Brussels sprouts add a nice crunch. Carrots give a sweet note that balances the garlic. Feel free to toss in bell peppers or zucchini for extra flavor. Roasting them together makes a tasty medley. If you want a vegan version, swap the Parmesan for nutritional yeast. It gives a cheesy flavor without dairy. You can also use vegan cheese shreds that melt well. For extra creaminess, add a splash of almond milk. This way, you keep the dish flavorful and plant-based. You can find the full recipe for Roasted Garlic Parmesan Cauliflower [here]. After enjoying your Roasted Garlic Parmesan Cauliflower, let it cool first. Place any leftovers in an airtight container. You can store it in the fridge for up to 3 days. This keeps the flavors fresh and the texture nice. To reheat, preheat your oven to 350°F (175°C). Spread the cauliflower on a baking sheet. Heat it for about 10 to 15 minutes. This method keeps the cauliflower crisp. You can also microwave it for 1 to 2 minutes, but the texture may change. If you want to freeze this dish, first let it cool completely. Transfer the cauliflower to a freezer-safe bag or container. It can last for up to a month. To enjoy, thaw it overnight in the fridge. Reheat it in the oven for the best results. For more details, check the Full Recipe. Roasting cauliflower takes about 20 to 25 minutes. Preheat your oven to 425°F (220°C). Spread the cauliflower florets on a baking sheet. Roast until they turn tender and golden brown. Remember to stir halfway through for even cooking. Yes, you can prepare this dish ahead of time. You can cut the cauliflower and mix in the garlic and oil. Store it in the fridge for up to 24 hours before roasting. When you’re ready, just pop it in the oven. This makes it easy for busy days! You can serve Roasted Garlic Parmesan Cauliflower with many dishes. It pairs well with grilled chicken or fish. You can also enjoy it as a side for pasta. For a vegetarian meal, serve it with quinoa or a fresh salad. The flavors work great together and make for a fun meal! For the full recipe, check out the section above. This recipe for Roasted Garlic Parmesan Cauliflower covers everything from ingredients to storage tips. You learned how to prepare, season, and roast the cauliflower for the best flavor. Remember to try different cheeses or veggie options for fun twists. When storing leftovers, keep them safe for another meal. Enjoy this dish alongside your favorites. Cook with confidence, and let your taste buds guide you!](https://dailydishly.com/wp-content/uploads/2025/06/e2797ad0-ebfe-4fec-85bd-8200cd052b8d-768x768.webp)
![- 2 ripe avocados, diced - 1 cup sweet corn (canned or grilled) - 1 cup cherry tomatoes, halved - 1 red bell pepper, diced - 1/4 cup red onion, finely chopped - 1/4 cup fresh cilantro, chopped - Juice of 2 limes - 2 tablespoons olive oil - 1 teaspoon cumin powder - Salt and pepper to taste I love using ripe avocados in this salad. They add creaminess. Sweet corn brings a nice crunch and sweetness. Cherry tomatoes add freshness and a pop of color. Red bell pepper gives it a crisp bite. Red onion adds a sharp taste that balances the other flavors. Fresh cilantro brightens everything up with its unique flavor. Lime juice adds a tangy kick. Olive oil gives richness. Cumin powder adds warmth. Salt and pepper round out the taste perfectly. - Additional vegetables - Cheese options - Protein additions (e.g., black beans, chicken) Feel free to add more vegetables like cucumbers or radishes for extra crunch. You can sprinkle cheese like feta or cotija for a salty bite. For a heartier dish, add protein like black beans or grilled chicken. These options make the salad more filling and can change the flavor profile. I love how versatile this salad is! For the full recipe, check out the provided details. 1. Combining base ingredients Start by grabbing a large mixing bowl. Add the diced avocados and sweet corn. Next, toss in the halved cherry tomatoes, diced red bell pepper, and finely chopped red onion. These fresh ingredients create a colorful base. 2. Whisking the dressing In a small bowl, combine lime juice, olive oil, cumin powder, salt, and pepper. Use a whisk to mix the dressing well. This will add flavor and bring the salad together. 3. Tossing and seasoning the salad Pour the dressing over the salad mixture. Gently toss everything together until all ingredients are coated. Taste the salad and adjust the seasoning if needed. Let it sit for about 10 minutes before serving to let the flavors blend. - Choosing ripe avocados Look for avocados that are slightly soft when you squeeze them. They should yield to gentle pressure. This ensures a creamy texture in your salad. - Tips for cutting vegetables Use a sharp knife to cut the veggies. For the avocados, cut them in half, remove the pit, and scoop out the flesh with a spoon. Dice them into bite-sized pieces. - Balancing flavors in the dressing Adjust the lime juice and salt to your taste. If you like it tangy, add more lime. A pinch of sugar can balance the acidity if needed. To make your avocado corn salad pop, serve it in a large, shallow bowl. This type of dish lets the colors shine. I love to garnish with fresh cilantro leaves on top. Adding lime wedges on the side makes it look fresh and inviting. For dishware, choose bright colors. White or light-colored bowls make the salad's colors stand out. You want your guests to be drawn in by the vibrant greens, reds, and yellows. You can prepare this salad a bit early. Chop the vegetables and store them in separate containers. This keeps them fresh and crunchy. You can mix the dressing in advance too. Just keep it in a jar in the fridge. When ready to serve, combine everything in a big bowl. Pour the dressing over the salad and toss gently. This way, your salad stays fresh and tasty. To keep the salad fresh, store it in an airtight container. This locks in flavors and keeps the ingredients crisp. If you notice browning avocados, squeeze a bit more lime juice on top. It helps slow down the browning. For the full recipe, check the earlier section. Enjoy your fresh and flavorful avocado corn salad! {{image_2}} You can easily change this salad. Spice it up by adding diced jalapeños. This will give it a kick. You can also try different dressings. A zesty vinaigrette adds a bright note. If you want creaminess, go for a yogurt-based dressing. Both options fit well with the fresh flavors. This salad shines in every season. In summer, add diced mango or peach. Their sweetness pairs perfectly with the corn and avocado. For winter, think roasted vegetables. Roasted sweet potatoes or bell peppers add warmth. These variations keep the dish fresh and exciting all year. For the full recipe, check out the detailed instructions above. To keep your avocado corn salad fresh, store it in the fridge. Use an airtight container. This will help keep moisture in and air out. To prevent browning of avocados, squeeze a little lime juice over them. The lime slows down oxidation. You can also cover the salad tightly with plastic wrap. Press the wrap directly onto the salad to limit air exposure. Your salad lasts for about 1 to 2 days in the fridge. After that, it may lose its taste and texture. Signs that your salad has spoiled include a strong, sour smell or a mushy texture. If you see dark spots on the avocados, it's time to toss it. Always trust your senses to decide if it's safe to eat. For the full recipe, check out the details above! To make this salad vegan, swap the honey for maple syrup if you like sweetness. Use a vegan olive oil dressing instead of any store-bought dressings. All the main ingredients are vegan-friendly. This gives you a fresh, tasty salad that fits your diet. Yes, you can use frozen corn! Just thaw it first. If you want a crisp taste, try grilling it briefly. This adds a nice smoky flavor. Both options work well in this salad. This salad pairs well with many dishes. You can add grilled chicken or shrimp for protein. It also works great with black beans for a vegetarian option. Serve it alongside tacos or grilled fish for a full meal. For a light meal, enjoy it on its own. For the complete recipe, check out the [Full Recipe]. In this blog post, I covered how to make a delicious avocado salad. You learned about the main ingredients, like ripe avocados, sweet corn, and cherry tomatoes. I shared tips for preparation and gave you ideas on how to present and store your salad. Remember, feel free to mix in different flavors or proteins. Get creative and make this dish your own. With fresh ingredients and simple steps, you can create a tasty and healthy meal that everyone will enjoy.](https://dailydishly.com/wp-content/uploads/2025/07/333f1f81-7d50-4cc6-bd3d-a33e08904fb9-768x768.webp)


