If you’re looking for a snack that’s both crispy and packed with flavor, I've got you covered! Lemon Garlic Roasted Chickpeas are easy to make and oh-so-delicious. With just a few simple ingredients, you can whip up a crunchy treat that's perfect for any time of day. Follow along as I share step-by-step instructions, helpful tips, and tasty variations. Get ready to elevate your snacking game!
Why I Love This Recipe
- Healthy Snack: These roasted chickpeas are a great source of protein and fiber, making them a nutritious option for snacking.
- Crispy Texture: When roasted to perfection, they become wonderfully crunchy, satisfying those cravings for something crispy.
- Flavor Explosion: The combination of lemon, garlic, and spices creates a burst of flavor that will keep you coming back for more.
- Versatile Use: These chickpeas can be enjoyed on their own or as a delightful topping for salads, soups, or grain bowls.
Ingredients
Detailed Ingredient List
To make these tasty lemon garlic roasted chickpeas, you need:
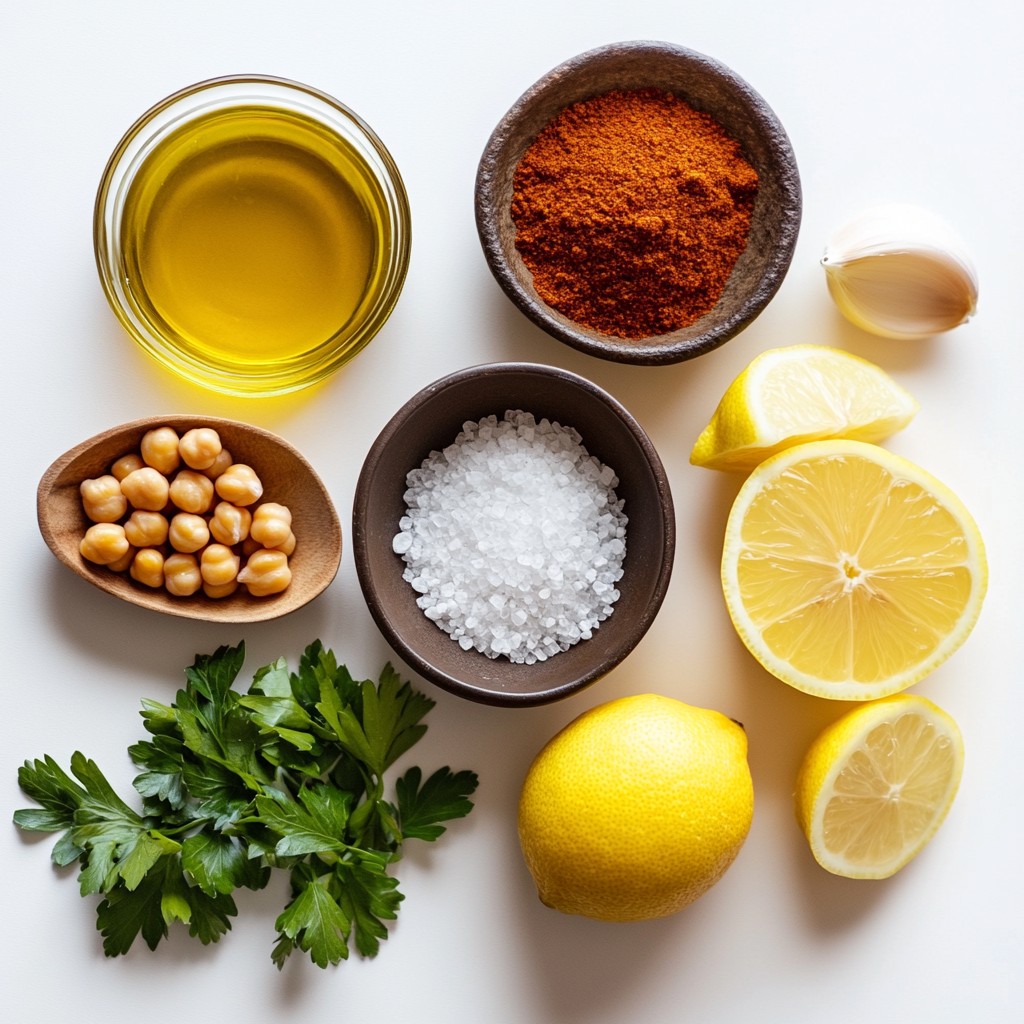
- 1 can (15 oz) chickpeas, drained and rinsed
- 2 tablespoons olive oil
- 3 cloves garlic, minced
- Zest of 1 lemon
- Juice of 1 lemon
- 1 teaspoon smoked paprika
- 1 teaspoon ground cumin
- Salt and pepper to taste
- Fresh parsley for garnish
Optional Ingredients for Extra Flavor
You can spice things up with:
- A pinch of cayenne pepper for heat
- A sprinkle of nutritional yeast for a cheesy taste
- A dash of chili powder for a smoky kick
Nutritional Benefits of Each Ingredient
- Chickpeas: Full of protein and fiber, they keep you full and satisfied.
- Olive oil: A healthy fat that supports heart health.
- Garlic: Has anti-inflammatory properties and boosts your immune system.
- Lemon: Rich in vitamin C and aids digestion.
- Smoked paprika: Adds flavor and may help with digestion.
- Ground cumin: Good for digestion and adds a warm taste.
- Parsley: Packed with vitamins A, C, and K, it adds freshness.
These ingredients not only make the chickpeas crispy and flavorful but also provide great health benefits.
Step-by-Step Instructions
Preparation Steps for Chickpeas
First, gather your ingredients. You will need one can of chickpeas. Drain and rinse them well. This helps remove excess salt and starch. Next, spread the chickpeas on a clean towel. Pat them dry with another towel. This step is key for crispiness.
Mixing and Coating the Chickpeas
Now, transfer the dry chickpeas to a mixing bowl. Add two tablespoons of olive oil. Then, add three minced garlic cloves. Zest one lemon and add that, too. Squeeze in the juice from the same lemon. It adds a fresh taste. Sprinkle in one teaspoon each of smoked paprika and ground cumin. Season with salt and pepper as you like. Toss everything well until the chickpeas are coated.
Roasting Instructions and Timing
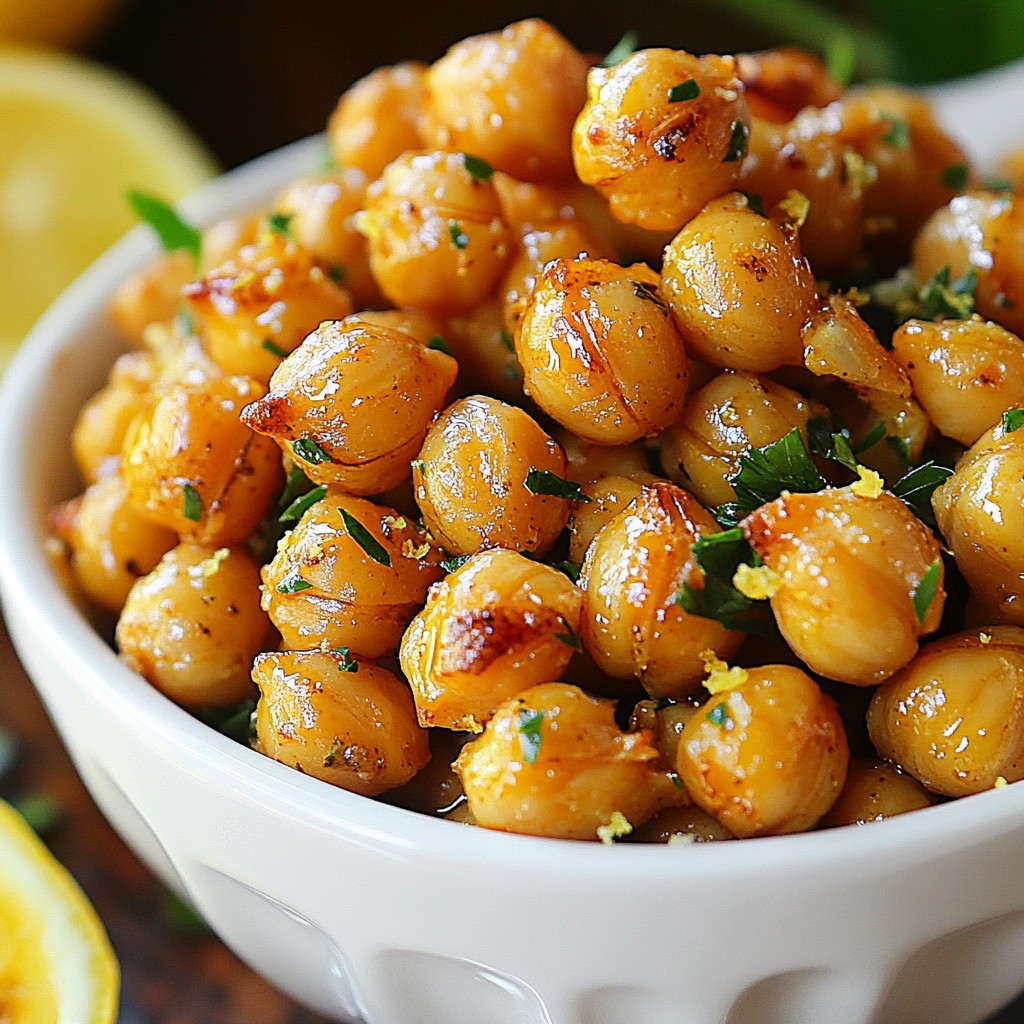
Preheat your oven to 400°F (200°C). Line a baking sheet with parchment paper. Pour the seasoned chickpeas onto the sheet in a single layer. Roast them for 25 to 30 minutes. Shake the pan halfway through for even cooking. They should turn golden brown and crunchy. When they are done, let them cool a bit. They will become crunchier as they cool. Serve them in a dish and add fresh parsley for a nice touch. Enjoy your crispy lemon garlic roasted chickpeas!
Tips & Tricks
How to Achieve the Perfect Crispy Texture
To get crispy lemon garlic roasted chickpeas, start with dry chickpeas. After rinsing, use a towel to pat them dry. This step is key. Any moisture will make them soggy. Toss them in olive oil and seasonings for an even coat. Spread them out on a baking sheet in a single layer. If they touch, they won’t crisp up well. Roast them at 400°F for 25-30 minutes. Give the pan a shake halfway through. This helps them cook evenly. Let them cool slightly before serving. They get crunchier as they cool.
Common Mistakes to Avoid
One common mistake is not drying the chickpeas enough. Moisture is the enemy of crunch. Another mistake is overcrowding the pan. Make sure they are in a single layer. If not, they will steam instead of roast. Also, avoid under-seasoning. The lemon and garlic flavors should shine. Use enough salt and spices to enhance the taste.
Suggested Pairings and Serving Ideas
Crispy lemon garlic roasted chickpeas make a great snack. You can enjoy them on their own. They also work well in salads for extra crunch. Try them in grain bowls for added texture. Pair them with dips like hummus or yogurt sauce. This adds more flavor and fun. Use them as a topping for soups, too. Their crunch can elevate any dish.
Pro Tips
- Dry Chickpeas Thoroughly: Make sure to pat the chickpeas completely dry before roasting. This step is key to achieving that perfect crispy texture.
- Adjust Seasoning to Taste: Feel free to modify the spices according to your preferences. Adding cayenne pepper can give an extra kick if you like heat!
- Use Fresh Garlic: For the best flavor, use fresh minced garlic instead of garlic powder. It adds a nice, robust garlic taste.
- Store in an Airtight Container: To maintain their crunchiness, store any leftovers in an airtight container. They’re best enjoyed within a few days.
Variations
Spicy Lemon Garlic Roasted Chickpeas
If you love heat, add cayenne pepper to your mix. Just half a teaspoon can make a big difference. You can also try chili powder for a different kick. The spicy flavor pairs well with lemon and garlic. It adds a fun twist to the original recipe.
Herb-Infused Chickpeas
For a fresh taste, add herbs like rosemary or thyme. Chop them finely and mix them in with the oil and spices. This adds a fragrant touch to your chickpeas. You can also use Italian seasoning for a mix of flavors.
Sweet and Savory Chickpea Variants
Want something sweet? Try adding a drizzle of honey or maple syrup. This balances the savory garlic and lemon. You can also sprinkle some cinnamon for a warm flavor. This version is great for a snack or a dish at a party.
Storage Info
How to Store Leftover Roasted Chickpeas
To keep your roasted chickpeas fresh, let them cool completely. Place them in an airtight container. Store the container in a cool, dry place. They will stay good for up to three days. If you want to enjoy them later, put them in the fridge. This helps to keep their flavor intact.
Best Practices for Reheating
When reheating, avoid the microwave. Microwaves can make them soggy. Instead, preheat your oven to 350°F (175°C). Spread the chickpeas on a baking sheet. Heat them for about 10 minutes. This will bring back their crunch. You can also use an air fryer for faster reheating. Set it to 350°F and cook for 5-7 minutes.
Freezing Tips for Long-Term Storage
If you want to store chickpeas for longer, freezing is a good option. First, cool them completely. Then, spread them on a baking sheet and freeze for about an hour. Once frozen, transfer them to a freezer bag. Squeeze out the air to prevent freezer burn. They can last up to three months. When you're ready to eat, just reheat them as explained above.
FAQs
Can I use dried chickpeas instead of canned?
Yes, you can use dried chickpeas. First, you need to soak them overnight. After soaking, cook them until tender. This takes about 1 to 2 hours on the stove. Once cooked, drain and dry them well. The texture will be great for roasting.
What can I substitute for olive oil?
You can use other oils like avocado or canola. These oils have a mild taste. You can also try melted coconut oil for a hint of sweetness. Each oil will change the flavor a bit, so choose what you like best.
How long do roasted chickpeas last?
Roasted chickpeas can last up to one week. Store them in an airtight container. Keep them at room temperature for best results. If they lose crunch, you can re-roast them for about five minutes. Enjoy them as a snack or a salad topping!
You now understand the key steps to make roasted chickpeas. We covered the best ingredients, how to prepare them, and tips for the perfect texture. Different flavor variations let you get creative. Storing your leftovers properly helps keep them fresh and tasty.
In closing, roasted chickpeas are a simple and healthy snack. Enjoy experimenting with flavors and sharing them with friends!