Lemon Garlic Shrimp Skewers Easy and Flavorful Recipe

If you crave a meal that’s simple yet bursting with flavor, look no further! My Lemon Garlic Shrimp Skewers recipe will transform your dinner in under 30 minutes. Juicy shrimp marinated in zesty lemon and fresh garlic make for the perfect grilled treat. Whether you’re hosting friends or enjoying a family night, these skewers are a hit. Let’s dive into the ingredients and get you grilling!
Ingredients
Main Ingredients for Lemon Garlic Shrimp Skewers
To make great lemon garlic shrimp skewers, you will need a few key items. Here is what you will need:
– 1 lb large shrimp, peeled and deveined
– 4 cloves garlic, minced
– 1/4 cup olive oil
– Juice and zest of 2 lemons
– 1 teaspoon smoked paprika
– 1 teaspoon dried oregano
– Salt and pepper to taste
– Skewers (soaked in water if using wooden skewers)
– Fresh parsley, chopped (for garnish)
These ingredients bring out the best flavors in the shrimp. Fresh shrimp works best for tenderness.
Optional Ingredients for Enhanced Flavor
You can add some optional ingredients to make your skewers even better. Consider these:
– Red pepper flakes for heat
– Fresh herbs like thyme or basil
– Lemon wedges for grilling
– Cherry tomatoes for extra color
These extras can add a personal touch. Feel free to mix and match!
Suggested Tools and Equipment
Having the right tools makes cooking easier and more fun. Here are some tools you might need:
– A mixing bowl for the marinade
– A grill or grill pan for cooking
– Skewers for threading the shrimp
– A basting brush for adding marinade while grilling
Using these tools helps create a smooth cooking experience.
Step-by-Step Instructions
Preparing the Marinade
Start by gathering your ingredients. You will need garlic, olive oil, lemon juice, lemon zest, smoked paprika, oregano, salt, and pepper. In a bowl, mix the minced garlic, olive oil, lemon juice, and lemon zest. Then, add the smoked paprika, oregano, salt, and pepper. Stir well to combine. This marinade gives the shrimp its tasty flavor.
Marinating the Shrimp
Next, add the shrimp to the marinade. Make sure each shrimp is coated well. Cover the bowl and place it in the fridge. Marinate for at least 30 minutes. If you have time, let it sit for up to an hour. This helps the shrimp soak in the flavors.
Grilling Instructions
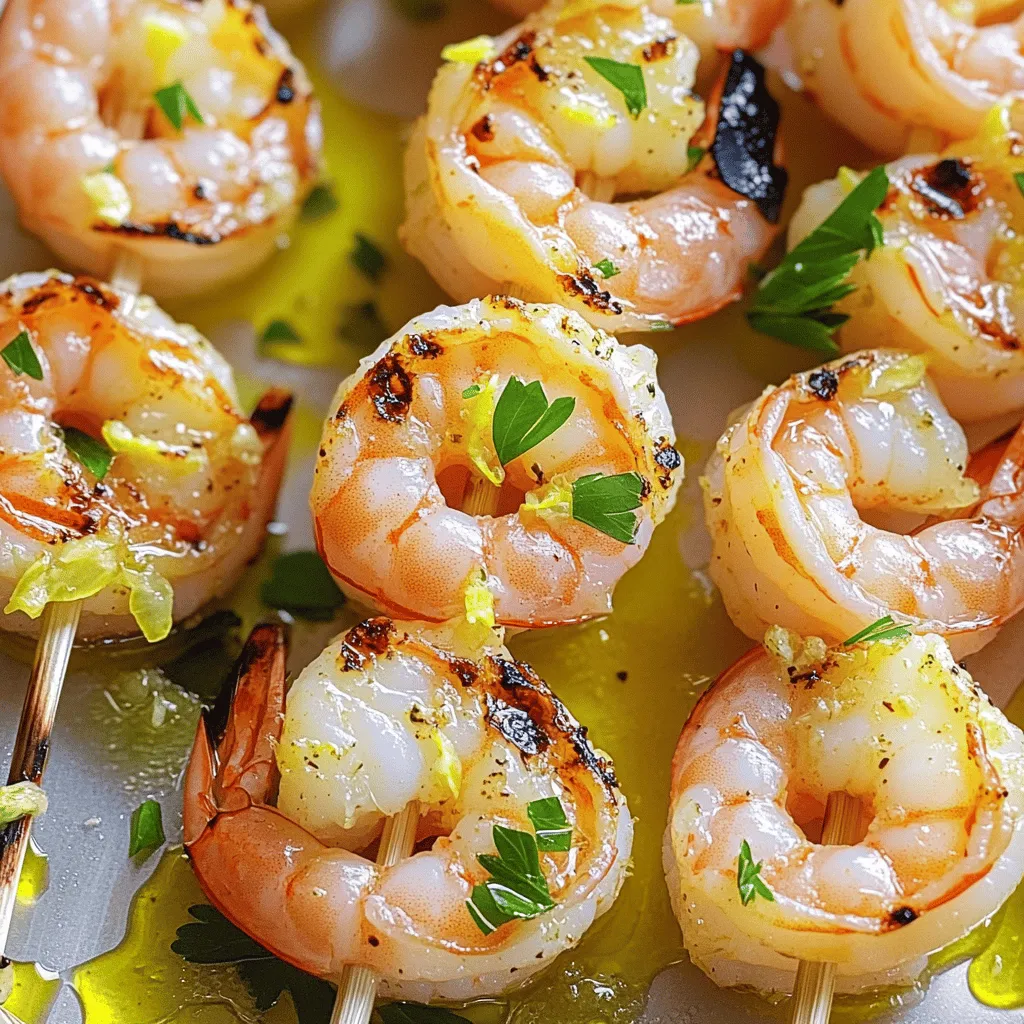
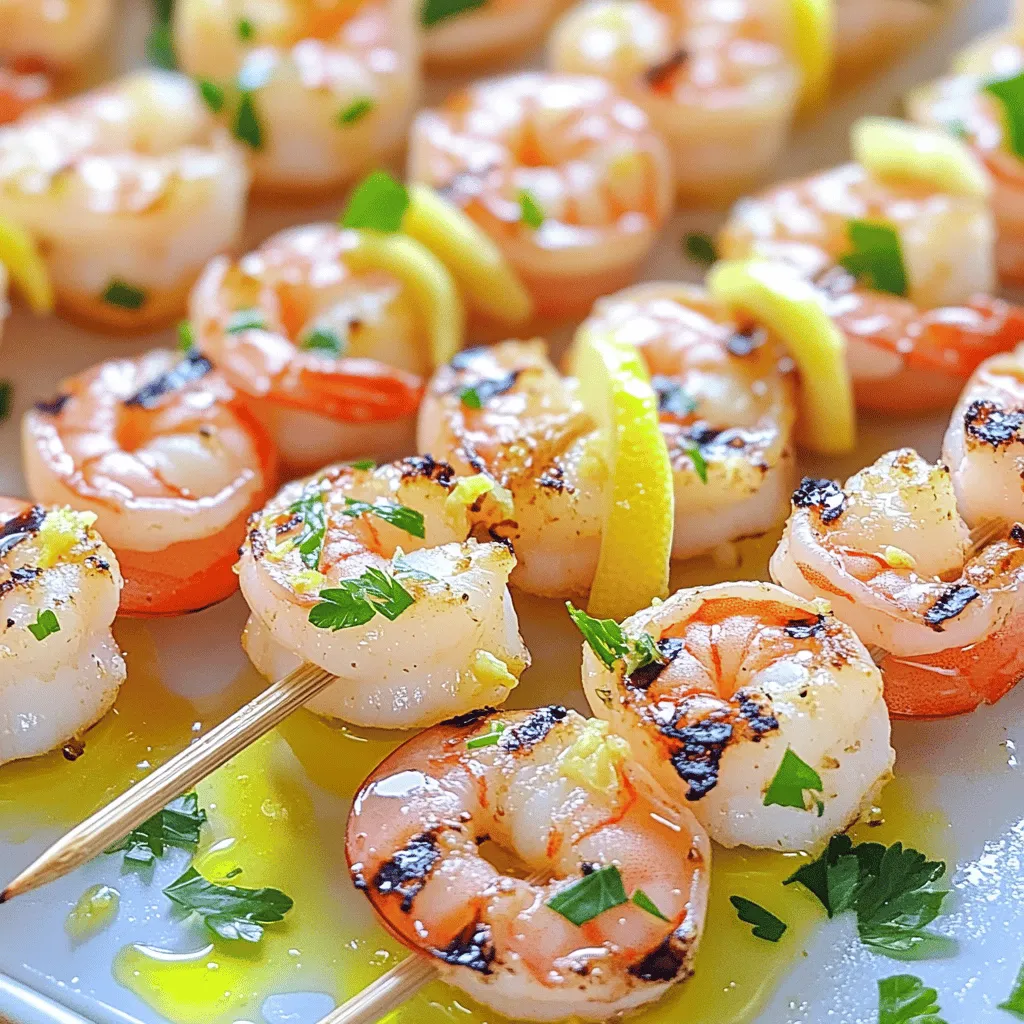
Now, it’s time to grill! Preheat your grill or grill pan over medium-high heat. If you use wooden skewers, soak them in water first. This prevents burning. Thread 4-5 shrimp onto each skewer, leaving space between them. Place the skewers on the grill. Cook for 2-3 minutes on each side. The shrimp should turn pink and opaque. Once cooked, remove the skewers from the grill. Let them rest for a minute. Garnish with fresh parsley and a squeeze of lemon juice if you like.
Tips & Tricks
Best Practices for Grilling Shrimp
Grilling shrimp is quick and easy. Here are some tips:
– Choose large shrimp: They hold up better on skewers.
– Soak wooden skewers: This prevents them from burning on the grill.
– Preheat the grill: Get it hot before adding the shrimp for a nice char.
How to Achieve a Perfectly Cooked Skewer
To cook shrimp just right, keep these points in mind:
– Watch the color: Shrimp should turn pink and opaque when done.
– Don’t overcook: This makes shrimp tough. Cook for about 2-3 minutes per side.
– Leave space on skewers: This helps heat circulate for even cooking.
Serving Suggestions for Lemon Garlic Shrimp Skewers
These shrimp skewers pair well with many sides. Here are some ideas:
– Serve with rice: A light lemon rice complements the dish beautifully.
– Add a salad: A fresh green salad adds crunch and color.
– Include dipping sauces: Try garlic aioli or a zesty lemon sauce.

Variations
Spicy Lemon Garlic Shrimp Skewers
To make your shrimp skewers spicy, add red pepper flakes. Start with half a teaspoon. You can add more if you want more heat. Mix the flakes into the marinade along with the garlic, olive oil, and lemon juice. This small change gives a nice kick to the dish. It pairs well with the lemon’s brightness and the garlic’s depth.
Lemon Garlic Shrimp Skewers with Vegetables
For a vibrant twist, add vegetables to your skewers. Bell peppers, zucchini, and cherry tomatoes work well. Cut the veggies into bite-sized pieces. Thread them onto the skewers with the shrimp. This adds color and nutrition. The grill will char the vegetables, enhancing their flavor. It makes for a more filling meal and looks great on the plate.
Alternative Cooking Methods
If you lack a grill, don’t worry! You can cook these skewers in the oven. Preheat your oven to 400°F (200°C). Place the skewers on a baking sheet lined with parchment paper. Bake for about 10-12 minutes, turning halfway through. You can also use a stovetop grill pan for a similar result. Cook them on medium-high heat for about 2-3 minutes per side. Each method brings out the shrimp’s natural sweetness.
Storage Info
Storing Leftover Shrimp Skewers
To store leftover shrimp skewers, place them in an airtight container. Make sure the container is sealed well. You can keep them in the fridge for up to 2 days. If you have leftover marinade, you can also save it. Just keep it separate from the shrimp to avoid sogginess.
Freezing and Reheating Tips
If you want to freeze the shrimp skewers, wrap them tightly in plastic wrap. Then, place them in a freezer bag. They can last up to 3 months in the freezer. To reheat, thaw them in the fridge overnight. Then, grill or sauté them on medium heat until heated through. This keeps them tasty and juicy.
Best Practices for Maintaining Freshness
To keep your shrimp fresh, only marinate what you plan to cook. Extra marinated shrimp can become mushy. When grilling, avoid overcrowding the skewers. This helps each shrimp cook evenly. After cooking, let them cool before storing. Always check for signs of spoilage before using leftovers. Following these tips makes your Lemon Garlic Shrimp Skewers last longer and taste great.
FAQs
Can I use frozen shrimp for this recipe?
Yes, you can use frozen shrimp. Just thaw them first. Place them in cold water for a quick thaw. Change the water every few minutes. This keeps the shrimp cold and helps them thaw evenly. After thawing, pat them dry with a paper towel. This step is key to good flavor.
What are the best sides to serve with Lemon Garlic Shrimp Skewers?
I love pairing these skewers with fresh sides. Here are some great options:
– Rice: White or brown rice works well.
– Quinoa: This adds a nutty flavor and is healthy.
– Salad: A light green salad with lemon vinaigrette is refreshing.
– Grilled veggies: Bell peppers, zucchini, and asparagus add color and flavor.
These sides balance the meal and add nutrients.
How can I adjust the recipe for a larger crowd?
To serve more people, simply double or triple the recipe. Use more shrimp and marinade. Make sure you have enough skewers. If grilling, do it in batches. This helps to cook the shrimp evenly. Keep an eye on cooking time, as it may vary with more skewers. Enjoy hosting with this fun dish!
Lemon garlic shrimp skewers are simple and tasty. We covered ingredients, tools, and a clear recipe. I shared tips for perfect grilling and fun variations. Storage advice helps keep leftovers fresh.
Try these skewers for your next meal. They’re a hit for any gathering. Enjoy the burst of flavor, and feel free to get creative!


![To make crispy baked sweet potato fries, you need a few key ingredients: - 2 large sweet potatoes, cut into fries - 2 tablespoons olive oil - 1 teaspoon cornstarch - 1 teaspoon paprika - 1/2 teaspoon garlic powder - 1/2 teaspoon onion powder - 1/4 teaspoon cayenne pepper (optional for heat) - Salt and pepper to taste - Fresh parsley, chopped (for garnish) Using quality ingredients makes a big difference in taste. Fresh sweet potatoes give your fries a lovely flavor. Good olive oil adds richness. The cornstarch helps achieve that perfect crispiness. You can enhance your fries with extra seasonings. Try adding: - Chili powder for a smoky kick - Italian herbs for a fresh taste - Parmesan cheese for a savory touch When it comes to dips, the options are endless! Serve your fries with: - Spicy mayo for some heat - Ketchup for a classic combo - Garlic aioli for a fancy twist These additions make your crispy baked sweet potato fries even more fun and tasty! For the complete recipe, check out the [Full Recipe]. 1. Preheat your oven to 425°F (220°C). This helps the fries crisp up well. 2. Line a baking sheet with parchment paper. This keeps the fries from sticking. 3. Cut the sweet potatoes into strips. Aim for uniform sizes for even cooking. 4. In a large bowl, toss the fries with olive oil. Ensure they are nicely coated. 5. Sprinkle cornstarch, paprika, garlic powder, onion powder, cayenne pepper, salt, and pepper. Toss again until all fries are coated. 1. Spread the fries in a single layer on the baking sheet. Do not crowd them. 2. Bake for 25 to 30 minutes. Flip them halfway for even crispiness. 3. Check for a crispy golden brown color on the edges. This means they are done. 1. Once baked, remove the fries from the oven and let them cool for a few minutes. 2. Garnish with fresh parsley for a pop of color. 3. Serve the fries in a cone or basket lined with parchment paper. 4. Add a small bowl of your favorite dip, like spicy mayo or ketchup, for fun. For a full recipe, check the detailed guide provided earlier. To make your sweet potato fries crispy, follow a few key steps. First, coat the fries in olive oil. This helps them brown nicely. Next, add cornstarch to the mix. Cornstarch absorbs moisture and creates a crispy outer layer. When you place the fries on the baking sheet, spread them out. Do not overcrowd the pan. If they are too close, they will steam instead of crisp. Give each fry room to breathe, so they can cook evenly. Avoid cutting the fries too thick. Thin fries cook better and become crispier. Another mistake is not flipping the fries halfway through baking. Flipping ensures even cooking and browning on both sides. If your fries turn out soggy, check the oil and cornstarch amounts. You may need to adjust these. Also, ensure that your baking sheet is not crowded. If you follow these tips, you will have perfect crispy fries every time! {{image_2}} You can change the taste of your crispy baked sweet potato fries with different seasonings. Here are some ideas: - Cajun Spice: Use Cajun seasoning for a bold flavor. - Italian Herbs: Mix in dried oregano and basil for a fresh twist. - Cinnamon Sugar: For a sweet option, dust with cinnamon and sugar after baking. - Taco Seasoning: Add taco seasoning for a fun, zesty kick. Experiment with spice blends and herbs to find your favorite taste. You can cook sweet potato fries in different ways. Each method gives a unique texture and flavor. - Air Frying: This method uses less oil and can make fries even crispier. Cook at 400°F for about 20 minutes. - Deep Frying: For a classic taste, deep fry in hot oil until golden. This method gives a crunchy exterior but uses more oil. - Baking: The original method yields a lighter fry. Bake at 425°F for 25-30 minutes, flipping halfway through. Each method has its pros and cons, so try them all to find your favorite! To store your crispy baked sweet potato fries, first, let them cool completely. This step helps keep them crispy. Place the fries in an airtight container. Use a container that has a tight seal to prevent moisture. You can keep them in the fridge for up to three days. When you're ready to eat them, reheat in the oven at 400°F (200°C) for about 10-15 minutes. This method helps restore their crunch. You can freeze both raw and cooked sweet potato fries. For raw fries, cut and coat them as you would for baking. Spread them in a single layer on a baking sheet. Freeze them for about two hours until solid. Then, transfer the fries to a freezer bag. Remove as much air as possible before sealing. They can stay in the freezer for up to three months. To cook from frozen, preheat the oven to 425°F (220°C). Spread the frozen fries on a baking sheet. Bake for 25-30 minutes, flipping halfway through. This method gives you crispy fries without thawing. Enjoy your delicious fries anytime! For the full recipe, check out the detailed steps above. Bake sweet potato fries at 425°F for 25 to 30 minutes. This time gives you crispy edges and soft centers. Flip them halfway through to ensure even cooking. Keep an eye on them. Ovens can vary, so adjust the time as needed. Look for a golden color to know they are done. Yes, you can use other potatoes. Regular russet potatoes work great for fries. They may not be as sweet, but they can still be crispy. You could also try Yukon gold or purple potatoes. Each type gives a different taste and texture. Just remember to adjust the baking time as needed. To add heat, sprinkle cayenne pepper over the fries. You can also add chili powder or crushed red pepper flakes. Mix spices with olive oil before coating the fries. This helps the heat stick better. Start with a little and taste as you go. Adjust based on your spice tolerance. In this post, we explored how to make perfect sweet potato fries. We covered essential ingredients, preparation steps, and cooking methods. I shared tips to achieve crispiness and avoid common mistakes. You also learned about flavor variations and the best ways to store leftovers. Making great fries can be easy and fun. By using quality ingredients and following the steps, you’ll enjoy delicious, crispy fries every time. Now, gather your supplies and get cooking for a tasty treat!](https://dailydishly.com/wp-content/uploads/2025/07/5c45319a-0858-4d48-b29a-502acd419023-768x768.webp)


![- 2 medium zucchinis - 1 cup breadcrumbs (preferably whole wheat) - 1/2 cup grated parmesan cheese - 2 tablespoons fresh parsley, chopped - 1 tablespoon fresh basil, chopped - 1 teaspoon garlic powder - 1/2 teaspoon onion powder - Salt and pepper to taste - 2 large eggs - Olive oil spray or 2 tablespoons olive oil The ingredients for herb crusted zucchini sticks are simple yet flavorful. Zucchini is a great base because it’s mild and absorbs spices well. You want to use fresh herbs like parsley and basil to boost taste. Whole wheat breadcrumbs add a nice crunch, and parmesan brings a cheesy depth. For the coating, garlic and onion powder add savory notes. Make sure to season with salt and pepper to enhance all the flavors. You will need eggs to help the breadcrumbs stick to the zucchini. Olive oil ensures the sticks get crispy in the oven. I recommend you gather everything before you start cooking. This will help you stay organized and make the process smoother. You can find the full recipe below to guide you through this delicious snack. 1. Preheat your oven to 425°F (220°C). This step is vital for crispiness. 2. Line a baking sheet with parchment paper. It helps with easy cleanup. 3. In a shallow bowl, combine the breadcrumbs, parmesan cheese, chopped parsley, basil, garlic powder, onion powder, salt, and pepper. Mix well to blend the flavors. 4. In a separate bowl, whisk the eggs until smooth and fully combined. 1. Take each zucchini stick and dip it in the egg mixture. Let the extra egg drip off. 2. Next, roll the zucchini stick in the breadcrumb mixture. Press gently to coat evenly. 1. Arrange the coated zucchini sticks on the prepared baking sheet. Give them space to crisp. 2. Lightly spray the zucchini sticks with olive oil or drizzle them with olive oil. This adds flavor and helps with browning. 3. Bake in the preheated oven for 20-25 minutes. Turn them halfway through for even crispiness. Look for a golden color as a sign they are done. 4. Remove from the oven and let them cool slightly before serving. Enjoy these crispy delights! For the complete recipe, refer to the [Full Recipe]. To make your herb crusted zucchini sticks crispy, use fresh herbs. Fresh parsley and basil add great flavor. Dried herbs can work, but fresh gives a better taste. For the perfect coating, press the zucchini sticks into the breadcrumb mix. This helps the crumbs stick well. A light spray of olive oil before baking also boosts crispiness. You can bake zucchini sticks or try an air fryer. An air fryer cooks them faster and can make them even crispier. If you use an air fryer, set it to 400°F (200°C) for about 10-15 minutes. Turn them halfway for even cooking. If you prefer baking, keep the temperature at 425°F (220°C) and bake for 20-25 minutes. Adjust the cook time based on how crispy you want them. For dips, ranch dressing or marinara sauce pairs well with zucchini sticks. You can also try a spicy aioli for a kick. As for side dishes, serve them with a fresh salad or alongside grilled chicken for a nice meal. These sticks can be a great snack or a fun side to any dish. {{image_2}} You can make your herb crusted zucchini sticks even tastier! Try adding spices like paprika or chili flakes. This gives a nice kick and makes them more exciting. You can also mix in cheese variations. Feta adds a tangy flavor, while mozzarella gives a creamy touch. Both options will enhance your dish and please your taste buds. Want to make this recipe fit your diet? You can use gluten-free breadcrumbs to keep it safe for those with gluten issues. Just look for certified gluten-free brands. If you’re vegan, replace the eggs with a mixture of ground flaxseed and water. This will help the breadcrumbs stick without using eggs. These zucchini sticks work great as appetizers or party snacks. Serve them with dips like ranch or marinara for extra fun. You can also mix them with other veggies for a colorful platter. Carrots, bell peppers, and cucumbers pair well and add variety to your snack table. Check out the Full Recipe for more ideas! To keep your zucchini sticks fresh, place them in an airtight container. This helps lock in moisture and flavor. If you want the best taste, eat them within three days. After that, they may lose some crispiness and flavor. For the best results, reheat your zucchini sticks in the oven. Preheat the oven to 375°F (190°C). Place the sticks on a baking sheet for about 10 minutes. This method keeps them crispy and tasty. If you need a quick option, the microwave works too. Heat them for 30 seconds. Check if they need more time. Note that they may not be as crispy in the microwave. Yes, you can freeze zucchini sticks! To do this properly, first, let them cool completely. Next, place them in a single layer on a baking sheet. Freeze for about two hours. Once frozen, transfer them to a freezer bag. Make sure to remove as much air as possible. They can last up to three months in the freezer. Just remember to bake them straight from frozen when you are ready to enjoy! For more details, check the Full Recipe. How do I know when the zucchini sticks are done? You can tell the zucchini sticks are done when they turn golden brown and crispy. They should feel firm to the touch. Bake them for 20 to 25 minutes at 425°F (220°C), turning them halfway through cooking. This helps them cook evenly. If you want extra crunch, keep an eye on them during the last few minutes. Can I use frozen zucchini for this recipe? I do not recommend using frozen zucchini for this recipe. Frozen zucchini tends to lose water and becomes mushy when cooked. Fresh zucchini gives the best texture and flavor. If you only have frozen zucchini, try to drain it well before using it. However, it may still not give you the same crispy result. What can I substitute for parmesan cheese? If you want to substitute parmesan cheese, try using nutritional yeast for a vegan option. It adds a nice cheesy flavor. You can also use other cheeses like Pecorino Romano or Grana Padano. Just remember that different cheeses may change the flavor a bit. Can I use regular breadcrumbs instead of whole wheat? Yes, you can use regular breadcrumbs instead of whole wheat. Both types will work well in this recipe. Just remember that whole wheat breadcrumbs add a bit more fiber and a heartier taste. Use what you have on hand for the best results. How can I make my zucchini less watery? To make zucchini less watery, you can salt the sticks before cooking. Cut them and sprinkle salt on them. Let them sit for about 15 minutes, then rinse and pat them dry. This helps remove excess moisture. You can also try using smaller zucchinis, as they tend to be firmer. Can I bake these zucchini sticks without oil? Yes, you can bake zucchini sticks without oil. Just be aware that they may not be as crispy. You can use a light spray of cooking oil for better results, but if you want to skip it, they will still cook fine. Keep an eye on them to prevent burning. In this blog post, we explored how to make crispy zucchini sticks. We covered the ingredients needed, the step-by-step process, and various tips to ensure great results. I shared methods for baking, storing, and serving your zucchini sticks. These versatile snacks are easy to adjust for different diets and flavors. Remember, fresh herbs and the right cooking methods will enhance your dish. Enjoy your cooking and get creative with your serving ideas!](https://dailydishly.com/wp-content/uploads/2025/07/e6e4c2e6-85fe-4d28-829b-ce9ad5e19088-768x768.webp)