Loaded Southwest Sweet Potato Skins Flavorful Dish

Are you ready to take your taste buds on a savory adventure? Loaded Southwest sweet potato skins offer a burst of flavor that’s hard to resist. With just a few easy steps, you can create a dish full of delicious spices, cheesy goodness, and optional add-ins that cater to every taste. Whether it’s for game night or a cozy dinner, these sweet potato skins will steal the show. Let’s dive in and explore how to make this flavorful dish!
Ingredients
Main Ingredients
– 2 large sweet potatoes
– 1 tablespoon olive oil
– 1 teaspoon cumin
– 1 teaspoon smoked paprika
– Salt and pepper to taste
– 1 cup black beans, rinsed and drained
– 1 cup corn kernels (frozen or fresh)
– 1/2 cup diced red bell pepper
– 1/2 cup diced red onion
– 1 cup shredded cheddar cheese
– 1/2 cup Greek yogurt or sour cream
– Fresh cilantro, chopped, for garnish
– Lime wedges, for serving
Sweet potatoes are the star here. They give a nice, sweet flavor. The cheese adds a creamy texture that melts perfectly. Cumin and smoked paprika give a warm, earthy taste. You can adjust salt and pepper to your liking.
Optional Add-Ins
– Other vegetables
– Plant-based substitutions
Feel free to mix in other veggies like zucchini or spinach. If you want a plant-based option, substitute the cheese with plant-based cheese. You can also use avocado or coconut yogurt in place of Greek yogurt.
Serving Suggestions
– Accompaniments
– Garnishes
Serve these sweet potato skins warm. A side of lime wedges adds a nice zing. You can also pair them with a fresh salad or guacamole. For garnishes, fresh cilantro and a dollop of yogurt make them look and taste great.
Step-by-Step Instructions
Prepping the Sweet Potatoes
To start, preheat your oven to 400°F (200°C). Wash two large sweet potatoes well. Use a fork to poke holes all over each potato. This step helps steam escape while baking. Place the potatoes on a baking sheet lined with parchment paper. Bake them for about 45-50 minutes. They should feel soft when poked. Once done, take them out and let them cool slightly.
Next, slice each potato in half lengthwise. Use a spoon to scoop out some of the flesh. Leave about 1/4 inch along the skin. This keeps the skins strong and ready to hold the filling.
Making the Filling
In a mixing bowl, combine the sweet potato flesh you scooped out, black beans, corn, red bell pepper, and red onion. Add one teaspoon of cumin, one teaspoon of smoked paprika, one tablespoon of olive oil, and some salt and pepper. Mix everything well until it’s all combined. If the mixture seems too thick, you can add a splash of water or olive oil for a smoother texture.
Assembling the Dish
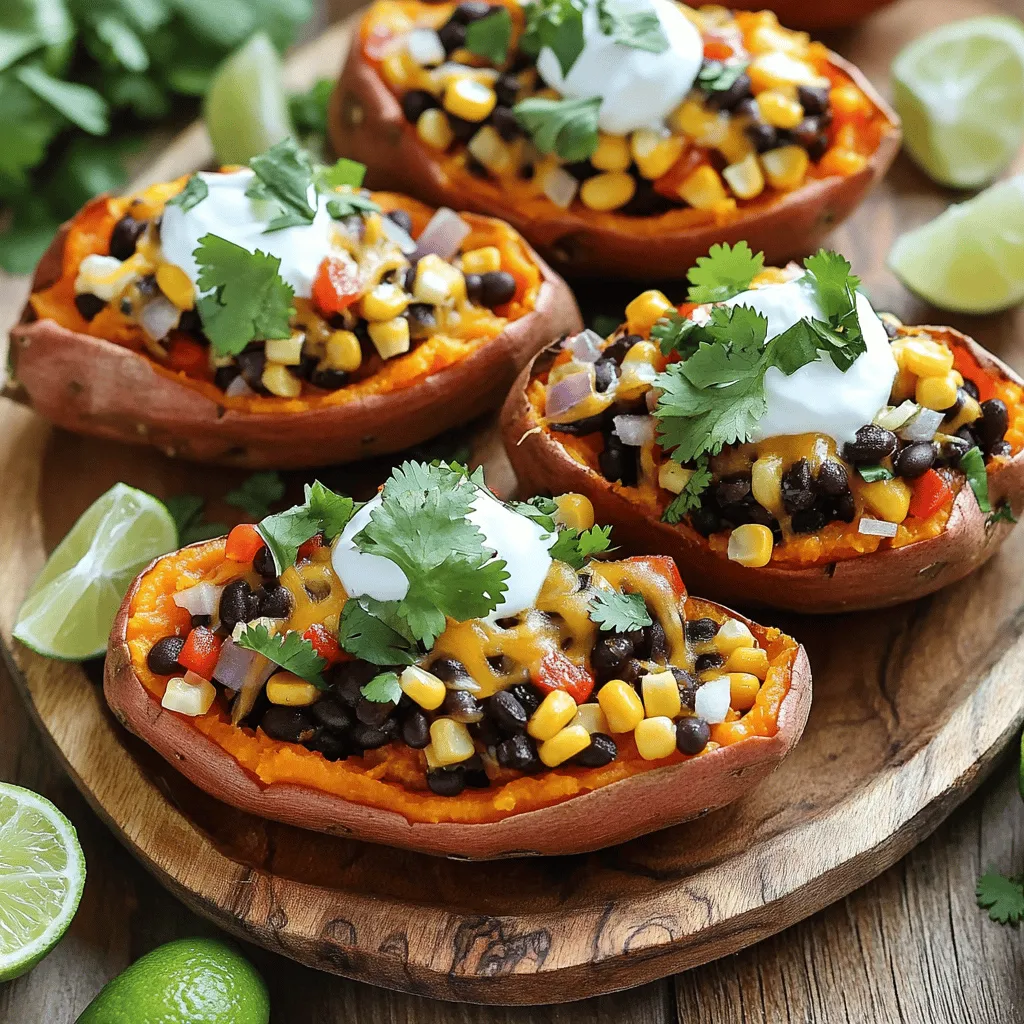
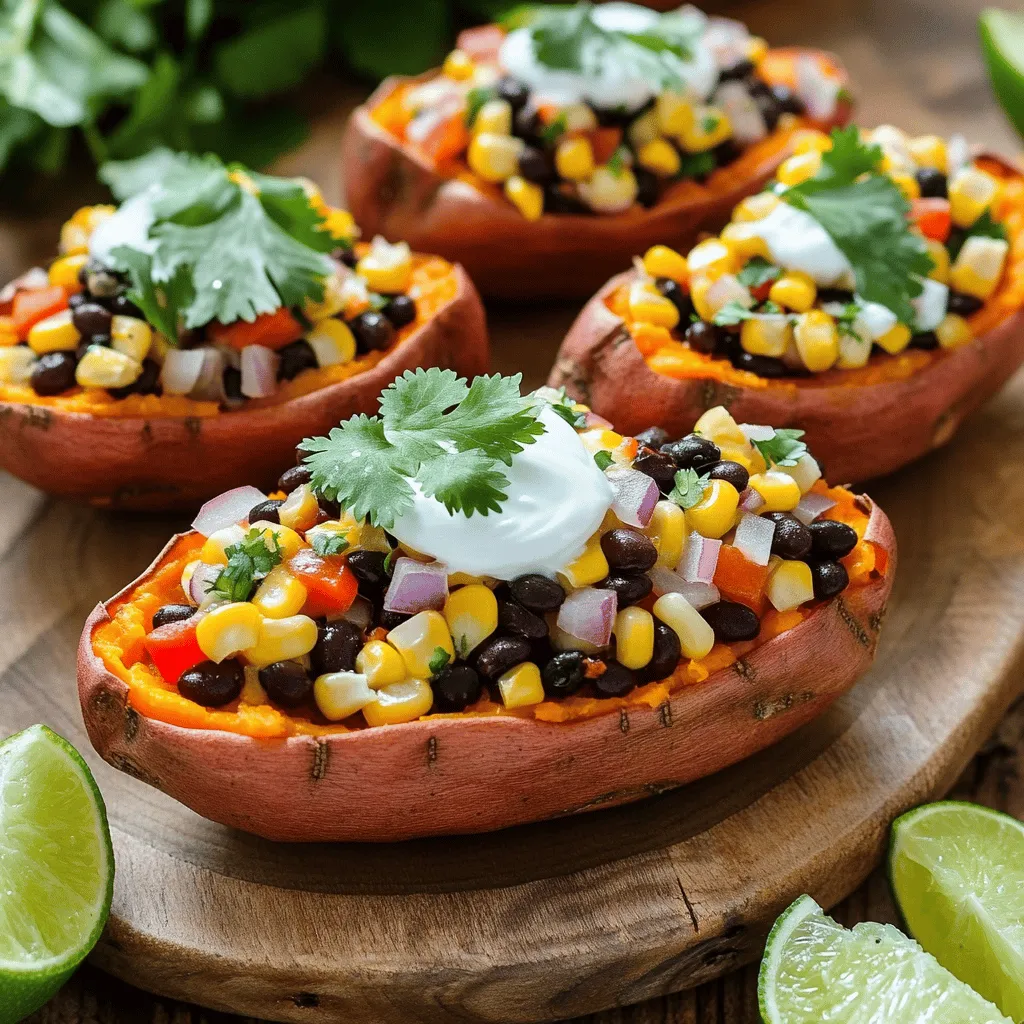
Now, it’s time to fill the skins. Carefully spoon the filling mixture back into each sweet potato skin. Pack it in generously to make them hearty. Once filled, sprinkle shredded cheddar cheese over the top of each half.
Return the loaded sweet potato skins to the oven. Bake them for an additional 15-20 minutes. You want the cheese to melt and bubble nicely. Once done, take them out and let them cool slightly. Top with Greek yogurt or sour cream and chopped fresh cilantro. Serve with lime wedges on the side for an extra zing!
Tips & Tricks
Achieving the Perfect Texture
To get the best texture, bake the sweet potatoes at 400°F (200°C) for 45-50 minutes. This time works well for large potatoes. If you use smaller ones, check for doneness a bit earlier. You can also microwave them. Simply pierce the skin, place on a plate, and cook for 5-10 minutes. This method saves time but may not give the same crisp texture as baking.
Flavor Enhancements
For flavor, try different spices. You can add chili powder or cayenne pepper for heat. If you want a milder taste, use paprika or garlic powder. Fresh herbs can really brighten the dish. Cilantro works great, but parsley or green onions can also add freshness. Mix them into the filling or sprinkle on top.
Presentation Techniques
For plating, arrange the loaded skins on a colorful platter. Drizzle extra Greek yogurt or sour cream over them for a creamy touch. Garnish with fresh cilantro for a pop of color. You can also add lime wedges on the side. This makes the dish look fun and inviting.

Variations
Vegetarian and Vegan Options
For a vegetarian twist, you can swap out regular cheese for dairy-free cheese. Brands like Daiya or Violife offer great options that melt well. If you want to make it vegan, use a plant-based yogurt instead of Greek yogurt.
You can also consider alternative protein sources. Try adding cooked quinoa or lentils for extra protein. These options not only boost nutrition but also add great texture.
Different Cuisine Flavors
To give your sweet potato skins a Tex-Mex vibe, add taco seasoning to the filling. Chopped jalapeños can bring in heat. You can top them with guacamole for a creamy finish.
If you’re feeling adventurous, mix in Mediterranean flavors. Use feta cheese instead of cheddar and add olives or sun-dried tomatoes. A sprinkle of oregano can enhance this twist beautifully.
Seasonal Ingredients
In the fall, use seasonal veggies like butternut squash or kale for the filling. These add a hearty taste and pair well with sweet potatoes. You can also roast some pumpkin seeds for crunch.
During summer, switch to lighter ingredients. Fresh zucchini or grilled corn can brighten the dish. You might even try adding fresh herbs like basil or mint for a refreshing kick.
Storage Info
Refrigeration Guidelines
To store leftover loaded Southwest sweet potato skins, let them cool first. Place them in an airtight container. This keeps them fresh and tasty for your next meal. Use parchment paper between layers to avoid sticking. Always label your container with the date. This helps you keep track of freshness.
Freezing Instructions
You can freeze prepared sweet potato skins for later. Wrap each one tightly in plastic wrap. Then, place them in a freezer bag. This keeps them safe from freezer burn. For reheating, let them thaw overnight in the fridge. Preheat your oven to 350°F (175°C) and bake for about 20 minutes. This warms them up nicely.
Shelf Life
Loaded sweet potato skins last about five days in the fridge. If you freeze them, they keep well for up to three months. After that, the taste may change. Always check for any signs of spoilage before eating.
FAQs
Can I make loaded Southwest sweet potato skins in advance?
Yes, you can make these tasty skins ahead of time. Here are some tips for meal prep:
– Bake the sweet potatoes a day before. Store them in the fridge once cooled.
– Prepare the filling in advance. Mix all the filling ingredients and store them separately.
– Assemble the sweet potato skins right before baking. This keeps them fresh and tasty.
– Bake them when you are ready to serve. This saves time and keeps the cheese melty.
What can I use as a healthier alternative?
You can make some low-calorie substitutions for this dish:
– Use low-fat cheese instead of regular cheddar. This cuts calories without losing flavor.
– Swap Greek yogurt with a dairy-free option if needed.
– Try black beans as a protein source. They are healthy and filling.
– Add more veggies like spinach or zucchini to boost nutrition and fiber.
How do I ensure my sweet potatoes are fluffy?
For fluffier filling, follow these key techniques:
– Bake sweet potatoes until very tender. This makes the flesh easier to mix.
– Pierce the skin before baking. This lets steam escape and helps them cook evenly.
– Scoop out the flesh gently, leaving a little around the edges. This keeps the skins sturdy.
– Mix filling well to incorporate air. This adds lightness to the mixture before stuffing the skins.
This article explored how to create loaded Southwest sweet potato skins. We covered essential ingredients, from sweet potatoes to spices, along with optional add-ins for extra flavor. I shared step-by-step instructions for prepping, making the filling, and assembly. Tips improved texture and flavor, while variations catered to different diets. Lastly, I provided storage tips to keep your dish fresh.
For a tasty treat, follow these steps, and enjoy every bite!


![- 12 mini bell peppers (assorted colors) - 1 cup cooked quinoa - 1 cup black beans, rinsed and drained - 1 cup corn (fresh, frozen, or canned) - 1/2 cup diced tomatoes (fresh or canned) - 1 cup shredded cheese (cheddar or pepper jack) The mini bell peppers are the stars here. Their sweet crunch makes a great bite. They come in many colors, adding fun to your dish. Quinoa adds protein and a nice texture. Black beans bring fiber and heartiness. Corn adds sweetness and color, while diced tomatoes add moisture and flavor. Finally, shredded cheese melts into a gooey topping that ties everything together. - 1 teaspoon cumin - 1 teaspoon smoked paprika - 1 teaspoon garlic powder - 1/2 teaspoon onion powder - Salt and pepper to taste Seasonings bring life to your dish. Cumin adds warmth and earthiness. Smoked paprika gives a touch of smokiness. Garlic powder adds depth, while onion powder enhances flavor. Salt and pepper balance everything out. This blend will make your stuffed mini bell peppers burst with flavor. - Fresh cilantro, chopped (for garnish) - 1 tablespoon olive oil Garnishes make your dish pretty and fresh. Fresh cilantro adds a pop of color and brightness. Olive oil adds richness and ties the flavors together. Together, they make your stuffed mini bell peppers look and taste amazing. You can find the full recipe [here]. 1. Preheat the oven to 375°F (190°C). This step gets your oven ready for baking. 2. Cut the tops off the mini bell peppers. Use a sharp knife for a clean cut. 3. Remove the seeds and any white parts inside the peppers. This helps reduce bitterness. 1. In a large mixing bowl, combine the cooked quinoa, black beans, corn, and diced tomatoes. 2. Add half a cup of shredded cheese to the mix. This adds creaminess and flavor. 3. Stir in the cumin, smoked paprika, garlic powder, onion powder, salt, and pepper. Mix well until everything is combined. 4. Drizzle one tablespoon of olive oil over the filling and stir again. This keeps it moist. 1. Carefully fill each mini bell pepper with the quinoa mixture. Press down gently to pack it in. 2. Arrange the stuffed peppers upright in a baking dish. If they tip over, use crumpled aluminum foil to help them stand. 3. Sprinkle the rest of the cheese on top of the stuffed peppers. This will melt into a tasty layer. 4. Cover the dish with aluminum foil. Bake for 20 minutes, then remove the foil. 5. Bake for an additional 10-15 minutes, until the peppers are tender and the cheese is bubbly and golden. 6. After baking, let them cool for a few minutes before garnishing with fresh cilantro. For the Full Recipe, refer to the ingredients and precise steps above. Enjoy! You can easily change this recipe. Try using ground turkey instead of black beans. It adds a nice flavor. For some heat, add chili powder or cayenne pepper. This can spice things up! If you want vegan options, skip the cheese and use tofu. For gluten-free, ensure you select gluten-free grains and beans. You have options for cooking. Baking is simple and gives a soft texture. You can also use an air fryer. Air frying makes them crispy and quick. If you want a smoky taste, grilling is great. Just watch the peppers so they don’t burn. Dips enhance the meal. Salsa and guacamole pair well with the stuffed peppers. You can serve them as appetizers or as a fun main dish. They are colorful and bright, making your table look good. For a complete meal, add a fresh salad on the side. You can find the full recipe above, so you have all the details you need. {{image_2}} You can make stuffed mini bell peppers in many tasty ways. For a Mexican twist, add taco seasoning to the filling. This adds spice and flavor. You can use ground meat or keep it vegetarian. For a Mediterranean style, mix in feta cheese and olives. This creates a salty and creamy taste. The tangy flavors work great with the sweet peppers. Both options are fun and easy to try. Feel free to play with the main ingredients. You can swap quinoa for rice if you prefer it. Rice adds a nice texture and flavor. If you want a change, use lentils instead of beans. Lentils cook fast and have a great taste. They also boost the protein in your dish. These swaps let you customize the recipe to your liking. Seasonal changes can inspire new stuffed pepper ideas. In summer, use fresh garden veggies like zucchini or corn. These add brightness and flavor. In winter, try heartier vegetables like mushrooms or kale. They give warmth and comfort to your meal. These seasonal changes keep things interesting and delicious. For the full recipe, check out the details above. After you enjoy your stuffed mini bell peppers, store the leftovers in the fridge. Place them in an airtight container. This keeps them fresh and tasty. If you have a lot, you can stack them, but make sure they are not too crowded. The best containers are glass or BPA-free plastic. They seal well and help keep the flavor. To freeze stuffed peppers, let them cool first. Then, wrap each pepper tightly in plastic wrap. After that, put them in a freezer-safe bag or container. This helps prevent freezer burn. When you want to eat them, take them out. Thaw them in the fridge overnight. You can reheat them in the oven or microwave. If using the oven, bake at 350°F (175°C) until warmed through. Stuffed mini bell peppers last about 3 to 5 days in the fridge. If frozen, they can last up to 3 months. For the best taste, eat them sooner rather than later. Always check for any signs of spoilage before eating. Keeping track of freshness helps you enjoy your meal at its best. Stuffed mini bell peppers are small, colorful peppers filled with a tasty mix. They are often stuffed with ingredients like quinoa, beans, corn, and cheese. After baking, they become soft and flavorful. The peppers add a nice crunch and sweetness. This dish is perfect as an appetizer or a main course. You can enjoy them warm or at room temperature. Yes, you can make stuffed mini bell peppers in advance. Prepare the filling and stuff the peppers. Then, cover and refrigerate them for up to a day. When ready to bake, take them out and let them sit for 15 minutes. This helps them cook evenly. You can also freeze them before baking. To do this, wrap them tightly and store them for up to three months. Thaw in the fridge overnight before baking. Stuffed mini bell peppers pair well with many sides. Here are a few tasty options: - A fresh green salad with vinaigrette - Guacamole and tortilla chips - Rice or quinoa pilaf - A light soup, like tomato or corn chowder - Sparkling water or a light white wine These sides complement the flavors of the stuffed peppers and make the meal more complete. You can tell stuffed mini bell peppers are done by checking a few signs. First, look for the peppers to be tender and slightly wrinkled. The cheese on top should be golden and bubbly. If you poke a pepper with a fork, it should feel soft but not mushy. Cooking time is usually 30 to 35 minutes at 375°F (190°C). If unsure, a food thermometer should read 165°F (74°C) inside the filling. Stuffed mini bell peppers are fun, tasty, and easy to make. We explored their main ingredients, seasonings, and garnishes. You learned how to prep, mix, and bake them perfectly. Plus, I shared great tips for customizing and serving your dish. Don’t forget about storing leftovers for later! Experiment with flavors and try different options. There’s so much you can do with this dish. Enjoy making stuffed peppers that please everyone at your table!](https://dailydishly.com/wp-content/uploads/2025/07/7be91d44-d02b-4978-8cdb-a2e2cd47e9c1-768x768.webp)
![For a vibrant and tasty treat, use a mix of colorful fruits. Here’s what you need: - 1 cup strawberries, hulled - 1 cup orange segments - 1 cup pineapple chunks - 1 cup green grapes - 1 cup blueberries - 1 cup purple grapes or blackberries These fruits not only look great, but they also pack in vitamins. Each fruit adds its own flavor and texture. You can choose fresh, ripe fruits for the best taste. If you want to add a bit of sweetness, consider these options: - 2 tablespoons honey (optional) Honey brings a natural sweetness to the skewers. Drizzle it on before serving. It works well with all the fruits. Garnishing makes your skewers look even better. Use fresh mint leaves for a pop of color. Arrange the skewers on a platter for a fun display. You can also place them in a glass jar for a playful touch. This way, everyone can grab their own skewer! For the full recipe, check the detailed steps to make these beautiful treats. Start by washing all the fruits well. Rinse strawberries, grapes, blueberries, and oranges under cool water. Hull the strawberries, removing the green tops. Cut large strawberries in half for easier skewering. Peel the oranges and break them into segments. For the pineapple, slice it into bite-sized pieces. Finally, rinse the green and purple grapes. Grab wooden skewers and now it’s time to thread the fruits. Begin with a strawberry, then add an orange segment. Next, add a pineapple chunk and follow with a green grape. Then, add a blueberry and finish with a purple grape or blackberry. Aim for a vibrant pattern with all the colors of the rainbow. Each skewer should look fun and inviting! If you want to add a bit of sweetness, drizzle honey over the skewers. This step is optional, but it can enhance the flavors. For a refreshing treat, chill the skewers in the fridge for about 30 minutes before serving. Arrange them on a lovely platter and add fresh mint leaves for a pop of color. These simple steps make your rainbow fruit skewers look and taste amazing. For more detailed instructions, check the Full Recipe. Choosing ripe fruits is key for tasty skewers. Look for bright colors and firm texture. For strawberries, pick those that are deep red. Oranges should feel heavy and have smooth skin. Pineapples should have a sweet smell and give slightly when pressed. Grapes are ripe when they are plump and not wrinkled. Blueberries should be deep blue, while purple grapes should show no signs of green. When skewering, use sturdy wooden sticks or metal skewers. Start with a strawberry at the bottom. Follow with an orange segment and then a pineapple chunk. Next, add a green grape and a blueberry. Finish with a purple grape or blackberry on top. This order keeps the colors bright and fun. Space the fruits a bit apart to allow for easy eating. For parties, arrange your skewers on a big platter. Display them upright in a tall glass or jar. This makes them easy to grab. You can add a small bowl of honey for dipping. Fresh mint leaves add a nice touch and flavor. Guests will love the colors and the taste! For more ideas, check out the Full Recipe. {{image_2}} You can switch up the fruits in your skewers. Try using kiwi instead of orange for a tangy taste. Swap in mango for a sweeter flavor, or use raspberries for a tart kick. Here are some great options: - Kiwi - Mango - Raspberries - Peaches - Apples These fruits add different colors, flavors, and textures. You can mix and match based on what you like. Get creative with your combinations! Dips can make your fruit skewers even more fun. You can serve them with yogurt or chocolate sauce. Here are some tasty ideas: - Vanilla yogurt - Honey yogurt - Chocolate sauce - Nut butter Dipping adds a new layer of flavor. You can make a small bowl for each dip. This way, everyone can enjoy their favorite! Make your skewers special for holidays or parties. For a birthday, use colorful sprinkles on your yogurt dip. For summer picnics, create a “beach” theme with coconut flakes. You can also arrange the fruits in shapes, like stars or hearts. This adds a fun touch to your dish. For more details on making these colorful treats, check the Full Recipe. To keep your rainbow fruit skewers fresh, store them in the fridge. Place them in an airtight container. This helps prevent the fruits from drying out or absorbing odors. If you plan to serve them later, keep the honey separate until just before serving. This way, the skewers stay crisp and colorful. When prepping your skewers, wash and cut your fruits ahead of time. Keep them in separate containers for easy access. This makes it simple to assemble the skewers when you’re ready. If you want to make them in advance, prepare them a few hours before serving. Just remember to refrigerate them to keep them fresh. Most fruits have a good shelf life when stored correctly. Here’s a quick guide: - Strawberries: 3–5 days - Oranges: 1–2 weeks - Pineapple: 3–5 days - Grapes: 1 week - Blueberries: 1 week - Blackberries: 3–5 days Always check for freshness before using any fruit. By following these tips, your rainbow fruit skewers will stay vibrant, tasty, and ready to enjoy! For the full recipe, check back on the main article. Yes, you can use frozen fruits for skewers. However, they may not hold their shape well. Frozen fruits often lose some water when thawed. This can make them mushy. If you want to use them, let them thaw first. Pat them dry with a towel to reduce excess moisture. This way, they won’t drip and make a mess. To boost the nutrition of your rainbow fruit skewers, consider these tips: - Add a source of protein. Use yogurt, cheese cubes, or nuts. - Include seeds. Sprinkle chia or flaxseed on the fruit. - Use whole fruits instead of fruit juice. Whole fruits have more fiber. - Mix in some veggies. Cherry tomatoes or cucumber slices can add crunch. These small changes can make your skewers even healthier without losing flavor. For a summer picnic, the best fruits are those that are sweet and refreshing. Here are some great choices: - Strawberries: Juicy and easy to eat. - Watermelon: Hydrating and fun to slice. - Pineapple: Sweet and tangy. - Grapes: Bite-sized and portable. - Blueberries: Packed with antioxidants. - Raspberries: Tart and flavorful. These fruits not only taste great but also look beautiful on your skewers. You can find the full recipe for rainbow fruit skewers [here]. Enjoy! Rainbow fruit skewers are fun and easy to make. We covered the best fruits, optional sweeteners, and cool presentation ideas. You learned how to prep the fruit and assemble the skewers step by step. I shared tips on choosing ripe fruit and serving them at gatherings. We also explored variations, like adding dips and themed designs. Finally, I discussed how to store your skewers for freshness. Now, grab your favorites and get creative with your skewers! Enjoy these tasty treats while having fun with friends and family.](https://dailydishly.com/wp-content/uploads/2025/06/1f4123b9-dd53-4d15-af26-e58167d567ef-768x768.webp)

![To make a tasty Zesty Greek Pasta Salad, you need fresh, vibrant ingredients. Here’s what to gather: - 8 oz. farfalle pasta (or your choice of pasta) - 1 cup cherry tomatoes, halved - 1 cucumber, diced - 1/2 red onion, thinly sliced - 1 cup Kalamata olives, pitted and halved - 1 cup feta cheese, crumbled - 1/4 cup fresh parsley, chopped - 1/4 cup olive oil - 2 tablespoons red wine vinegar (or lemon juice) - 1 teaspoon dried oregano - 1 clove garlic, minced - Salt and pepper to taste These ingredients create a bright flavor that makes the salad shine. You can add your own twist to this salad. Here are some options: - Bell peppers for extra crunch - Artichoke hearts for a tangy bite - Spinach or arugula for more greens - Chickpeas for added protein - Avocado for creaminess Feel free to mix in these ingredients based on what you like. If you can’t find some ingredients, don’t worry! Here are some tips: - Use any pasta shape you prefer. Penne or rotini work well too. - Swap Kalamata olives for green olives if desired. - Feta can be replaced with goat cheese for a different flavor. - Use fresh herbs like dill or mint instead of parsley for a unique taste. These swaps help you create a salad that suits your taste. For the complete recipe, check the [Full Recipe]. To make a great Zesty Greek Pasta Salad, start with the pasta. Use 8 oz. of farfalle or your favorite kind. Bring a big pot of salted water to a boil. Add the pasta and cook it until it's al dente. This usually takes about 8 to 10 minutes. Drain the pasta and rinse it with cold water. This stops the cooking and cools the pasta. You want it nice and firm. Next, let’s make the zesty dressing. In a small bowl, add 1/4 cup olive oil. Then, mix in 2 tablespoons of red wine vinegar. You can use lemon juice if you prefer. Now, add 1 clove of minced garlic and 1 teaspoon of dried oregano. Sprinkle in salt and pepper to taste. Whisk everything until it blends well. This dressing brings a bright flavor to the salad. Now, it's time to combine everything! In a large bowl, add the cooled pasta. Then, toss in 1 cup of halved cherry tomatoes, 1 diced cucumber, and 1/2 sliced red onion. Next, add 1 cup of Kalamata olives and 1 cup of crumbled feta cheese. Pour the zesty dressing over the top. Gently toss to coat everything evenly. Finally, sprinkle 1/4 cup of chopped parsley. Give it one last toss. For the best taste, chill the salad for at least 30 minutes. This lets all the flavors mix nicely. Check the seasoning once more, then serve. Enjoy your fresh and tasty Zesty Greek Pasta Salad! For more details, see the Full Recipe. To make your Zesty Greek Pasta Salad shine, use fresh ingredients. Fresh herbs, like parsley, add bright flavor. A squeeze of lemon juice can also boost taste. For a kick, try adding red pepper flakes. They bring heat without overpowering the dish. When mixing, taste as you go. Adjust salt and pepper as needed for balance. The texture of your pasta salad is key. Cook the farfalle pasta just until tender, or al dente. Rinse it under cold water after cooking. This stops the cooking process and keeps it firm. When you mix in the veggies, chop them evenly. This ensures every bite has a bit of everything. Letting the salad chill helps the flavors blend while keeping the crunch. Presentation matters! Serve your Zesty Greek Pasta Salad in a big bowl. This invites guests to help themselves. For a pop of color, add whole olives on top. A sprinkle of fresh parsley brightens it further. Drizzle a bit more olive oil before serving for shine. Pair it with crusty bread or grilled chicken for a full meal. Enjoy the vibrant colors and flavors! {{image_2}} You can easily add a Mediterranean twist to your Zesty Greek Pasta Salad. Try adding artichoke hearts or sun-dried tomatoes for a new flavor. Roasted red peppers bring a sweet touch. You could also toss in some capers for a salty bite. Each addition makes the dish more vibrant and exciting. Boost the nutrition in your salad with healthy add-ins. Consider adding chickpeas for protein and fiber. Spinach or arugula adds a fresh green crunch. You can also mix in some toasted nuts for healthy fats. Each of these options makes your salad not just tasty, but also good for you. While the olive oil dressing is classic, you can try other options too. A lemon-tahini dressing offers a creamy texture and a tangy flavor. Greek yogurt dressing gives a rich taste and adds protein. A balsamic vinaigrette can bring a sweet twist. Each dressing changes the salad's flavor while keeping it fresh and light. For the full recipe, check out the detailed steps to create this delightful dish. After making your Zesty Greek Pasta Salad, store it in an airtight container. This keeps the flavors fresh and prevents spills. Place parchment paper between layers if you stack ingredients. This way, the salad stays crisp and delicious. Your salad stays tasty in the fridge for about 3 to 5 days. The flavors blend well over time, which is a bonus. Just make sure to check for freshness before eating. If any ingredients look off, it’s best to toss them. I don’t recommend freezing this salad. Freezing can change the texture of fresh vegetables and cheese. However, if you must freeze it, leave out the tomatoes and cucumbers. Store it in a freezer-safe container. It can last up to 2 months. When ready to eat, thaw it in the fridge overnight and mix in fresh veggies before serving. For the complete recipe, check out the Full Recipe section. Yes, you can use any pasta you like. I often choose rotini or penne for this salad. These shapes hold the dressing well. You can even try whole wheat or gluten-free pasta for a healthier option. Absolutely! This salad is great for meal prep. It stays fresh in the fridge for about three days. Just store it in an airtight container. Make sure to add fresh herbs right before serving for the best taste. Adding protein boosts this salad nicely. Grilled chicken, shrimp, or chickpeas work well. You can also try diced turkey or even canned tuna. These options make the salad heartier and more filling. For the full recipe, check out the details above. This blog post covered how to make a tasty Zesty Greek Pasta Salad. We explored key ingredients and options for customization. Simple steps guided the cooking and mixing. Tips helped enhance flavor and texture. We also looked at fun variations and storage tips. In conclusion, you can enjoy this salad in many ways. Whether for a meal or a party, it’s a crowd-pleaser. Get creative with your ingredients, and have fun making it!](https://dailydishly.com/wp-content/uploads/2025/07/db2e56f5-892c-4a59-805f-2ecaeb9e2bc5-768x768.webp)
