Maple Soy Glazed Chicken Thighs Savory and Simple Meal

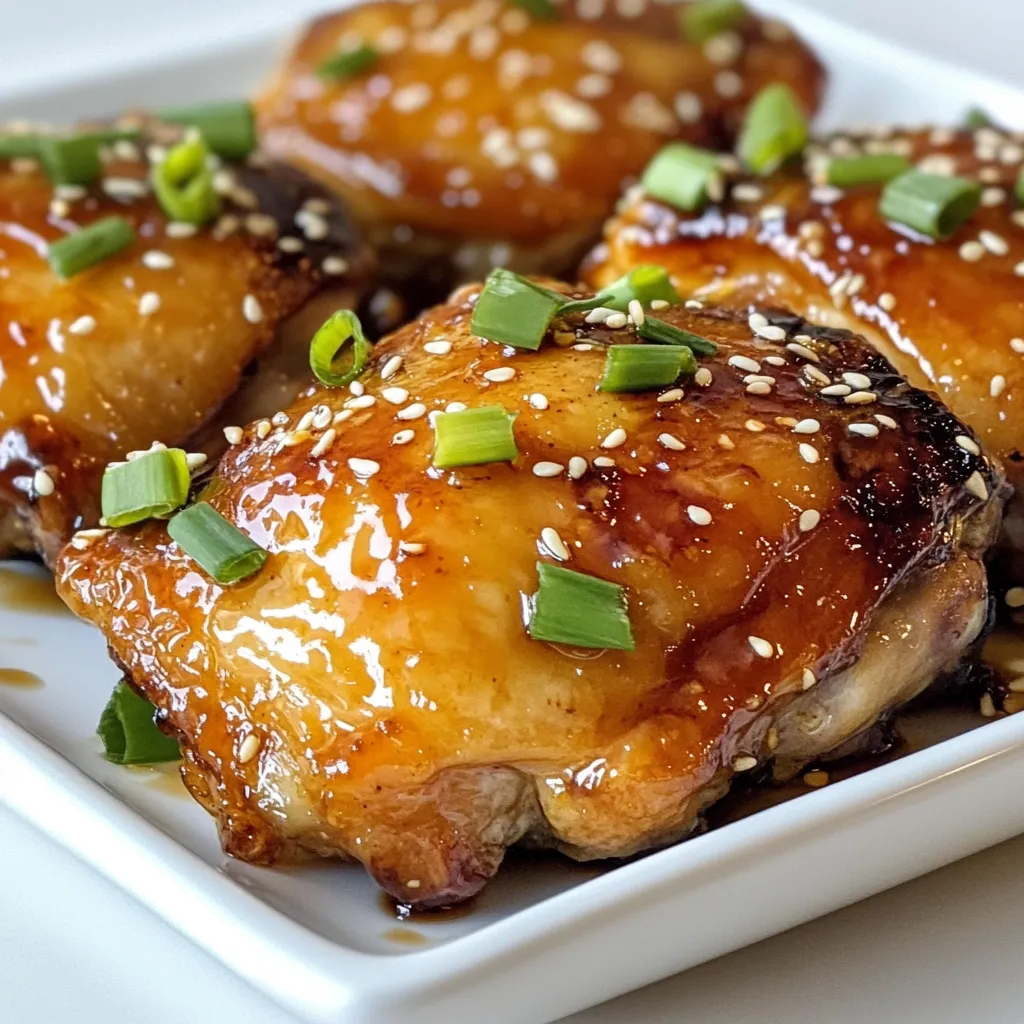
Get ready to savor a dish that’s both simple and delicious: Maple Soy Glazed Chicken Thighs! This recipe combines sweet maple syrup and savory soy sauce for a flavor-packed meal that everyone will love. Whether you’re a kitchen novice or a seasoned chef, I’ll guide you step-by-step to achieve perfectly glazed chicken. Let’s dive into the ingredients and get cooking! Your taste buds will thank you.
Why I Love This Recipe
- Deliciously Sweet and Savory: The combination of maple syrup and soy sauce creates a perfect balance of sweetness and umami, making each bite incredibly flavorful.
- Easy to Prepare: With minimal ingredients and straightforward instructions, this recipe is perfect for both novice and experienced cooks.
- Perfectly Crispy Skin: The baking and broiling process guarantees a crispy skin that contrasts beautifully with the tender meat underneath.
- Versatile: This dish pairs well with a variety of sides such as rice, noodles, or steamed vegetables, making it a great option for any meal.
Ingredients
Essential Ingredients for Maple Soy Glazed Chicken Thighs
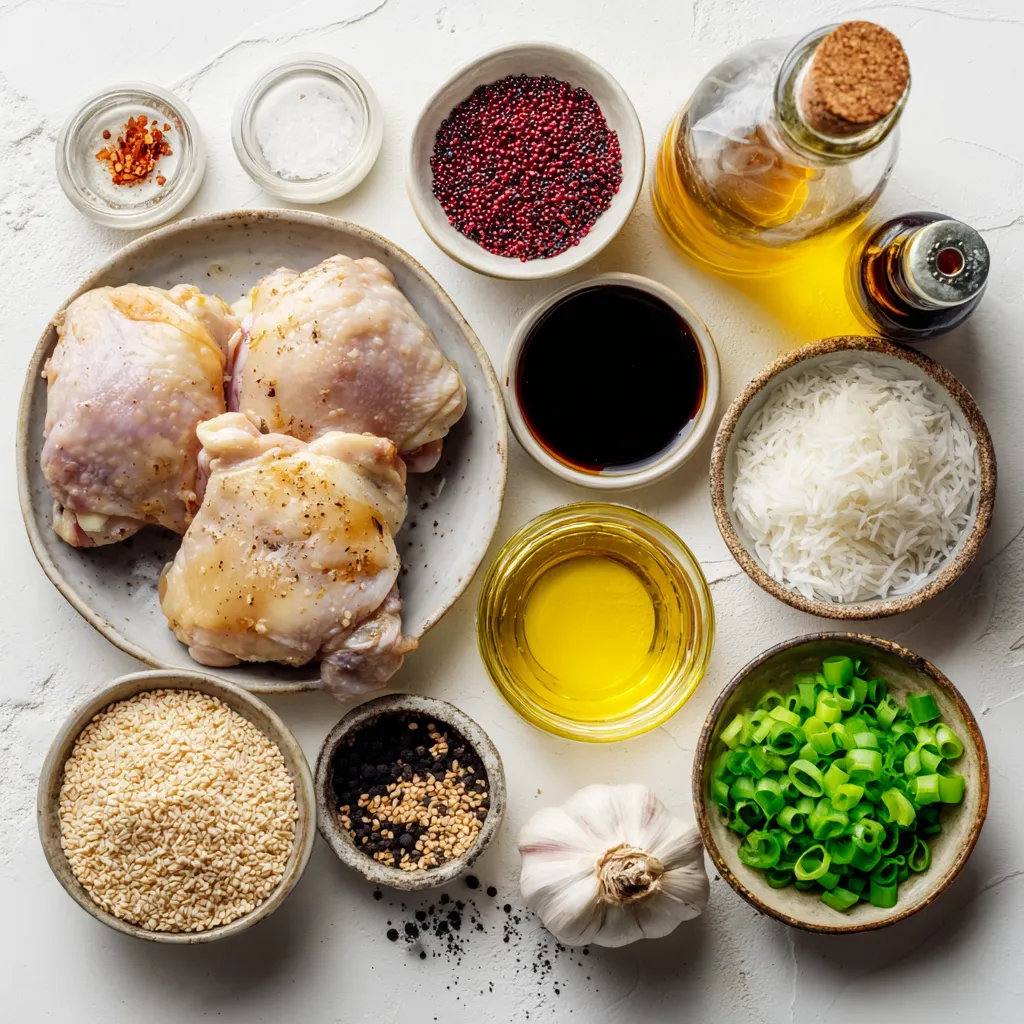
To make the best Maple Soy Glazed Chicken Thighs, you’ll need:
– 4 bone-in, skin-on chicken thighs
– 1/4 cup soy sauce
– 1/4 cup pure maple syrup
– 2 tablespoons rice vinegar
– 2 cloves garlic, minced
– 1 teaspoon fresh ginger, grated
– 1 tablespoon sesame oil
– 1/2 teaspoon black pepper
– 1/4 teaspoon red pepper flakes (optional)
These ingredients blend together to create a sweet and salty taste. The chicken thighs stay juicy, and the glaze gives them a nice shine.
Optional Ingredients for Variations
You can add some fun twists to this dish with these optional ingredients:
– 1 tablespoon sesame seeds (for garnish)
– 2 green onions, chopped (for garnish)
These garnishes add color and crunch. The seeds give a nutty flavor, while green onions add a fresh touch.
Ingredient Substitutions
Don’t have all the ingredients? Here are some easy swaps:
– Use honey instead of maple syrup for a different sweet taste.
– If you don’t have rice vinegar, apple cider vinegar works well too.
– For the ginger, you can use ground ginger in a pinch.
Making these swaps keeps the dish flavorful, even if you don’t have everything on hand. Enjoy the freedom to create!

Step-by-Step Instructions
Marinating the Chicken
To start, you will whisk the marinade. Take a large bowl and combine:
– 1/4 cup soy sauce
– 1/4 cup pure maple syrup
– 2 tablespoons rice vinegar
– 2 cloves garlic, minced
– 1 teaspoon fresh ginger, grated
– 1 tablespoon sesame oil
– 1/2 teaspoon black pepper
– 1/4 teaspoon red pepper flakes (optional)
Mix these well. Next, add your chicken thighs. Make sure they are fully coated. Cover the bowl and place it in the fridge. Let the chicken marinate for at least one hour. For best results, leave it overnight. This step is key for deep flavor.
Preparing the Baking Dish
While the chicken marinates, preheat your oven to 400°F (200°C). This temperature helps the chicken cook evenly. Now, prepare your baking dish. You can line it with parchment paper. This keeps the chicken from sticking. If you don’t have parchment paper, lightly grease the dish with oil.
Baking and Glazing the Chicken
Once your chicken is marinated, take it out. Place the thighs skin-side up in the prepared dish. Don’t forget to save the marinade for later. Now, bake the chicken in the oven. Set your timer for 25-30 minutes. You’ll know it’s done when the skin is crispy and the chicken is cooked through. Halfway through baking, baste the chicken with the reserved marinade. This gives it a wonderful flavor.
In the last five minutes, switch your oven to broil. This will create a nice glaze on the chicken skin. Watch closely to prevent burning. Once finished, take the chicken out and let it rest for five minutes. Finally, sprinkle with sesame seeds and chopped green onions to serve. Enjoy your tasty meal!
Tips & Tricks
Best Marinating Practices
To get the best flavor, marinate your chicken thighs. Mix soy sauce, maple syrup, rice vinegar, garlic, ginger, sesame oil, black pepper, and red pepper flakes in a bowl. Add the chicken and coat it well. Cover the bowl and put it in the fridge. For the best taste, let it sit overnight, but at least one hour works too. The longer you marinate, the more flavor your chicken will absorb.
Cooking Methods: Oven, Grill, Stovetop
You can cook your maple soy glazed chicken thighs in different ways. The oven is my favorite method. It gives even cooking and crispy skin. Preheat your oven to 400°F before baking for 25-30 minutes. If you prefer grilling, cook on medium heat. Grill each side for about 7-10 minutes. For stovetop cooking, heat a pan over medium heat. Cook each thigh for about 8-10 minutes per side. Always check that your chicken is fully cooked.
Achieving Perfectly Crispy Skin
To get that crispy skin, start with skin-on chicken thighs. Bake them skin-side up in the oven. Halfway through baking, baste with the reserved marinade. This adds flavor and helps with crispiness. In the last 5 minutes, switch your oven to broil. This high heat will give the skin a nice glaze. Watch closely to avoid burning. Once done, let the chicken rest for about 5 minutes. Enjoy that crispy goodness!
Pro Tips
- Marinate Longer for Best Flavor: For maximum flavor, marinate the chicken thighs overnight. This allows the marinade to penetrate deeply, enhancing the taste.
- Use a Meat Thermometer: To ensure your chicken is cooked through, use a meat thermometer. The internal temperature should reach 165°F (74°C) for safe consumption.
- Broil with Caution: When broiling, keep a close eye on the chicken. The high heat can quickly turn crispy skin into burnt skin if left unattended.
- Serve with a Side: Pair these glazed chicken thighs with steamed rice or a fresh salad to balance the rich flavors and create a complete meal.

Variations
Maple Soy Glazed Chicken Thighs with Spicy Kick
To add heat to your dish, try the spicy kick. You can add red pepper flakes to the marinade. Start with 1/4 teaspoon. If you like it hotter, increase the amount. You can also add sriracha sauce for more flavor. Just mix it in with the marinade. This spicy twist pairs well with the sweet maple flavor.
Alternative Protein Options
You can switch up the protein in this recipe. Try using chicken breasts or drumsticks. Both options work great with the same marinade. If you prefer, use firm tofu for a vegetarian option. Just cut the tofu into thick slices and marinate it. Each protein will soak up the sweet and salty flavors.
Dressing Up the Recipe with Vegetables
Adding vegetables makes your meal colorful and healthy. Try roasting broccoli, carrots, or bell peppers. Toss them in the marinade for extra flavor. Arrange the veggies around the chicken in the baking dish. This way, they cook together and soak up the tasty sauce. You can also serve the chicken over a bed of sautéed spinach. It adds freshness and a pop of green.
Storage Info
How to Store Leftover Chicken Thighs
After you enjoy your Maple Soy Glazed Chicken Thighs, store any leftovers in the fridge. Place the chicken thighs in an airtight container. Make sure to cover them well to keep them fresh. They can last in the fridge for about 3 to 4 days.
Reheating Tips
To reheat the chicken thighs, use the oven for the best results. Preheat your oven to 350°F (175°C). Place the chicken on a baking sheet. Cover it with foil to keep it moist. Heat for about 15-20 minutes until warm. You can also use a microwave, but it may dry out the chicken.
Freezing Instructions
If you want to save your chicken for later, freezing is a great option. Let the chicken cool completely before freezing. Wrap each thigh in plastic wrap, then place them in a freezer bag. Squeeze out the air to avoid freezer burn. The chicken can last in the freezer for up to 3 months. When ready to eat, thaw in the fridge overnight before reheating.
FAQs
Can I use boneless chicken thighs for this recipe?
Yes, you can use boneless chicken thighs. They will cook faster than bone-in thighs. The flavor will still shine through with the maple and soy marinade. Just make sure to adjust the cooking time. Bake them for about 20-25 minutes. Always check for doneness to ensure they’re fully cooked.
What can I serve with Maple Soy Glazed Chicken Thighs?
You have many great options for sides. Here are a few ideas:
– Steamed rice
– Roasted vegetables
– Stir-fried greens
– Quinoa salad
– Mashed potatoes
These dishes will pair well with the sweet and salty flavors of the chicken.
How do I know when the chicken is fully cooked?
To check if the chicken is done, use a meat thermometer. The internal temperature should reach 165°F (75°C). If you don’t have a thermometer, cut into the thickest part. The juices should run clear, not pink. Let the chicken rest for 5 minutes after cooking. This helps the juices settle, making it more tender.
In this post, we explored maple soy glazed chicken thighs. I shared essential ingredients and fun variations. You learned easy steps for marinating and baking. I also covered storage tips and answered common questions.
Cooking doesn’t have to be hard. With these tips, you can make a tasty meal. Try different flavors, and make it your own! Enjoy your cooking adventure and savor every bit

Maple Soy Glazed Chicken Thighs
Ingredients
- 4 pieces bone-in, skin-on chicken thighs
- 0.25 cup soy sauce
- 0.25 cup pure maple syrup
- 2 tablespoons rice vinegar
- 2 cloves garlic, minced
- 1 teaspoon fresh ginger, grated
- 1 tablespoon sesame oil
- 0.5 teaspoon black pepper
- 0.25 teaspoon red pepper flakes (optional)
- 1 tablespoon sesame seeds (for garnish)
- 2 pieces green onions, chopped (for garnish)
Instructions
- In a large bowl, whisk together the soy sauce, maple syrup, rice vinegar, minced garlic, grated ginger, sesame oil, black pepper, and red pepper flakes (if using). Add the chicken thighs and ensure they are fully coated in the marinade. Cover and refrigerate for at least 1 hour, or overnight for best flavor.
- Preheat your oven to 400°F (200°C).
- Line a baking dish with parchment paper or lightly grease it to prevent sticking.
- Remove the chicken thighs from the marinade and place them skin-side up in the prepared baking dish. Reserve the marinade for later.
- Bake in the preheated oven for 25-30 minutes, or until the chicken is cooked through and the skin is crispy. Baste the chicken with the reserved marinade halfway through cooking for extra flavor.
- In the final 5 minutes of baking, switch the oven to broil. This will give the chicken skin an irresistible glaze. Keep a close watch to prevent burning.
- Once cooked, remove the chicken from the oven and let it rest for about 5 minutes. Sprinkle with sesame seeds and chopped green onions before serving.


![- 4 bone-in chicken thighs, skin-on - 2 medium zucchinis, sliced into half-moons - 1 bell pepper (red or yellow), chopped - 1 cup cherry tomatoes, halved - 1 red onion, cut into wedges - 4 cloves garlic, minced - 1/4 cup olive oil - Juice of 2 lemons - Zest of 1 lemon - 2 teaspoons dried oregano - 1 teaspoon smoked paprika - Salt and pepper to taste - Fresh parsley, chopped for garnish For the main dish, I like to use bone-in chicken thighs. They stay juicy and add great flavor. Pair them with colorful veggies like zucchini, bell peppers, cherry tomatoes, and red onion. Don’t forget the garlic—its aroma will fill your kitchen. The olive oil and lemon juice create a tasty marinade that makes everything shine. - Fresh herbs and spices - Alternative vegetables to add - Marinade variations Fresh herbs like thyme or rosemary can boost flavor even more. You could also swap in veggies like asparagus or broccoli based on what you have. For a twist, try a different marinade. A honey mustard blend or a spicy harissa can change the game. With these options, you can create your own unique version of the dish. Check out the Full Recipe for more details on how to make it! Start by whisking together the marinade. In a bowl, mix olive oil, lemon juice, lemon zest, minced garlic, oregano, smoked paprika, salt, and pepper. This mix brings bright flavors to the chicken and veggies. Marinating is key. Place the chicken thighs in a bag or bowl. Pour half of the marinade over the chicken. Let it sit in the fridge for at least 30 minutes. For stronger flavor, marinate up to 2 hours. Next, preheat your oven to 425°F (220°C). This step ensures even cooking. While the oven heats, prepare the veggies. In a large bowl, combine zucchini, bell pepper, cherry tomatoes, and red onion. Pour the remaining marinade over the veggies and toss well. This will help the vegetables soak up the flavors. Now, arrange the chicken and veggies on a sheet pan. Place the marinated chicken in the center. Spread the veggies around the chicken for even cooking. Bake the dish for 30 to 35 minutes. The chicken should reach an internal temperature of 165°F (75°C). The veggies will become tender and slightly caramelized. Check for doneness by using a meat thermometer. Once done, remove the pan from the oven. Let it rest for a few minutes before serving. Garnish with freshly chopped parsley for a pop of color. For the full recipe, check out the [Full Recipe]. To enhance the marinade, focus on fresh ingredients. Fresh lemon juice adds brightness. The zest boosts the lemon flavor. Garlic brings depth and warmth. Use quality olive oil for richness. You can also add fresh herbs like rosemary or thyme for extra flavor. When choosing chicken cuts, I recommend bone-in thighs. They stay juicy and tender during cooking. The skin adds flavor and helps crisp up nicely. You can also use drumsticks, but avoid boneless cuts. They tend to dry out faster. For even cooking, cut vegetables into similar sizes. This way, they cook together without some burning. Toss them in the marinade well. Make sure every piece is coated for the best flavor. To add textures, mix soft and crunchy vegetables. Cherry tomatoes become sweet and juicy. Zucchini softens but keeps some bite. Bell peppers add a nice crunch. Red onions caramelize, bringing sweetness to the dish. {{image_2}} You can switch up the taste of your sheet pan lemon chicken easily. Instead of lemon, try lime or orange juice. Both citrus fruits bring a unique zest to the dish. Lime adds a fresh twist, while orange gives a sweeter note. Mixing in different herbs and spices can also change the flavor profile. For example, swap oregano for thyme or rosemary. These herbs add depth and pair well with chicken. You can even try a dash of chili powder for a spicy kick! Grilling is a fun way to cook this recipe. It gives a nice smoky flavor that's hard to beat. Just marinate the chicken and veggies as usual. Then, place them on the grill until cooked through. If you want a one-pan meal, consider using other proteins. Boneless chicken breast, shrimp, or even tofu work great. Adjust the cooking time as needed. This way, you can enjoy new flavors while keeping it simple. After enjoying your sheet pan lemon chicken and veggies, store leftovers properly to keep them fresh. - Refrigerating leftovers safely: Place the chicken and veggies in an airtight container. They will stay good in the fridge for up to four days. Make sure to let them cool down before sealing the container. - Freezing guidelines for chicken and veggies: If you want to save them for later, freeze the leftovers. Use freezer-safe bags or containers. You can freeze them for up to three months. Just remember to label the bags with the date. To enjoy your meal again, reheating is key to keeping it tasty. - Best methods to maintain quality: The best way to reheat is in the oven. Preheat it to 350°F (175°C). Place the chicken and veggies in a baking dish. Cover with foil to keep them moist. - Time and temperature considerations: Heat for about 20-25 minutes. Check that the chicken reaches 165°F (75°C) again. This ensures it is safe and delicious to eat. I recommend marinating the chicken for at least 30 minutes. If you can, let it marinate for up to 2 hours. This longer time allows the chicken to soak in all the zesty flavors. The marinade adds moisture and taste, making the chicken juicy and savory. Yes, you can use boneless chicken. Just remember to adjust the cooking time. Boneless chicken cooks faster than bone-in cuts. Start checking for doneness at about 20 minutes. You want the internal temperature to reach 165°F. This will ensure your chicken is safe to eat and still juicy. If you don’t have a sheet pan, don’t worry! You can use a baking dish or a large skillet. Just make sure to arrange the chicken and veggies in a single layer. This helps them cook evenly. If you use a smaller pan, you may need to cook in batches. This recipe is great for meal prep! You can make it ahead and store the leftovers in the fridge. It keeps well for up to four days. Just reheat portions in the oven or microwave when you’re ready to eat. Divide the meal into containers for easy lunches or dinners. For a twist, try adding different sides throughout the week. Exciting meals can make your prep even more fun! For the full recipe, be sure to check out the details above. This blog post showed you how to make a tasty sheet pan lemon chicken. We covered the main and optional ingredients, plus how to prepare and cook them. You learned tips for flavor and texture, and even some fun variations. Don’t forget how to store and reheat leftovers. Now, you can enjoy delicious meals without much fuss. Try making this dish and share it with friends or family. Cooking can be fun and easy!](https://dailydishly.com/wp-content/uploads/2025/06/6619f650-0475-47be-ab23-3ec1a8437763-768x768.webp)

![To make cheesy scalloped potatoes, you need just a few simple ingredients. Here’s what you’ll need: - 4 large russet potatoes, peeled and thinly sliced - 1 cup sharp cheddar cheese, grated - 1 cup Gruyère cheese, grated - 1 medium onion, finely chopped - 2 cloves garlic, minced - 2 cups heavy cream - 1 tablespoon butter - 1 teaspoon salt - 1/2 teaspoon black pepper - 1/4 teaspoon nutmeg - Fresh parsley, chopped (for garnish) Each ingredient plays a key role in creating that creamy, cheesy goodness. The potatoes provide the base, while the cheeses add flavor and richness. Choosing the right cheese is important. I love using sharp cheddar for its bold flavor. Gruyère brings a nice creaminess and a nutty taste. You can mix these cheeses or use others you like. Just remember, a good melt is what you want. While the basic recipe is tasty, you can add a few seasonings. Consider these: - Fresh thyme for a herbal note - Smoked paprika for a hint of smokiness - Red pepper flakes for some heat These add-ons can elevate your dish. You can adjust them based on your taste. For a full experience, follow the Full Recipe to bring these flavors together perfectly! First, gather all your ingredients. You need four large russet potatoes, sharp cheddar cheese, Gruyère cheese, an onion, garlic, heavy cream, butter, salt, black pepper, nutmeg, and fresh parsley. Peel and thinly slice the potatoes. I often use a mandoline for even slices. Finely chop the onion and mince the garlic. Next, melt one tablespoon of butter in a medium saucepan over medium heat. Add the chopped onion and minced garlic. Sauté until they turn soft and clear, about four to five minutes. This step adds great flavor. Pour in the two cups of heavy cream and mix in the salt, pepper, and nutmeg. Heat until it simmers, but do not boil. Remove from heat. Now, grease a 9x13 inch baking dish. Start by layering half of the sliced potatoes on the bottom. Spread them out evenly. Next, pour half of the cream mixture over the potatoes. Then, sprinkle half of the grated cheddar and Gruyère cheese on top. Do this carefully to cover all the potatoes. Repeat the process with the remaining ingredients. Layer the rest of the potatoes, followed by the cream mixture, and finish with the remaining cheese. This layering gives the dish its rich flavor and texture. Cover the baking dish with aluminum foil. Bake in the preheated oven at 375°F (190°C) for 45 minutes. This helps the potatoes cook through. After 45 minutes, carefully remove the foil. Bake uncovered for an additional 25 to 30 minutes. The top should turn golden brown, and the dish will bubble up. Let the scalloped potatoes cool for about ten minutes before serving. This cooling time helps the layers set. Garnish with fresh parsley for a pop of color. Enjoy this cheesy delight! To get the best creamy texture, use heavy cream. It gives a rich taste. Heat the cream slowly with salt and spices. This helps the flavors mix well. Avoid boiling the cream; just let it simmer. Layer the potatoes and cream mixture evenly in the dish. This allows every bite to be creamy and delicious. To achieve a golden, bubbly cheese top, remove the foil halfway through baking. This lets the heat reach the cheese directly. If you want an extra crispy top, add a bit more cheese before the last baking phase. Broil the dish for a few minutes at the end if you want even more browning. Just watch it closely to avoid burning. One common mistake is cutting the potatoes too thick. Thin slices cook evenly and absorb the cream better. Another mistake is skipping the onion and garlic. These add depth and flavor. Also, don’t rush the baking time. Ensure potatoes are tender before serving. Following the Full Recipe will keep you on track for success. {{image_2}} You can make cheesy scalloped potatoes vegetarian. Simply skip any meat or meat-based broths. Focus on using rich, creamy ingredients like heavy cream and cheese. Add layers of fresh vegetables, too. Spinach, mushrooms, or zucchini give great flavor and texture. They blend well with the potatoes and cheese, making each bite delightful. Cheese is key in this dish. You can play with different cheese blends. Try mozzarella for a gooey texture. Feta adds a nice tang, while gouda gives a smoky flavor. Mix and match your favorites to create a unique taste. Aim for a mix of sharp and creamy cheeses to balance the flavors. Want to make this dish heartier? Add proteins like cooked bacon or ham. Both add savory notes that complement the cheese. You can also sneak in some vegetables. Broccoli or asparagus works well. Simply chop them small and layer them with the potatoes. This not only enhances flavor but also boosts nutrition. For more detailed steps on making these variations, check out the Full Recipe. After you make your cheesy scalloped potatoes, let them cool first. This helps keep them fresh. Store the leftovers in an airtight container. They can stay good in the fridge for about three to four days. If you want to keep them longer, freezing is a great option. You can freeze cheesy scalloped potatoes for up to three months. To do this, make sure they cool completely. Cut them into portions. Wrap each piece tightly with plastic wrap. Then, place them in a freezer-safe bag. Label the bag with the date. This way, you’ll know when to use them. To reheat, take the potatoes out of the fridge or freezer. If frozen, let them thaw overnight in the fridge. Preheat your oven to 350°F (175°C). Place the leftovers in a baking dish. Cover with foil to keep them moist. Bake for about 20 to 30 minutes, or until hot. You can also microwave them, but the oven gives a better texture. Enjoy your cheesy scalloped potatoes just like the first time! For the full recipe, check out the [Full Recipe]. You can make cheesy scalloped potatoes a day before. Prepare the dish fully, then cover it with plastic wrap. Store it in the fridge overnight. When you are ready to bake, remove the wrap and let it sit at room temperature for 30 minutes. Then, bake as instructed in the Full Recipe. This method helps the flavors blend and saves time. Yes, you can use different potatoes. While I prefer russet potatoes for their creaminess, Yukon gold potatoes work well too. They add a nice buttery flavor. Just remember to slice them thinly for even cooking. Avoid waxy potatoes, as they may not soften well in the oven. Cheesy scalloped potatoes pair nicely with many dishes. They complement roast chicken, beef, or pork perfectly. You can also serve them with a fresh salad for a balanced meal. For a special touch, add some steamed green beans or sautéed spinach on the side. These options create a colorful plate and elevate your dining experience. You now know how to make cheesy scalloped potatoes from scratch. We covered essential ingredients, baking steps, and tips to avoid mistakes. Experiment with different cheeses and veggies for your own twist. Remember to store leftovers properly to enjoy later. Use these insights to impress your friends and family at your next meal. Happy cooking; I can’t wait for you to try this dish!](https://dailydishly.com/wp-content/uploads/2025/07/68a68aa2-1fa5-4915-a359-e46e8929230b-768x768.webp)

