Mediterranean Orzo Salad Fresh and Flavorful Dish

Looking for a fresh and tasty dish? Try this Mediterranean Orzo Salad! It’s packed with vibrant flavors and healthy ingredients. With juicy tomatoes, crunchy cucumbers, and creamy feta, this dish is sure to please. It’s easy to make, perfect for gatherings, or a quick lunch. Join me as I guide you step-by-step to create this delightful salad that’s as good for you as it is delicious!
Why I Love This Recipe
- Fresh and Vibrant: This Mediterranean Orzo Salad is bursting with fresh ingredients that bring a vibrant taste to every bite.
- Quick and Easy: With a prep time of just 15 minutes, this dish is perfect for busy days or last-minute gatherings.
- Nutritious and Satisfying: Loaded with veggies, healthy fats, and protein from feta cheese, it’s a wholesome meal option.
- Perfect for Any Occasion: This salad is versatile enough to be served as a side dish, main course, or picnic treat.
Ingredients
List of Primary Ingredients
– 1 cup orzo pasta
– 1 ½ cups cherry tomatoes, halved
– 1 cup cucumber, diced
– ½ cup red onion, finely chopped
– 1 cup Kalamata olives, pitted and sliced
– 1 cup feta cheese, crumbled
– ½ cup fresh parsley, chopped
– 2 tablespoons capers, rinsed and drained
Dressing Ingredients
– ¼ cup olive oil
– 2 tablespoons lemon juice
– 1 teaspoon dried oregano
– Salt and pepper to taste
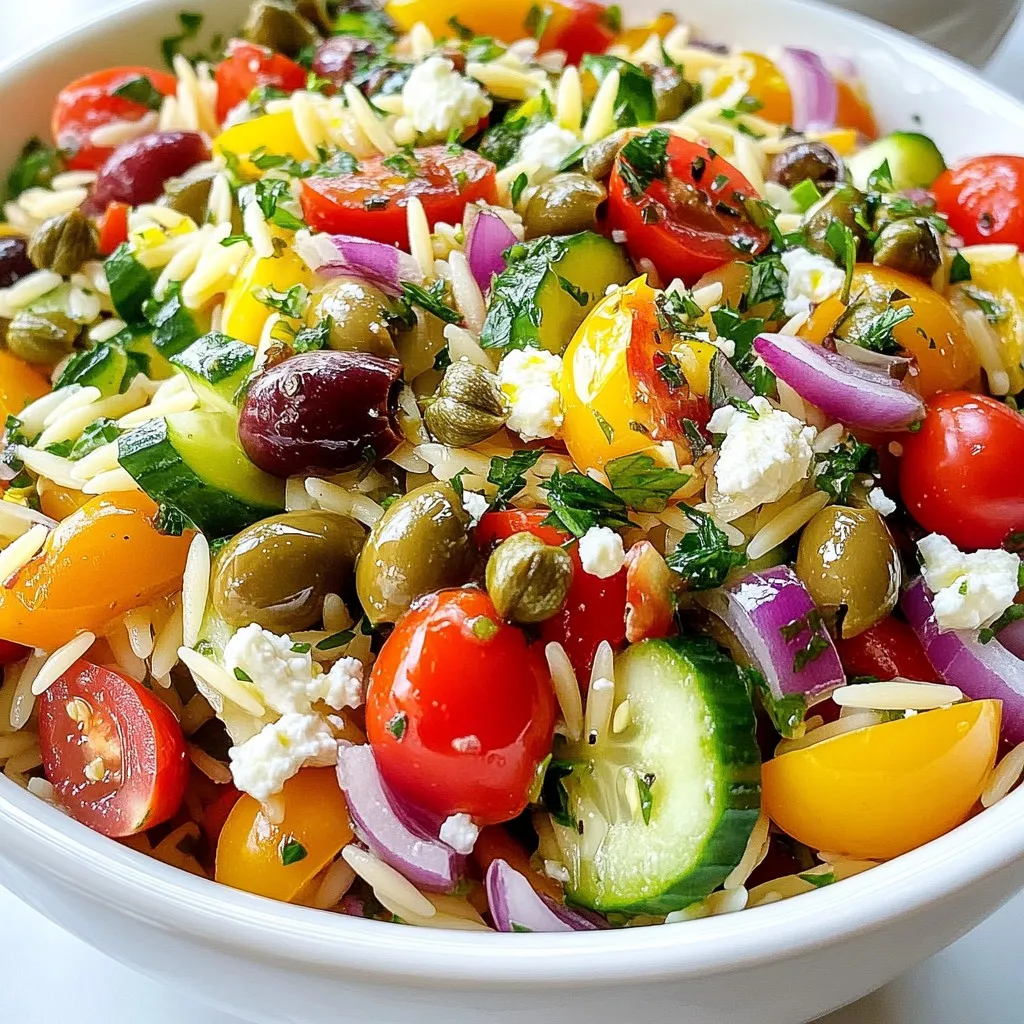
In Mediterranean Orzo Salad, each ingredient plays a key role in flavor and texture. The orzo pasta forms a soft base. Cherry tomatoes add a burst of sweetness. Cucumbers give a nice crunch. Red onions bring a sharp bite, while Kalamata olives add a salty, briny punch. Feta cheese adds creaminess and tang. Fresh parsley brightens the dish. Lastly, capers offer a unique, tangy kick.
For the dressing, I use olive oil and lemon juice as the main components. They create a light and refreshing taste. Dried oregano adds an earthy note. Salt and pepper enhance all the flavors. When combined, these ingredients create a balanced and vibrant salad that shines on any table.

Step-by-Step Instructions
Cooking the Orzo
1. Bring a large pot of salted water to a boil. This is key for great flavor.
2. Cook the orzo until it is al dente. This usually takes about 8 to 10 minutes.
3. Once cooked, drain the orzo and rinse it with cold water. This stops the cooking and cools it down.
Preparing the Salad
1. In a large mixing bowl, combine the fresh ingredients:
– 1 ½ cups cherry tomatoes, halved
– 1 cup cucumber, diced
– ½ cup red onion, finely chopped
– 1 cup Kalamata olives, pitted and sliced
– 1 cup feta cheese, crumbled
– ½ cup fresh parsley, chopped
– 2 tablespoons capers, rinsed and drained
2. Mix everything gently to combine.
Making the Dressing
1. In a small bowl, whisk together the dressing ingredients:
– ¼ cup olive oil
– 2 tablespoons lemon juice
– 1 teaspoon dried oregano
– Salt and pepper to taste
2. Pour the dressing over the salad and toss gently until it coats everything well.
Final Steps
1. Taste the salad and adjust the seasoning. You can add more salt, pepper, or lemon juice if you like.
2. Chill the salad in the refrigerator for at least 30 minutes. This helps the flavors blend together nicely.
Tips & Tricks
Achieving the Perfect Orzo
Cooking orzo can seem tricky, but it is easy. First, boil salted water in a big pot. Add the orzo and cook it for 8-10 minutes. You want it to be al dente, which means it should be firm but cooked. After cooking, drain the orzo. Rinsing it with cold water stops the cooking. This step keeps the orzo from getting mushy.
Enhancing Flavor
To boost the flavor, use fresh herbs. Basil and dill are great options. You can chop them up and mix them in with the veggies. For the dressing, add a bit more lemon juice if you like it tangy. A touch of garlic can also enhance the taste. Experiment with your favorite herbs to find what you love.
Presentation Ideas
Serving it well makes a big difference. Use a large bowl for a family gathering. For picnics, pack the salad in mason jars. This way, each person has their own portion. Garnish the salad with extra parsley and a sprinkle of feta on top. This adds color and makes it look pretty.
Pro Tips
- Cook Orzo Perfectly: Make sure to cook the orzo in salted water and rinse it with cold water after draining to stop the cooking process, ensuring it remains al dente.
- Fresh Ingredients Matter: Use fresh vegetables and herbs for the best flavor. Seasonal produce will elevate the taste of your salad.
- Customize Your Dressing: Feel free to adjust the olive oil and lemon juice ratios to suit your taste preferences. A splash of red wine vinegar can also add a nice tang!
- Chill for Flavor: Allow the salad to chill in the refrigerator for at least 30 minutes before serving. This helps the flavors meld together beautifully.

Variations
Protein Additions
Adding protein can make your Mediterranean orzo salad heartier. You can grill chicken and slice it into strips. This adds flavor and makes the dish more filling. For a vegetarian option, use chickpeas. They give a nice texture and boost protein without meat.
Ingredient Swaps
Sometimes, you may want to change ingredients. If you don’t like olives or feta, try using sun-dried tomatoes or goat cheese. These swaps keep the salad tasty. You can also add seasonal vegetables. Think about bell peppers in summer or roasted squash in fall. Fresh ingredients make the salad shine.
Dietary Adjustments
If you need gluten-free options, look for gluten-free orzo. This way, everyone can enjoy the dish. For those who want a vegan meal, swap the dressing for a mix of olive oil and balsamic vinegar. It adds a tangy flavor without dairy. Adjusting ingredients helps you cater to different diets while keeping the salad delicious.
Storage Information
Storing Leftovers
To keep your Mediterranean Orzo Salad fresh, store it in an airtight container. This helps prevent the salad from drying out. Place the container in the fridge right after serving. The salad will stay good for 3 to 5 days.
Be aware that tomatoes can release water over time. This may make the salad a bit soggy. To avoid this, mix in the tomatoes just before serving. For best taste, enjoy the salad within the first couple of days.
Freezing Guidelines
Can you freeze orzo salad? Yes, you can freeze it, but note that the texture may change. The vegetables may become soft once thawed. If you want to freeze it, do so right after making, before adding tomatoes.
To freeze, put the salad in a freezer-safe bag. Squeeze out as much air as possible before sealing. This helps to prevent freezer burn.
For thawing, move the salad to the fridge a day before you plan to eat it. This way, it defrosts slowly. When ready to serve, toss in fresh tomatoes and any new herbs. This will bring back some freshness.
FAQs
What is orzo pasta?
Orzo is a small pasta that looks like rice. It is made from wheat and cooks quickly. Unlike traditional pasta, orzo is often used in salads and soups due to its unique shape. This tiny pasta adds a nice texture to dishes. You can find orzo in most grocery stores.
How long can Mediterranean Orzo Salad be refrigerated?
You can refrigerate Mediterranean Orzo Salad for about three to five days. To keep it fresh, store it in an airtight container. Make sure to check for any signs of spoilage before eating. If the salad looks or smells off, it’s best to toss it.
Can I make the salad ahead of time?
Yes, making Mediterranean Orzo Salad ahead of time is a great idea. You can prepare it a day in advance. Just mix all the ingredients and chill it in the fridge. This allows the flavors to blend nicely. If you want it extra fresh, add feta cheese and herbs right before serving.
Is Mediterranean Orzo Salad healthy?
Mediterranean Orzo Salad is quite healthy! It has fresh vegetables, healthy fats, and protein from feta. The olives and olive oil provide good fats for your heart. Plus, the salad is packed with vitamins from the veggies. It is a tasty way to enjoy a balanced meal!
In this post, we explored the vibrant Mediterranean Orzo Salad. We covered main ingredients, from orzo to feta, and detailed simple steps for preparation. Tips on flavor and presentation enhanced your dish’s appeal. You learned about variations to fit your taste and dietary needs. Lastly, we provided storage advice to keep leftovers fresh. This salad is not only delicious but also versatile and easy to make. Enjoy sharing it with family and friend

Mediterranean Orzo Salad
Ingredients
- 1 cup orzo pasta
- 1.5 cups cherry tomatoes, halved
- 1 cup cucumber, diced
- 0.5 cup red onion, finely chopped
- 1 cup Kalamata olives, pitted and sliced
- 1 cup feta cheese, crumbled
- 0.5 cup fresh parsley, chopped
- 2 tablespoons capers, rinsed and drained
- 0.25 cup olive oil
- 2 tablespoons lemon juice
- 1 teaspoon dried oregano
- to taste salt and pepper
Instructions
- Bring a large pot of salted water to a boil. Add the orzo pasta and cook according to package instructions until al dente, about 8-10 minutes. Drain and rinse with cold water to stop the cooking process.
- In a large mixing bowl, combine the halved cherry tomatoes, diced cucumber, finely chopped red onion, sliced Kalamata olives, crumbled feta cheese, chopped parsley, and capers.
- In a separate small bowl, whisk together the olive oil, lemon juice, dried oregano, salt, and pepper to create a dressing.
- Add the cooked and cooled orzo to the mixing bowl with the vegetables and feta. Pour the dressing over the salad and gently toss until everything is evenly coated.
- Taste and adjust seasoning if necessary, adding more salt, pepper, or lemon juice as desired.
- Chill the salad in the refrigerator for at least 30 minutes before serving to allow the flavors to meld.


![- 2 cups cooked salmon, flaked - 1/2 cup breadcrumbs (preferably panko) - 1/4 cup fresh dill, finely chopped - 1/4 cup green onions, finely chopped - 1/4 cup mayonnaise - 1 tablespoon Dijon mustard - 1 tablespoon lemon juice - 1 teaspoon lemon zest - 1 egg, lightly beaten - 1/2 teaspoon garlic powder - Olive oil for frying - Salt and pepper to taste You can swap out fresh dill for dried dill if needed. Use whole wheat or gluten-free breadcrumbs for a healthier option. If you don't have mayonnaise, Greek yogurt works great. For salmon, you can use canned salmon, which saves time and is still tasty. Each salmon cake has about 200 calories. They provide around 15 grams of protein, which is great for muscle health. The healthy fats from salmon support heart health. You also get vitamins and minerals from the dill and lemon. These cakes offer a good balance of carbs and protein, making them a smart choice for meals or snacks. 1. Start by gathering all your ingredients. You will need cooked salmon, breadcrumbs, dill, and more. 2. In a large mixing bowl, combine the flaked salmon, breadcrumbs, dill, green onions, mayonnaise, Dijon mustard, lemon juice, lemon zest, and garlic powder. 3. Next, add the lightly beaten egg along with salt and pepper to taste. 4. Mix everything until just combined. Be careful not to overmix; this keeps the cakes light. 5. Now, form the mixture into patties. Make them about 2-3 inches wide and 1/2 inch thick. You should get around 8-10 patties. 1. Heat a skillet over medium heat. Pour in a drizzle of olive oil to coat the bottom. 2. Wait for the oil to get hot. This is key for a good crisp. 3. Carefully place the patties in the skillet. Don't overcrowd the pan; cook in batches if needed. 4. Fry each side for about 4-5 minutes. You want them golden brown and cooked through. 5. Once they're done, move the cakes to a paper towel-lined plate. This helps absorb extra oil. 1. Present the salmon cakes on a nice platter. Add some lemon wedges on the side for a pop of color. 2. Garnish with extra fresh dill to make it look appealing. 3. Serve with a side of tartar sauce or a light salad for a complete meal. 4. Enjoy your flavorful Lemon Dill Salmon Cakes! You can find the Full Recipe for more detailed steps. To make the best Lemon Dill Salmon Cakes, focus on a few key points. First, use fresh ingredients. Fresh dill and green onions boost flavor. Second, don’t overmix the batter. This keeps your cakes tender. Form the patties gently to maintain their structure. When frying, make sure the oil is hot. This helps create a golden crust. Flip the cakes carefully to avoid breaking them. Lastly, let them rest on paper towels to absorb extra oil. Serve your salmon cakes with bright sides. A fresh green salad pairs well. You might also want to try a simple tartar sauce or yogurt dip. Lemon wedges add a nice touch. Pick a sauce with a bit of tang to balance the richness of the salmon. This will enhance the flavors and make the meal more enjoyable. For storing leftover salmon cakes, cool them first. Then, place them in an airtight container. They can stay in the fridge for up to three days. If you want to keep them longer, freeze them. Wrap each cake in plastic wrap, then place them in a freezer bag. They last up to three months in the freezer. To reheat, warm them in a skillet or the oven. This keeps them crispy and delicious. For the full recipe and step-by-step guide, check the [Full Recipe]. {{image_2}} You can easily change the flavor of these salmon cakes. Adding spices can make a big difference. Try mixing in: - Old Bay seasoning for a classic seafood taste. - Cajun seasoning for a spicy kick. - Fresh parsley instead of dill for a different herb flavor. - Capers for a briny touch. You can also mix in some cheese, like feta or cheddar. This adds creaminess and richness. Don't be afraid to experiment with your favorite flavors. If you want to make these cakes gluten-free, swap out regular breadcrumbs for gluten-free ones. You can also use crushed rice cakes or almond flour. For a low-carb option, skip the breadcrumbs entirely. Use a bit more egg to help bind the cakes. You can even add mashed cauliflower for extra nutrition and texture. While frying gives a nice crispy texture, you can bake or air fry these salmon cakes. To bake, preheat your oven to 400°F (200°C). Place the formed patties on a baking sheet lined with parchment paper. Brush them lightly with olive oil and bake for 15-20 minutes or until golden. For air frying, set your air fryer to 375°F (190°C) and cook for about 10-12 minutes. This method keeps the cakes crispy with less oil. To keep Lemon Dill Salmon Cakes fresh, store them in an airtight container. Place parchment paper between layers to avoid sticking. Refrigerate them if you plan to eat them within three days. For longer storage, freeze the cakes. Wrap each patty in plastic wrap and place them in a freezer bag. This keeps them safe from freezer burn. In the fridge, Lemon Dill Salmon Cakes last about three days. Make sure they are in a sealed container. If you freeze them, they can last up to three months. Just remember, the longer you freeze, the more the texture can change. Reheat salmon cakes safely to enjoy their full flavor. You can use a skillet for the best results. Heat a bit of olive oil over medium heat. Place the cakes in the skillet and cook for about 3-4 minutes on each side. Alternatively, you can use an oven. Preheat it to 350°F (175°C) and bake for 10-15 minutes. This method keeps them moist and helps restore the crispiness. Lemon Dill Salmon Cakes last about 3 to 4 days in the fridge. Make sure to store them in an airtight container. This keeps them fresh and safe to eat. If you see any changes in color or smell, throw them away. Always trust your senses when it comes to food safety. Yes, you can use canned salmon for this recipe. It makes the cooking process quicker and easier. Canned salmon is already cooked, so you just need to mix it with the other ingredients. However, fresh salmon often has a better taste and texture. If you choose canned salmon, look for wild-caught options for a healthier choice. These salmon cakes pair well with many sides. Here are some ideas: - A fresh green salad with a light vinaigrette - Crispy roasted potatoes or sweet potato fries - Steamed vegetables like broccoli or green beans - A tangy tartar sauce or lemon aioli for dipping - Light, chilled white wine or sparkling water These sides complement the flavors of the salmon cakes and make for a tasty meal. For the full recipe, check out the [Full Recipe]. Lemon Dill Salmon Cakes are a tasty, healthy choice. We covered key ingredients, how to make them, and tips for serving. You can mix up flavors and even swap ingredients based on your needs. Remember to store leftovers properly to enjoy later. Whether you're cooking for yourself or others, these cakes bring joy to the table. Experiment with cooking methods and pairings to find your favorite version. Enjoy creating this delicious dish that’s both satisfying and good for you.](https://dailydishly.com/wp-content/uploads/2025/06/eb5d3737-472f-4456-95e5-2392a9f87439-768x768.webp)
![- 2 ripe avocados, diced - 1 cup sweet corn (canned or grilled) - 1 cup cherry tomatoes, halved - 1 red bell pepper, diced - 1/4 cup red onion, finely chopped - 1/4 cup fresh cilantro, chopped - Juice of 2 limes - 2 tablespoons olive oil - 1 teaspoon cumin powder - Salt and pepper to taste I love using ripe avocados in this salad. They add creaminess. Sweet corn brings a nice crunch and sweetness. Cherry tomatoes add freshness and a pop of color. Red bell pepper gives it a crisp bite. Red onion adds a sharp taste that balances the other flavors. Fresh cilantro brightens everything up with its unique flavor. Lime juice adds a tangy kick. Olive oil gives richness. Cumin powder adds warmth. Salt and pepper round out the taste perfectly. - Additional vegetables - Cheese options - Protein additions (e.g., black beans, chicken) Feel free to add more vegetables like cucumbers or radishes for extra crunch. You can sprinkle cheese like feta or cotija for a salty bite. For a heartier dish, add protein like black beans or grilled chicken. These options make the salad more filling and can change the flavor profile. I love how versatile this salad is! For the full recipe, check out the provided details. 1. Combining base ingredients Start by grabbing a large mixing bowl. Add the diced avocados and sweet corn. Next, toss in the halved cherry tomatoes, diced red bell pepper, and finely chopped red onion. These fresh ingredients create a colorful base. 2. Whisking the dressing In a small bowl, combine lime juice, olive oil, cumin powder, salt, and pepper. Use a whisk to mix the dressing well. This will add flavor and bring the salad together. 3. Tossing and seasoning the salad Pour the dressing over the salad mixture. Gently toss everything together until all ingredients are coated. Taste the salad and adjust the seasoning if needed. Let it sit for about 10 minutes before serving to let the flavors blend. - Choosing ripe avocados Look for avocados that are slightly soft when you squeeze them. They should yield to gentle pressure. This ensures a creamy texture in your salad. - Tips for cutting vegetables Use a sharp knife to cut the veggies. For the avocados, cut them in half, remove the pit, and scoop out the flesh with a spoon. Dice them into bite-sized pieces. - Balancing flavors in the dressing Adjust the lime juice and salt to your taste. If you like it tangy, add more lime. A pinch of sugar can balance the acidity if needed. To make your avocado corn salad pop, serve it in a large, shallow bowl. This type of dish lets the colors shine. I love to garnish with fresh cilantro leaves on top. Adding lime wedges on the side makes it look fresh and inviting. For dishware, choose bright colors. White or light-colored bowls make the salad's colors stand out. You want your guests to be drawn in by the vibrant greens, reds, and yellows. You can prepare this salad a bit early. Chop the vegetables and store them in separate containers. This keeps them fresh and crunchy. You can mix the dressing in advance too. Just keep it in a jar in the fridge. When ready to serve, combine everything in a big bowl. Pour the dressing over the salad and toss gently. This way, your salad stays fresh and tasty. To keep the salad fresh, store it in an airtight container. This locks in flavors and keeps the ingredients crisp. If you notice browning avocados, squeeze a bit more lime juice on top. It helps slow down the browning. For the full recipe, check the earlier section. Enjoy your fresh and flavorful avocado corn salad! {{image_2}} You can easily change this salad. Spice it up by adding diced jalapeños. This will give it a kick. You can also try different dressings. A zesty vinaigrette adds a bright note. If you want creaminess, go for a yogurt-based dressing. Both options fit well with the fresh flavors. This salad shines in every season. In summer, add diced mango or peach. Their sweetness pairs perfectly with the corn and avocado. For winter, think roasted vegetables. Roasted sweet potatoes or bell peppers add warmth. These variations keep the dish fresh and exciting all year. For the full recipe, check out the detailed instructions above. To keep your avocado corn salad fresh, store it in the fridge. Use an airtight container. This will help keep moisture in and air out. To prevent browning of avocados, squeeze a little lime juice over them. The lime slows down oxidation. You can also cover the salad tightly with plastic wrap. Press the wrap directly onto the salad to limit air exposure. Your salad lasts for about 1 to 2 days in the fridge. After that, it may lose its taste and texture. Signs that your salad has spoiled include a strong, sour smell or a mushy texture. If you see dark spots on the avocados, it's time to toss it. Always trust your senses to decide if it's safe to eat. For the full recipe, check out the details above! To make this salad vegan, swap the honey for maple syrup if you like sweetness. Use a vegan olive oil dressing instead of any store-bought dressings. All the main ingredients are vegan-friendly. This gives you a fresh, tasty salad that fits your diet. Yes, you can use frozen corn! Just thaw it first. If you want a crisp taste, try grilling it briefly. This adds a nice smoky flavor. Both options work well in this salad. This salad pairs well with many dishes. You can add grilled chicken or shrimp for protein. It also works great with black beans for a vegetarian option. Serve it alongside tacos or grilled fish for a full meal. For a light meal, enjoy it on its own. For the complete recipe, check out the [Full Recipe]. In this blog post, I covered how to make a delicious avocado salad. You learned about the main ingredients, like ripe avocados, sweet corn, and cherry tomatoes. I shared tips for preparation and gave you ideas on how to present and store your salad. Remember, feel free to mix in different flavors or proteins. Get creative and make this dish your own. With fresh ingredients and simple steps, you can create a tasty and healthy meal that everyone will enjoy.](https://dailydishly.com/wp-content/uploads/2025/07/333f1f81-7d50-4cc6-bd3d-a33e08904fb9-768x768.webp)


