Mexican Street Corn Salad Flavorful and Fresh Delight

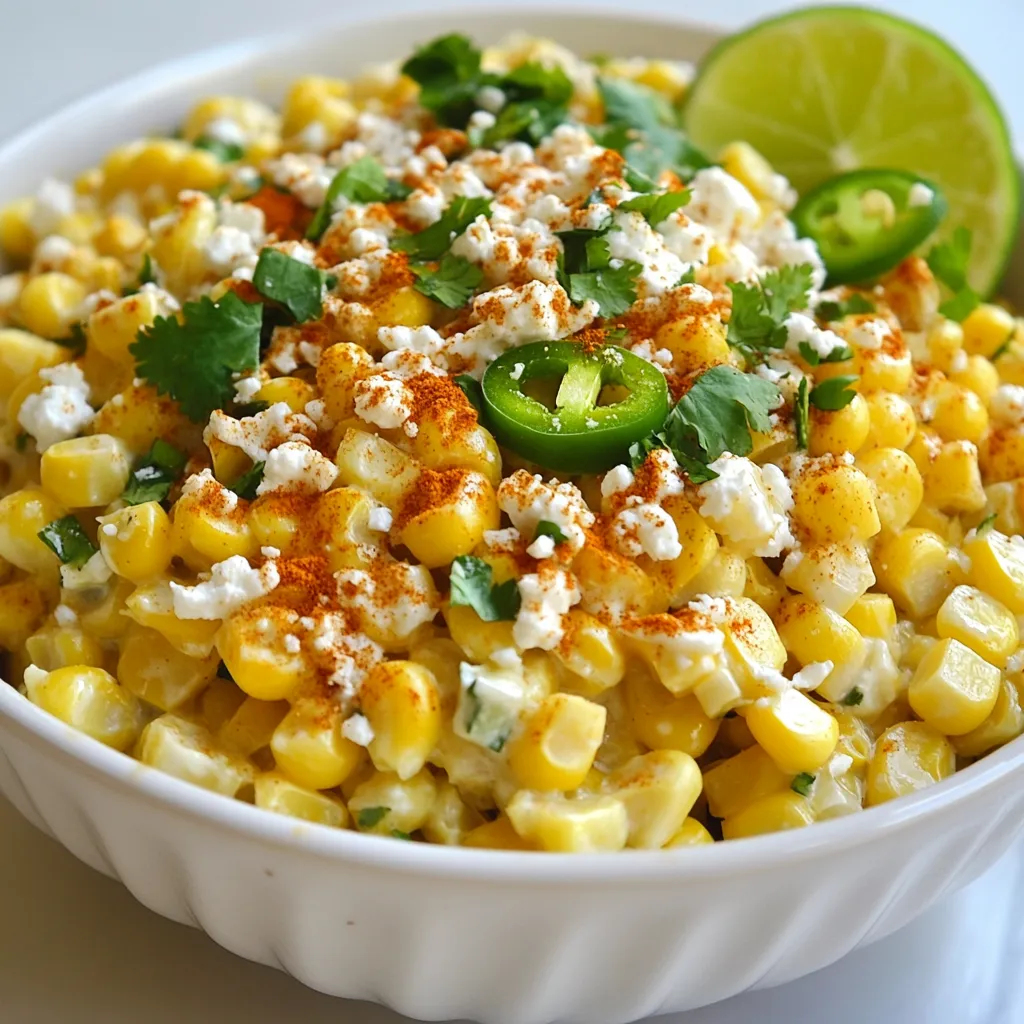
Get ready to enjoy a burst of flavor with my Mexican Street Corn Salad! This fresh and tasty dish combines sweet corn, creamy dressing, and zesty spices. Perfect for gatherings or a quick weeknight meal, it’s both easy to make and delightful to eat. I’ll guide you step-by-step to create a salad that impresses everyone. Let’s dive in and make this delicious salad together!
Why I Love This Recipe
- Fresh and Flavorful: This salad captures the essence of summer with its vibrant ingredients and bold flavors.
- Customizable Heat: Adjust the spiciness by adding or omitting jalapeños to suit your taste preferences.
- Perfect for Gatherings: This dish is always a hit at BBQs and potlucks, bringing everyone together over delicious food.
- Easy to Prepare: With simple ingredients and quick instructions, this salad can be whipped up in no time.
Ingredients
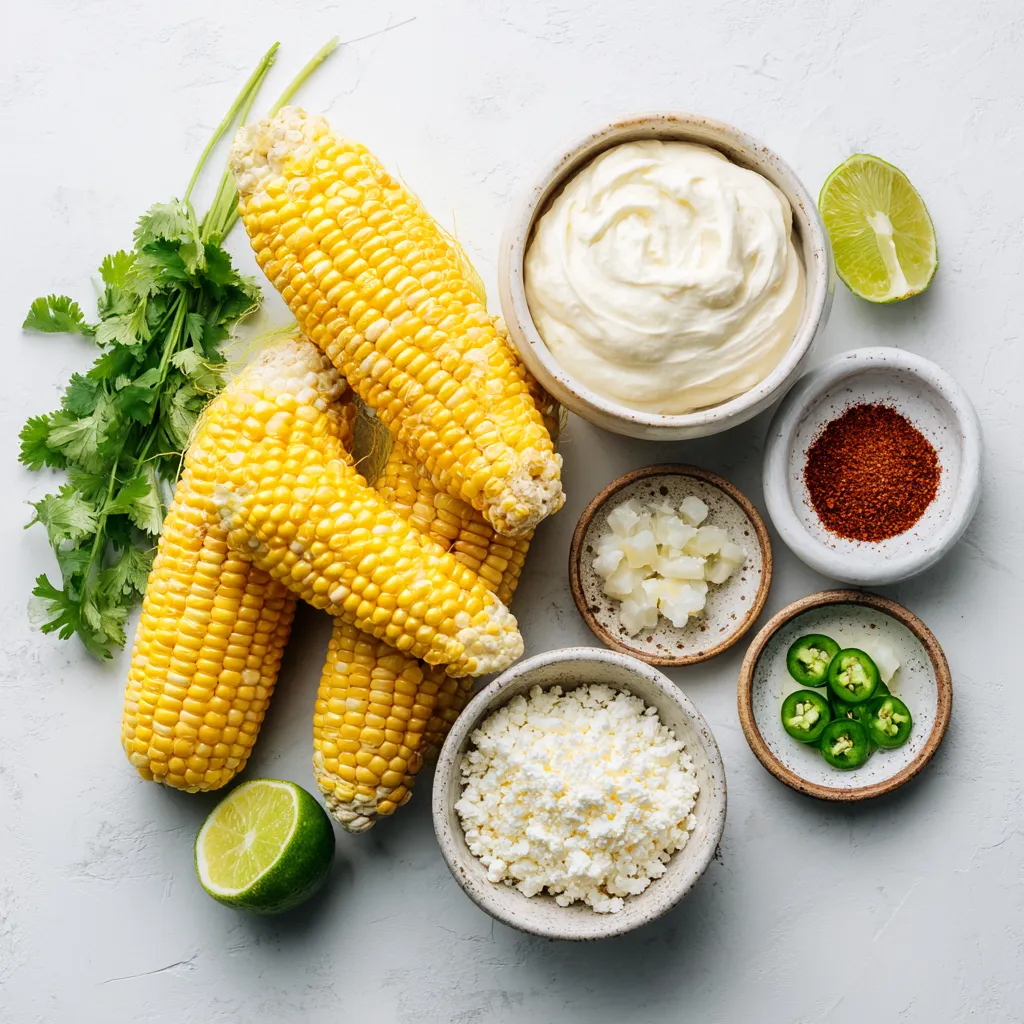
To make the best Mexican Street Corn Salad, gather these fresh and tasty ingredients:
– Fresh corn: 4 ears, husked
– Creamy base: 1/2 cup mayonnaise, 1/4 cup sour cream
– Spices and seasonings: 1 teaspoon chili powder, 1/2 teaspoon smoked paprika, salt and pepper to taste
– Fresh produce: 1 lime, juiced, 1/4 cup fresh cilantro, chopped
– Cheese: 1/2 cup Cotija cheese, crumbled
– Optional heat: 1 jalapeño, finely diced
Each ingredient plays a key role. The corn gives sweetness and crunch. The creamy base adds richness. The spices bring warmth, while lime juice brightens the dish. Fresh cilantro adds a burst of flavor. Cotija cheese gives a salty finish. If you like heat, the jalapeño offers a spicy kick.
Make sure to use fresh corn for the best taste. You can find corn at local farmers’ markets or grocery stores. Fresh ingredients lead to a vibrant salad that sings with flavor. Enjoy the process of gathering these items!

Step-by-Step Instructions
Preparing the Corn
Boil a large pot of water. Once it boils, add the husked corn. Cook it for about 5 to 7 minutes. You want the corn to be tender. After cooking, remove it from heat and let it cool down. Once it’s cool, carefully slice the kernels off the cob. Place those kernels in a large mixing bowl.
Making the Dressing
In a separate bowl, whisk together the creamy ingredients. Use 1/2 cup of mayonnaise and 1/4 cup of sour cream. Add in 1 teaspoon of chili powder and 1/2 teaspoon of smoked paprika. Squeeze the juice of 1 lime into the bowl. Season with salt and pepper to your liking. Mix until everything is well combined.
Combining Ingredients
Pour the dressing mixture over the corn. Toss the corn to coat it evenly with the dressing. Next, gently fold in 1/2 cup of crumbled Cotija cheese. Add in 1/4 cup of chopped cilantro and the diced jalapeño if you want some heat. Mix until just combined.
Final Touches
Refrigerate the salad for about 30 minutes. This helps the flavors meld together. When ready to serve, you can serve it chilled or at room temperature. For a nice finish, top the salad with extra Cotija cheese and a sprinkle of chili powder. Enjoy your fresh and tasty Mexican Street Corn Salad!
Tips & Tricks
Enhancing Flavor
To make your salad pop, choose the right spices. I like to use chili powder and smoked paprika. One teaspoon of chili powder brings nice heat, while half a teaspoon of smoked paprika adds depth. Mix them well for a balanced taste. Fresh ingredients are key. Use sweet, ripe corn and fresh lime juice. These will make a big difference in flavor.
Texture Variations
Cotija cheese is traditional, but you can switch it up. Try feta or goat cheese for a tangy twist. If you want more flavor, use grilled corn. Grill the corn for a few minutes to add smokiness. This brings a new layer of taste that is simply delightful.
Preparation Tips
Husking corn can be a chore. A quick tip: use a sharp knife and cut off the top of the ear. Pull down the husk easily. For make-ahead advice, prepare the salad a day early. Just keep it in the fridge. The flavors will blend nicely, making it even tastier.
Pro Tips
- Choose Fresh Corn: The fresher the corn, the sweeter and more flavorful your salad will be. Look for bright green husks and plump kernels.
- Adjust the Heat: If you like your salad spicy, add more diced jalapeños or even a dash of hot sauce to the dressing.
- Make Ahead: This salad can be made a few hours in advance. Just keep it chilled until you’re ready to serve for optimal flavor.
- Garnish Wisely: For an extra touch, garnish with lime wedges and a sprinkle of extra Cotija cheese just before serving.

Variations
Customized Ingredients
You can make this salad your own by adding proteins. Grilled chicken or shrimp works well. These add a nice touch and make it a complete meal. For a plant-based version, consider using black beans or chickpeas. They add protein and fiber while keeping it vegan.
Regional Twists
Different regions of Mexico use various cheeses. You can try feta or queso fresco for a different flavor. You can also infuse unique spices and herbs. Cumin adds warmth. Fresh basil gives a new twist. Just remember to balance the flavors.
Serving Ideas
Pair this salad with tacos or grilled meats for a great meal. You can also serve it as a dip with tortilla chips. For creative presentations, use mason jars or small cups to serve. It makes a fun dish for parties or gatherings.
Storage Info
How to Store Leftovers
To keep your Mexican Street Corn Salad fresh, place it in an airtight container. Make sure to seal it tightly to avoid air exposure. Store it in the fridge. This salad stays good for about 3 to 5 days. The flavors will blend nicely over time, but it’s best to eat it fresh.
Freezing Options
If you want to save some for later, you can freeze it. First, scoop the salad into a freezer-safe container. Leave some space at the top because it will expand. It can last up to 2 months in the freezer. To enjoy later, take it out and let it thaw in the fridge overnight. When you’re ready to eat, just stir it well. You may want to add fresh lime juice or more cheese for extra flavor.
FAQs
What type of corn is best for this salad?
Fresh sweet corn is the best choice. I prefer using corn on the cob for this salad. It brings a juicy, sweet flavor that frozen corn can’t match. Look for corn with bright yellow kernels and green husks. This ensures freshness and taste.
Can I make Mexican Street Corn Salad ahead of time?
Yes, you can make this salad ahead of time. I recommend preparing it a few hours before you want to serve it. This gives the flavors time to mix. Just keep it in the fridge until you’re ready to enjoy.
How long does the salad last in the fridge?
The salad lasts about 3 days in the fridge. Make sure to store it in an airtight container. After a couple of days, the flavors may change, but it should still taste good.
Is it possible to make a dairy-free version?
Absolutely! You can swap out the mayonnaise and sour cream for dairy-free options. Look for vegan mayonnaise and plant-based yogurt. This keeps the creaminess while making it dairy-free.
What can I serve with Mexican Street Corn Salad?
This salad pairs well with many dishes. Try serving it with grilled meats like chicken or steak. It also goes great with tacos or burritos. You can even enjoy it as a side with chips and salsa for a fun snack!
This blog post covered how to make a delicious Mexican Street Corn Salad. You learned about the fresh ingredients, steps to prepare, and tips for best flavor. I shared variations to suit your taste and storage tips to keep leftovers fresh. Don’t be afraid to customize your salad or try new flavors. You now have all the tools needed to create your perfect dish. Enjoy making and sharing this fun recipe with other

Mexican Street Corn Salad
Ingredients
- 4 ears fresh corn, husked
- 0.5 cup mayonnaise
- 0.25 cup sour cream
- 1 teaspoon chili powder
- 0.5 teaspoon smoked paprika
- 1 lime juiced
- 0.5 cup Cotija cheese, crumbled
- 0.25 cup fresh cilantro, chopped
- to taste Salt and pepper
- 1 jalapeño finely diced (optional for extra heat)
Instructions
- Start by boiling a large pot of water. Once boiling, add the husked corn and cook for about 5-7 minutes until tender. Remove the corn and let it cool.
- Once cooled, carefully slice the kernels off the cob and place them in a large mixing bowl.
- In a separate bowl, whisk together the mayonnaise, sour cream, chili powder, smoked paprika, lime juice, salt, and pepper until well combined.
- Pour the dressing mixture over the corn and toss to coat evenly.
- Gently fold in the Cotija cheese, cilantro, and diced jalapeño (if using) until just combined.
- Taste and adjust seasoning with additional lime juice, salt, or pepper if desired.
- Refrigerate the salad for 30 minutes to allow the flavors to meld together.
- Serve chilled or at room temperature, topped with extra Cotija cheese and a sprinkle of chili powder for garnish.


. If you need a substitute for quinoa, try these options: - Brown rice - Bulgur wheat - Couscous - Farro - Barley These grains provide a similar texture and can carry flavors well. Each option has its own taste and cooking time, so pick what you like best! Yes, Lemon Garlic Quinoa Salad is very healthy! Quinoa is a complete protein, meaning it has all nine essential amino acids. It is also gluten-free and high in fiber. The fresh vegetables add vitamins and minerals. Olive oil gives healthy fats, while lemon juice adds vitamin C. This salad is low in calories and full of nutrients. It’s a great choice for a light meal or side dish. Yes, you can make this salad in advance! It tastes even better after sitting for a while. Prepare it a few hours before serving. Just keep it in the fridge. The salad can marinate, letting the flavors mix well. If you plan to make it one day ahead, wait to add the feta cheese until serving. This keeps it fresh and tasty. This blog post covered how to make a delicious quinoa salad. We explored main ingredients like quinoa, fresh vegetables, and tasty dressings. I shared tips for cooking quinoa and ways to prep veggies. You learned how to make the dressing and assemble the salad for the best results. Plus, I provided ideas for variations and storage methods. Making this salad can be easy and fun. Trying different flavors can keep it exciting. Enjoy every bite and make it your own!](https://dailydishly.com/wp-content/uploads/2025/07/e42a7f06-4d66-46b9-9caa-936cc7f21d46-768x768.webp)

![For these grilled veggie skewers, you will need: - 1 large zucchini, sliced into thick rounds - 1 red bell pepper, cut into squares - 1 yellow bell pepper, cut into squares - 1 red onion, cut into chunks - 8 cherry tomatoes - 1 cup mushrooms, halved These vegetables bring color and flavor to your skewers. You can mix and match based on your taste. Try using eggplant or asparagus for a twist. The marinade adds zest and depth to the veggies. You will need: - 3 tablespoons olive oil - 2 teaspoons dried oregano - 1 teaspoon garlic powder - Salt and pepper to taste This simple mix enhances the natural flavors of the vegetables. Adjust the salt and pepper to fit your liking. Garnishes can make your skewers pop! Consider using: - Fresh parsley, chopped Adding parsley gives a fresh touch. It also adds a nice green color to the dish. You can also sprinkle feta cheese for a creamy bite. For the full recipe, check the Grilled Mediterranean Veggie Skewers. Start by gathering your veggies. Use a large bowl to combine: - 1 large zucchini, sliced into thick rounds - 1 red bell pepper, cut into squares - 1 yellow bell pepper, cut into squares - 1 red onion, cut into chunks - 8 cherry tomatoes - 1 cup mushrooms, halved Make sure to wash all your vegetables well. This keeps them fresh and clean. Cut them into even pieces. This helps them cook evenly on the grill. Next, we make the marinade. In a small bowl, whisk together: - 3 tablespoons olive oil - 2 teaspoons dried oregano - 1 teaspoon garlic powder - Salt and pepper to taste Mix until well combined. Pour this mixture over your veggies in the large bowl. Toss gently. Make sure every piece is coated. This will add great flavor to your skewers. Now it’s time to grill! First, preheat your grill to medium-high heat. While it heats, thread the marinated vegetables onto the skewers. Alternate between different types for a colorful look. Once the grill is hot, place the skewers on it. Grill for about 10-12 minutes. Turn the skewers occasionally. You want nice grill marks and tender veggies. When they are done, remove them from the grill. Let them cool slightly before serving. You can garnish with fresh parsley for an extra burst of flavor. For the full recipe, check out [Full Recipe]. Enjoy your grilled Mediterranean veggie skewers! To grill veggie skewers well, start with a clean grill. This helps prevent sticking. Preheat your grill to medium-high heat. This temperature cooks veggies evenly and keeps them crisp. Soak wooden skewers in water for at least 30 minutes. This step helps them not burn on the grill. When placing skewers on the grill, leave space between them. This promotes even heat flow. Keep a close eye on them. Turn the skewers every few minutes. This way, every side gets that nice grill mark. To get that perfect char, use high heat for a short time. Grill your skewers for about 10-12 minutes. Turn them often to avoid burning. The goal is tender veggies with those lovely grill lines. You want a bit of caramelization for extra flavor. Don’t forget to watch for the color change, too. When the veggies are brightly colored and tender, they are done. If you want a deeper char, leave them on a bit longer. Just be careful not to overcook them. Serve your grilled Mediterranean veggie skewers warm. They shine on their own, but pair nicely with dips. Try hummus or a yogurt sauce for added flavor. You can also serve them on a bed of fresh greens. This adds a nice crunch and vibrancy. For a fun twist, chop up leftovers and add them to salads. You can also use them in wraps or sandwiches. They keep well, making them a great meal prep option. For the full recipe, check out the details above. Enjoy your grilling! {{image_2}} You can swap in many other veggies for your skewers. Try using eggplant, asparagus, or even cauliflower. Each brings a unique taste and texture. For a sweeter note, add butternut squash or carrots. These flavors will shine when grilled. Don't be afraid to mix and match. The more colorful, the better! For a heartier meal, add protein to your skewers. Chicken or shrimp work well here. Cut them into bite-sized pieces for even cooking. You can marinate them just like the veggies. For a vegan option, try tofu or tempeh. They soak up flavors beautifully. Adding protein makes your skewers more filling and nutritious. While the olive oil and oregano mix is great, you can get creative. Try adding lemon juice or balsamic vinegar for extra zing. A bit of honey can bring a sweet touch. Experiment with spices like smoked paprika or cumin for warmth. Each marinade will change the flavor profile. Feel free to explore and find your favorite! Check out the Full Recipe for more details on creating the perfect skewers. After enjoying your Grilled Mediterranean Veggie Skewers, store leftovers in an airtight container. This keeps the flavors fresh. You can keep them in the fridge for three to four days. Make sure they cool down before sealing. Layer them with paper towels to absorb extra moisture. To reheat your skewers, use a skillet or grill. This helps maintain the charred flavor. Heat them on medium for about five minutes. Turn them gently to warm all sides. You can also use a microwave, but it may make them soft. If you choose the microwave, heat in short bursts to avoid overcooking. Freezing grilled skewers is a great option for meal prep. Let them cool completely first. Then, wrap each skewer in plastic wrap. Place the wrapped skewers in a freezer bag, removing as much air as possible. They can stay fresh for up to three months. To enjoy, thaw in the fridge overnight before reheating. Yes, you can use many types of vegetables. Try eggplant, asparagus, or even corn. Mixing colors and shapes makes your dish fun and tasty. Each vegetable adds its unique flavor. Experiment to find your favorites! Soak wooden skewers for at least 30 minutes. This helps prevent them from burning on the grill. If you forget to soak them, use metal skewers instead. They work great and need no soaking at all. Many sauces taste great with these skewers. Tzatziki sauce adds a cool, creamy bite. A balsamic glaze gives a sweet twist. You can also try a spicy harissa sauce for heat. Each sauce adds its own special touch to the dish. For the full recipe, check it out! Grilled Mediterranean Veggie Skewers are fun and easy to make. We looked at the best veggies, how to prepare them, and tasty marinades. I shared tips for grilling and great serving ideas. You can try different veggies and proteins to mix things up. Remember to store leftovers well so you can enjoy them later. With these guidelines, your grilling efforts will be a hit. Enjoy every bite and happy grilling!](https://dailydishly.com/wp-content/uploads/2025/07/4b70700e-9f85-4317-b9e4-a855a04e592b-768x768.webp)