Mexican Street Corn Salad Fresh and Flavorful Dish

Are you ready to spice up your meals? This Mexican Street Corn Salad is fresh and full of flavor. It’s a great way to enjoy summer corn with a twist. In this post, I’ll guide you through simple steps, tips, and tasty variations to make it your own. Whether you’re prepping for a picnic or a family dinner, this salad is sure to impress. Let’s dive into the deliciousness!
Why I Love This Recipe
- Fresh and Flavorful: This salad captures the vibrant flavors of Mexican street corn with fresh ingredients that make each bite a delight.
- Easy to Make: With minimal prep and cooking time, this salad can be whipped up quickly for any occasion.
- Customizable: You can easily modify the ingredients to suit your taste, adding more veggies or spices as you like.
- Perfect for Sharing: Great for gatherings, this salad is a crowd-pleaser that’s sure to impress your guests!
Ingredients
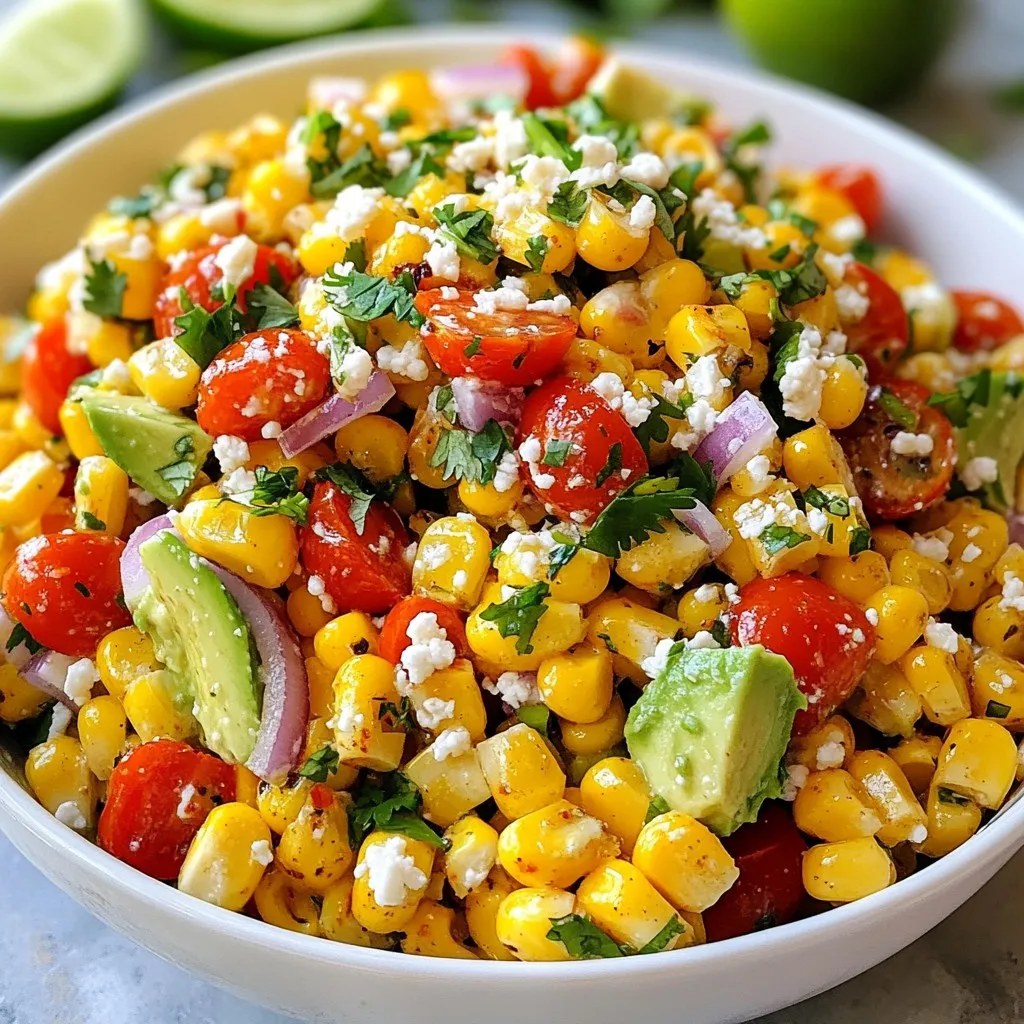
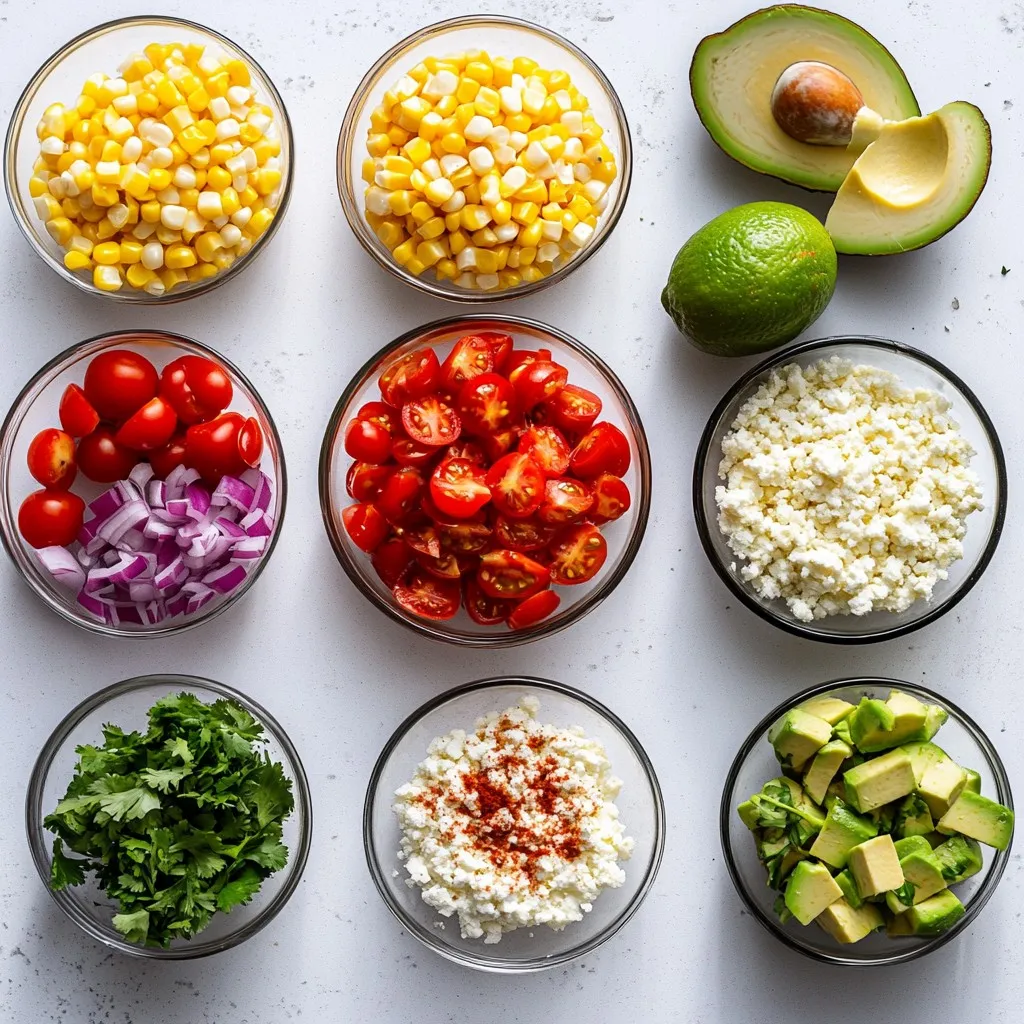
List of Ingredients for Mexican Street Corn Salad
To make a great Mexican street corn salad, you need:
– 4 ears of corn, kernels removed (or 4 cups frozen corn)
– 1 red bell pepper, diced
– 1 small red onion, finely chopped
– 1 cup cherry tomatoes, halved
– 1/4 cup fresh cilantro, chopped
– 1/2 cup crumbled cotija cheese (or feta)
– 2 tablespoons mayonnaise
– 1 tablespoon lime juice
– 1 teaspoon chili powder
– Salt and pepper to taste
– 1 avocado, diced (optional)
Substitutions for Fresh Ingredients
You can swap fresh items for frozen ones. If you can’t find fresh corn, use frozen corn. It saves time, and the taste stays great. For cotija cheese, feta works well too. You can also use other peppers, like yellow or green. If you want a kick, try jalapeños instead of red bell pepper. If you’re out of cilantro, fresh parsley can add a nice flavor.
Essential Tools for Preparation
To prepare this salad, you will need a few simple tools:
– A sharp knife for chopping
– A cutting board for safe slicing
– A large mixing bowl to combine ingredients
– A small bowl to mix the dressing
– A whisk or fork for blending the dressing
These tools help make the process quick and easy. You will enjoy making this fresh and flavorful dish!

Step-by-Step Instructions
How to Prepare Corn for the Salad
To start, you can use fresh corn or frozen corn. If you choose fresh corn, grill the ears over medium heat. Grill for about 10 minutes and turn them often. You want them to be lightly charred. Once done, let them cool. Then, slice off the kernels with a knife. If you use frozen corn, thaw it in hot water. Drain it well before adding it to the salad.
Combining Salad Ingredients in the Mixing Bowl
Next, grab a large mixing bowl. In this bowl, combine the corn kernels with other fresh ingredients. Add the diced red bell pepper, finely chopped red onion, and halved cherry tomatoes. These ingredients give the salad color and crunch. If you like, add chopped fresh cilantro and crumbled cotija cheese. If you want a creamier texture, toss in diced avocado. Gently mix everything together.
Preparing the Dressing and Combining
Now, let’s make the dressing. In a small bowl, whisk together mayonnaise, lime juice, chili powder, salt, and pepper. This dressing adds a rich flavor to the salad. Pour the dressing over the corn mixture. Gently toss everything together. Make sure all ingredients get coated well. Taste the salad and adjust the seasoning. You can add more salt, pepper, or lime juice as needed. Serve the salad right away, or chill it for up to an hour. This allows the flavors to blend beautifully.
Tips & Tricks
How to Achieve the Best Flavor
To get the best taste in your Mexican street corn salad, use fresh corn. If you grill fresh corn, it gives a smoky flavor. Char the corn for ten minutes until it is lightly brown. This adds depth to the salad. Use ripe avocados for creaminess. The lime juice brightens the dish. Adjust the chili powder to match your spice level.
Prepping Ahead of Time for Meal Prep
This salad is great for meal prep. You can make it a day early. Just wait to add the avocado until right before serving. This keeps it fresh and green. Store the salad in a sealed container. If you want the flavors to blend, let it sit for one hour in the fridge.
Serving Suggestions and Presentation Ideas
Serve your salad in a big bowl. Top it with extra cotija cheese and fresh cilantro. This makes it look colorful and inviting. Add lime wedges on the side for an extra zing. You can also serve it with tortilla chips for crunch. This salad pairs well with grilled meats or tacos too.
Pro Tips
- Choosing the Corn: Fresh corn will give you the best flavor and texture, but frozen corn is a great time-saver and still delicious.
- Adjusting Heat: If you prefer a spicier kick, add diced jalapeños or an extra sprinkle of chili powder to the dressing.
- Serving Fresh: This salad is best served immediately, but if you need to prepare it ahead of time, add the avocado just before serving to prevent browning.
- Mixing It Up: Feel free to experiment with other ingredients like black beans, corn, or different cheeses for a unique twist!

Variations
Spicy Mexican Street Corn Salad
If you like heat, add more chili powder or cayenne pepper. You can also mix in diced jalapeños for a fresh kick. This spicy twist brings extra flavor and makes the salad pop. Just remember, you can always adjust spice levels to suit your taste.
Creamy Avocado Addition
For a richer taste, include diced avocado. This adds creaminess and pairs well with the crunchy corn. The avocado gives a nice balance to the spice and acidity. You can mash it slightly for a thicker dressing. This makes the salad even more delicious and satisfying.
Vegan-Friendly Alternatives
To make the salad vegan, skip the cotija cheese and mayonnaise. Instead, use a plant-based yogurt or cashew cream for a creamy texture. Nutritional yeast can give a cheesy flavor without dairy. This way, everyone can enjoy the fresh and tasty salad!
Storage Info
How to Store Leftovers Properly
To keep your Mexican Street Corn Salad fresh, store it in an airtight container. Make sure to cool the salad to room temperature first. This helps to prevent moisture buildup inside the container. If you have any extra lime juice, squeeze a little on top before sealing. This can add flavor and help keep the salad vibrant.
Best Practices for Reheating
This salad is best enjoyed cold, so reheating is not usually needed. If you prefer warm corn, heat just the corn in a pan over medium heat. Avoid reheating the whole salad, as it can make the vegetables soggy. If you must warm it, do so gently in the microwave for a short time.
Shelf Life and Freezing Options
Your salad can last in the fridge for up to three days. After that, the ingredients may start to lose their quality. If you want to freeze it, keep in mind that the texture will change. I suggest freezing only the corn. Thaw it and mix it with fresh ingredients when ready to serve. This keeps the flavors fresh and the texture crisp.
FAQs
What can I use instead of cotija cheese?
If you can’t find cotija cheese, feta cheese works great. Both have a salty flavor. You can also use queso fresco for a milder taste. These cheeses crumble well, just like cotija.
Can I make this salad in advance?
Yes, you can prepare this salad ahead of time. Make the salad and store it in the fridge. Wait to add the dressing until just before serving. This keeps the salad fresh and crisp.
What are some protein options to add?
Adding protein to your salad boosts its nutrition. Grilled chicken or shrimp are tasty choices. Black beans or chickpeas make it vegetarian-friendly. You could even add crispy bacon for extra flavor!
In this blog post, I covered how to make Mexican Street Corn Salad. You learned about key ingredients, helpful tools, and step-by-step prep. I shared tips for great flavor and easy serving ideas. You also saw fun variations to try, including spicy and vegan options. Finally, I provided storage tips to keep your salad fresh.
Now, grab your ingredients and start creating! Enjoy this vibrant dish with friends and family. It’s flexible, fun, and a hit at any mea

Mexican Street Corn Salad
Ingredients
- 4 ears corn, kernels removed (or 4 cups frozen corn)
- 1 medium red bell pepper, diced
- 1 small red onion, finely chopped
- 1 cup cherry tomatoes, halved
- 0.25 cup fresh cilantro, chopped
- 0.5 cup crumbled cotija cheese (or feta)
- 2 tablespoons mayonnaise
- 1 tablespoon lime juice
- 1 teaspoon chili powder
- to taste salt and pepper
- 1 medium avocado, diced (optional)
Instructions
- If using fresh corn, grill the ears over medium heat for about 10 minutes, turning occasionally, until lightly charred. Allow to cool, then slice off the kernels. If using frozen corn, simply thaw in hot water, then drain.
- In a large mixing bowl, combine the charred corn kernels, diced red bell pepper, chopped red onion, and halved cherry tomatoes.
- Add the fresh cilantro, crumbled cotija cheese, and diced avocado (if using) into the mixing bowl.
- In a small bowl, whisk together the mayonnaise, lime juice, chili powder, salt, and pepper.
- Pour the dressing over the corn mixture and gently toss everything together until well combined.
- Taste and adjust seasoning with more salt, pepper, or lime juice if desired.
- Serve the salad immediately or refrigerate for up to 1 hour to let the flavors meld.


![- 2 cups sushi rice - 4 sheets nori (seaweed) - 1 avocado, sliced - 1 cucumber, julienned - 1 carrot, julienned - 1 red bell pepper, julienned To make easy veggie sushi rolls, you need key ingredients that create the perfect base and flavor. Sushi rice is sticky and helps hold the rolls together. Nori provides a tasty wrap. Fresh veggies add crunch and color. - 1/4 cup rice vinegar - 1 tablespoon sugar - 1/2 teaspoon salt These seasoning ingredients enhance the rice's flavor. Rice vinegar gives a slight tang. Sugar adds a hint of sweetness, while salt balances the taste. This mixture makes the sushi rice shine. - Soy sauce for dipping - Optional garnishes (sesame seeds, wasabi) When serving, soy sauce adds a salty kick. You can sprinkle sesame seeds for added crunch. Wasabi provides a spicy option for those who like heat. Enjoying these rolls with the right dips makes them even better. For the full recipe, check the Easy Veggie Sushi Rolls section. To start, rinse the sushi rice under cold water. This helps remove the excess starch. Keep rinsing until the water runs clear. You can cook the rice in a rice cooker or on the stovetop. If using a rice cooker, add 2 ½ cups of water and follow the machine's instructions. For stovetop cooking, bring the rice and water to a boil. Then, lower the heat, cover, and simmer for about 20 minutes until the water is gone. Next, mix rice vinegar, sugar, and salt in a small bowl. After cooking, transfer the rice to a large bowl. While it is still warm, gently fold in the vinegar mixture. This adds great flavor to the rice. Allow the rice to cool to room temperature before using it. While the rice cools, slice your fresh veggies. Take an avocado and slice it into thin pieces. Next, julienne the cucumber and carrot. Finally, slice the red bell pepper into thin strips. Each vegetable adds a nice crunch and color to your sushi. Place a bamboo sushi mat on a flat surface. Put a sheet of nori on top, shiny side down. Wet your hands to stop the rice from sticking. Take about a handful of rice and spread it evenly over the nori, leaving a small margin at the top edge. Now it's time to roll! Add a few pieces of each vegetable horizontally across the center of the rice. Starting from the bottom edge, carefully roll the mat away from you, holding the filling with your fingers. Make sure to roll tightly, but not too tight. Moisten the top edge with water to seal the roll. Use a sharp knife to slice the roll into bite-sized pieces. Wipe the knife with a damp cloth between cuts for clean slices. Arrange the sushi rolls on a serving platter. If you like, sprinkle sesame seeds on top and serve with soy sauce for dipping. Enjoy your beautiful veggie sushi rolls! For the complete recipe, check out [Full Recipe]. - Overcooking rice: If you cook the rice too long, it becomes mushy. This ruins the texture of your sushi. Keep an eye on your timer! - Squashing the roll while slicing: When you cut the sushi, press too hard. This squashes the roll and makes a mess. Use a sharp knife and gentle pressure. - How to roll sushi without a mat: No mat? No problem! Use a clean kitchen towel instead. Place the nori on the towel, add rice and fillings, and roll tightly. Keep your hands wet to avoid sticking. - Adding sauces or spices: Soy sauce is classic, but you can try others too. Add a splash of sriracha for heat or sprinkle sesame seeds for crunch. Experiment with flavors you love! For the complete recipe, you can refer to the Full Recipe section. {{image_2}} You can add protein to your sushi rolls for extra flavor and nutrition. Tofu is a great choice. Try firm or extra-firm tofu. It holds its shape well. You can marinate it in soy sauce or sesame oil for added flavor. Then, grill or sauté it until golden. Tempeh is another tasty option. This soy product has a nutty flavor. Slice it thin and cook it the same way. Both tofu and tempeh make your rolls filling and satisfying. Don’t feel limited to just avocado and cucumber! Use seasonal veggies for variety. In spring, try adding asparagus or snap peas. They add a nice crunch. In summer, bell peppers and zucchini are perfect. They are sweet and juicy. In fall, consider roasted sweet potatoes or beets for earthiness. Winter brings hearty greens like kale or spinach. You can even use radishes for a spicy kick. Mix and match to find your favorite combinations. Get creative by blending cuisines! Add cream cheese for a sushi-style bagel roll. You can also try spicy kimchi for a Korean twist. Consider using hummus and roasted red peppers for a Mediterranean flair. For a Mexican spin, add black beans and corn. Top it with fresh cilantro and lime juice. Each fusion idea brings new flavors to your rolls. It makes sushi fun and exciting! For the complete recipe, check out the Full Recipe section. To store leftover sushi rolls, wrap them tightly in plastic wrap or foil. This keeps them fresh and prevents the rice from drying out. Place the wrapped rolls in an airtight container. Store them in the fridge for up to 24 hours. The sooner you eat them, the better they taste. Freezing sushi rolls is simple. Wrap each roll in plastic wrap, then place them in a freezer-safe bag. Squeeze out as much air as possible. You can freeze sushi for about one month. When you are ready to eat, thaw it in the fridge overnight. Avoid microwaving, as it can make the rice mushy. Sushi rolls taste best when fresh. If stored properly in the fridge, they last for one day. After that, they may lose their flavor and texture. If you freeze the rolls, they can stay fresh for one month. Always check for any off smells or changes in color before eating. The best rice for sushi is short-grain sushi rice. This rice is sticky and holds its shape well. It gives sushi rolls their unique texture. When cooked, this rice becomes chewy, which is great for sushi. Look for sushi rice in Asian grocery stores or online. You can also use medium-grain rice if sushi rice is hard to find. Just remember not to use long-grain rice, as it will not stick well. Yes, you can use other ingredients besides nori. If you don’t like nori, try using lettuce leaves. They are fresh and crunchy. You can also use rice paper, which adds a different texture. Another option is to use thinly sliced cucumber as a wrap. This keeps your sushi light and refreshing. Just be creative with your wraps and fillings. The choice is all yours! Absolutely! This recipe is great for meal prep. You can make sushi rolls in advance and store them. Just keep them in an airtight container in the fridge. They will stay fresh for about 24 hours. If you prep the rice and veggies ahead of time, it makes rolling easy. You can also cut the rolls into pieces before storing. This way, you have quick snacks or lunches ready to go. Enjoy making your sushi rolls ahead of time! For the full recipe, check out the Easy Veggie Sushi Rolls section. In this blog post, I covered how to create sushi from start to finish. We looked at key ingredients like sushi rice, nori, and fresh veggies. I shared step-by-step instructions to prepare the rice, slice the vegetables, and assemble your rolls. I also offered tips to avoid common mistakes and enhance flavor. You can add your favorite proteins and try different veggies or fusion styles. With proper storage, your sushi can stay fresh for days. Now, it’s time to roll up your sleeves and enjoy making sushi at home!](https://dailydishly.com/wp-content/uploads/2025/07/11ef977b-69a9-4776-8bce-81e4c28b3d11-768x768.webp)