Minute Chili Garlic Shrimp Stir-Fry Quick and Simple

Ready for a quick and tasty meal? My Minute Chili Garlic Shrimp Stir-Fry is just that! In under 15 minutes, you can whip up a dish packed with flavor and nutrition. This recipe uses simple ingredients, making it perfect for busy nights. Whether you want a spicy kick or a mild bite, I’ve got tips to fit your taste. Let’s dive into this quick, fun recipe that’s sure to satisfy!
Ingredients
Shrimp
– 1 lb large shrimp, peeled and deveined
Shrimp are the star of this dish. They cook quickly and add great flavor. Choose large shrimp for the best bite. Make sure they are peeled and deveined. This saves time and keeps your stir-fry smooth.
Vegetables
– 2 tablespoons vegetable oil
– 4 cloves garlic, minced
– 1 red bell pepper, sliced
– 1 medium zucchini, sliced into half-moons
– 1 cup snap peas
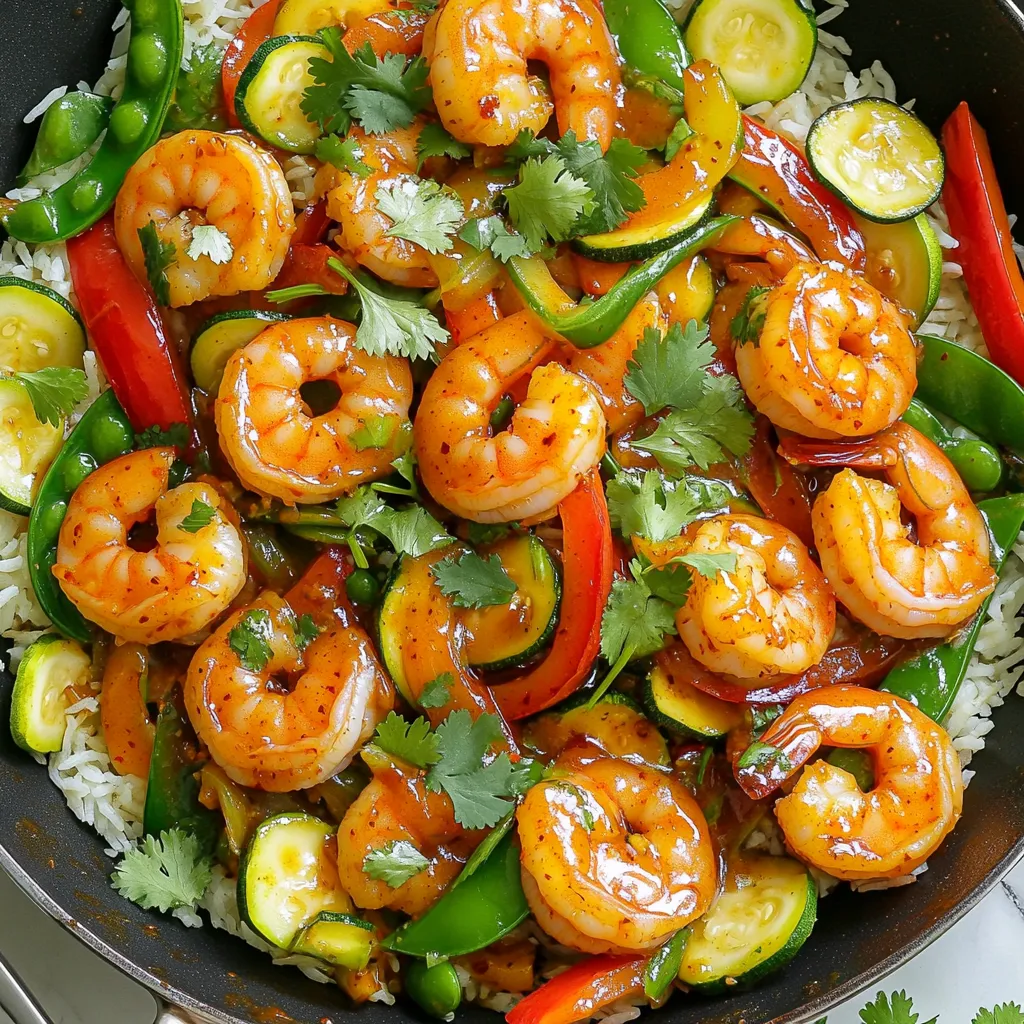
The vegetables add color and crunch. The red bell pepper brings sweetness, while zucchini adds a nice texture. Snap peas give a fresh taste. Garlic is key for flavor. The oil helps everything cook evenly and prevents sticking.
Sauce Components
– 2 tablespoons soy sauce
– 1 tablespoon chili paste (adjust for spice preference)
– 1 teaspoon honey or agave syrup
– Salt and pepper to taste
– Fresh cilantro, for garnish
– Cooked jasmine or basmati rice, for serving
The sauce ties it all together. Soy sauce adds saltiness. Chili paste gives heat, so adjust it to your taste. Honey or agave syrup balances the spice. Fresh cilantro on top adds brightness. Serve over jasmine or basmati rice for a full meal.
Step-by-Step Instructions
Preparing the Ingredients
Start by gathering your ingredients. You need:
– 1 lb large shrimp, peeled and deveined
– 2 tablespoons vegetable oil
– 4 cloves garlic, minced
– 1 red bell pepper, sliced
– 1 medium zucchini, sliced into half-moons
– 1 cup snap peas
– 2 tablespoons soy sauce
– 1 tablespoon chili paste
– 1 teaspoon honey or agave syrup
– Salt and pepper to taste
– Fresh cilantro for garnish
– Cooked jasmine or basmati rice for serving
Make sure everything is ready. This makes cooking quick and easy.
Sautéing the Garlic
Heat your large skillet or wok on medium-high. Add the vegetable oil and let it heat up. Once hot, toss in the minced garlic. Sauté for about 30 seconds. You want it fragrant but not burnt. Keep an eye on it!
Cooking the Shrimp and Vegetables
Now it’s time for the shrimp. Add them to the skillet. Cook for 2 to 3 minutes. They should turn pink and opaque. Next, add the red bell pepper, zucchini, and snap peas. Stir-fry for another 2 to 3 minutes. The veggies should be tender-crisp.
Adding the Sauce
In a small bowl, mix the soy sauce, chili paste, and honey or agave syrup. Pour this sauce over the shrimp and veggies. Stir well to coat everything. Cook for one more minute. Season with salt and pepper to taste. Now your Minute Chili Garlic Shrimp Stir-Fry is ready to serve!
Tips & Tricks
Choosing the Right Shrimp
When picking shrimp, look for large, fresh ones. Fresh shrimp should smell like the ocean. If you use frozen shrimp, thaw them in cold water. This keeps them tender. Always peel and devein shrimp before cooking. This makes them easier to eat and look nice on the plate.
Adjusting Spice Levels
If you want a spicy kick, add more chili paste. Start with one tablespoon and taste. You can also add fresh chili slices for more heat. If spice is not your thing, use less chili paste. A bit of honey can balance the spice and add sweetness.
Perfecting Your Stir-Fry Technique
A hot pan is key for a good stir-fry. Heat the oil well before adding garlic. Stir quickly so the garlic doesn’t burn. Add shrimp next, cooking until pink. Don’t overcrowd the pan; this helps them cook evenly. Always keep the food moving in the pan. This gives you crispy shrimp and crisp veggies.

Variations
Adding Extra Vegetables
You can boost the nutrition by adding more veggies. Try carrots, broccoli, or spinach. These add color and taste. You can also use mushrooms for a nice texture. Just remember to cut them small for even cooking.
Alternative Protein Options
If you want a change from shrimp, use chicken or tofu. Chicken cooks well and takes on flavor nicely. Tofu can be a great choice for a vegetarian meal. Make sure to press the tofu to remove extra water. This helps it absorb the sauce better.
Different Sauce Combinations
Change up the sauce for new flavors. Instead of soy sauce, try teriyaki or hoisin sauce. You can also mix in lime juice for a zesty kick. If you love heat, add more chili paste or fresh chili peppers. Experimenting will keep this dish exciting!
Storage Info
Short-Term Storage
You can store leftover Minute Chili Garlic Shrimp Stir-Fry in an airtight container. Keep it in the fridge for up to three days. Make sure it cools down before sealing. This helps maintain its taste and texture. When you’re ready to eat, check for freshness first.
Freezing Tips
If you want to save it for later, freezing is a good option. Place the stir-fry in a freezer-safe bag or container. Remove as much air as possible. This helps prevent freezer burn. You can freeze it for up to three months. To enjoy it again, thaw it overnight in the fridge.
Reheating Instructions
To reheat, use a skillet over medium heat. Add a splash of oil to keep it moist. Stir until heated through. You can also use the microwave. Place it in a microwave-safe dish, cover it, and heat for about two minutes. Stir halfway to ensure even heating. Enjoy your quick meal again!
FAQs
Can I use frozen shrimp?
Yes, you can use frozen shrimp. Just make sure to thaw them first. You can place them in cold water for about 15 minutes. This helps them cook evenly. Frozen shrimp are often just as tasty as fresh ones.
How can I make this dish vegetarian?
To make this dish vegetarian, swap shrimp for tofu or tempeh. Tofu absorbs flavors well and adds protein. Cut it into cubes and sauté it just like shrimp. Use the same sauce to keep that tasty flavor.
What can I serve with chili garlic shrimp stir-fry?
This stir-fry goes great with jasmine or basmati rice. You can also serve it with noodles. Add a side of fresh salad or steamed veggies for a complete meal. They will balance the heat and add crunch.
How do I store leftovers?
Store leftovers in an airtight container. It stays fresh in the fridge for up to three days. To reheat, use a skillet over medium heat. This keeps the shrimp tender and the veggies crisp.
This post covered how to make a great chili garlic shrimp stir-fry. We looked at key ingredients like shrimp, veggies, and sauce components. I shared step-by-step instructions for cooking and some handy tips to improve your stir-fry. You can also explore variations to keep things fresh and exciting. Proper storage advice ensures you enjoy leftovers. Cooking does not have to be hard. With practice, you will master this dish and impress yourself and others. Enjoy your cooking journey!


![To make crispy chickpea tacos, you need the following main ingredients: - 1 can (15 oz) chickpeas, drained and rinsed - 1 tablespoon olive oil - 1 teaspoon paprika - 1 teaspoon cumin - ½ teaspoon garlic powder - ½ teaspoon chili powder - Salt and pepper to taste - 6 small corn tortillas - 1 cup shredded cabbage - ½ cup diced tomatoes - ¼ cup diced red onion - ½ avocado, sliced - Fresh cilantro for garnish - Lime wedges for serving Chickpeas are the star of this dish. They provide protein and fiber. The spices add depth and flavor. The tortillas hold all the goodness together. Fresh toppings bring crunch and color. You will need a few simple tools for this recipe: - Baking sheet - Mixing bowl - Dry skillet Using these tools makes the cooking process smooth. A baking sheet helps the chickpeas get crispy. A mixing bowl lets you combine ingredients easily. A dry skillet warms the tortillas just right. Here’s a quick look at the nutritional facts for one serving of these tacos: - Calories: About 200 - Protein: 8g - Carbohydrates: 30g - Fat: 7g These tacos are filling yet light. They are great for lunch or dinner. You get a good balance of protein, carbs, and healthy fats. For the full recipe, check out the other sections. 1. Preheating the oven Start by preheating your oven to 400°F (200°C). This will help the chickpeas get nice and crispy. 2. Tossing chickpeas with seasoning In a mixing bowl, add the drained and rinsed chickpeas. Pour in olive oil, then sprinkle paprika, cumin, garlic powder, chili powder, salt, and pepper. Toss everything well until the chickpeas are coated with the spices. This step is key for great flavor. 1. Spreading chickpeas on a baking sheet Take a baking sheet and spread the seasoned chickpeas in a single layer. Make sure they are not piled on top of each other. This helps them crisp up nicely. 2. Baking time and techniques for crispiness Bake the chickpeas in the oven for about 20 to 25 minutes. Halfway through, shake the pan to ensure even cooking. You'll know they are done when they are golden brown and crispy. 1. Heating tortillas While the chickpeas bake, heat your corn tortillas in a dry skillet over medium heat. Cook them for about 30 seconds on each side until they are warm and flexible. 2. Layering ingredients for optimal flavor Once your chickpeas are crispy, it’s time to assemble the tacos. Place a generous scoop of chickpeas in each tortilla. Add shredded cabbage, diced tomatoes, red onion, and avocado slices on top. For the final touch, sprinkle fresh cilantro and squeeze some lime juice over everything. This adds a fresh burst of flavor! For the full recipe, you can refer to the detailed instructions included earlier. Enjoy these tasty tacos! To get the best crunch from your chickpeas, rinse and dry them well. This step removes extra starch and moisture. Use a clean kitchen towel to pat them dry. This helps them crisp up nicely in the oven. When baking, spread the chickpeas out on the sheet. Give them space to breathe and cook evenly. Bake at 400°F (200°C) for 20-25 minutes. Shake the pan halfway through to ensure they get crispy all around. You can make your chickpeas even tastier! Try adding smoked paprika or cayenne pepper for a kick. Adjust the seasonings based on your taste. For toppings, think beyond the usual. Add fresh corn, diced jalapeños, or pickled radishes for a zesty touch. These will boost flavor and add crunch to your tacos. These tacos pair well with fresh sides. Try serving them with a simple avocado salad or black bean salsa. These sides add color and more flavor. For presentation, use a bright platter. Arrange the tacos neatly and add lime wedges on the side. This makes the meal more inviting. You can drizzle a bit of light ranch or yogurt dressing over the tacos for creamy goodness. For the full recipe, check out the earlier section. Enjoy your crispy chickpea tacos! {{image_2}} You can easily make these tacos fit your diet. For gluten-free options, use corn tortillas. They are tasty and safe for those who avoid gluten. You can also try lettuce wraps for a fresh twist. If you're vegan, this recipe is already perfect for you! The chickpeas provide protein and flavor without any animal products. Just make sure to check any additional toppings you use. Get creative with spices! Try adding curry powder or smoked paprika for a different taste. You can mix in some cayenne pepper for a spicy kick. Adjust the amounts to fit your spice level. Toppings are where you can really shine. Add jalapeños for heat or mango salsa for sweetness. Pickled onions can add a tangy crunch. You can even sprinkle some feta cheese on top for a creamy finish. Use seasonal vegetables for a fresh touch. In summer, add sweet corn or diced bell peppers. In fall, roasted butternut squash or pumpkin can add warmth. You can switch up the veggies based on what you find at the market. Don’t forget about dressings! In warmer months, a light lime vinaigrette works wonders. In cooler months, you might enjoy a creamy avocado dressing. Adjust based on what you have on hand or what’s in season. For the full recipe, check out the Crispy Chickpea Tacos section! To keep leftover chickpeas fresh, store them in an airtight container. Place them in the fridge. They will stay good for about three to four days. If you want to recook them, heat the chickpeas in a skillet. Add a splash of olive oil and your favorite spices. This helps restore their crispy texture. If you want to assemble your tacos in advance, do so carefully. Keep the ingredients separate until you are ready to eat. Store the chickpeas in one container and the toppings in another. For tortillas, wrap them in foil or wax paper. This keeps them soft. When you are ready to serve, warm the tortillas in a skillet for the best taste. Yes, you can freeze cooked chickpeas! Place them in a freezer-safe bag. Remove as much air as possible before sealing. They will stay fresh for up to three months. As for assembled tacos, I do not recommend freezing them. The tortillas become soggy when thawed. However, you can freeze the chickpeas and toppings separately. Just thaw and reheat when you’re ready to enjoy. For the full recipe, refer back to the beginning of this article. To make crispy chickpea tacos, start by preheating your oven to 400°F (200°C). Rinse one can of chickpeas and drain them well. In a bowl, toss the chickpeas with one tablespoon of olive oil and a mix of spices: one teaspoon of paprika, one teaspoon of cumin, half a teaspoon of garlic powder, and half a teaspoon of chili powder. Add salt and pepper to taste. Spread the seasoned chickpeas on a baking sheet in a single layer. Bake them for 20 to 25 minutes. Shake the pan halfway through. This gives them a nice crunch. While they bake, heat six small corn tortillas in a dry skillet over medium heat for about 30 seconds on each side. Once the chickpeas are crispy and golden, fill each tortilla with them. Add fresh toppings like shredded cabbage, diced tomatoes, diced red onion, and avocado slices. Finish with fresh cilantro and a squeeze of lime juice for a bright taste. For the full recipe, check out the [Full Recipe]. Chickpea tacos benefit from fresh and crunchy toppings. Here are some great options: - Shredded cabbage - Diced tomatoes - Diced red onion - Sliced avocado - Fresh cilantro - Lime wedges These toppings add color and flavor. You can also try pickled jalapeños for some heat or crumbled feta for a creamy touch. Mix and match to find your favorite combination! This recipe is already vegan-friendly! To keep it that way, ensure you use corn tortillas and skip any dairy toppings. For added creaminess, try using avocado or a vegan yogurt. You can also add a splash of hot sauce for extra flavor without any animal products. Crispy chickpea tacos pair well with various sides. Here are a few suggestions: - Mexican rice or quinoa - Black beans or refried beans - A simple green salad with lime vinaigrette - Chips and salsa or guacamole These sides not only complement the tacos but also make your meal more filling and satisfying. Enjoy! Crispy chickpea tacos are easy to make and pack great flavor. We covered the main ingredients, tools, and nutritional info to help you. You learned the step-by-step process, plus tips for crispiness and flavor. Don’t forget the variations and storage tips to keep your meals fresh. Experiment with different spices and toppings to find what you love. Enjoy creating your tacos and make them your own for delicious meals!](https://dailydishly.com/wp-content/uploads/2025/06/47f89152-e87e-483c-b85b-8fc38f5c57d2-768x768.webp)
![- 8 oz rice noodles - 1 cup red bell pepper, julienned - 1 cup yellow bell pepper, julienned - 1 cup cucumber, julienned - 1 cup purple cabbage, shredded - 1 cup carrots, grated - 1 cup edamame (shelled) - 1/4 cup fresh cilantro, chopped - 1/4 cup green onions, sliced For the Peanut Sauce: - 1/2 cup creamy peanut butter - 3 tablespoons soy sauce (or tamari for a gluten-free option) - 2 tablespoons lime juice - 1 tablespoon maple syrup (or honey) - 1 tablespoon sesame oil - 1 garlic clove, minced - 1 teaspoon grated fresh ginger - 1-2 tablespoons water (to thin the sauce, as needed) Each serving has about 250 calories. This salad is packed with nutrients. It offers protein and fiber from the noodles and veggies. The peanut sauce adds healthy fats and flavor. Each bite is both tasty and good for you. If you need gluten-free options, use rice noodles and tamari. For vegan alternatives, swap honey for maple syrup. You can also add tofu for extra protein. This salad can fit many diets while still being delicious. You can find the full recipe for Rainbow Thai Peanut Noodle Salad [Full Recipe]. To start, bring a large pot of water to a boil. Use enough water to let the noodles float freely. Once boiling, add 8 oz of rice noodles. Cook them for about 3 to 5 minutes, or until they are firm but tender. Keep an eye on them! After they are cooked, drain them in a colander. Rinse the noodles with cold water. This stops the cooking and keeps the noodles from sticking together. Set them aside while you prep the veggies. While the noodles cook, wash and cut the vegetables. To make it easy, julienne the red and yellow bell peppers. Use a sharp knife for clean cuts. Slice the cucumber and shred the purple cabbage. Grate the carrots too. Aim for uniform pieces so they mix well. Once cut, place all the veggies in a large mixing bowl. This keeps everything together for the next step. You can also add the edamame for extra protein. Now, let’s make the peanut sauce! In a medium bowl, mix 1/2 cup of creamy peanut butter, 3 tablespoons of soy sauce, and 2 tablespoons of lime juice. Add 1 tablespoon of maple syrup for a touch of sweetness. Next, add 1 tablespoon of sesame oil, 1 minced garlic clove, and 1 teaspoon of grated ginger. Whisk these ingredients together until smooth. If the sauce feels thick, add 1-2 tablespoons of water. This helps thin it out to your liking. Now, pour this yummy sauce over the noodles and veggies. Toss gently to coat everything evenly. The flavors will blend beautifully together. For more details, check the Full Recipe. To cook noodles al dente, bring water to a boil. Add rice noodles and cook for about 4-6 minutes. Stir often to prevent sticking. Once done, drain and rinse under cold water. This stops cooking and keeps noodles firm. For crunchy vegetables, cut them just before serving. This keeps their crispness. Use a sharp knife for even slices. Julienne the peppers and cucumber. Shred the cabbage and grate the carrots. Keep them colorful for a vibrant dish. Boost flavor with spices and condiments. A pinch of red pepper flakes gives heat. Add a splash of fish sauce for depth. If you love citrus, lime zest brightens the dish. Fresh herbs make a big difference. Cilantro adds a fresh taste. You can try mint or basil for a twist. Chop herbs finely and mix them in just before serving. Serving bowls set the stage for a great meal. Use larger bowls for family-style serving. For individual plates, choose clear glass bowls. This shows off the colorful layers. Garnishing techniques can elevate your dish. Sprinkle extra cilantro on top for a pop of green. Add chopped peanuts for crunch. Arrange salad in colorful layers for a beautiful view. A rainbow of colors always catches the eye. {{image_2}} You can make this salad heartier by adding protein. Chicken is a great choice. Just grill or sauté it, then slice it thin. Tofu is another option. It soaks up the peanut sauce well. You can also try shrimp or beans for a different flavor. Each adds a nice touch to the Rainbow Thai Peanut Noodle Salad. Switching up the peanut sauce can give your salad new life. You can try a sesame sauce for a nutty twist. Just blend sesame paste with soy sauce and lime juice. For a sweeter flavor, teriyaki sauce works well too. It brings a rich taste that pairs nicely with the fresh veggies. Using seasonal vegetables can enhance your salad's freshness. In summer, add ripe tomatoes or corn for sweetness. Fall brings squash or roasted peppers for warmth. Winter might call for hearty greens like kale. Each season offers unique flavors. Tailoring your recipe helps keep it exciting all year long. For the full recipe, check out the detailed steps to make this dish shine. To store leftovers of your Rainbow Thai Peanut Noodle Salad, put it in the fridge. Use an airtight container to keep it fresh. Glass containers work great because they don’t hold onto smells. If you use plastic, make sure it’s food-safe and BPA-free. You can freeze the salad, but it is best to freeze only the noodles and sauce. Keep the veggies separate. They don't freeze well and lose their crunch. To thaw, move the noodles and sauce to the fridge overnight. When ready to eat, heat the noodles gently and mix in fresh veggies. This keeps everything bright and tasty. In the fridge, the salad lasts about 3 to 5 days. Check for signs of spoilage before eating. If the veggies look wilted or the sauce smells off, it’s best to toss it. Freshness is key for this vibrant dish! What is the best type of noodles for this salad? The best noodles are rice noodles. They are light and soak up the sauce. You can also use soba or whole grain noodles if you prefer. Just remember to cook them until they are al dente. This keeps them from getting too mushy in the salad. Can I make the salad in advance? Yes, you can make the salad ahead of time. It tastes better after chilling for a bit. Prepare it up to a day in advance and store it in the fridge. Just keep the sauce separate if you want the noodles to stay firm. What to do if the sauce is too thick? If your sauce is too thick, add a tablespoon of water. Mix it well, and check again. You can repeat this until it reaches the right consistency. A smooth sauce coats the salad nicely. How to fix overly soggy noodles? To fix soggy noodles, rinse them in cold water. This stops the cooking process and helps firm them up. If they still seem too soft, use them in soups or stir-fries instead. What can I serve with Rainbow Thai Peanut Noodle Salad? This salad pairs well with grilled chicken or shrimp. You can also serve it with spring rolls for a light meal. Add a side of fresh fruit for a sweet touch. Can this dish be served warm? Yes, you can serve this dish warm. Just toss the salad right after mixing it. However, I recommend chilling it first to enhance the flavors. For the full recipe, check out the details provided above. This blog post covered key ingredients for Rainbow Thai Peanut Noodle Salad, including rice noodles, fresh veggies, and tasty peanut sauce. I shared nutritional info, substitutions for dietary needs, and step-by-step cooking instructions. We also explored tips to enhance texture and flavor, various protein additions, and creative presentation ideas. Overall, this salad is versatile and easy to make, perfect for any occasion. Keep it fresh, store leftovers properly, and don't hesitate to try new variations. Enjoy crafting your delicious, colorful dish!](https://dailydishly.com/wp-content/uploads/2025/07/2e038f5f-8562-408c-ae38-174aa7e62a42-768x768.webp)