Minute Creamy Garlic Lemon Pasta Easy and Tasty Dish

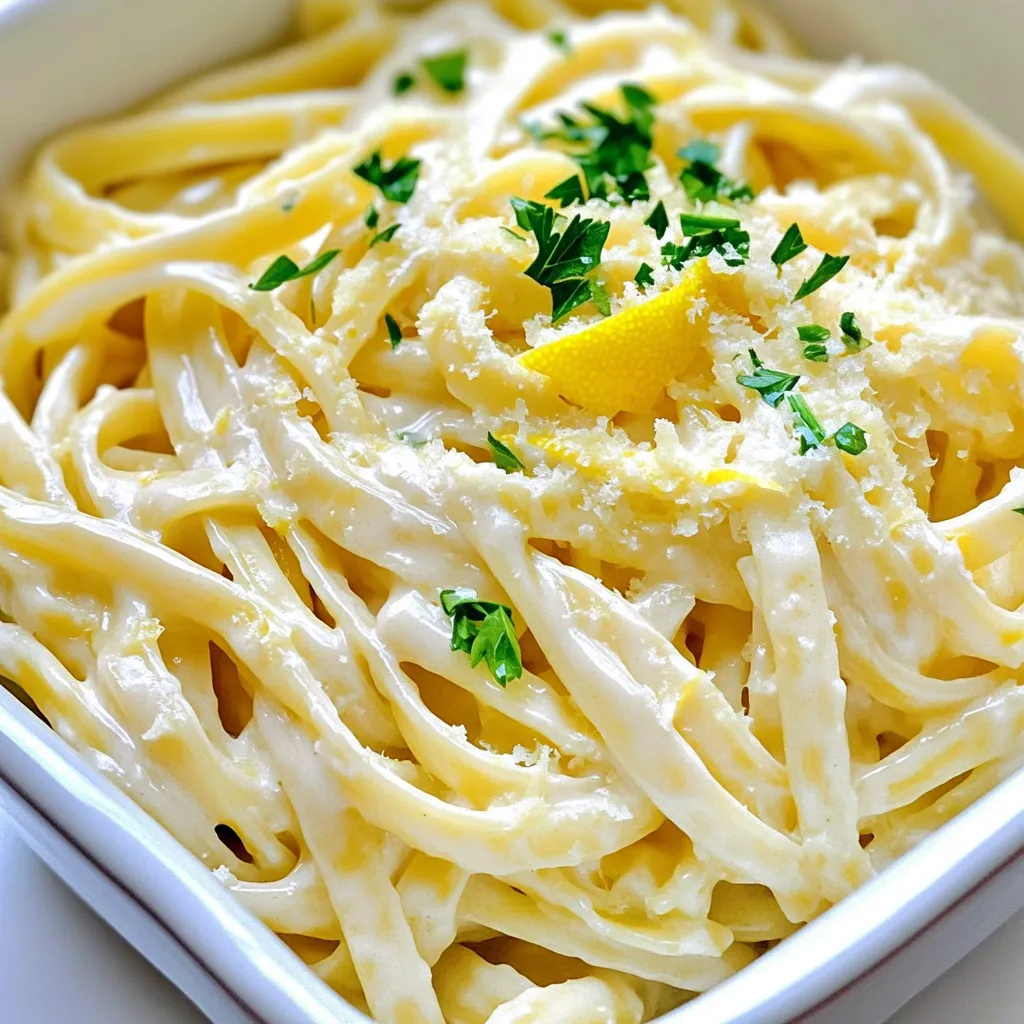
Looking for a quick and tasty meal? My Minute Creamy Garlic Lemon Pasta is your answer! This dish combines fresh garlic, zesty lemon, and rich cream to create a simple yet delicious pasta experience. Whether you’re cooking for one or feeding a crowd, this recipe is quick to make and packed with flavor. Ready to impress your taste buds? Let’s dive into the ingredients and get started!
Ingredients
Main Ingredients
– 8 oz fettuccine or spaghetti
– 2 tablespoons olive oil
– 4 cloves garlic, minced
– 1 cup heavy cream
– 1 cup grated Parmesan cheese
– Zest of 1 lemon
– Juice of 1 lemon
– Salt and pepper to taste
This dish starts with either fettuccine or spaghetti. Both types work well, but I love the way fettuccine hugs the sauce. I always use good olive oil for flavor. Fresh garlic adds a lovely aroma and taste. Heavy cream makes the sauce rich and smooth. Parmesan cheese gives it a savory depth. Lemon zest and juice brighten the dish and add freshness. Don’t forget salt and pepper! These basic seasonings bring all the flavors together.
Optional Garnishes
– Fresh parsley
– Extra Parmesan cheese
– Lemon wedges
Garnishes make your dish look beautiful. Fresh parsley adds color and a hint of freshness. Extra Parmesan cheese gives a nice finishing touch. Lemon wedges are great on the side. They let you add a little extra zing if you want. Garnishing makes a simple dish feel special!
Step-by-Step Instructions
Cooking the Pasta
Start by boiling a large pot of salted water. Use a good amount of salt; it helps flavor the pasta. Once the water is at a rolling boil, add your 8 oz of fettuccine or spaghetti. Cook the pasta according to the package instructions until it is al dente. This usually takes about 8-10 minutes. When it’s ready, reserve 1 cup of the pasta water. Then, drain the pasta and set it aside.
Making the Sauce
In the same pot, heat 2 tablespoons of olive oil over medium heat. Add 4 cloves of minced garlic to the pot. Sauté the garlic for 1-2 minutes until it is fragrant but not browned. Lower the heat to low, and pour in 1 cup of heavy cream. Stir to combine the cream with the garlic. Let it simmer gently for about 2 minutes. Gradually add 1 cup of grated Parmesan cheese. Stir until the cheese melts and the sauce becomes creamy. If the sauce is too thick, add some reserved pasta water a little at a time until you reach your desired consistency. Now, stir in the zest and juice of 1 lemon. Season with salt and pepper to your taste.
Combining Pasta and Sauce
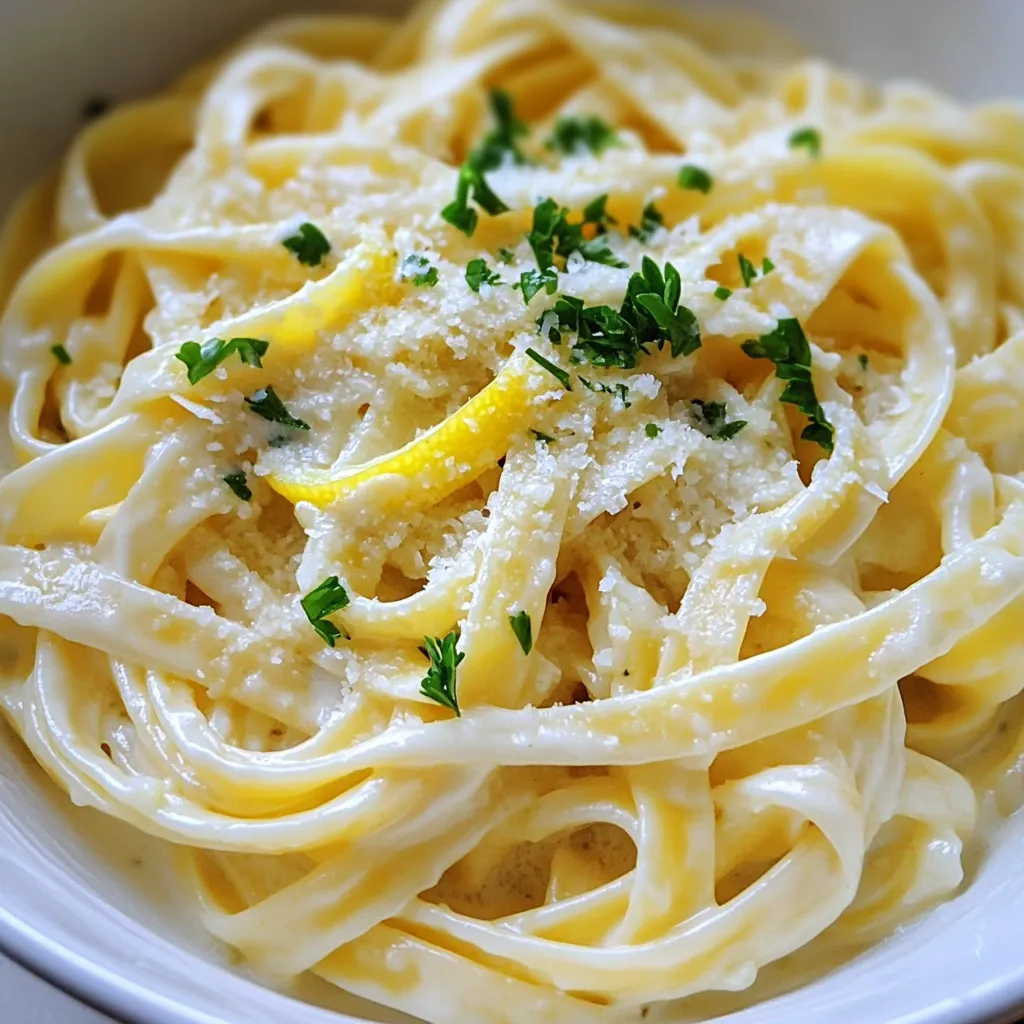
Add the drained pasta to the creamy sauce. Toss the pasta well to coat it fully. If the sauce seems too thick, add more reserved pasta water until it is just right. This helps the sauce cling to the pasta better. Serve the pasta right away, garnishing with chopped fresh parsley for a nice touch. Enjoy your delicious dish!
Tips & Tricks
Perfecting the Sauce
To keep your sauce from getting grainy, use fresh Parmesan cheese. Grate it yourself for the best results. If the cheese clumps, it can ruin the smooth texture. Make sure to stir continuously when adding the cheese to the cream.
If your sauce is too thick, use the reserved pasta water. Add a little at a time until you reach your desired smoothness. This water adds flavor and helps blend the sauce with the pasta.
Enhancing Flavors
You can add spices or herbs to make your dish pop. A pinch of red pepper flakes gives heat. Fresh basil or thyme adds a nice twist, too. Don’t forget about the lemon zest; it boosts the lemon flavor. Use a microplane to get fine shavings for a bright taste.
Serving Suggestions
For plate presentation, serve the pasta in shallow bowls. Drizzle some extra olive oil on top for shine. Add a sprinkle of extra Parmesan and a lemon wedge for color.
Pair the pasta with a simple salad or garlic bread. These sides balance the creamy sauce and enhance your meal.

Variations
Protein Additions
You can easily add protein to Minute Creamy Garlic Lemon Pasta. Grilled chicken works great. It adds a nice texture and taste. Just slice it up and toss it in with the pasta. Shrimp or scallops are also fantastic choices. They cook quickly and soak up the garlic-lemon sauce. Simply sauté them in olive oil until pink and tender, and combine them with your pasta for a tasty meal.
Dietary Adjustments
If you need gluten-free options, use gluten-free pasta. It cooks just like regular pasta and tastes great. There are many brands available, so you can find one that fits your needs. For a vegan version, swap the heavy cream for coconut milk or cashew cream. Use nutritional yeast instead of Parmesan cheese. This will still give you that rich, creamy flavor without any dairy.
Flavor Profiles
You can change up the flavors by adding vegetables. Spinach or peas are excellent choices. They add color and nutrients. Just toss them in with the pasta during the last minute of cooking. For cheese, you can try alternatives like goat cheese or vegan cheese. These options can add a new twist to this dish, giving it a unique flavor while still being creamy and delicious.
Storage Info
Refrigeration
After making Minute Creamy Garlic Lemon Pasta, let it cool. Store it in an airtight container. This keeps the pasta fresh and tasty. It will last in the fridge for about 3-4 days.
When you are ready to eat, reheat it in a pan over low heat. Add a splash of water or cream to help bring back the creamy texture. Stir gently to warm it up. You can also use a microwave. Heat for 1-2 minutes, stirring halfway through.
Freezing Tips
To freeze this dish, first let it cool completely. Portion it into freezer-safe bags or containers. Be sure to remove as much air as possible. This helps prevent freezer burn. The pasta can last in the freezer for about 2-3 months.
When you want to enjoy it again, thaw it overnight in the fridge. For a quick thaw, place the sealed bag in warm water. Once thawed, reheat as mentioned before.
Shelf Life
Understanding how long the pasta lasts is key. In the fridge, it stays fresh for 3-4 days. In the freezer, it lasts 2-3 months. Always check for any signs of spoilage before eating. If it smells off or looks strange, it’s best to throw it away. Enjoy your creamy garlic lemon pasta with confidence!
FAQs
How long does Minute Creamy Garlic Lemon Pasta take to make?
This dish takes just 15 minutes to make. You spend about 5 minutes getting ready and 10 minutes cooking. First, boil the pasta while you prep the sauce. This quick method makes it perfect for busy days.
Can I use other types of pasta?
Yes, you can use other pasta types! Fettuccine and spaghetti work well. You can also try penne, linguine, or even gluten-free pasta. Just remember to adjust the cooking time as needed. Enjoy experimenting with your favorites!
Is this recipe suitable for a crowd?
Absolutely! You can easily double or triple the recipe. Just make sure to adjust your pot size for cooking. If you have more guests, this dish will still be quick and tasty. It’s a perfect choice for gatherings or family dinners!
This blog post covered how to make a creamy garlic lemon pasta dish. We explored key ingredients like fettuccine, garlic, and heavy cream. Each step, from cooking the pasta to combining it with the sauce, is straightforward and simple.
You can make adjustments based on your taste and dietary needs. Try adding proteins or veggies to suit your preferences. With these tips, you’ll create a delicious meal every time. Enjoy cooking and sharing this easy dish!


![- 1 zucchini, sliced into thick rounds - 1 yellow bell pepper, sliced into strips - 1 red bell pepper, sliced into strips - 1 red onion, cut into wedges - 1 cup cherry tomatoes - 3 tablespoons olive oil - Zest and juice of 1 lemon - 2 teaspoons dried oregano - 2 teaspoons dried thyme - 2 cloves garlic, minced - Salt and pepper to taste - Fresh parsley, chopped (for garnish) When I create Lemon Herb Grilled Vegetables, I focus on using fresh, high-quality vegetables. Zucchini brings a nice crunch, while yellow and red bell peppers add sweetness and color. The red onion gives a mild bite, and cherry tomatoes burst with flavor. Next, I make the marinade. I combine olive oil, lemon zest, and lemon juice to give a citrusy kick. Dried oregano and thyme add earthy notes, while minced garlic brings depth. Salt and pepper enhance all the flavors. This marinade coats the veggies, making them vibrant and flavorful. Finally, I garnish with fresh parsley. This simple touch adds brightness and a pop of color. For the full recipe, check the complete cooking instructions and enjoy this fresh dish! To start, gather your ingredients. In a large bowl, combine these items: - 3 tablespoons olive oil - Zest of 1 lemon - Juice of 1 lemon - 2 teaspoons dried oregano - 2 teaspoons dried thyme - 2 cloves garlic, minced - Salt and pepper to taste Whisk these together until smooth. This marinade packs in bright flavors. It will make your veggies sing! Next, it's time to add the fresh veggies. Use: - 1 zucchini, sliced into thick rounds - 1 yellow bell pepper, sliced into strips - 1 red bell pepper, sliced into strips - 1 red onion, cut into wedges - 1 cup cherry tomatoes Toss the veggies in the marinade. Make sure every piece gets coated well. Cover your bowl with plastic wrap. Place it in the fridge. Let the vegetables sit for at least 30 minutes. This step is key for flavor. After marinating, it’s grilling time! First, preheat your grill or grill pan on medium-high heat. When hot, place the marinated vegetables directly on the grill. Spread them out in a single layer. Grill for about 6-8 minutes. Turn them occasionally. You want those lovely grill marks! The veggies should be tender but still crisp. Once done, remove the vegetables from the grill. Transfer them to a serving platter. For a nice touch, garnish with fresh chopped parsley before serving. For the full recipe, check out the details above! For Lemon Herb Grilled Vegetables, choose fresh and seasonal options. Look for bright colors and firm textures. Zucchini, bell peppers, red onion, and cherry tomatoes are great choices. They all grill well and taste amazing. Select vegetables in peak season for the best flavor. Visit local farmers' markets to find the freshest picks. To get those perfect grill marks, preheat your grill to medium-high heat. Spread the vegetables in a single layer on the grill. This helps them cook evenly. Turn them occasionally for even char and tenderness. Aim for 6-8 minutes of grilling. You want them tender but still crisp. Use tongs to flip them gently. Enhance the taste of your grilled veggies with extra herbs or spices. Fresh herbs like basil or cilantro work well. You can also try adding a pinch of red pepper flakes for heat. A drizzle of balsamic glaze after grilling adds a sweet touch. Customize the flavors to match your meal or mood. For the full recipe, check out Lemon Herb Grilled Vegetables. {{image_2}} You can swap in many vegetables for this dish. Asparagus works great on the grill. It adds a nice crunch and fresh taste. Eggplant is another tasty choice. It absorbs flavors well and becomes creamy when grilled. Other options include mushrooms, carrots, or even sweet potatoes. Each choice brings something unique to your plate. If you want to change up the taste, try different citrus fruits. Lime or orange juice can add a new twist. You can also mix in fresh herbs like basil or cilantro. These herbs give a fresh and vibrant flavor. A splash of balsamic vinegar can also work wonders. Experimenting with marinades keeps the meal exciting. Pair your grilled vegetables with grains for a full meal. Quinoa, rice, or couscous work well. You can also add grilled chicken or fish for protein. A fresh salad on the side brightens up the dish. For a little kick, drizzle some chili oil over the top. This dish can be a main event or a perfect side for any meal. For the full recipe, check out the complete guide. Grilled vegetables can last in the fridge for about 3 to 5 days. Make sure to store them in an airtight container. This keeps them fresh and tasty. When you want to eat them again, just take a look and see if they still smell good. If they look or smell off, it's best to discard them. If you want to save grilled vegetables for later, freezing is a great option. Here’s how to do it: 1. Cool the Vegetables: Let them cool to room temperature first. 2. Prepare the Freezer Bags: Use freezer-safe bags or containers. 3. Pack the Vegetables: Place the veggies in the bags, leaving some space for air. 4. Seal and Label: Seal the bags tightly. Label them with the date. 5. Freeze: Lay the bags flat in the freezer to save space. These steps help keep your vegetables safe and tasty for up to 3 months. When it’s time to enjoy your grilled vegetables again, reheating them the right way is key. Here are some great methods: - Stovetop: Heat a skillet over medium heat. Add a splash of olive oil. Toss the veggies for about 5 minutes, until warmed through. - Oven: Preheat your oven to 350°F (175°C). Spread the vegetables on a baking sheet. Bake for about 10 minutes, or until hot. - Microwave: Place the vegetables in a microwave-safe dish. Heat for 1-2 minutes, stirring halfway. These methods keep the flavor and texture close to fresh, so you can enjoy them just like the first time. For the full recipe, check out the instructions above. Yes, you can prepare these grilled vegetables ahead of time. I recommend marinating them first. Mix the marinade and coat the veggies. Then, cover the bowl and place it in the fridge. You can marinate for at least 30 minutes or up to 24 hours. The longer they sit, the more flavor they absorb. Grill them right before serving for the best taste and texture. Lemon Herb Grilled Vegetables pair well with many dishes. Serve them alongside grilled chicken or fish for a balanced meal. They also go great with quinoa or couscous. Add a fresh salad for extra crunch. You can even toss them into pasta dishes for added flavor. Yes, this recipe is perfect for both vegetarians and vegans. All the ingredients are plant-based. If you want extra protein, consider adding chickpeas or tofu. These additions make the dish even heartier while maintaining its vibrant flavor. Enjoy this healthy and colorful meal! For the complete recipe, check out the [Full Recipe]. This blog post showed you how to make Lemon Herb Grilled Vegetables. We covered fresh veggies, flavorful marinades, and tips for grilling. Choosing fresh ingredients boosts taste. Also, various veggie combos can spice up your meals. Storing and reheating are easy too. You can enjoy this dish any time. Whether you’re cooking for yourself or feeding a crowd, you have all the tools needed to impress. Dive into the joy of grilling, and experiment with your favorite flavors. Enjoy your delicious creations!](https://dailydishly.com/wp-content/uploads/2025/06/2c532b5c-078c-48cf-b109-f94e84489936-768x768.webp)


