Are you looking for a quick and tasty meal? Try my Minute Ginger Garlic Beef Lettuce Wraps! This easy recipe is packed with flavor and ready in minutes. With lean ground beef, fresh ginger, and colorful veggies, you’ll impress your family or guests without spending hours in the kitchen. Don’t miss out on this delicious dish—let’s dive into the simple steps to make your next favorite meal!
Ingredients
Main Ingredients
– 1 lb ground beef (preferably lean)
– 1 tablespoon ginger, minced
– 4 cloves garlic, minced
– 2 teaspoons soy sauce (or tamari for gluten-free option)
– 1 tablespoon sesame oil
Vegetables
– 1 bell pepper, finely diced (red or yellow for sweetness)
– 1 carrot, grated
– 2 green onions, chopped
Seasonings and Garnishes
– 1 tablespoon honey or maple syrup
– 1 tablespoon rice vinegar
– Fresh cilantro leaves for garnish (optional)
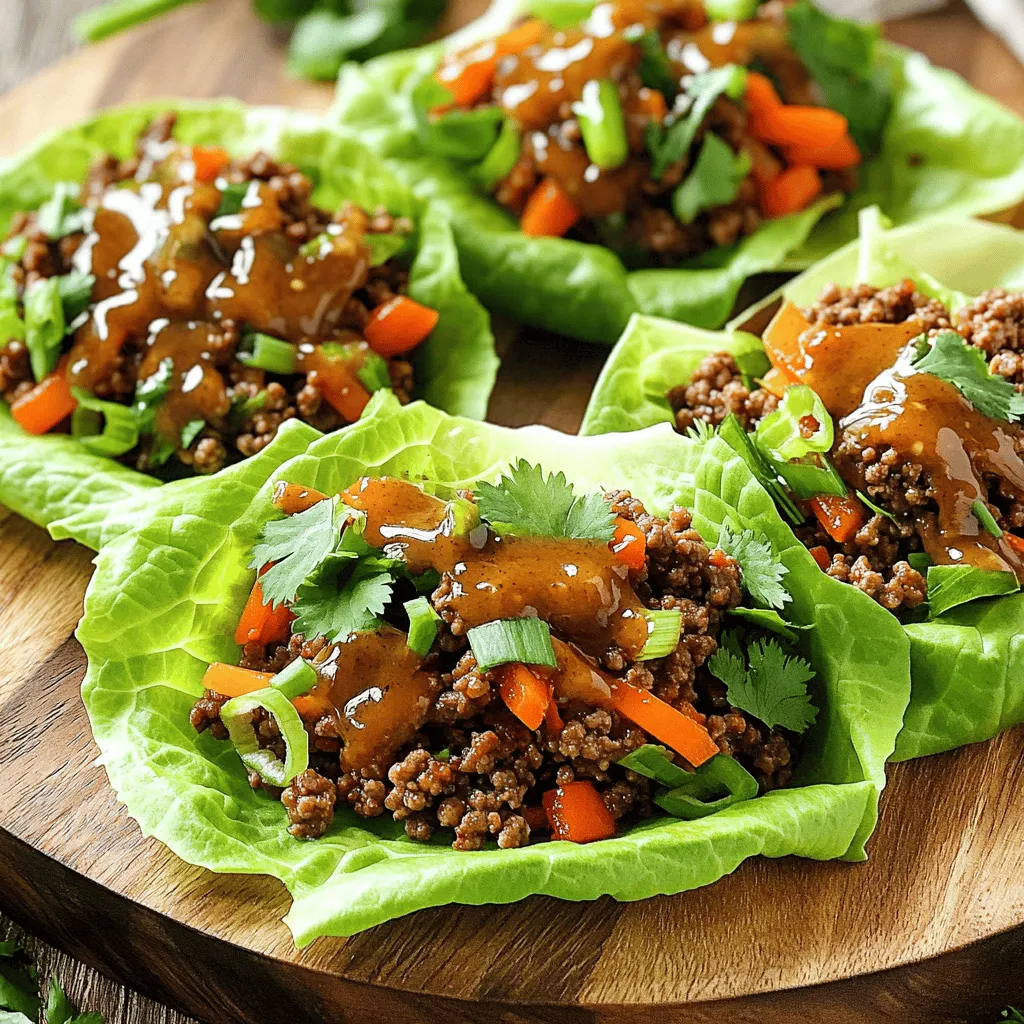
The main ingredients for my Minute Ginger Garlic Beef Lettuce Wraps feature ground beef, ginger, and garlic. I love using lean beef as it keeps the dish light yet filling. Fresh ginger and garlic add a burst of flavor, making each bite delightful.
For vegetables, I recommend using a bell pepper, either red or yellow. This choice adds sweetness and colors the dish beautifully. Grated carrots bring a nice crunch and a bit of sweetness too. I also like to toss in chopped green onions for extra flavor and texture.
To finish, I combine simple seasonings. Honey or maple syrup balances the saltiness of soy sauce. A splash of rice vinegar adds a light tang. If you want, fresh cilantro leaves make a lovely garnish, adding a pop of color and freshness.
Step-by-Step Instructions
Preparing the Ingredients
– Mince 1 tablespoon of ginger and 4 cloves of garlic.
– Dice 1 bell pepper and grate 1 carrot.
Start by prepping your ingredients. This step keeps your cooking smooth and fun. Fresh ginger and garlic bring strong flavors that make this dish shine. Choose a red or yellow bell pepper for sweetness. Grating the carrot makes it blend well with the beef.
Cooking the Beef Mixture
– Sauté ginger and garlic in 1 tablespoon of sesame oil.
– Brown 1 lb of ground beef.
Heat your skillet on medium-high. Add the sesame oil, then toss in the minced ginger and garlic. Sauté for about 30 seconds. This step releases their aroma. Next, add the ground beef. Break it apart with a spoon. Cook until it is brown and no longer pink, about 5 to 7 minutes.
Combining Ingredients
– Add the diced bell pepper and grated carrot.
– Mix in the sauce and cook.
Once the beef is ready, add the bell pepper and carrot. Cook for another 3 to 4 minutes so they soften up. In a small bowl, mix 2 teaspoons of soy sauce, 1 tablespoon of honey or maple syrup, and 1 tablespoon of rice vinegar. Pour this sauce over the beef mixture. Stir well and let it cook for 1 to 2 minutes. Everything should be well-coated and flavorful.
Tips & Tricks
Cooking Tips
To make your ginger and garlic shine, heat the sesame oil first. Add minced ginger and garlic once the oil is hot. Sauté them for about 30 seconds. You want them fragrant but not burnt. This step brings out their full flavors.
For beef, you want even cooking. Use a spatula to break it apart as it cooks. Stir it well to prevent clumps. Cook until the beef is brown and no longer pink. This usually takes about 5-7 minutes.
Presentation Tips
For a great look, serve the wraps on a large platter. Place the beef mixture in the center. This way, guests can refill their wraps easily. Garnish the platter with extra green onions and cilantro. It adds color and freshness to the dish.
Customization Ideas
Want to mix things up? Add extra veggies like mushrooms, zucchini, or snap peas. You can also add spices like chili flakes for heat. If you want a protein swap, try ground turkey, chicken, or tofu. These options work well and keep the dish tasty.

Variations
Ingredient Swaps
You can make this dish fit your needs. If you want it gluten-free, use tamari instead of soy sauce. For a dairy-free option, you can skip dairy altogether. Instead of honey, try maple syrup for sweetness. Both options taste great!
Flavor Additions
Want to spice things up? Add chili flakes for heat, or five-spice powder for a unique twist. You can also experiment with sauces. Try hoisin or teriyaki for a new flavor profile. Each sauce brings its own taste, making your wraps exciting.
Serving Styles
You can serve these wraps in many ways. The traditional way is to fill lettuce leaves. But you can also make it a bowl. Just place the beef mixture over rice or quinoa. This way, it’s easy to customize each serving. Try both styles for fun!
Storage Info
Storing Leftovers
To store leftovers, let the beef mixture cool first. Place it in an airtight container. Keep it in the fridge for up to three days. This method keeps the flavor fresh and safe to eat.
Reheating Instructions
When reheating, do it gently. Use a skillet on low heat. This helps keep the beef soft. Avoid using the microwave, as it can make the beef tough. For the lettuce, heat the beef and serve it fresh on the leaves. This way, the wraps stay crunchy and tasty.
Freezing Recommendations
You can freeze the beef mixture for later use. Just let it cool, then place it in a freezer-safe bag. Squeeze out the air to prevent freezer burn. It can last for up to three months. To defrost, place the bag in the fridge overnight or use the microwave. Reheat it in a skillet before serving. Enjoy your wraps fresh!
FAQs
How long do Minute Ginger Garlic Beef Lettuce Wraps take to prepare?
These wraps are quick and easy! The total time needed is about 20 minutes. You spend around 10 minutes prepping the ingredients. Cooking the beef and veggies takes about 10 minutes. This means you can have a delicious meal ready in no time.
Can I make these wraps ahead of time?
Yes, you can prepare some parts in advance. You can chop the veggies and store them in the fridge. You can also cook the beef mixture ahead. Just keep it in an airtight container. When you’re ready to serve, just reheat it and assemble your wraps.
What kinds of lettuce should I use for wraps?
You have a few great options for lettuce. Butter lettuce is soft and easy to fold. Romaine is crunchy and holds the filling well. Both types work great for wraps. Choose what you like best for a tasty bite!
In this blog post, I shared a simple recipe for Minute Ginger Garlic Beef Lettuce Wraps. We covered the main ingredients like ground beef, ginger, and bell peppers. I provided step-by-step instructions for preparation and cooking, along with tips for presentation and customization.
To make this dish your own, remember to experiment with different flavors and veggies. Whether you enjoy it fresh or as leftovers, you’ll find this recipe easy to make. Embrace the joy of cooking and enjoy your flavorful wraps!


