No Bake Oatmeal Cookie Bars Easy and Delicious Treat
. You learned about tasty no-bake oatmeal cookie bars. We covered the key ingredients and step-by-step instructions for making them. You now know tips for perfect texture and options for variations and storage. These bars are easy to customize. They are healthy snacks that you can enjoy anytime. Keep exploring your flavors and share these bars with friends and family. Enjoy your cooking adventure!](https://dailydishly.com/wp-content/uploads/2025/07/f09ca3d9-767d-43d9-b263-9e4a23fd83a9.webp)
Are you craving a sweet treat that’s both easy and fun to make? You’ll love these No Bake Oatmeal Cookie Bars! Made with simple ingredients, like oats, peanut butter, and honey, these bars come together quickly without turning on the oven. Plus, you can customize them to fit your taste! Dive into this guide, and discover how to whip up this delicious snack in no time. Let’s get started!
Ingredients
Essential Ingredients
– 2 cups rolled oats
– 1 cup natural peanut butter
– 1/2 cup honey or maple syrup
Additional Ingredients
– 1/2 cup almond flour
– 1/4 cup mini chocolate chips
– 1/4 cup shredded coconut (unsweetened)
– 1 teaspoon vanilla extract
– 1/2 teaspoon sea salt
Optional ingredients for customization
– A sprinkle of cinnamon
In this recipe, rolled oats are the star. They give the bars a chewy texture. Natural peanut butter adds creaminess and protein. Honey or maple syrup sweetens the mix while acting as a binder.
Almond flour enhances the bars with healthy fats and a nice crunch. Mini chocolate chips bring sweetness and fun. Shredded coconut adds a tropical twist. Vanilla extract boosts the flavor, while sea salt balances the sweetness.
For a personal touch, sprinkle cinnamon on top. It adds warmth and spice. You can swap ingredients to fit your taste. Use almond or sunflower butter instead of peanut butter.
These ingredients come together quickly. You can have a tasty treat ready in no time.
Step-by-Step Instructions
Preparation of Dry Ingredients
Start by gathering your dry ingredients. In a large mixing bowl, combine:
– 2 cups rolled oats
– 1/2 cup almond flour
– 1/4 cup shredded coconut
Mix them well to ensure they blend together. This creates a solid base for your bars.
Preparation of Wet Ingredients
Next, it’s time for the wet ingredients. In a separate microwave-safe bowl, gently warm:
– 1 cup natural peanut butter
– 1/2 cup honey or maple syrup
Heat them in the microwave for about 30 seconds. Stir in:
– 1 teaspoon vanilla extract
– 1/2 teaspoon sea salt
Mix until everything is smooth and well combined. This step will add flavor and sweetness.
Combining Wet and Dry Ingredients
Now, pour the warm peanut butter mixture over the dry ingredients. Use a spatula to mix everything together. Make sure to blend well until fully combined.
Then, add in:
– 1/4 cup mini chocolate chips
Gently fold them into the mixture. This ensures the chocolate chips are evenly distributed throughout.
Tips & Tricks
Perfecting the Texture
To get the best texture in your no bake oatmeal cookie bars, combine the ingredients well. If the mix isn’t unified, the bars may fall apart. Use your spatula to fold everything together gently. It helps to press the mixture firmly into the baking dish. This step ensures the bars hold their shape once set.
For setting time, chill the bars for at least 2 hours. This time allows them to firm up nicely. If you want a more sturdy bar, let them chill longer. The longer they chill, the more perfect they become.
Presentation Tips
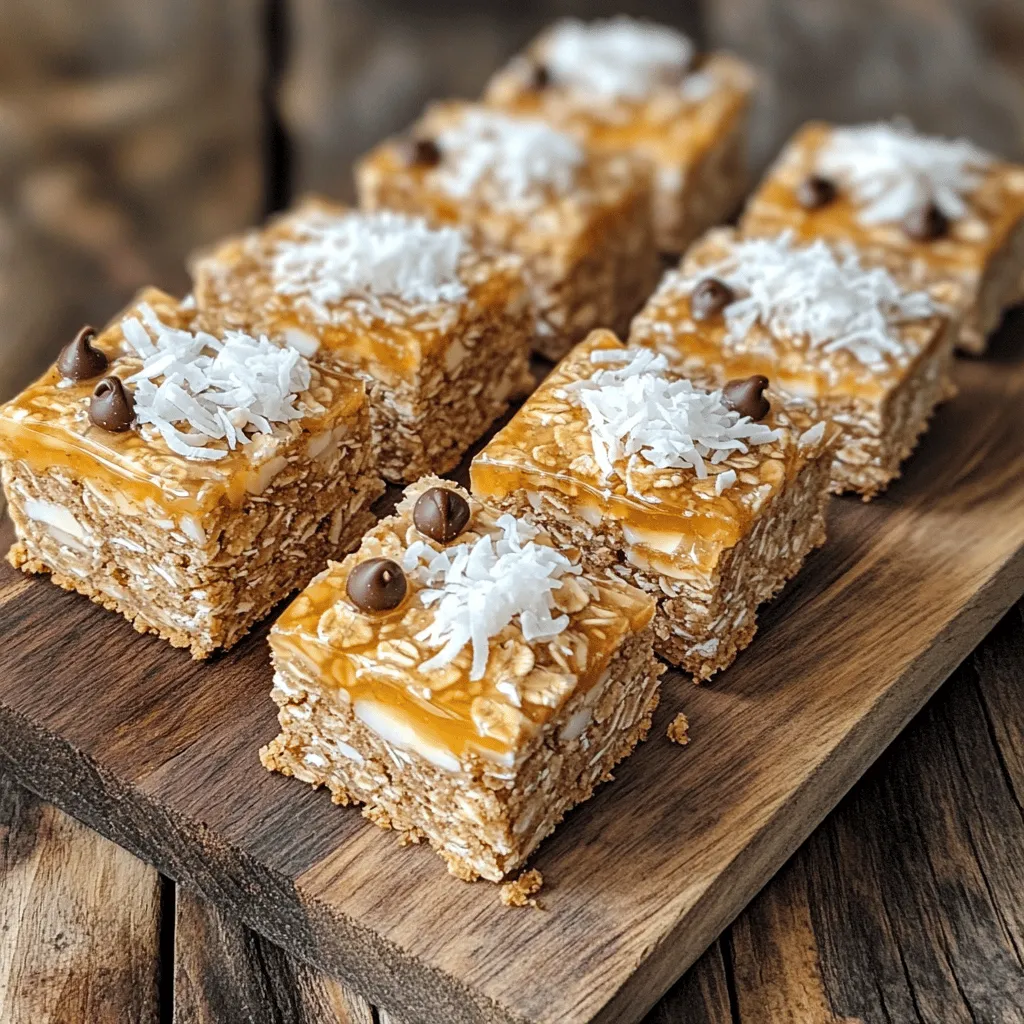
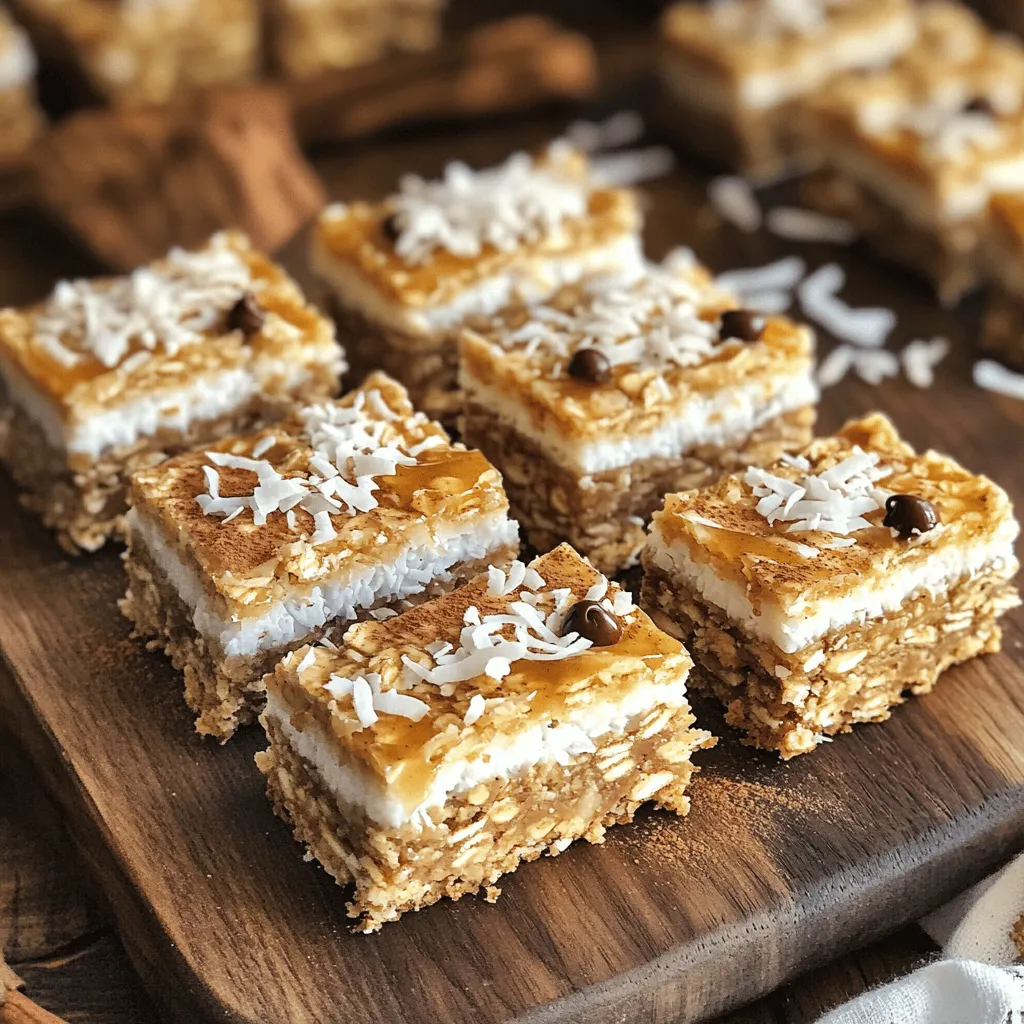
When serving, arrange the bars on a rustic wooden board. You can sprinkle some shredded coconut on top for extra flair. For a fun gift idea, wrap the bars in clear cellophane. Then, add a decorative ribbon to make them look special.
If you want to serve them at a party, slice them into smaller squares. Guests will love the bite-sized treats. Plus, they are easy to grab and enjoy!

Variations
Flavor Combinations
You can change the flavor of your no bake oatmeal cookie bars easily. For example, substitute peanut butter with almond or sunflower butter. Each option adds a unique taste. Almond butter gives a nutty twist, while sunflower butter is great for nut-free diets.
Add-ins for Extra Flavor
Adding extras makes these bars even better. You can mix in dried fruits like raisins, cranberries, or apricots. Nuts also add crunch. Try walnuts, almonds, or pecans. Seeds like chia or flaxseed are great for added nutrition.
Dietary Modifications
If you need gluten-free options, use gluten-free oats. They work just as well in this recipe. You can also choose maple syrup instead of honey to make these bars vegan-friendly. This way, everyone can enjoy your no bake treats!
Storage Info
Best Storage Practices
To keep your no-bake oatmeal cookie bars fresh, store them in an airtight container. This helps maintain their flavor and texture. I find that a glass container works best, but plastic is fine too.
For storage location, the fridge is ideal. It keeps the bars cool and firm. If you prefer, you can also store them at room temperature. Just make sure they are in a cool, dry place.
The shelf life of these bars is about one week in the fridge. If you want them to last longer, freezing is a great option.
Freezing Instructions
To freeze your bars, first cut them into pieces. Then, wrap each piece in plastic wrap. Place them in a freezer-safe bag or container. This way, you can grab a bar whenever you want!
When you’re ready to eat, just take a bar out and let it thaw for a few minutes. Enjoy a tasty snack anytime!
FAQs
Can I use quick oats instead of rolled oats?
Yes, you can use quick oats. They will work, but the texture will change. Quick oats absorb more liquid and make the bars softer. Rolled oats give a chewier bite and hold the bars together better.
How long do the bars last?
These bars can last up to a week when stored in an airtight container. You can keep them in the fridge or at room temperature. The fridge keeps them firm and fresh longer.
Are these bars vegan-friendly?
Yes, these bars are vegan if you use maple syrup instead of honey. Both options are delicious, but maple syrup makes them fully plant-based.
Common concerns and tips
If you want to make a few changes, I have tips for you. If you don’t have honey, you can use agave syrup or brown rice syrup. Both will add sweetness and stickiness.
What can I substitute if I don’t have honey?
You can use maple syrup or agave syrup as a sweetener. Both are great substitutes. They work well in this recipe, keeping the bars sticky and sweet.
Can I make this recipe nut-free?
Yes, you can make it nut-free. Simply use sun butter instead of peanut butter. Sun butter has a similar texture and taste, making it a perfect replacement.
You learned about tasty no-bake oatmeal cookie bars. We covered the key ingredients and step-by-step instructions for making them. You now know tips for perfect texture and options for variations and storage.
These bars are easy to customize. They are healthy snacks that you can enjoy anytime. Keep exploring your flavors and share these bars with friends and family. Enjoy your cooking adventure!
. You learned about tasty no-bake oatmeal cookie bars. We covered the key ingredients and step-by-step instructions for making them. You now know tips for perfect texture and options for variations and storage. These bars are easy to customize. They are healthy snacks that you can enjoy anytime. Keep exploring your flavors and share these bars with friends and family. Enjoy your cooking adventure!](https://dailydishly.com/wp-content/uploads/2025/07/f09ca3d9-767d-43d9-b263-9e4a23fd83a9-300x300.webp)

![- 1 ½ cups all-purpose flour - 1 teaspoon baking powder - ½ teaspoon baking soda - ¼ teaspoon salt - ½ cup unsalted butter, softened - 1 cup granulated sugar - 2 large eggs - ½ cup plain yogurt - 2 tablespoons lemon zest (from about 2 lemons) - ¼ cup fresh lemon juice - 3 tablespoons poppy seeds - Optional: Glaze made from ½ cup powdered sugar and 2 tablespoons lemon juice When making Lemon Poppy Seed Bread, I find that using fresh ingredients makes the biggest difference. Fresh lemons give your bread a bright flavor. You want ripe lemons for zest and juice. Look for lemons that feel heavy for their size and have a smooth skin. These lemons are juicy and full of flavor. For yogurt, I prefer plain yogurt. It adds moisture and a slight tang. Greek yogurt works well too, but regular plain yogurt keeps the texture light. If you want to switch things up, consider using sour cream instead. It can give your bread a rich flavor. - Selecting ripe lemons for zest and juice: Look for heavy, smooth-skinned lemons. - The best type of yogurt to use: Use plain yogurt or sour cream for moisture. If you need gluten-free options, try using a gluten-free flour blend. Mix it with a bit of xanthan gum for texture. For a vegan version, substitute unsalted butter with coconut oil or a vegan butter. You can replace eggs with a mashed banana or unsweetened applesauce. This will still keep the bread moist and tasty. Let’s make cooking easier and more fun with these simple tips! If you want to dive deeper into the recipe, check out the Full Recipe for all the steps. 1. Preheat your oven to 350°F (175°C). Grease and flour a 9x5 inch loaf pan. This step helps the bread rise well and not stick. 2. In a medium bowl, whisk together the dry ingredients: flour, baking powder, baking soda, and salt. Set this mix aside for later. 3. In a large bowl, cream the softened butter and granulated sugar together. Use an electric mixer on medium speed for about 3 to 4 minutes. This makes the mixture light and fluffy. 4. Add the eggs one at a time, mixing well after each. This helps to blend everything smoothly. 5. Stir in the yogurt, lemon zest, and lemon juice until fully mixed. Each ingredient adds a burst of flavor to the bread. 6. Gradually add the dry ingredients to the wet mixture. Stir gently until just combined. Do not overmix; this keeps the bread soft. 7. Fold in the poppy seeds, being careful not to overmix again. They add a nice crunch and visual appeal. 1. Pour the batter into the prepared loaf pan. Smooth out the top with a spatula to ensure even baking. 2. Bake in the oven for about 55 to 60 minutes. Check if it's done by inserting a toothpick into the center. If it comes out clean, your bread is ready! 1. Let the bread cool in the pan for about 10 minutes. This makes it easier to remove without breaking. 2. Transfer it to a wire rack to cool completely. This prevents sogginess and keeps the crust nice. 3. Slice the bread and serve it on a platter. If you like, drizzle the optional glaze over the top. Garnish with thin lemon slices and a sprinkle of poppy seeds for a beautiful finish. For the complete recipe, refer to the [Full Recipe]. Enjoy your baking! To bake the best Lemon Poppy Seed Bread, avoid common mistakes. First, do not skip the baking powder or baking soda. They help the bread rise and stay fluffy. Mix the dry and wet ingredients gently. Overmixing can make the bread tough. Make sure your butter is softened, not melted. This helps create the right texture. A beautiful presentation makes your bread shine. Slice the bread and arrange it on a nice platter. Drizzle a glaze on top for extra flair. You can make the glaze by mixing powdered sugar and lemon juice. Garnish with thin lemon slices and a sprinkle of poppy seeds. This adds color and makes it look fancy. Want a stronger lemon flavor? Use lemon extract in addition to fresh juice. This boosts the citrus taste. You can also add mix-ins like chopped nuts or dried fruit. These add texture and flavor. Feel free to explore your own ideas to customize your bread! For the full recipe, check out the complete guide. {{image_2}} To make gluten-free lemon poppy seed bread, start with a good flour blend. Look for blends that contain rice flour, almond flour, or tapioca starch. These work well in most recipes. You may need to adjust the liquid in your recipe. Gluten-free flours often absorb more moisture. So, add a little extra yogurt or lemon juice if needed. For a vegan version, swap out the eggs and butter. Use flaxseed meal mixed with water as an egg substitute. One tablespoon of flaxseed meal mixed with three tablespoons of water equals one egg. For butter, use coconut oil or a vegan alternative. This keeps your bread moist and tasty. To maintain the batter's texture, ensure you mix well, so it remains light and fluffy. You can add nuts or dried fruits for extra flavor. Walnuts or almonds give a nice crunch. Dried cranberries or blueberries add sweetness. If you want more citrus, try adding orange or lime zest. This will brighten the flavor of the bread. You can even mix different citrus fruits for a unique twist. Don't hesitate to experiment, and see what flavors you love best! To keep your Lemon Poppy Seed Bread fresh, you have two main options: room temperature and refrigeration. Storing it at room temperature is best if you plan to eat it within a few days. Place the bread in an airtight container. This keeps it soft and moist. If you want to store it longer, refrigeration works too. Just know that it may dry out a bit. Using airtight containers is key. They block air and moisture. This helps prevent your bread from going stale. If you choose to refrigerate it, wrap the bread tightly in plastic wrap first. Then, place it in the container. This double layer helps keep the bread fresh. Freezing is a great way to save your Lemon Poppy Seed Bread for later. To freeze it, let the bread cool completely first. Once cool, slice it into pieces if you prefer. Wrap each slice in plastic wrap. Then, place the wrapped slices in a freezer-safe bag or container. This method saves space and makes it easy to grab a slice when you want one. When you’re ready to enjoy it, thaw the bread in the fridge overnight. If you want it warm, you can reheat it in the oven. Preheat the oven to 350°F (175°C) and bake for about 10 to 15 minutes. This brings back its fresh-from-the-oven taste. For optimal flavor and freshness, Lemon Poppy Seed Bread lasts about 3 to 4 days at room temperature. If refrigerated, it can last up to a week. However, freezing extends its shelf life to about 2 to 3 months. Keep an eye out for signs of spoilage. If you see mold or if the bread smells off, it's time to toss it. Freshness is key to enjoying this delightful bread. Always trust your senses! Lemon poppy seed bread stays fresh for about 3 to 5 days at room temperature. To keep it fresh longer, store it in an airtight container. You can also wrap it tightly in plastic wrap or foil. This helps block out air and moisture. If you want to enjoy it later, freeze it for up to three months. Yes, you can make this bread ahead of time. Bake it and let it cool completely. Then, wrap it tightly and store it in the fridge for up to a week. For longer storage, freeze it. Just remember to slice it before freezing. This makes it easy to grab a slice whenever you want. Lemon poppy seed bread pairs well with many items. For breakfast, try it with fresh fruit or yogurt. You can also enjoy it with coffee or tea. For dessert, a scoop of vanilla ice cream or a dollop of whipped cream adds a nice touch. You can even drizzle some honey or jam on top for extra flavor. Absolutely! To make mini loaves, use small loaf pans. Adjust the baking time to about 30 to 40 minutes. Check for doneness with a toothpick. It should come out clean when the bread is done. This way, you can share or gift smaller portions easily. In this blog post, we've covered everything about Lemon Poppy Seed Bread. You learned the full list of ingredients and tips for choosing fresh ones. You also found step-by-step instructions for baking, plus tips and tricks for perfect results. Variations like gluten-free and vegan options were discussed, along with storage tips to keep your bread fresh. Enjoy making this tasty loaf that gives you bright flavors. With these ideas, you can bake with confidence and impress anyone who tries your bread. Happy baking!](https://dailydishly.com/wp-content/uploads/2025/06/d333cd57-b5c0-4704-bdd2-e8fc2d1dc8a6-768x768.webp)


