No-Bake Samoa Cookie Bars Simple and Delicious Treat

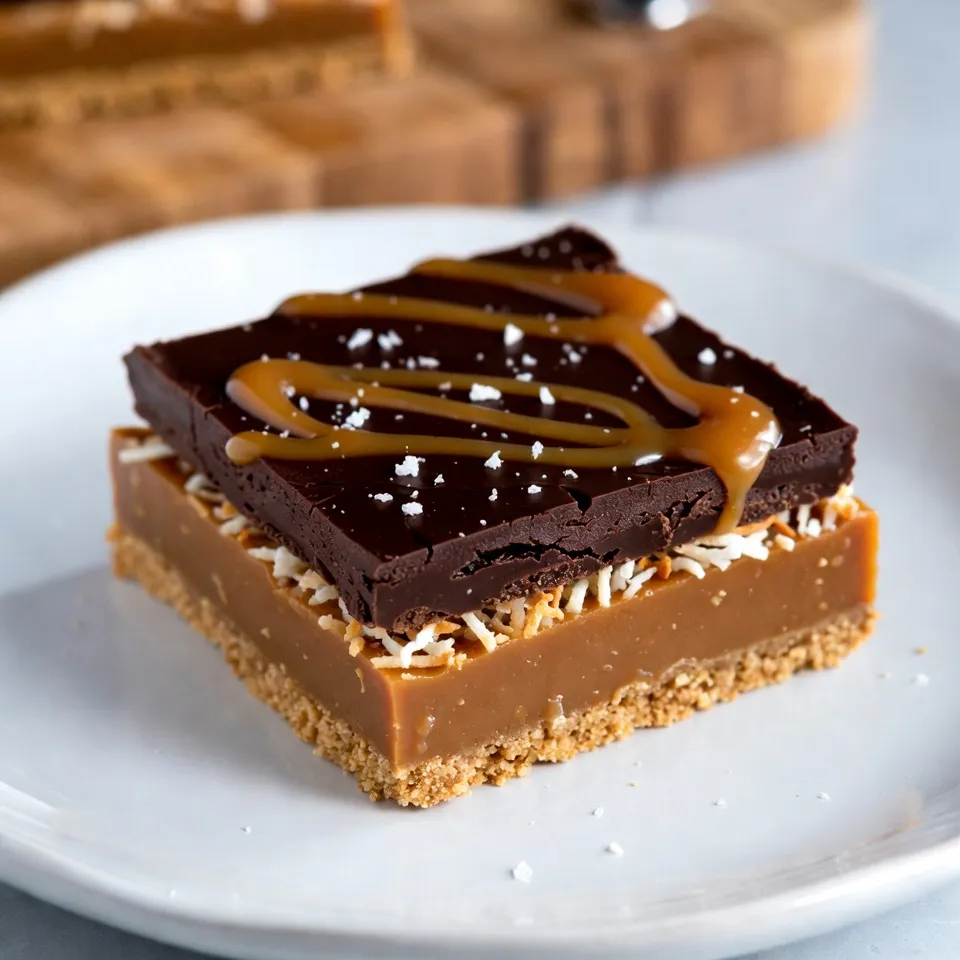
If you crave a sweet treat that’s easy to make, then you’ll love these No-Bake Samoa Cookie Bars! With simple ingredients like graham crackers and chocolate, these bars bring the taste of Samoa cookies right to your kitchen. You don’t need an oven to create this delicious dessert. Get ready to impress your friends and family with these rich, chocolatey bars that are perfect for any occasion!
Why I Love This Recipe
- Decadent Flavor: These Samoa cookie bars combine rich chocolate, creamy caramel, and toasted coconut, creating a taste sensation that’s hard to resist.
- No-Bake Convenience: This recipe requires no baking, making it perfect for hot days or when you need a quick and easy dessert.
- Perfect for Sharing: With 16 generous bars, they are great for parties, gatherings, or just sharing with friends and family.
- Customizable: Feel free to add your own twist by mixing in nuts or using different types of chocolate for a unique flavor profile.
Ingredients
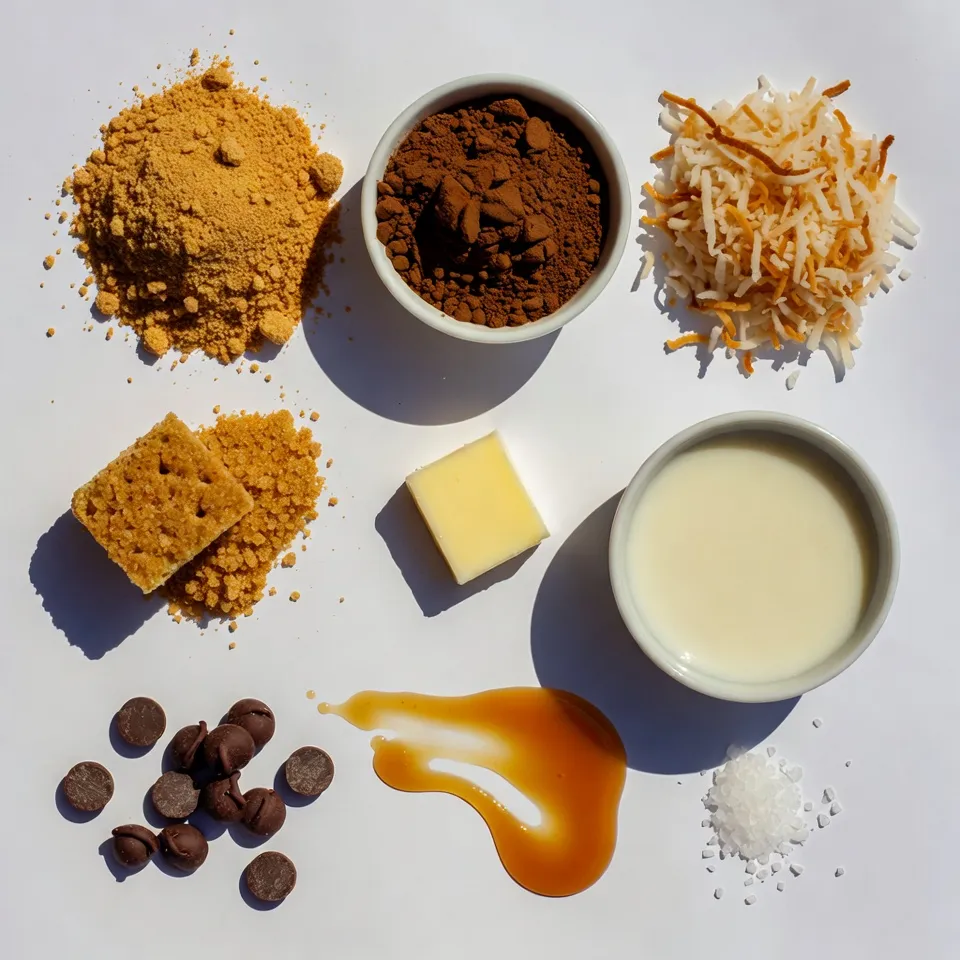
Here are the simple ingredients you need for no-bake Samoa cookie bars. Each one plays a key role in flavor and texture.
– 1 ½ cups graham cracker crumbs
– ½ cup unsweetened cocoa powder
– ½ cup unsweetened shredded coconut, toasted
– ½ cup brown sugar, packed
– ½ cup unsalted butter, melted
– 1 cup sweetened condensed milk
– 1 cup semi-sweet chocolate chips
– ¼ cup caramel sauce
– 1 teaspoon vanilla extract
– Sea salt for garnish
Each ingredient adds something special. The graham cracker crumbs give a great base. Cocoa powder adds rich flavor. Shredded coconut brings a chewy texture. Brown sugar adds sweetness. Melted butter helps everything stick together.
Sweetened condensed milk makes the filling creamy. Chocolate chips provide a delicious topping. Caramel sauce adds a sweet twist. Lastly, a sprinkle of sea salt enhances all the flavors.
With these ingredients, you can create a treat that tastes like a cookie without baking!

Step-by-Step Instructions
Preparing the Base
First, gather your ingredients. In a large bowl, mix together graham cracker crumbs, cocoa powder, toasted coconut, brown sugar, and melted butter. Stir until you see a wet sand texture. This mixture will form the base of your bars. Make sure everything is well combined for the best flavor.
Forming the Crust
Next, take an 8×8-inch baking dish. Line it with parchment paper, leaving extra paper on the sides. This makes it easier to lift the bars out later. Now, press the crumb mixture firmly into the bottom of the dish. Ensure it’s even to create a strong crust.
Creating the Filling
In a new bowl, combine sweetened condensed milk, caramel sauce, and vanilla extract. Mix until smooth. This creamy filling adds a sweet layer. For more coconut flavor, add a bit more toasted coconut. Stir it in gently.
Layering the Filling
Pour the caramel coconut mixture over the crust. Use a spatula to spread it evenly. This layer should cover the crust completely. Take your time to make it look nice.
Melting the Chocolate
Grab a microwave-safe bowl for the chocolate chips. Heat them in the microwave in 30-second bursts. Stir after each time until the chocolate is smooth. This melted chocolate will top off your bars perfectly.
Topping with Chocolate
Now, pour the melted chocolate over the caramel layer. Use your spatula to spread it evenly. If you like, drizzle some extra caramel on top for a nice look. It adds a sweet touch, too.
Chilling and Serving
Let the bars sit at room temperature for about 10 minutes. Then, move them to the fridge for at least 2 hours. This time helps them set properly. Once firm, lift them out using the parchment paper. Cut them into squares and sprinkle a pinch of sea salt on top before serving. Enjoy your delicious no-bake Samoa cookie bars!
Tips & Tricks
Perfecting the Chocolate Layer
To get a smooth chocolate layer, melt your chips carefully. Use a microwave-safe bowl. Heat in 30-second bursts. Stir after each interval until the chocolate is fully melted. This method keeps the chocolate from burning. Pour the melted chocolate over your filling. Spread it evenly with a spatula. If you want a fancy touch, drizzle extra caramel on top. It adds a nice look and flavor.
Customizing Coconut Flavor
For a stronger coconut taste, use more toasted coconut in the filling. I suggest adding an extra ¼ cup to the mixture. You can also use coconut extract instead of vanilla. Just a teaspoon will enhance the coconut flavor. This tweak gives your bars an extra tropical twist. Experiment with different types of coconut, such as sweetened or flaked.
Storing Leftover Bars
To keep your Samoa cookie bars fresh, store them in an airtight container. Place a piece of parchment paper between layers to prevent sticking. They will stay good in the fridge for up to a week. If you want to keep them longer, consider freezing them. Cut them into squares before freezing. This way, you can grab just what you need later.
Pro Tips
- Use Fresh Ingredients: Always use fresh and high-quality ingredients for the best flavor, especially in the caramel and chocolate layers.
- Toast the Coconut: Toasting the shredded coconut enhances its flavor and adds a lovely crunch to the bars.
- Chill Thoroughly: Make sure to chill the bars for at least 2 hours to allow them to set properly, making them easier to cut.
- Customize Toppings: Feel free to get creative with toppings—try adding chopped nuts or a sprinkle of flaky sea salt for an extra touch.

Variations
Adding Nuts for Extra Crunch
You can add nuts to your No-Bake Samoa Cookie Bars for a fun twist. Walnuts or pecans work well in this recipe. Chop them finely and mix them in with the crust. This adds a nice crunch and a rich flavor. You can also sprinkle them on top before chilling the bars. This gives your dessert a great look and taste.
Gluten-Free Substitute Options
If you need a gluten-free option, use gluten-free graham cracker crumbs. Many brands offer these now. You can also use almond flour as a base. This keeps the bars tasty while meeting your dietary needs. Just make sure to check the labels to ensure all ingredients are gluten-free.
Alternative Toppings
There are many fun toppings you can try. Instead of chocolate, you can use white chocolate for a sweeter taste. Drizzling more caramel on top adds extra flavor and a beautiful finish. You might even sprinkle some sea salt for a sweet and salty mix. These changes help you customize your bars to fit your taste buds perfectly.
Storage Info
Best Storage Practices
To keep your No-Bake Samoa Cookie Bars fresh, store them in an airtight container. Place parchment paper between layers to avoid sticking. Keep them in the refrigerator for best taste and texture. They stay firm and tasty this way.
Freezing for Longer Shelf Life
You can freeze these bars for up to three months. Cut them into squares first. Wrap each piece in plastic wrap, then place them in a freezer bag. To enjoy, thaw them in the fridge overnight. They will taste just as good!
Reheating Tips
These bars are best served cold, so you don’t need to reheat them. If you want a warm treat, try melting a bit of chocolate to drizzle on top. This small change gives a fresh twist to the bars without losing their charm.
FAQs
Can I use another type of cookie crumb?
Yes, you can! Try using crushed Oreos, vanilla wafers, or even shortbread cookies. Each type adds a unique flavor and texture. Just remember to adjust the sugar if your cookies are sweet.
How long do the bars last in the fridge?
These bars can last up to one week in the fridge when stored in an airtight container. To keep them fresh, make sure they are well covered.
Can I make this recipe vegan?
Absolutely! Use vegan butter and replace the sweetened condensed milk with coconut cream or a store-bought vegan alternative. You can find vegan chocolate chips too.
What is the best way to cut no-bake bars?
To cut the bars, use a sharp knife. Dip it in hot water and dry it off before slicing. This method helps create clean cuts.
How can I make these bars more chocolatey?
To boost the chocolate flavor, try adding more chocolate chips to the filling. You can also drizzle extra melted chocolate on top before chilling.
You learned how to make delicious no-bake chocolate coconut bars using simple ingredients. We covered the steps, tips, and variations to help you succeed. Remember, you can customize these bars to fit your taste. Store them properly to enjoy later, and try the FAQs if you have questions. Now, it’s time to gather your ingredients and start creating something sweet. Enjoy your tasty treat

No-Bake Samoa Cookie Bars
Ingredients
- 1.5 cups graham cracker crumbs
- 0.5 cups unsweetened cocoa powder
- 0.5 cups unsweetened shredded coconut, toasted
- 0.5 cups brown sugar, packed
- 0.5 cups unsalted butter, melted
- 1 cups sweetened condensed milk
- 1 cups semi-sweet chocolate chips
- 0.25 cups caramel sauce
- 1 teaspoon vanilla extract
- for garnish sea salt
Instructions
- Prepare the Base: In a large mixing bowl, combine the graham cracker crumbs, cocoa powder, toasted shredded coconut, brown sugar, and melted butter. Mix until everything is fully combined and resembles wet sand.
- Form the Crust: Line an 8x8-inch baking dish with parchment paper, leaving some overhang for easy removal. Press the crumb mixture evenly into the bottom of the prepared dish to form a firm crust.
- Create the Filling: In a separate bowl, mix the sweetened condensed milk, caramel sauce, and vanilla extract until smooth. Stir in a little more toasted shredded coconut, about ¼ cup, for an extra coconut flavor.
- Layer the Filling: Pour the caramel coconut mixture over the graham cracker crust, spreading it evenly with a spatula.
- Melt the Chocolate: In a microwave-safe bowl, melt the semi-sweet chocolate chips in 30-second intervals, stirring in between until smooth.
- Top with Chocolate: Pour the melted chocolate over the caramel layer, spreading it evenly with a spatula. Optional: drizzle a bit of extra caramel over the chocolate for decoration.
- Chill: Allow the bars to sit at room temperature for about 10 minutes, then place them in the refrigerator for at least 2 hours or until they are set.
- Serve: Once set, lift the bars out of the dish using the parchment paper overhang. Cut into squares and sprinkle with a pinch of sea salt before serving.


![- 4 slices of thick bread (brioche or challah) - 2 large eggs - 1/2 cup milk - 1 teaspoon vanilla extract - 1 teaspoon ground cinnamon - 1 tablespoon granulated sugar - Additional mixture (1 tablespoon sugar and 1/2 teaspoon cinnamon) - 1 tablespoon unsalted butter (for frying) - Maple syrup or honey for serving The key to great Cinnamon Sugar French Toast Sticks lies in the ingredients. Start with thick slices of bread like brioche or challah. These breads soak up the egg mixture well. For the egg mix, use large eggs, milk, and vanilla extract. This mix adds richness and flavor. Next, you need cinnamon and sugar. Ground cinnamon brings warmth and spice, while granulated sugar adds sweetness. You will want an extra mix of sugar and cinnamon for coating later. This makes them irresistible. Don't forget the butter! A tablespoon of unsalted butter helps fry the sticks. It gives them a nice golden color and flavor. The dish pairs perfectly with maple syrup or honey for dipping. With these ingredients, you can make a delightful breakfast or snack that everyone will love. Check out the Full Recipe for all the details! In a shallow bowl, whisk together the eggs, milk, vanilla, cinnamon, and sugar. This mix is key. It gives the French toast sticks their rich flavor. Make sure the ingredients blend well. You want a smooth mixture. This will coat the bread perfectly. Next, slice the bread into sticks. Aim for 1-inch wide pieces. This size helps them cook evenly. Using thick bread, like brioche or challah, adds great taste. Uniform sticks ensure that every bite is just as tasty as the last. Now, dip each stick into the egg mixture. Make sure they get fully coated. Let any extra liquid drip off before cooking. Heat a non-stick skillet over medium heat. Add butter and let it melt. Once the pan is ready, place the sticks in without crowding. Cook for about 2-3 minutes on each side. You want them golden brown and a bit crispy. After cooking, mix some sugar and cinnamon in a bowl. While the sticks are warm, roll them in this mix. The cinnamon sugar coating makes them delightful! For more details, you can refer to the [Full Recipe]. The best bread makes a big difference. I love using thick bread like brioche or challah. These types add a soft texture and sweet flavor. They soak up the egg mixture well and stay soft inside. You can also try Texas toast for a nice change. Look for bread that isn't too fresh. Day-old bread works best. It holds up better while cooking. To get perfect golden-brown sticks, use medium heat. If the heat is too high, they might burn. Keep an eye on them while cooking. Flip them carefully with a spatula. Cook for about 2-3 minutes on each side. The goal is a crispy outside and soft center. If they are browning too fast, lower the heat. This way, you get that nice, even color. You can serve these sticks in many fun ways! Maple syrup or honey make great dips. They add sweetness and flavor. You can also add fresh fruit like strawberries or bananas on the side. For extra flair, sprinkle some whipped cream on top. If you're feeling adventurous, try a chocolate sauce for dipping. It makes a tasty treat! {{image_2}} You can add chocolate chips or fruit to the egg mixture. This twist makes your French toast sticks even more fun. Just fold in small amounts of your favorite fruit, like berries or bananas, before dipping the bread. For chocolate lovers, sprinkle in some mini chocolate chips. These additions bring sweetness and texture to each bite. Switching to brown sugar or flavored syrups can change the flavor profile. Brown sugar adds a rich, caramel taste that pairs well with cinnamon. You can also try flavored syrups, like maple or vanilla, for a unique touch. Drizzle these on or serve them for dipping. Each option offers a new twist on this classic dish. You can easily make this dish plant-based by swapping out eggs and milk. Use a mixture of flaxseed meal and water instead of eggs. For milk, try almond, soy, or oat milk. These substitutes maintain the creaminess and flavor you want. This way, everyone can enjoy cinnamon sugar French toast sticks, regardless of their diet. For the full recipe, check the main article. To keep leftover cinnamon sugar French toast sticks fresh, follow these steps: - Cool the sticks: Let them cool to room temperature. - Use an airtight container: Place the sticks in a container with a tight lid. - Refrigerate: Store them in the fridge for up to three days. - Freeze for longer storage: For freezing, wrap each stick in plastic wrap and place them in a freezer bag. To enjoy the sticks again, reheating is key: - Oven method: Preheat your oven to 350°F (175°C). Place the sticks on a baking sheet and heat for about 10 minutes. This keeps them crispy. - Skillet method: Heat a non-stick skillet over medium heat. Add a small amount of butter, then place the sticks in the pan. Cook for 2-3 minutes on each side. Knowing how long your cinnamon sugar French toast sticks last is important: - In the fridge: They stay fresh for about three days. - In the freezer: They can last for up to three months. When ready to eat, thaw in the fridge overnight before reheating. By following these storage tips, you can savor every bite of your delicious cinnamon sugar French toast sticks. For the full recipe, refer to the earlier sections. Yes, you can prepare them in advance. Make the egg mixture and cut the bread into sticks. Store them in an airtight container in the fridge for a few hours. You can also cook them, then keep them warm in the oven at low heat. This way, you save time and still enjoy a tasty breakfast. If you need alternatives, try using gluten-free bread or low-carb options like cloud bread. You can also use slices of banana or even zucchini for a unique twist. These options still give you a fun shape and taste great with cinnamon sugar! To keep the sticks crisp, don't soak them too long in the egg mixture. Just a quick dip works wonders. Make sure your pan is hot enough before cooking. This helps to seal the outside quickly, keeping the inside soft but not soggy. Enjoy your delicious Cinnamon Sugar French Toast Sticks! In this blog post, we covered how to make delicious Cinnamon Sugar French Toast Sticks. You learned about the key ingredients, step-by-step cooking instructions, and helpful tips for the best results. I also shared fun variations and storage techniques to keep your leftovers fresh. Enjoying these treats at breakfast or brunch elevates your meal. Whether you customize the flavors or pick the right bread, your French toast will impress. Try it out and make each bite count.](https://dailydishly.com/wp-content/uploads/2025/07/664e1dd1-150a-4660-86e6-505ad35a42cc-768x768.webp)

