One Pan Honey Garlic Chicken Quick and Yummy Meal
![One Pan Honey Garlic Chicken is a simple dish that packs a big flavor punch. It combines juicy chicken thighs with sweet honey and rich garlic. The colorful veggies add crunch and nutrition. This dish is quick to make and perfect for busy nights. You can find the Full Recipe at the end. - 4 boneless, skinless chicken thighs - 3 tablespoons honey - 3 tablespoons soy sauce - 4 cloves garlic, minced - 1 tablespoon fresh ginger, grated - 2 tablespoons olive oil - 1 teaspoon sesame oil - 1 red bell pepper, sliced - 1 green bell pepper, sliced - 1 cup snap peas - Salt and pepper to taste - Sesame seeds for garnish - Chopped green onions for garnish To make this recipe, you need a few basic tools: - A large skillet for cooking - A mixing bowl for marinating - A cutting board and knife for chopping - A measuring spoon for accuracy - A meat thermometer to check chicken doneness With these ingredients and tools, you can create a meal that delights your taste buds and impresses your friends and family! To start, you need to marinate the chicken. In a bowl, mix honey, soy sauce, minced garlic, and grated ginger. This mix gives the chicken a sweet and savory taste. Take your chicken thighs and add them to the bowl. Make sure they are well coated. Let the chicken marinate for at least 20 minutes. This step helps the flavors soak in. Next, it’s time to prepare the pan. Heat olive oil and sesame oil in a large skillet. Set the heat to medium-high. The oils will help the chicken cook nicely and add flavor. Once the pan is hot, take the chicken out of the marinade. Reserve the marinade for later. Add the chicken thighs to the pan. Sear each side for about 5-6 minutes. You want them to be golden brown. After that, add the sliced red and green bell peppers and snap peas. Sauté the vegetables for 3-4 minutes. They should be tender but still crisp. Pour the reserved marinade over the chicken and vegetables in the skillet. Lower the heat to medium. Let it simmer for about 5 minutes. This will thicken the sauce a bit. Check the chicken’s internal temperature. It should reach 165°F (74°C). Don’t forget to season with salt and pepper to taste. Once done, remove from heat and let it rest for a couple of minutes. Finally, sprinkle sesame seeds and chopped green onions on top before serving. Enjoy your One Pan Honey Garlic Chicken! To make the best marinade, use fresh ingredients. Combine honey, soy sauce, garlic, and ginger. This mix gives a sweet and savory taste. Let the chicken soak in the marinade for at least 20 minutes. If you have more time, an hour is even better. This helps the chicken absorb all the flavors. For juicy chicken, avoid overcooking. Use a meat thermometer to check the temperature. Aim for 165°F (74°C) for safe eating. Searing the chicken first locks in the juices. Cook each side for about 5-6 minutes until golden brown. Let the chicken rest after cooking to keep it moist. Cook vegetables until they are tender-crisp. You want them to stay bright and colorful. Add them to the pan after the chicken has browned. This keeps them from getting too soft. Sauté the sliced bell peppers and snap peas for 3-4 minutes. This way, they retain their crunch and freshness. Remember, for the full recipe, check out the [Full Recipe]. Enjoy creating this quick and yummy meal! {{image_2}} You can switch up the protein in this recipe for quick meals. Chicken thighs are great, but you can use chicken breasts, shrimp, or tofu. Each choice adds a unique taste. If you use shrimp, cook them just until they turn pink. For tofu, press it to remove extra water and cube it. Marinate as you would the chicken for the same sweet and savory flavor. Feel free to swap vegetables based on your taste or what you have. Broccoli, carrots, and zucchini work well. Use any crunchy vegetable you like. Just cut them into similar sizes so they cook evenly. Remember to sauté until they are tender yet crisp. This keeps them vibrant and full of flavor! For those who enjoy heat, add crushed red pepper flakes or sliced jalapeños. This gives your dish a nice kick. You can also mix in lime juice or rice vinegar for a tangy twist. Both will enhance the honey garlic sauce. Experiment with these ideas to find your favorite taste! Check out the Full Recipe for more details! After enjoying your One Pan Honey Garlic Chicken, let the leftovers cool. Place the chicken and vegetables in an airtight container. This keeps them fresh and tasty. Store in the fridge for up to three days. Always label your container with the date. To reheat, use a microwave or a skillet. If using the microwave, warm on medium for about 2-3 minutes. Stir halfway through for even heating. If you prefer a skillet, heat a small amount of oil over medium heat. Add the chicken and vegetables, stirring for about 5 minutes until warm. If you want to save some for later, freezing works great. First, let the dish cool completely. Then, transfer it to a freezer-safe container. Make sure to remove as much air as possible. You can freeze it for up to three months. When ready to eat, thaw it overnight in the fridge before reheating. For the best taste, marinate the chicken for at least 20 minutes. This allows the flavors to soak in. If you have more time, marinating for up to 2 hours gives even better results. Just remember, don’t marinate too long, as it can make the chicken mushy. Yes, you can use chicken breasts. They will work fine in this recipe. However, chicken thighs have more fat, which keeps them juicy and tasty. If you use breasts, be sure to watch the cooking time. They cook faster than thighs. You can serve this dish with rice or quinoa. Both soak up the sweet sauce well. Steamed veggies or a fresh salad also make great sides. They add color and balance to your meal. You can even serve it with noodles for a fun twist. Yes, this dish is perfect for meal prep. It stores well in the fridge for up to four days. Just keep the chicken and veggies in an airtight container. You can heat it up easily for quick lunches or dinners. Enjoy your yummy meal without the fuss! For the full recipe, check out the details above. We covered the key steps for making One Pan Honey Garlic Chicken. You learned about the ingredients, kitchen tools, and the cooking process. I shared tips to perfect your dish, including marination and vegetable cooking. You also saw fun variations to try and how to store your leftovers. This dish is simple and tasty for any meal. Enjoy making it your own!](https://dailydishly.com/wp-content/uploads/2025/06/cad806aa-ae3a-4121-b5f5-07eae0f4869e.webp)
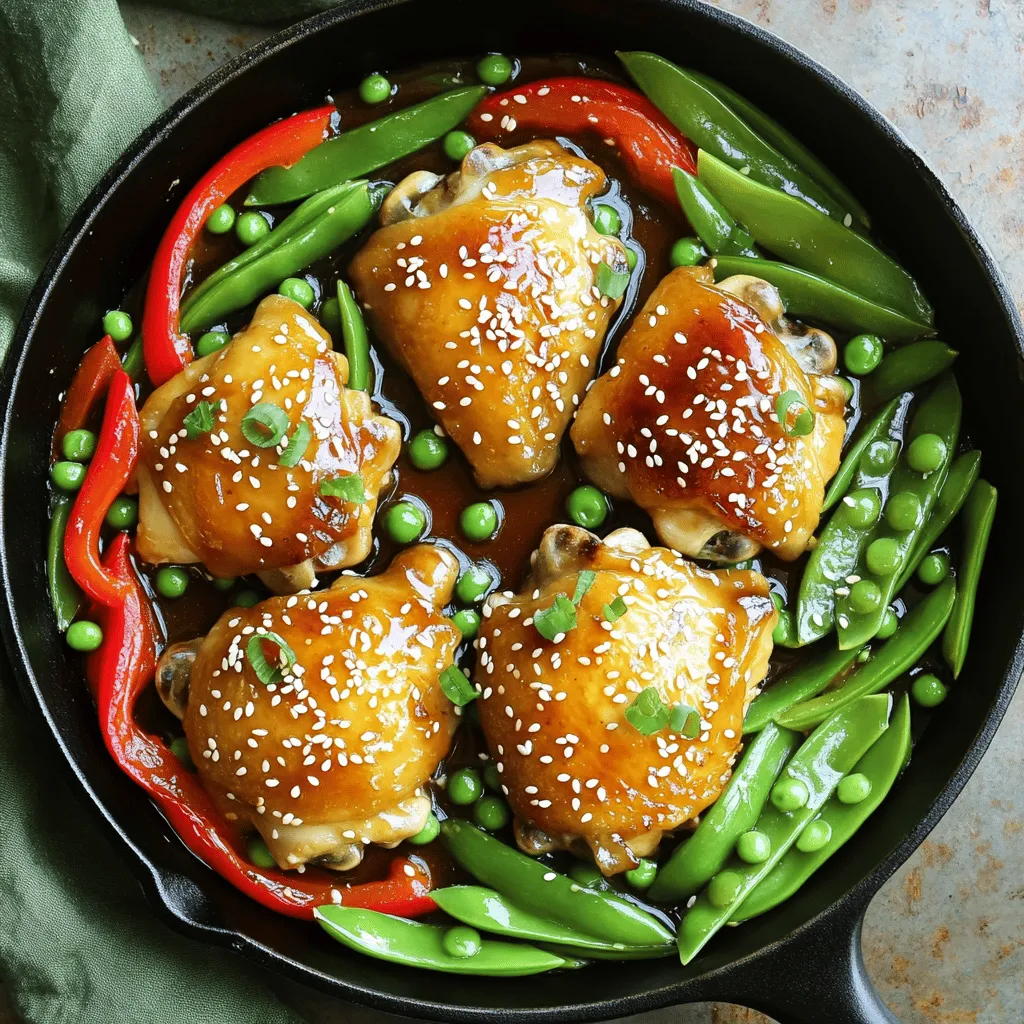
Looking for a quick and tasty recipe that packs a flavor punch? One Pan Honey Garlic Chicken is your answer. This easy meal only needs one pan, making cleanup a breeze. I’ll show you how to marinate the chicken and cook it with fresh veggies and a sweet garlic sauce. Let’s dive into this quick and yummy dish that will please the whole family!It combines juicy chicken thighs with sweet honey and rich garlic. The colorful veggies add crunch and nutrition. This dish is quick to make and perfect for busy nights.
List of Ingredients
– 4 boneless, skinless chicken thighs
– 3 tablespoons honey
– 3 tablespoons soy sauce
– 4 cloves garlic, minced
– 1 tablespoon fresh ginger, grated
– 2 tablespoons olive oil
– 1 teaspoon sesame oil
– 1 red bell pepper, sliced
– 1 green bell pepper, sliced
– 1 cup snap peas
– Salt and pepper to taste
– Sesame seeds for garnish
– Chopped green onions for garnish
Essential Kitchen Tools
To make this recipe, you need a few basic tools:
– A large skillet for cooking
– A mixing bowl for marinating
– A cutting board and knife for chopping
– A measuring spoon for accuracy
– A meat thermometer to check chicken doneness
With these ingredients and tools, you can create a meal that delights your taste buds and impresses your friends and family!
Step-by-Step Instructions
Marinating the Chicken
To start, you need to marinate the chicken. In a bowl, mix honey, soy sauce, minced garlic, and grated ginger. This mix gives the chicken a sweet and savory taste. Take your chicken thighs and add them to the bowl. Make sure they are well coated. Let the chicken marinate for at least 20 minutes. This step helps the flavors soak in.
Pan Preparation
Next, it’s time to prepare the pan. Heat olive oil and sesame oil in a large skillet. Set the heat to medium-high. The oils will help the chicken cook nicely and add flavor.
Cooking the Chicken and Vegetables
Once the pan is hot, take the chicken out of the marinade. Reserve the marinade for later. Add the chicken thighs to the pan. Sear each side for about 5-6 minutes. You want them to be golden brown. After that, add the sliced red and green bell peppers and snap peas. Sauté the vegetables for 3-4 minutes. They should be tender but still crisp.
Adding the Sauce and Final Touches
Pour the reserved marinade over the chicken and vegetables in the skillet. Lower the heat to medium. Let it simmer for about 5 minutes. This will thicken the sauce a bit. Check the chicken’s internal temperature. It should reach 165°F (74°C). Don’t forget to season with salt and pepper to taste. Once done, remove from heat and let it rest for a couple of minutes. Finally, sprinkle sesame seeds and chopped green onions on top before serving. Enjoy your One Pan Honey Garlic Chicken!
Tips & Tricks
Perfecting the Marinade
To make the best marinade, use fresh ingredients. Combine honey, soy sauce, garlic, and ginger. This mix gives a sweet and savory taste. Let the chicken soak in the marinade for at least 20 minutes. If you have more time, an hour is even better. This helps the chicken absorb all the flavors.
Ensuring Juicy Chicken
For juicy chicken, avoid overcooking. Use a meat thermometer to check the temperature. Aim for 165°F (74°C) for safe eating. Searing the chicken first locks in the juices. Cook each side for about 5-6 minutes until golden brown. Let the chicken rest after cooking to keep it moist.
Best Practices for Cooking Vegetables
Cook vegetables until they are tender-crisp. You want them to stay bright and colorful. Add them to the pan after the chicken has browned. This keeps them from getting too soft. Sauté the sliced bell peppers and snap peas for 3-4 minutes. This way, they retain their crunch and freshness.Enjoy creating this quick and yummy meal!

Variations
Different Protein Options
You can switch up the protein in this recipe for quick meals. Chicken thighs are great, but you can use chicken breasts, shrimp, or tofu. Each choice adds a unique taste. If you use shrimp, cook them just until they turn pink. For tofu, press it to remove extra water and cube it. Marinate as you would the chicken for the same sweet and savory flavor.
Vegetable Substitutions
Feel free to swap vegetables based on your taste or what you have. Broccoli, carrots, and zucchini work well. Use any crunchy vegetable you like. Just cut them into similar sizes so they cook evenly. Remember to sauté until they are tender yet crisp. This keeps them vibrant and full of flavor!
Spicy and Tangy Twists
For those who enjoy heat, add crushed red pepper flakes or sliced jalapeños. This gives your dish a nice kick. You can also mix in lime juice or rice vinegar for a tangy twist. Both will enhance the honey garlic sauce. Experiment with these ideas to find your favorite taste!
Storage Info
How to Store Leftovers
After enjoying your One Pan Honey Garlic Chicken, let the leftovers cool. Place the chicken and vegetables in an airtight container. This keeps them fresh and tasty. Store in the fridge for up to three days. Always label your container with the date.
Reheating Instructions
To reheat, use a microwave or a skillet. If using the microwave, warm on medium for about 2-3 minutes. Stir halfway through for even heating. If you prefer a skillet, heat a small amount of oil over medium heat. Add the chicken and vegetables, stirring for about 5 minutes until warm.
Freezing Tips
If you want to save some for later, freezing works great. First, let the dish cool completely. Then, transfer it to a freezer-safe container. Make sure to remove as much air as possible. You can freeze it for up to three months. When ready to eat, thaw it overnight in the fridge before reheating.
FAQs
How long to marinate chicken for optimal flavor?
For the best taste, marinate the chicken for at least 20 minutes. This allows the flavors to soak in. If you have more time, marinating for up to 2 hours gives even better results. Just remember, don’t marinate too long, as it can make the chicken mushy.
Can I use chicken breasts instead of thighs?
Yes, you can use chicken breasts. They will work fine in this recipe. However, chicken thighs have more fat, which keeps them juicy and tasty. If you use breasts, be sure to watch the cooking time. They cook faster than thighs.
What can I serve with One Pan Honey Garlic Chicken?
You can serve this dish with rice or quinoa. Both soak up the sweet sauce well. Steamed veggies or a fresh salad also make great sides. They add color and balance to your meal. You can even serve it with noodles for a fun twist.
Is this dish suitable for meal prep?
Yes, this dish is perfect for meal prep. It stores well in the fridge for up to four days. Just keep the chicken and veggies in an airtight container. You can heat it up easily for quick lunches or dinners. Enjoy your yummy meal without the fuss!
We covered the key steps for making One Pan Honey Garlic Chicken. You learned about the ingredients, kitchen tools, and the cooking process. I shared tips to perfect your dish, including marination and vegetable cooking. You also saw fun variations to try and how to store your leftovers.
This dish is simple and tasty for any meal. Enjoy making it your own!
![One Pan Honey Garlic Chicken is a simple dish that packs a big flavor punch. It combines juicy chicken thighs with sweet honey and rich garlic. The colorful veggies add crunch and nutrition. This dish is quick to make and perfect for busy nights. You can find the Full Recipe at the end. - 4 boneless, skinless chicken thighs - 3 tablespoons honey - 3 tablespoons soy sauce - 4 cloves garlic, minced - 1 tablespoon fresh ginger, grated - 2 tablespoons olive oil - 1 teaspoon sesame oil - 1 red bell pepper, sliced - 1 green bell pepper, sliced - 1 cup snap peas - Salt and pepper to taste - Sesame seeds for garnish - Chopped green onions for garnish To make this recipe, you need a few basic tools: - A large skillet for cooking - A mixing bowl for marinating - A cutting board and knife for chopping - A measuring spoon for accuracy - A meat thermometer to check chicken doneness With these ingredients and tools, you can create a meal that delights your taste buds and impresses your friends and family! To start, you need to marinate the chicken. In a bowl, mix honey, soy sauce, minced garlic, and grated ginger. This mix gives the chicken a sweet and savory taste. Take your chicken thighs and add them to the bowl. Make sure they are well coated. Let the chicken marinate for at least 20 minutes. This step helps the flavors soak in. Next, it’s time to prepare the pan. Heat olive oil and sesame oil in a large skillet. Set the heat to medium-high. The oils will help the chicken cook nicely and add flavor. Once the pan is hot, take the chicken out of the marinade. Reserve the marinade for later. Add the chicken thighs to the pan. Sear each side for about 5-6 minutes. You want them to be golden brown. After that, add the sliced red and green bell peppers and snap peas. Sauté the vegetables for 3-4 minutes. They should be tender but still crisp. Pour the reserved marinade over the chicken and vegetables in the skillet. Lower the heat to medium. Let it simmer for about 5 minutes. This will thicken the sauce a bit. Check the chicken’s internal temperature. It should reach 165°F (74°C). Don’t forget to season with salt and pepper to taste. Once done, remove from heat and let it rest for a couple of minutes. Finally, sprinkle sesame seeds and chopped green onions on top before serving. Enjoy your One Pan Honey Garlic Chicken! To make the best marinade, use fresh ingredients. Combine honey, soy sauce, garlic, and ginger. This mix gives a sweet and savory taste. Let the chicken soak in the marinade for at least 20 minutes. If you have more time, an hour is even better. This helps the chicken absorb all the flavors. For juicy chicken, avoid overcooking. Use a meat thermometer to check the temperature. Aim for 165°F (74°C) for safe eating. Searing the chicken first locks in the juices. Cook each side for about 5-6 minutes until golden brown. Let the chicken rest after cooking to keep it moist. Cook vegetables until they are tender-crisp. You want them to stay bright and colorful. Add them to the pan after the chicken has browned. This keeps them from getting too soft. Sauté the sliced bell peppers and snap peas for 3-4 minutes. This way, they retain their crunch and freshness. Remember, for the full recipe, check out the [Full Recipe]. Enjoy creating this quick and yummy meal! {{image_2}} You can switch up the protein in this recipe for quick meals. Chicken thighs are great, but you can use chicken breasts, shrimp, or tofu. Each choice adds a unique taste. If you use shrimp, cook them just until they turn pink. For tofu, press it to remove extra water and cube it. Marinate as you would the chicken for the same sweet and savory flavor. Feel free to swap vegetables based on your taste or what you have. Broccoli, carrots, and zucchini work well. Use any crunchy vegetable you like. Just cut them into similar sizes so they cook evenly. Remember to sauté until they are tender yet crisp. This keeps them vibrant and full of flavor! For those who enjoy heat, add crushed red pepper flakes or sliced jalapeños. This gives your dish a nice kick. You can also mix in lime juice or rice vinegar for a tangy twist. Both will enhance the honey garlic sauce. Experiment with these ideas to find your favorite taste! Check out the Full Recipe for more details! After enjoying your One Pan Honey Garlic Chicken, let the leftovers cool. Place the chicken and vegetables in an airtight container. This keeps them fresh and tasty. Store in the fridge for up to three days. Always label your container with the date. To reheat, use a microwave or a skillet. If using the microwave, warm on medium for about 2-3 minutes. Stir halfway through for even heating. If you prefer a skillet, heat a small amount of oil over medium heat. Add the chicken and vegetables, stirring for about 5 minutes until warm. If you want to save some for later, freezing works great. First, let the dish cool completely. Then, transfer it to a freezer-safe container. Make sure to remove as much air as possible. You can freeze it for up to three months. When ready to eat, thaw it overnight in the fridge before reheating. For the best taste, marinate the chicken for at least 20 minutes. This allows the flavors to soak in. If you have more time, marinating for up to 2 hours gives even better results. Just remember, don’t marinate too long, as it can make the chicken mushy. Yes, you can use chicken breasts. They will work fine in this recipe. However, chicken thighs have more fat, which keeps them juicy and tasty. If you use breasts, be sure to watch the cooking time. They cook faster than thighs. You can serve this dish with rice or quinoa. Both soak up the sweet sauce well. Steamed veggies or a fresh salad also make great sides. They add color and balance to your meal. You can even serve it with noodles for a fun twist. Yes, this dish is perfect for meal prep. It stores well in the fridge for up to four days. Just keep the chicken and veggies in an airtight container. You can heat it up easily for quick lunches or dinners. Enjoy your yummy meal without the fuss! For the full recipe, check out the details above. We covered the key steps for making One Pan Honey Garlic Chicken. You learned about the ingredients, kitchen tools, and the cooking process. I shared tips to perfect your dish, including marination and vegetable cooking. You also saw fun variations to try and how to store your leftovers. This dish is simple and tasty for any meal. Enjoy making it your own!](https://dailydishly.com/wp-content/uploads/2025/06/cad806aa-ae3a-4121-b5f5-07eae0f4869e-300x300.webp)

![To make these tasty tacos, you need some simple yet bold ingredients. Here’s what you’ll need: - 2 cans black beans, rinsed and drained - 1 medium onion, diced - 3 garlic cloves, minced - 2 tablespoons chipotle in adobo sauce, chopped These ingredients give your tacos a distinct smoky flavor. The black beans provide protein and creaminess. The onions and garlic add depth, while the chipotle brings heat and smokiness. Next, we need some seasonings and garnishes to elevate the dish: - 1 teaspoon smoked paprika - 1 teaspoon cumin - Salt and pepper to taste - Fresh cilantro, for garnish Smoked paprika and cumin enhance the earthy flavor of the beans. A pinch of salt and pepper balances everything out. Fresh cilantro adds brightness and color, making your tacos visually appealing. Lastly, let’s prepare the tortillas and toppings: - 8 small corn tortillas - 1 avocado, sliced - Lime wedges, for serving Corn tortillas are perfect for this dish. They have a lovely flavor and hold up well. Sliced avocado adds creaminess, while lime wedges give a zesty kick. For the full recipe, check out the details for cooking and assembling! First, I heat olive oil in a large skillet over medium heat. I add the diced onion and sauté it until it turns translucent, which takes about five minutes. Next, I stir in the minced garlic and cook it for one minute until it becomes fragrant. Then, I combine the rinsed black beans, chopped chipotle in adobo, smoked paprika, cumin, salt, and pepper. Mixing these ingredients well creates a rich base full of flavor. After combining the filling, I grab a potato masher. I mash some of the black beans to create a creamy texture while leaving others whole for extra bite. This step adds depth to the dish. I then reduce the heat to low, cover the skillet, and let it simmer for about ten minutes. This allows all the flavors to meld beautifully. I stir occasionally to ensure even cooking. While the filling simmers, I warm the small corn tortillas in a separate skillet. I heat them over medium heat for about thirty seconds on each side. This makes the tortillas pliable and ready for filling. Now comes the fun part! I spoon the smoky black bean mixture onto each warm tortilla. Then, I top them with sliced avocado and sprinkle fresh cilantro on top. For an extra burst of flavor, I serve the tacos with lime wedges on the side. This adds a zesty touch that brightens the whole dish. You can find the full recipe for Smoky Chipotle Black Bean Tacos in the previous section. Enjoy! To make your Smoky Chipotle Black Bean Tacos even better, try adding more spices. A dash of cayenne can kick up the heat. You can also mix in a pinch of oregano for a fresh herb taste. If you enjoy a bit of sweetness, drizzle some honey over the top before serving. Toppings can really change the game too! Try adding pickled onions, crumbled feta, or diced tomatoes. Each will give your tacos a unique twist. Don't be afraid to get creative! Presentation matters. When serving, arrange your tacos on a large platter. Add lime wedges and fresh cilantro around them for color. You can even use a small bowl for salsa on the side. This makes your meal look vibrant and inviting. Consider adding colorful accompaniments like sliced radishes or a side of corn salad. These not only look great but also enhance the meal’s flavor. Sautéing and simmering are key for perfect tacos. When you sauté the onion, aim for a golden color. This adds a sweet flavor to the dish. Stir often to avoid burning. To prevent soggy tortillas, warm them before filling. Heat them in a skillet for about 30 seconds on each side. This keeps them soft and easy to fold. If you want extra crispiness, consider lightly frying them in oil. This simple step can elevate your tacos to the next level. For the complete recipe, check out the [Full Recipe]. {{image_2}} Want to add more protein to your tacos? You can easily incorporate chicken or shrimp. Simply cook them in the skillet before adding the beans. For a vegetarian option, try using tofu or tempeh. Cube the tofu and sauté it until golden. For tempeh, steam it first to soften, then sauté for a nice texture. These additions will keep your tacos satisfying and packed with flavor. If you're looking for plant-based protein, consider lentils or chickpeas. They both work well and add a hearty touch. For cheese lovers, look for dairy-free cheese substitutes. Many brands offer tasty options that melt well. This way, you can enjoy creamy toppings without dairy. These alternatives keep your meal both delicious and inclusive for all diets. Tacos don’t have to be served in the traditional way. You can create taco bowls instead. Just layer the black bean mixture over rice or quinoa. Then add your favorite toppings. Another fun option is using lettuce wraps instead of tortillas. This makes for a low-carb alternative while keeping the fresh crunch. Each style offers a unique twist to your smoky chipotle black bean tacos. For the full recipe, check out the Smoky Chipotle Black Bean Tacos section. To store any leftover tacos, place them in an airtight container. Make sure to cool them first. These tacos will stay fresh in the fridge for about three to four days. If you want to freeze the taco filling, let it cool completely. Then, place it in a freezer-safe bag. Squeeze out the air before sealing. The filling can last in the freezer for up to three months. To enjoy, take it out of the freezer and put it in the fridge overnight to thaw. When you reheat the filling, you have two good options: the oven or the microwave. If you use the oven, preheat it to 350°F. Spread the filling in a baking dish and cover it with foil. Heat for about 15 minutes. For the microwave, put the filling in a bowl and cover it. Heat for about 1 to 2 minutes, stirring halfway. Both methods work, but the oven keeps the texture nice. Enjoy your delicious Smoky Chipotle Black Bean Tacos even as leftovers! To make your tacos crispy, you can fry the tortillas. Heat oil in a pan. Add each tortilla and fry for about 30 seconds on each side. This method gives them a nice crunch. You can also use the oven. Preheat it to 400°F (200°C). Brush tortillas with a little oil and place them on a baking sheet. Bake for 5-7 minutes until they are crispy around the edges. Yes, you can use dried beans! However, they need more time. Soak them overnight in water. Then, cook them until soft. This process can take 1-2 hours. Canned beans are quicker and easier, but dried beans can add great flavor and texture. If you don’t have chipotle in adobo, try using smoked paprika or cayenne pepper. Both can add heat and depth. You can also use liquid smoke for that smoky flavor. Adjust the amount to match your heat preference. Start small and taste as you go. In this guide, I covered how to make smoky chipotle black bean tacos. We talked about the key ingredients, cooking steps, and tips for perfect tacos. You can add your favorite proteins or toppings to make it your own. Don’t forget to store leftovers properly to enjoy later. These tacos are flexible and sure to impress. Dive in and enjoy the flavors! You've got this.](https://dailydishly.com/wp-content/uploads/2025/07/3dafe893-e4f9-4e41-b9c9-258fb494a309-768x768.webp)
![- Chicken and rice requirements - 4 boneless, skinless chicken thighs - 2 cups long-grain rice - Seasoning and flavor enhancers - 4 tablespoons unsalted butter - 5 cloves garlic, minced - 1 onion, finely chopped - 3 cups chicken broth - 1 teaspoon dried oregano - 1 teaspoon paprika - Salt and pepper to taste - Optional garnishes and additions - 1 cup frozen peas - Fresh parsley, chopped (for garnish) Gathering these ingredients sets the stage for a dish that bursts with flavor. Each item plays a key role. The chicken thighs offer rich taste and tenderness. The long-grain rice absorbs all the savory broth. Butter and garlic create a lovely aroma and depth. Onions bring sweetness, while seasonings elevate the whole dish. Feel free to add peas for a pop of color and nutrition. Fresh parsley adds a lovely touch on top. This simple yet flavorful dish uses ingredients you can find easily. Check out the Full Recipe to see how everything comes together! 1. Sautéing onion and garlic Start by melting 2 tablespoons of butter in a large skillet over medium heat. Add the finely chopped onion. Sauté for about 5 minutes until it turns translucent. Next, toss in 5 cloves of minced garlic. Cook for another minute until it smells amazing. 2. Cooking chicken thighs Season 4 boneless, skinless chicken thighs with 1 teaspoon of dried oregano, 1 teaspoon of paprika, salt, and pepper. Move the onion and garlic to the side of the skillet. Place the chicken thighs in the center. Cook for 6-7 minutes on each side until they are browned and cooked through. Once done, remove the chicken and set it aside. 3. Toasting rice and adding broth In the same skillet, add the other 2 tablespoons of butter. Stir in 2 cups of long-grain rice. Let it toast for about 2-3 minutes. Then, pour in 3 cups of chicken broth. Stir to combine and bring the mixture to a boil. 1. Combining chicken and rice Once the broth boils, reduce the heat to low. Carefully place the cooked chicken thighs on top of the rice. Cover the skillet and let it simmer for 15-20 minutes. You want the rice to be tender and soak up most of the broth. 2. Simmering for perfect texture In the last 5 minutes of cooking, add 1 cup of frozen peas on top of the rice. Do not stir. Let the peas steam with the rice for added color and flavor. 3. Final touches before serving After cooking, turn off the heat. Let the dish sit covered for another 5 minutes. Fluff the rice with a fork and gently mix in the peas. Serve warm and garnish with fresh chopped parsley for a beautiful finish. For the full recipe, check out the complete instructions and tips! To get the best flavor from your chicken, use the right seasonings. I like to mix oregano, paprika, salt, and pepper. This blend gives the chicken a tasty kick. Let the chicken sit for a few minutes after seasoning. This helps the spices soak in. When cooking, aim for a golden brown on each side. Cook the chicken for about 6-7 minutes per side. This timing ensures juicy chicken. Use a meat thermometer to check the inside. It should reach 165°F. To avoid mushy rice, rinse it before cooking. This removes excess starch. Use a 1:1.5 ratio of rice to liquid. For this recipe, use 3 cups of chicken broth for 2 cups of rice. Bring the broth to a boil before adding rice. Once boiling, reduce the heat and cover the skillet. Let the rice simmer for 15-20 minutes. This technique gives you fluffy rice that absorbs all the flavors. Garnishing adds a nice touch. Fresh herbs like parsley brighten the dish. Chop the parsley finely and sprinkle it on before serving. For a great look, serve the chicken on top of the rice. This way, the colors mix well. You can also add a lemon wedge on the side for a pop of freshness. Enjoy your meal! For the full recipe, check [Full Recipe]. {{image_2}} You can switch out the chicken for other meats. Try boneless pork chops or even tofu. Each option brings a new taste. If you want a different grain, choose quinoa or farro. These grains add unique textures and flavors to the dish. Adding vegetables is a great way to boost flavor and nutrition. Consider bell peppers, carrots, or spinach. These veggies cook well and add color. You can also use different herbs and spices. Basil, thyme, or even a kick of chili flakes can change the whole dish. To make this dish gluten-free, use rice and check your broth. Many brands offer gluten-free options. For low-carb choices, replace rice with cauliflower rice. It’s a great substitute and keeps the meal light. You don’t lose flavor, and it stays filling. Explore the [Full Recipe] for more tips and ideas! To keep your Garlic Butter Chicken and Rice fresh, refrigerate it within two hours. Use an airtight container for best results. Store it in the fridge for up to three days. For longer storage, freezing is a great option. Place the dish in a freezer-safe container. It can last up to three months in the freezer. Just remember to label it with the date. When it's time to enjoy leftovers, reheating is key. For rice, add a splash of water before reheating. This helps keep the rice fluffy. You can use a microwave or a stovetop for this. For chicken, use a low heat setting. This keeps the chicken juicy and flavorful. Make sure to cover it while reheating to trap moisture. Enjoy your delicious meal again! For the full recipe, check out the section above. What can I serve with Garlic Butter Chicken and Rice? You can serve this dish with a side of steamed veggies. Broccoli or green beans work well. A fresh salad adds crunch. Garlic bread can also enhance the meal. Can I make this dish ahead of time? Yes, you can prepare Garlic Butter Chicken and Rice in advance. Cook it, then cool it down. Store in an airtight container in the fridge. Reheat before serving, and it will taste great. How do I ensure my chicken is tender? To keep chicken tender, do not overcook it. Use a meat thermometer to check for doneness. Aim for 165°F. Marinating the chicken can also help it stay juicy. Why is my rice still hard? If your rice is hard, it may need more liquid. Add a bit of broth or water and simmer longer. Cover the pot to trap steam, which helps cook the rice. What if I don't have chicken broth? If you lack chicken broth, you can use water. Add extra seasonings to boost flavor. You can also use vegetable broth as a substitute. Can I use brown rice instead? Yes, you can use brown rice instead of white rice. Just know that brown rice takes longer to cook. Increase the simmer time to about 30-40 minutes. Adjust the liquid as needed. This blog post covered a complete guide to making Garlic Butter Chicken and Rice. You learned about the key ingredients and step-by-step instructions. I shared tips to ensure flavorful chicken and perfect rice. You also discovered variations and storage info. In closing, this dish is simple and flexible. Adjust it to your taste and dietary needs. Enjoy your cooking journey and share this recipe with others!](https://dailydishly.com/wp-content/uploads/2025/05/2b69aced-7351-4258-8c9e-dc4a3c9f0304-768x768.webp)


